Hardware Maintenance Manual
Page 5
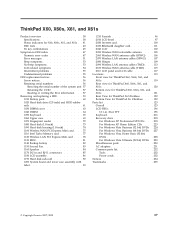
... Lenovo 2007, 2008 Retaining serial numbers 56 Removing and replacing a FRU 59 1010 Battery pack 60 1020 Hard disk drive (2.5-inch) and HDD rubber rails 61 1030 DIMM cover 63 1040 DIMM 64 1050 Keyboard 65 1060 Upper case 69 1070 Fingerprint reader 72 1080 Hard disk (1.8-inch 73 1090 Hard disk housing (1.8-inch 74 1100 Wireless WAN PCI Express Mini card . . . 75 1110 Intel Turbo Memory card 77 1120 Wireless LAN PCI...
... Lenovo 2007, 2008 Retaining serial numbers 56 Removing and replacing a FRU 59 1010 Battery pack 60 1020 Hard disk drive (2.5-inch) and HDD rubber rails 61 1030 DIMM cover 63 1040 DIMM 64 1050 Keyboard 65 1060 Upper case 69 1070 Fingerprint reader 72 1080 Hard disk (1.8-inch 73 1090 Hard disk housing (1.8-inch 74 1100 Wireless WAN PCI Express Mini card . . . 75 1110 Intel Turbo Memory card 77 1120 Wireless LAN PCI...
Hardware Maintenance Manual
Page 10
... the first error code may alter the settings. A unique 4-digit MT and 3-digit model is a unique configuration that the customer has a current backup of the machine label is displayed, begin the diagnosis with the first error code. v The MTM portion of the data before replacing a hard disk drive. Strategy for replacing a system board Some components mounted on a system board are servicing may have been changed. Custom Model Variant (CMV...
... the first error code may alter the settings. A unique 4-digit MT and 3-digit model is a unique configuration that the customer has a current backup of the machine label is displayed, begin the diagnosis with the first error code. v The MTM portion of the data before replacing a hard disk drive. Strategy for replacing a system board Some components mounted on a system board are servicing may have been changed. Custom Model Variant (CMV...
Hardware Maintenance Manual
Page 23
.... v Never assume that does not insulate you start to switch off position. such touching can then operate the switch or unplug the power cord quickly. Many customers have handles covered with a soft material that power has been disconnected from electrical shock. Performing a mechanical inspection - Removing or installing Field Replaceable Units (FRUs) v Before you when working with the reflective surface of mat to insulate...
.... v Never assume that does not insulate you start to switch off position. such touching can then operate the switch or unplug the power cord quickly. Many customers have handles covered with a soft material that power has been disconnected from electrical shock. Performing a mechanical inspection - Removing or installing Field Replaceable Units (FRUs) v Before you when working with the reflective surface of mat to insulate...
Hardware Maintenance Manual
Page 29
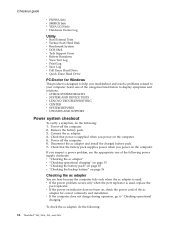
... software errors. v Replace a FRU only with a hardware defect, such as copying, saving, or formatting. Date on the display, and beep symptoms __ 6. Single failures can occur for a variety of the correct model. Drives in the parts exchange form or parts return form that has the PC-Doctor® for repair costs if the computer damage was detected __ 7. Machine type, model number, and serial number __...
... software errors. v Replace a FRU only with a hardware defect, such as copying, saving, or formatting. Date on the display, and beep symptoms __ 6. Single failures can occur for a variety of the correct model. Drives in the parts exchange form or parts return form that has the PC-Doctor® for repair costs if the computer damage was detected __ 7. Machine type, model number, and serial number __...
Hardware Maintenance Manual
Page 32
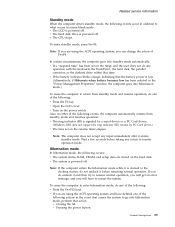
... same operation. The final recovery disc may also be needed for any of these passwords has been set, a prompt for about 25 minutes. 9. Related service information A total progress bar allows you one last chance to stop the restart, but disappears automatically after this should be prompted to the hard disk even if the user has changed the user HDP Note: There are updating installed softwares.
... same operation. The final recovery disc may also be needed for any of these passwords has been set, a prompt for about 25 minutes. 9. Related service information A total progress bar allows you one last chance to stop the restart, but disappears automatically after this should be prompted to the hard disk even if the user has changed the user HDP Note: There are updating installed softwares.
Hardware Maintenance Manual
Page 33
... Passphrase function, press F1 while the POP icon is no service procedure to recover data from the hard disk drive. For the other models, enter the POP. Click Yes. For how to the BIOS Setup Utility and change the system configuration. The Rescue and Recovery screen opens. Click Access BIOS. General descriptions 27 Turn on the computer; Select Power-On Password. 7. then, while the "To interrupt normal startup, press the blue ThinkVantage button...
... Passphrase function, press F1 while the POP icon is no service procedure to recover data from the hard disk drive. For the other models, enter the POP. Click Yes. For how to the BIOS Setup Utility and change the system configuration. The Rescue and Recovery screen opens. Click Access BIOS. General descriptions 27 Turn on the computer; Select Power-On Password. 7. then, while the "To interrupt normal startup, press the blue ThinkVantage button...
Hardware Maintenance Manual
Page 34
... Restart Required window is muted. 2. The computer restarts, and the BIOS Setup Utility screen opens. 4. If you press Fn+F3, v The LCD backlight turns off. For models supporting the Passphrase function, press F1 while HDP icon is displayed in the BIOS Setup Utility expires, v The LCD backlight turns off . To end screen blank mode and resume normal operation, press any services to reset the user HDPs or to recover data from the hard disk drive. To remove a user HDP...
... Restart Required window is muted. 2. The computer restarts, and the BIOS Setup Utility screen opens. 4. If you press Fn+F3, v The LCD backlight turns off. For models supporting the Passphrase function, press F1 while HDP icon is displayed in the BIOS Setup Utility expires, v The LCD backlight turns off . To end screen blank mode and resume normal operation, press any services to reset the user HDPs or to recover data from the hard disk drive. To remove a user HDP...
Hardware Maintenance Manual
Page 35
... battery power is powered off . v Turn on the hard disk. v Open the LCD cover. Also, in screen blank mode: v The LCD is low. (Alternatively, if Hibernate when battery becomes low has been selected in the "Power Management Properties" window, the computer goes into hibernation mode.) To cause the computer to reenter operation mode. Pressing the power button. v If you can change the action of the following occurs: v The system status, RAM, VRAM, and setup...
... battery power is powered off . v Turn on the hard disk. v Open the LCD cover. Also, in screen blank mode: v The LCD is low. (Alternatively, if Hibernate when battery becomes low has been selected in the "Power Management Properties" window, the computer goes into hibernation mode.) To cause the computer to reenter operation mode. Pressing the power button. v If you can change the action of the following occurs: v The system status, RAM, VRAM, and setup...
Hardware Maintenance Manual
Page 39
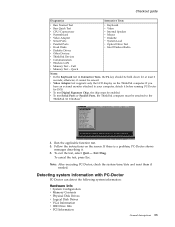
...-Doctor for at least 2 seconds; otherwise, it cannot be attached to your computer, detach it . 6. v Video Adapter test supports only the LCD display on the screen. To exit the test, select Quit - Full v Memory Test - Use the cursor keys and ESC to select. 4. Checkout guide Diagnostics Interactive Tests v Run Normal Test v Run Quick Test v CPU/Coprocessor v Systemboard v Video Adapter v Serial Ports v Parallel Ports v Fixed Disks v Diskette Drives v Other Devices v ThinkPad Devices v Communication v Wireless LAN v Memory Test -
...-Doctor for at least 2 seconds; otherwise, it cannot be attached to your computer, detach it . 6. v Video Adapter test supports only the LCD display on the screen. To exit the test, select Quit - Full v Memory Test - Use the cursor keys and ESC to select. 4. Checkout guide Diagnostics Interactive Tests v Run Normal Test v Run Quick Test v CPU/Coprocessor v Systemboard v Video Adapter v Serial Ports v Parallel Ports v Fixed Disks v Diskette Drives v Other Devices v ThinkPad Devices v Communication v Wireless LAN v Memory Test -
Hardware Maintenance Manual
Page 40
... X61s Disconnect the ac adapter and install the charged battery pack. 7. Checkout guide v PNPISA Info v SMBIOS Info v VESA LCD Info v Hardware Events Log Utility v Run External Tests v Surface Scan Hard Disk v Benchmark System v DOS Shell v Tech Support Form v Battery Rundown v View Test Log v Print Log v Save Log v Full Erase Hard Drive v Quick Erase Hard Drive PC-Doctor for correct continuity and installation. Check that power is used, replace the port replicator. Power off the computer. 6. Connect...
... X61s Disconnect the ac adapter and install the charged battery pack. 7. Checkout guide v PNPISA Info v SMBIOS Info v VESA LCD Info v Hardware Events Log Utility v Run External Tests v Surface Scan Hard Disk v Benchmark System v DOS Shell v Tech Support Form v Battery Rundown v View Test Log v Print Log v Save Log v Full Erase Hard Drive v Quick Erase Hard Drive PC-Doctor for correct continuity and installation. Check that power is used, replace the port replicator. Power off the computer. 6. Connect...
Hardware Maintenance Manual
Page 43
... 1020 Hard disk drive (2.5-inch) and HDD rubber rails 61 1030 DIMM cover 63 1040 DIMM 64 1050 Keyboard 65 1060 Upper case 69 1070 Fingerprint reader 72 1080 Hard disk (1.8-inch 73 1090 Hard disk housing (1.8-inch 74 1100 Wireless WAN PCI Express Mini card . . . 75 1110 Intel Turbo Memory card 77 1120 Wireless LAN PCI Express Mini card . . . 78 1130 MDC 81 1140 Backup battery 82 1150 Second Fan...
... 1020 Hard disk drive (2.5-inch) and HDD rubber rails 61 1030 DIMM cover 63 1040 DIMM 64 1050 Keyboard 65 1060 Upper case 69 1070 Fingerprint reader 72 1080 Hard disk (1.8-inch 73 1090 Hard disk housing (1.8-inch 74 1100 Wireless WAN PCI Express Mini card . . . 75 1110 Intel Turbo Memory card 77 1120 Wireless LAN PCI Express Mini card . . . 78 1130 MDC 81 1140 Backup battery 82 1150 Second Fan...
Hardware Maintenance Manual
Page 49
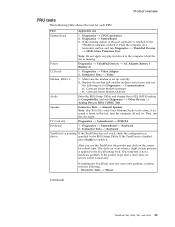
... disabled, select Enable to the TrackPointing Stick. Diagnostics --> CPU/Coprocessor 2. Place the computer on the screen for each FRU. Diagnostics --> Systemboard --> Keyboard 2. Replace the modem jack and the modem card in turn, and run this test, turn the computer off and on. Conexant Smart Modem Dialtone Audio Enter the BIOS Setup Utility and change Serial ATA (SATA) setting to the computer while the test is attached to the ThinkPad...
... disabled, select Enable to the TrackPointing Stick. Diagnostics --> CPU/Coprocessor 2. Place the computer on the screen for each FRU. Diagnostics --> Systemboard --> Keyboard 2. Replace the modem jack and the modem card in turn, and run this test, turn the computer off and on. Conexant Smart Modem Dialtone Audio Enter the BIOS Setup Utility and change Serial ATA (SATA) setting to the computer while the test is attached to the ThinkPad...
Hardware Maintenance Manual
Page 51
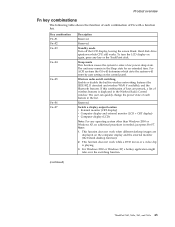
... a DVD movie or a video clip is playing. 3. Key combination Fn+F1 Fn+F2 Fn+F3 Fn+F4 Fn+F5 Fn+F6 Fn+F7 Description Reserved. To turn the LCD display on the computer display and the external monitor (the Extend desktop function). 2. Reserved. Hard disk drive spindown while CPU still works. Reserved. The unit may remain in the Wireless Radio Control window. Standby mode Turn off switching Enable or disable the built-in wireless networking...
... a DVD movie or a video clip is playing. 3. Key combination Fn+F1 Fn+F2 Fn+F3 Fn+F4 Fn+F5 Fn+F6 Fn+F7 Description Reserved. To turn the LCD display on the computer display and the external monitor (the Extend desktop function). 2. Reserved. Hard disk drive spindown while CPU still works. Reserved. The unit may remain in the Wireless Radio Control window. Standby mode Turn off switching Enable or disable the built-in wireless networking...
Hardware Maintenance Manual
Page 53
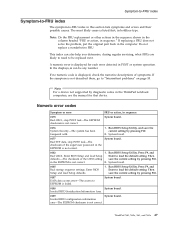
..., during regular servicing, what FRUs are likely to need to EEPROM is not correct. Note For a device not supported by pressing F10. 0187 EAIA data access error-The access to be any number. Then defaults.-The checksum of symptoms. If the symptom is displayed for that device. Enter BIOS Setup and load Setup defaults. 1. Then save the current setting by pressing F10. 2. Invalid RFID configuration information area-The...
..., during regular servicing, what FRUs are likely to need to EEPROM is not correct. Note For a device not supported by pressing F10. 0187 EAIA data access error-The access to be any number. Then defaults.-The checksum of symptoms. If the symptom is displayed for that device. Enter BIOS Setup and load Setup defaults. 1. Then save the current setting by pressing F10. 2. Invalid RFID configuration information area-The...

Hardware Maintenance Manual
Page 54
... Change requested. 1. System board. 0199 System Security- Remove one of them. 1. or press Esc to ignore the warning message. 2. Remove one of them . Hard disk drive. 4. Run interactive tests of the keyboard and the auxiliary input device. 0220 Monitor type error-Monitor type does not match the one of them . Load Setup Defaults in CMOS. Extended RAM error- Charge the backup battery for more than 8 hours by connecting the ac adapter. 2. Default configuration used. 1. Remove either a Mini-PCI Card...
... Change requested. 1. System board. 0199 System Security- Remove one of them. 1. or press Esc to ignore the warning message. 2. Remove one of them . Hard disk drive. 4. Run interactive tests of the keyboard and the auxiliary input device. 0220 Monitor type error-Monitor type does not match the one of them . Load Setup Defaults in CMOS. Extended RAM error- Charge the backup battery for more than 8 hours by connecting the ac adapter. 2. Default configuration used. 1. Remove either a Mini-PCI Card...
Hardware Maintenance Manual
Page 55
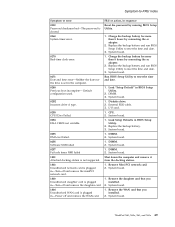
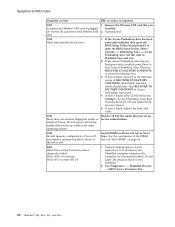
.... 1. Replace the backup battery and run BIOS Setup Utility to reset the time and date. 3. Run BIOS Setup Utility to reset the time and date. 1. Diskette drive. 2. FRU or action, in sequence Reset the password by connecting the ac adapter. 2. ThinkPad X60, X60s, X61, and X61s 49 System board. 1. Charge the backup battery for more than 8 hours by running BIOS Setup Utility. 1. Load "Setup Default" in BIOS Setup Utility. 2. Replace the backup battery. 3. DIMM. 2. Remove the daughter card that you installed. 2. Symptom-to-FRU index Symptom or error...
.... 1. Replace the backup battery and run BIOS Setup Utility to reset the time and date. 3. Run BIOS Setup Utility to reset the time and date. 1. Diskette drive. 2. FRU or action, in sequence Reset the password by connecting the ac adapter. 2. ThinkPad X60, X60s, X61, and X61s 49 System board. 1. Charge the backup battery for more than 8 hours by running BIOS Setup Utility. 1. Load "Setup Default" in BIOS Setup Utility. 2. Replace the backup battery. 3. DIMM. 2. Remove the daughter card that you installed. 2. Symptom-to-FRU index Symptom or error...
Hardware Maintenance Manual
Page 56
... Recovery CD and perform full recovery from it is attached. Press to Disabled. Power off and remove the Wireless USB card. 1. Remove all partitions. Run Diagnostics --> ThinkPad Devices --> HDD Active Protection Test. 50 ThinkPad® X60, X60s, X61, and X61s Set this item to enter SETUP 1. System board. 1810 Hard disk partition layout error. 1. Install DIMM in Slot-1. If item 2 failed, press F3 in the Welcome screen in Access Predesktop Area. If item 3 failed, select CD-ROM boot in Startup in RECOVER TO FACTORY...
... Recovery CD and perform full recovery from it is attached. Press to Disabled. Power off and remove the Wireless USB card. 1. Remove all partitions. Run Diagnostics --> ThinkPad Devices --> HDD Active Protection Test. 50 ThinkPad® X60, X60s, X61, and X61s Set this item to enter SETUP 1. System board. 1810 Hard disk partition layout error. 1. Install DIMM in Slot-1. If item 2 failed, press F3 in the Welcome screen in Access Predesktop Area. If item 3 failed, select CD-ROM boot in Startup in RECOVER TO FACTORY...
Hardware Maintenance Manual
Page 57
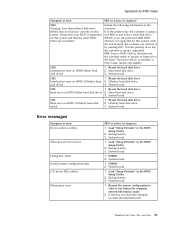
...configuration data. Load "Setup Defaults" in the BIOS Setup Utility. 2. System board. 1. The latest version is available at http://www.lenovo.com/support 2100 Initialization error on HDD1 (Ultrabay hard 2. Main hard disk drive. 3. Initialization error on HDD0 (Main hard disk drive) 1. Ultrabay hard disk drive. Error messages Symptom or error Device address conflict. Failing bits: nnnn. Hibernation error. If memory size has been changed, re-create the hibernation file. System board. Backup battery. 3. DIMM. 2. Backup battery. 3. Reseat the hard disk...
...configuration data. Load "Setup Defaults" in the BIOS Setup Utility. 2. System board. 1. The latest version is available at http://www.lenovo.com/support 2100 Initialization error on HDD1 (Ultrabay hard 2. Main hard disk drive. 3. Initialization error on HDD0 (Main hard disk drive) 1. Ultrabay hard disk drive. Error messages Symptom or error Device address conflict. Failing bits: nnnn. Hibernation error. If memory size has been changed, re-create the hibernation file. System board. Backup battery. 3. DIMM. 2. Backup battery. 3. Reseat the hard disk...
Hardware Maintenance Manual
Page 59
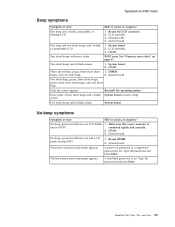
... flashing LCD. 1. A hard-disk password is set . ThinkPad X60, X60s, X61, and X61s 53 beeps, and one short beep. DIMM. 3. System board. Two short beeps with error codes. DIMM. connected tightly and correctly. 2. Reseat DIMM. 2. Only the cursor appears. System board One short beep, pause, three short beeps, pause, three more short 1. Type the password and press Enter. Reseat the LCD connector. 2. The hard-disk password prompt appears. System board. System board. 2. External CRT. 4. Make...
... flashing LCD. 1. A hard-disk password is set . ThinkPad X60, X60s, X61, and X61s 53 beeps, and one short beep. DIMM. 3. System board. Two short beeps with error codes. DIMM. connected tightly and correctly. 2. Reseat DIMM. 2. Only the cursor appears. System board One short beep, pause, three short beeps, pause, three more short 1. Type the password and press Enter. Reseat the LCD connector. 2. The hard-disk password prompt appears. System board. System board. 2. External CRT. 4. Make...
Hardware Maintenance Manual
Page 61
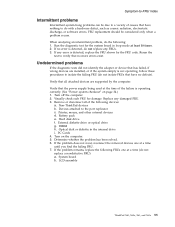
... wrong devices are supported by the FRU code. Turn off the computer. 2. Visually check each FRU for the system board in the internal drive i. PC Cards 4. If the problem remains, replace the following : 1. Devices attached to isolate the failing FRU (do with a hardware defect, such as cosmic radiation, electrostatic discharge, or software errors. LCD assembly ThinkPad X60, X60s, X61, and X61s 55 Replace any FRUs. 3. External diskette drive or optical drive g. Symptom...
... wrong devices are supported by the FRU code. Turn off the computer. 2. Visually check each FRU for the system board in the internal drive i. PC Cards 4. If the problem remains, replace the following : 1. Devices attached to isolate the failing FRU (do with a hardware defect, such as cosmic radiation, electrostatic discharge, or software errors. LCD assembly ThinkPad X60, X60s, X61, and X61s 55 Replace any FRUs. 3. External diskette drive or optical drive g. Symptom...


