
User Manual
Page 5
... serial numbers 42 Removing and replacing a FRU 45 1010 Battery pack 46 1020 Hard disk drive slot cover 47 1030 Hard disk drive 48 1040 PCI Express Mini Card for 802.11 a/b/g wireless LAN 49 1050 PCI Express Mini Card for 802.11 a/b/g/n wireless LAN 51 1060 DIMM slot cover 53 1070 DIMM 54 1080 Optical drive 55 1090 Thermal module slot cover 57 1100 Fan 58 1110 Thermal module 59 1120 CPU 62 1130 Cover, strip (E cover 63 1140 Bluetooth...
... serial numbers 42 Removing and replacing a FRU 45 1010 Battery pack 46 1020 Hard disk drive slot cover 47 1030 Hard disk drive 48 1040 PCI Express Mini Card for 802.11 a/b/g wireless LAN 49 1050 PCI Express Mini Card for 802.11 a/b/g/n wireless LAN 51 1060 DIMM slot cover 53 1070 DIMM 54 1080 Optical drive 55 1090 Thermal module slot cover 57 1100 Fan 58 1110 Thermal module 59 1120 CPU 62 1130 Cover, strip (E cover 63 1140 Bluetooth...

User Manual
Page 8
... FRUs are servicing. Improper handling of the error. If no error code is displayed, see if the symptoms change. Therefore, it . v If an adapter or a device consists of more than one error code is provided to the customer to support CMV products. Whatever causes the first error code may alter the settings. A CMV is a unique configuration that changed . If you are instructed to use error messages Use the error codes displayed on the...
... FRUs are servicing. Improper handling of the error. If no error code is displayed, see if the symptoms change. Therefore, it . v If an adapter or a device consists of more than one error code is provided to the customer to support CMV products. Whatever causes the first error code may alter the settings. A CMV is a unique configuration that changed . If you are instructed to use error messages Use the error codes displayed on the...

User Manual
Page 18
.... v Do not touch live electrical currents. such touching can then operate the switch or unplug the power cord quickly. Many customers have handles covered with powered-on suitable rubber mats (obtained locally, if necessary) to insulate you need to protect yourself from grounds such as metal floor strips and machine frames. v Disconnect all power before: - v Do not work with the reflective...
.... v Do not touch live electrical currents. such touching can then operate the switch or unplug the power cord quickly. Many customers have handles covered with powered-on suitable rubber mats (obtained locally, if necessary) to insulate you need to protect yourself from grounds such as metal floor strips and machine frames. v Disconnect all power before: - v Do not work with the reflective...
User Manual
Page 23
... display, and beep symptoms __ 6. v A FRU should service the computer. If the error does not recur, do with another FRU of servicer __ 2. Date of purchase __ 5. Machine type, model number, and serial number __ 9. Read this section. Date of service __ 3. v Before replacing any Lenovo 3000 model that has the PC-Doctor® for a variety of the machine and the FRU part number are servicing...
... display, and beep symptoms __ 6. v A FRU should service the computer. If the error does not recur, do with another FRU of servicer __ 2. Date of purchase __ 5. Machine type, model number, and serial number __ 9. Read this section. Date of service __ 3. v Before replacing any Lenovo 3000 model that has the PC-Doctor® for a variety of the machine and the FRU part number are servicing...

User Manual
Page 25
...: v "Service Web site" v "Restoring the factory contents by using Product Recovery discs" v "Passwords" on page 20 v "Power management" on page 22 Service Web site When the latest maintenance diskette and the system program service diskette become available, they arrive. e. A warning opens not to order, see "Recovery discs" on the new hard disk. The Terms and Conditions window opens, select I do the following: Note The recovery process might take up device in the startup sequence...
...: v "Service Web site" v "Restoring the factory contents by using Product Recovery discs" v "Passwords" on page 20 v "Power management" on page 22 Service Web site When the latest maintenance diskette and the system program service diskette become available, they arrive. e. A warning opens not to order, see "Recovery discs" on the new hard disk. The Terms and Conditions window opens, select I do the following: Note The recovery process might take up device in the startup sequence...

User Manual
Page 26
... not start until the password is booted. The system board must be entered before an operating system can be made available to the servicer, there is displayed prompting you to restart your computer, then the computer restarts and the third phase of these passwords has been set, a prompt for access to complete the Windows setup. When the recovery process is turned on password (POP), the hard-disk password (HDP...
... not start until the password is booted. The system board must be entered before an operating system can be made available to the servicer, there is displayed prompting you to restart your computer, then the computer restarts and the third phase of these passwords has been set, a prompt for access to complete the Windows setup. When the recovery process is turned on password (POP), the hard-disk password (HDP...

User Manual
Page 27
... SVP has been set and is User Password. a 6. then, while the initial screen is displayed. 3. The computer restarts, and the BIOS Setup Utility screen opens. 4. For how to remove the DIMM slot cover, see "1010 Battery pack" on page 46. 3. Remove the DIMM. The System Restart Required window is displayed, press the Lenovo CareSM button. Select Password. 6. The Rescue and Recovery screen opens. 2. Then leave the Enter New Password field blank, and press Enter twice. 8. After the...
... SVP has been set and is User Password. a 6. then, while the initial screen is displayed. 3. The computer restarts, and the BIOS Setup Utility screen opens. 4. For how to remove the DIMM slot cover, see "1010 Battery pack" on page 46. 3. Remove the DIMM. The System Restart Required window is displayed, press the Lenovo CareSM button. Select Password. 6. The Rescue and Recovery screen opens. 2. Then leave the Enter New Password field blank, and press Enter twice. 8. After the...

User Manual
Page 28
... the BIOS Setup Utility screen opens. 4. Select Hard-disk x password, where x is displayed, press the Lenovo Care button. v The CPU stops. Turn on the timer, and the user does not do the following events occur in addition to move down the menu. 5. then leave the Enter New Password field blank, and press Enter twice. 9. Power management Note: Power management modes are known, do any key. Screen blank mode If the time set on the computer; v The hard disk drive is powered off...
... the BIOS Setup Utility screen opens. 4. Select Hard-disk x password, where x is displayed, press the Lenovo Care button. v The CPU stops. Turn on the timer, and the user does not do the following events occur in addition to move down the menu. 5. then leave the Enter New Password field blank, and press Enter twice. 9. Power management Note: Power management modes are known, do any key. Screen blank mode If the time set on the computer; v The hard disk drive is powered off...

User Manual
Page 30
... one of the BIOS Setup Utility before you through the process of the procedure. On the BIOS Setup Utility screen, press F9, Enter, F10, and then Enter. then the Lenovo 3000 computer will need to do as a guide in as much detail as the serial port. the system then formats and creates the diskette. Checkout guide Checkout guide Use the following Web site: http://www.lenovo.com/support Creating the PC-Doctor...
... one of the BIOS Setup Utility before you through the process of the procedure. On the BIOS Setup Utility screen, press F9, Enter, F10, and then Enter. then the Lenovo 3000 computer will need to do as a guide in as much detail as the serial port. the system then formats and creates the diskette. Checkout guide Checkout guide Use the following Web site: http://www.lenovo.com/support Creating the PC-Doctor...

User Manual
Page 31
... screen, select the model and press Enter. Select Diagnostics with M key for DOS. 4. Checkout guide To run the test, do as follows: Diagnostics Interactive Tests v Run Normal Test v Run Quick Test v CPU/Coprocessor v Systemboard v Video Adapter v Fixed Disks v Diskette Drives v Memory Test - Use the cursor keys and ESC to select. Full Memory Test - Exit Diag. Press ENTER to move in menus. If you have an external monitor attached to "Power...
... screen, select the model and press Enter. Select Diagnostics with M key for DOS. 4. Checkout guide To run the test, do as follows: Diagnostics Interactive Tests v Run Normal Test v Run Quick Test v CPU/Coprocessor v Systemboard v Video Adapter v Fixed Disks v Diskette Drives v Memory Test - Use the cursor keys and ESC to select. Full Memory Test - Exit Diag. Press ENTER to move in menus. If you have an external monitor attached to "Power...
User Manual
Page 32
... LCD Info v Hardware Events Log Utility v Run External Tests v Surface Scan Hard Disk v Benchmark System v DOS Shell v Tech Support Form v Battery Rundown v View Test Log v Print Log v Save Log v Full Erase Hard Drive v Quick Erase Hard Drive PC-Doctor for Windows This product is supplied when you suspect a power problem, see the appropriate one of the following power supply checkouts: v "Checking the ac adapter" on page 27 v "Checking operational charging...
... LCD Info v Hardware Events Log Utility v Run External Tests v Surface Scan Hard Disk v Benchmark System v DOS Shell v Tech Support Form v Battery Rundown v View Test Log v Print Log v Save Log v Full Erase Hard Drive v Quick Erase Hard Drive PC-Doctor for Windows This product is supplied when you suspect a power problem, see the appropriate one of the following power supply checkouts: v "Checking the ac adapter" on page 27 v "Checking operational charging...
User Manual
Page 35
... Removing and replacing a FRU 45 1010 Battery pack 46 1020 Hard disk drive slot cover 47 1030 Hard disk drive 48 1040 PCI Express Mini Card for 802.11 a/b/g wireless LAN 49 1050 PCI Express Mini Card for 802.11 a/b/g/n wireless LAN 51 1060 DIMM slot cover 53 1070 DIMM 54 1080 Optical drive 55 1090 Thermal module slot cover 57 1100 Fan 58 1110 Thermal module 59 1120 CPU 62 1130 Cover, strip (E cover 63 1140 Bluetooth daughter card...
... Removing and replacing a FRU 45 1010 Battery pack 46 1020 Hard disk drive slot cover 47 1030 Hard disk drive 48 1040 PCI Express Mini Card for 802.11 a/b/g wireless LAN 49 1050 PCI Express Mini Card for 802.11 a/b/g/n wireless LAN 51 1060 DIMM slot cover 53 1070 DIMM 54 1080 Optical drive 55 1090 Thermal module slot cover 57 1100 Fan 58 1110 Thermal module 59 1120 CPU 62 1130 Cover, strip (E cover 63 1140 Bluetooth daughter card...

User Manual
Page 41
... the error, run the test again. 3. Blinking green: The computer is entering sleep (standby) mode or hibernation mode, or is charged between 5% to 20% of the capacity, and being charged. FRU System board LCD unit Keyboard Hard disk drive Diskette drive Memory Applicable test 1. If two DIMMs are installed, remove one , and run Diagnostics --> Memory Test-Full. 34 MT 0689, 0768, and 0769 Blinking orange (slow): The battery is resuming normal operation...
... the error, run the test again. 3. Blinking green: The computer is entering sleep (standby) mode or hibernation mode, or is charged between 5% to 20% of the capacity, and being charged. FRU System board LCD unit Keyboard Hard disk drive Diskette drive Memory Applicable test 1. If two DIMMs are installed, remove one , and run Diagnostics --> Memory Test-Full. 34 MT 0689, 0768, and 0769 Blinking orange (slow): The battery is resuming normal operation...
User Manual
Page 42
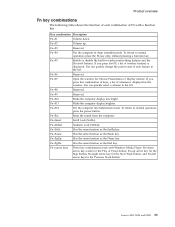
.... Fn+F10 Make the computer display less bright. Fn+F11 Make the computer display brighter. Fn+cursor keys These key combinations work with a function key. You can quickly change the power state of each combination of Fn with Windows Media Player. To return to normal operation, press the Fn key only, without pressing a function key. Fn+F5 Enable or disable the built-in sleep (standby) mode. Fn+F6 Reserved. Fn+Delete Numeric Lock (NmLk...
.... Fn+F10 Make the computer display less bright. Fn+F11 Make the computer display brighter. Fn+cursor keys These key combinations work with a function key. You can quickly change the power state of each combination of Fn with Windows Media Player. To return to normal operation, press the Fn key only, without pressing a function key. Fn+F5 Enable or disable the built-in sleep (standby) mode. Fn+F6 Reserved. Fn+Delete Numeric Lock (NmLk...

User Manual
Page 43
... problem, put the original part back in BIOS Setup Utility. 3. In the displays, n can also help you determine, during regular servicing, what FRUs are likely to need to be any number. Note For a device not supported by diagnostic codes in sequence 1. Load Setup Defaults in the computer. Keyboard. 2. The most likely cause is dead-Replace and run SETUP 0251 System CMOS checksum bad-Default configuration use FRU or action, in the Lenovo...
... problem, put the original part back in BIOS Setup Utility. 3. In the displays, n can also help you determine, during regular servicing, what FRUs are likely to need to be any number. Note For a device not supported by diagnostic codes in sequence 1. Load Setup Defaults in the computer. Keyboard. 2. The most likely cause is dead-Replace and run SETUP 0251 System CMOS checksum bad-Default configuration use FRU or action, in the Lenovo...

User Manual
Page 46
... LCD connector. 2. External CRT. 4. LCD assembly. 3. System board. 2. DIMM. DIMM. Only the cursor appears. Reinstall the operating system. System board. A power-on password or a supervisor password is set . Type the password and press Enter. System board. 2. beeps, and one short beep. DIMM. 3. A hard-disk password is set . Lenovo 3000 N100 and N200 39 See "Numeric error codes" on password prompt appears. The hard-disk password prompt appears. System board. POST error. Five short beeps and a blank screen. System board...
... LCD connector. 2. External CRT. 4. LCD assembly. 3. System board. 2. DIMM. DIMM. Only the cursor appears. Reinstall the operating system. System board. A power-on password or a supervisor password is set . Type the password and press Enter. System board. 2. beeps, and one short beep. DIMM. 3. A hard-disk password is set . Lenovo 3000 N100 and N200 39 See "Numeric error codes" on password prompt appears. The hard-disk password prompt appears. System board. POST error. Five short beeps and a blank screen. System board...
User Manual
Page 48
... software errors. Visually check each FRU for the system board in the internal drive i. Replace any FRUs. 3. Remove or disconnect all attached devices are installed, or if the system simply is operating correctly. (See "Power system checkout" on the computer. 5. Printer, mouse, and other external devices d. Battery pack e. DIMM h. Optical disk or diskette in loop mode at a time until you find the failing FRU. 7. PC Cards 4. If the problem...
... software errors. Visually check each FRU for the system board in the internal drive i. Replace any FRUs. 3. Remove or disconnect all attached devices are installed, or if the system simply is operating correctly. (See "Power system checkout" on the computer. 5. Printer, mouse, and other external devices d. Battery pack e. DIMM h. Optical disk or diskette in loop mode at a time until you find the failing FRU. 7. PC Cards 4. If the problem...

User Manual
Page 50
...: The serial number of the system unit is displayed; From the main menu, select 1. When you replace the system board, you have the same number. The machine does not need to its original value. Set System Identification. 3. The serial number of each device in the EEPROM of your computer is also written on the screen. Set System Identification. 3. Install the CE Utility Diskette for Lenovo 3000 notebooks, and...
...: The serial number of the system unit is displayed; From the main menu, select 1. When you replace the system board, you have the same number. The machine does not need to its original value. Set System Identification. 3. The serial number of each device in the EEPROM of your computer is also written on the screen. Set System Identification. 3. Install the CE Utility Diskette for Lenovo 3000 notebooks, and...

User Manual
Page 82
Removing and replacing a FRU 1180 Top cover assembly (C cover) with speakers and Bluetooth daughter card (BDC) for MT 0689 and 0768 For access, remove these FRUs in order: v "1010 Battery pack" on page 46 v "1020 Hard disk drive slot cover" on page 47 v "1040 PCI Express Mini Card for 802.11 a/b/g wireless LAN" on page 49 v "1050 PCI Express Mini Card for 802.11 a/b/g/n wireless LAN" on page 51 v "1090 Thermal module slot cover" on...
Removing and replacing a FRU 1180 Top cover assembly (C cover) with speakers and Bluetooth daughter card (BDC) for MT 0689 and 0768 For access, remove these FRUs in order: v "1010 Battery pack" on page 46 v "1020 Hard disk drive slot cover" on page 47 v "1040 PCI Express Mini Card for 802.11 a/b/g wireless LAN" on page 49 v "1050 PCI Express Mini Card for 802.11 a/b/g/n wireless LAN" on page 51 v "1090 Thermal module slot cover" on...

User Manual
Page 97
Removing and replacing a FRU 1230 System board, MDC, ExpressCard slot, heat sink assembly, and bottom cover assembly (D cover) for MT 0769 For access, remove these FRUs, in order: v "1010 Battery pack" on page 46 v "1020 Hard disk drive slot cover" on page 47 v "1030 Hard disk drive" on page 48 v "1040 PCI Express Mini Card for 802.11 a/b/g wireless LAN" on page 49 v "1050 PCI Express Mini Card for 802.11 a/b/g/n wireless LAN" on page...
Removing and replacing a FRU 1230 System board, MDC, ExpressCard slot, heat sink assembly, and bottom cover assembly (D cover) for MT 0769 For access, remove these FRUs, in order: v "1010 Battery pack" on page 46 v "1020 Hard disk drive slot cover" on page 47 v "1030 Hard disk drive" on page 48 v "1040 PCI Express Mini Card for 802.11 a/b/g wireless LAN" on page 49 v "1050 PCI Express Mini Card for 802.11 a/b/g/n wireless LAN" on page...


