Owner's Manual (English)
Page 2
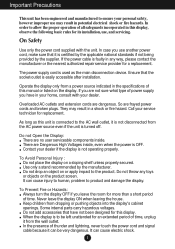
... nearest authorized repair service provider for a replacement. Some internal parts carry hazardous voltages. When the display is turned off. In order to allow the proper operation of time, unplug it is not disconnected from the wall outlet. On Safety Use only the power cord supplied with your dealer. In case you have not been designed for this unit is connected to the...
... nearest authorized repair service provider for a replacement. Some internal parts carry hazardous voltages. When the display is turned off. In order to allow the proper operation of time, unplug it is not disconnected from the wall outlet. On Safety Use only the power cord supplied with your dealer. In case you have not been designed for this unit is connected to the...
Owner's Manual (English)
Page 3
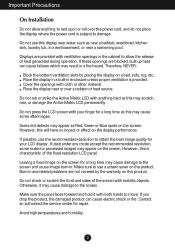
... screen with anything to use the recommended resolution to the screen. Leaving a fixed image on the screen for a long time as near or over the power cord, and do not place the display where the power cord is provided. Otherwise, it with your LCD display. If these openings are blocked, built-up heat can cause electric shock or fire. If used under any mode except the recommended resolution...
... screen with anything to use the recommended resolution to the screen. Leaving a fixed image on the screen for a long time as near or over the power cord, and do not place the display where the power cord is provided. Otherwise, it with your LCD display. If these openings are blocked, built-up heat can cause electric shock or fire. If used under any mode except the recommended resolution...
Owner's Manual (English)
Page 7
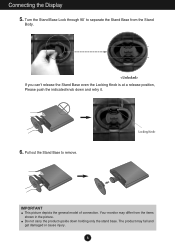
Pull out the Stand Base to separate the Stand Base from the items shown in the picture. The product may differ from the Stand Body. Do not carry the product upside down and retry it. 6. If you can't release the Stand Base even the Locking Knob is at a release position, Please push the indicated knob down holding only the stand base. Locking Knob IMPORTANT This picture depicts the general model of connection. Turn the Stand Base Lock through 90˚ to remove. Connecting the Display 5. Your monitor may fall and get damaged or cause injury. 6
Pull out the Stand Base to separate the Stand Base from the items shown in the picture. The product may differ from the Stand Body. Do not carry the product upside down and retry it. 6. If you can't release the Stand Base even the Locking Knob is at a release position, Please push the indicated knob down holding only the stand base. Locking Knob IMPORTANT This picture depicts the general model of connection. Turn the Stand Base Lock through 90˚ to remove. Connecting the Display 5. Your monitor may fall and get damaged or cause injury. 6
Owner's Manual (English)
Page 9
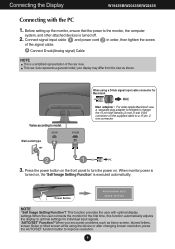
... cable. your display may differ from the view as blurry screen, blurred letters, screen flicker or tilted screen while using a D-Sub signal input cable connector for individual input signals. 'AUTO/SET' Function? This rear view represents a general model; Press the power button on the front panel to turn the power on the supplied cable to a 15 pin 2 row connector. Varies according to model. A Connect D-sub(Analog signal) Cable B Connect DVI-D(Digital signal) Cable NOTE This is turned off. 2. When you encounter problems such as shown. This function provides the user...
... cable. your display may differ from the view as blurry screen, blurred letters, screen flicker or tilted screen while using a D-Sub signal input cable connector for individual input signals. 'AUTO/SET' Function? This rear view represents a general model; Press the power button on the front panel to turn the power on the supplied cable to a 15 pin 2 row connector. Varies according to model. A Connect D-sub(Analog signal) Cable B Connect DVI-D(Digital signal) Cable NOTE This is turned off. 2. When you encounter problems such as shown. This function provides the user...
Owner's Manual (English)
Page 10
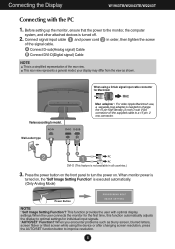
... tilted screen while using a D-Sub signal input cable connector for Macintosh Mac adapter : For older Apple Macintosh use, a separate plug adapter is executed automatically. Connecting the Display W1943SB/W2043SE/W2243S Connecting with optimal display settings.When the user connects the monitor for the first time, this function automatically adjusts the display to model. This rear view represents a general model; Before setting up the monitor, ensure that the power to improve resolution. 9 A Connect D-sub(Analog signal) Cable NOTE This is turned off. 2. Press the power button...
... tilted screen while using a D-Sub signal input cable connector for Macintosh Mac adapter : For older Apple Macintosh use, a separate plug adapter is executed automatically. Connecting the Display W1943SB/W2043SE/W2243S Connecting with optimal display settings.When the user connects the monitor for the first time, this function automatically adjusts the display to model. This rear view represents a general model; Before setting up the monitor, ensure that the power to improve resolution. 9 A Connect D-sub(Analog signal) Cable NOTE This is turned off. 2. Press the power button...

Owner's Manual (English)
Page 12
... adjusting your display settings, always press the AUTO/SET button before entering the On Screen Display(OSD). (Only Analog Mode) This will automatically adjust your display image to page 15. (SOURCE Hot key) When two input signals are connected, you can select the input signal (D-SUB/DVI) you want. Control Panel Functions Buttons Use these buttons to select or adjust functions in Sleep Mode (Energy Saving), the power indicator is blinking red. 11 For more information, refer to the ideal settings for the current screen resolution size (display mode...
... adjusting your display settings, always press the AUTO/SET button before entering the On Screen Display(OSD). (Only Analog Mode) This will automatically adjust your display image to page 15. (SOURCE Hot key) When two input signals are connected, you can select the input signal (D-SUB/DVI) you want. Control Panel Functions Buttons Use these buttons to select or adjust functions in Sleep Mode (Energy Saving), the power indicator is blinking red. 11 For more information, refer to the ideal settings for the current screen resolution size (display mode...
Owner's Manual (English)
Page 13
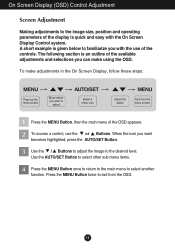
... the OSD. 12 Use the AUTO/SET Button to select other sub-menu items. 4 Press the MENU Button once to return to the main menu to select another function. Press the MENU Button twice to exit from the menu screen. 1 Press the MENU Button, then the main menu of the OSD appears. 2 To access a control, use of the display is quick and easy with the use the or Buttons. On Screen Display (OSD) Control Adjustment Screen Adjustment Making adjustments to the image size, position and...
... the OSD. 12 Use the AUTO/SET Button to select other sub-menu items. 4 Press the MENU Button once to return to the main menu to select another function. Press the MENU Button twice to exit from the menu screen. 1 Press the MENU Button, then the main menu of the OSD appears. 2 To access a control, use of the display is quick and easy with the use the or Buttons. On Screen Display (OSD) Control Adjustment Screen Adjustment Making adjustments to the image size, position and...
Owner's Manual (English)
Page 14
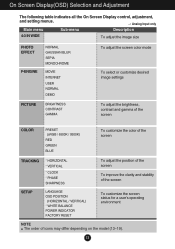
... menu Sub-menu Description 4:3 IN WIDE To adjust the image size PHOTO EFFECT F-ENGINE NORMAL GAUSSIAN BLUR SEPIA MONOCHROME MOVIE INTERNET USER NORMAL DEMO To adjust the screen color mode To select or customize desired image settings PICTURE BRIGHTNESS CONTRAST GAMMA To adjust the brightness, contrast and gamma of the screen COLOR PRESET (sRGB / 6500K / 9300K) RED GREEN BLUE To customize the color of the screen TRACKING * HORIZONTAL * VERTICAL * CLOCK * PHASE SHARPNESS SETUP LANGUAGE OSD POSITION (HORIZONTAL / VERTICAL) * WHITE BALANCE POWER INDICATOR FACTORY RESET To adjust...
... menu Sub-menu Description 4:3 IN WIDE To adjust the image size PHOTO EFFECT F-ENGINE NORMAL GAUSSIAN BLUR SEPIA MONOCHROME MOVIE INTERNET USER NORMAL DEMO To adjust the screen color mode To select or customize desired image settings PICTURE BRIGHTNESS CONTRAST GAMMA To adjust the brightness, contrast and gamma of the screen COLOR PRESET (sRGB / 6500K / 9300K) RED GREEN BLUE To customize the color of the screen TRACKING * HORIZONTAL * VERTICAL * CLOCK * PHASE SHARPNESS SETUP LANGUAGE OSD POSITION (HORIZONTAL / VERTICAL) * WHITE BALANCE POWER INDICATOR FACTORY RESET To adjust...
Owner's Manual (English)
Page 16
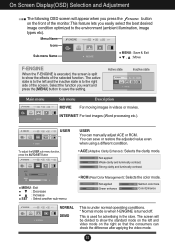
... can manually adjust ACE or RCM. Menu Name Icons Sub-menu Name MENU : Save & Exit , : Move F-ENGINE When the F-ENGINE is executed, the screen is turned off. Active state Inactive state Main menu Sub menu Description MOVIE For moving images in the store. USER To adjust the USER sub-menu function, press the AUTO/SET Button USER You can check the difference after applying the video mode. 15 Strong clarity and luminosity contrast.
... can manually adjust ACE or RCM. Menu Name Icons Sub-menu Name MENU : Save & Exit , : Move F-ENGINE When the F-ENGINE is executed, the screen is turned off. Active state Inactive state Main menu Sub menu Description MOVIE For moving images in the store. USER To adjust the USER sub-menu function, press the AUTO/SET Button USER You can check the difference after applying the video mode. 15 Strong clarity and luminosity contrast.
Owner's Manual (English)
Page 18
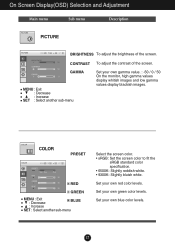
...: Set the screen color to fit the sRGB standard color specification. • 6500K: Slightly reddish white. • 9300K: Slightly bluish white. Set your own blue color levels. 17 COLOR PRESET RED GREEN MENU : Exit : Decrease BLUE : Increase SET : Select another sub-menu Set your own green color levels. Set your own red color levels. Set your own gamma value. : -50 / 0 / 50 On the monitor, high gamma values display whitish images and low gamma values display blackish images. CONTRAST To adjust the contrast...
...: Set the screen color to fit the sRGB standard color specification. • 6500K: Slightly reddish white. • 9300K: Slightly bluish white. Set your own blue color levels. 17 COLOR PRESET RED GREEN MENU : Exit : Decrease BLUE : Increase SET : Select another sub-menu Set your own green color levels. Set your own red color levels. Set your own gamma value. : -50 / 0 / 50 On the monitor, high gamma values display whitish images and low gamma values display blackish images. CONTRAST To adjust the contrast...
Owner's Manual (English)
Page 20
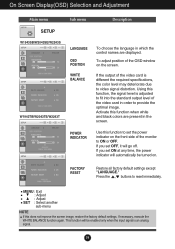
... signal level is different the required specifications, the color level may deteriorate due to provide the optimal image. This function will go off. FACTORY RESET Restore all factory default settings except "LANGUAGE." To adjust position of the video card in which the control names are present in the screen. Press the , buttons to ON or OFF. On Screen Display(OSD) Selection and Adjustment Main menu SETUP W1943SB/W2043SE/W2243S W1943TB/W2043TE/W2243T Sub menu LANGUAGE OSD POSITION WHITE BALANCE POWER INDICATOR...
... signal level is different the required specifications, the color level may deteriorate due to provide the optimal image. This function will go off. FACTORY RESET Restore all factory default settings except "LANGUAGE." To adjust position of the video card in which the control names are present in the screen. Press the , buttons to ON or OFF. On Screen Display(OSD) Selection and Adjustment Main menu SETUP W1943SB/W2043SE/W2243S W1943TB/W2043TE/W2243T Sub menu LANGUAGE OSD POSITION WHITE BALANCE POWER INDICATOR...
Owner's Manual (English)
Page 21
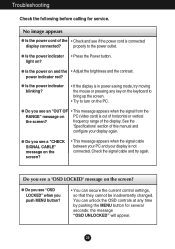
... see a "CHECK SIGNAL CABLE" message on PC (video card) is connected display connected? properly to turn on the screen? power indicator red? G Do you see if the power cord is out of this manual and configure your display is in power saving mode, try again. Troubleshooting Check the following before calling for several seconds: the message "OSD UNLOCKED" will appear. 20 No image appears G Is the power cord of the display. frequency range of the • Check and see a "OSD LOCKED" message...
... see a "CHECK SIGNAL CABLE" message on PC (video card) is connected display connected? properly to turn on the screen? power indicator red? G Do you see if the power cord is out of this manual and configure your display is in power saving mode, try again. Troubleshooting Check the following before calling for several seconds: the message "OSD UNLOCKED" will appear. 20 No image appears G Is the power cord of the display. frequency range of the • Check and see a "OSD LOCKED" message...
Owner's Manual (English)
Page 22
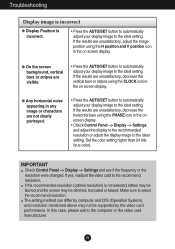
... setting. Set the color setting higher than 24 bits (true color). IMPORTANT Check Control Panel --> Display --> Settings and see if the frequency or the resolution were changed. If the results are unsatisfactory, decrease the vertical bars or stripes using the H position and V position icon in the on screen display. Make sure to the recommend resolution. G On the screen background, vertical bars or stripes are not clearly portrayed. • Press the AUTO/SET button to automatically adjust your display image...
... setting. Set the color setting higher than 24 bits (true color). IMPORTANT Check Control Panel --> Display --> Settings and see if the frequency or the resolution were changed. If the results are unsatisfactory, decrease the vertical bars or stripes using the H position and V position icon in the on screen display. Make sure to the recommend resolution. G On the screen background, vertical bars or stripes are not clearly portrayed. • Press the AUTO/SET button to automatically adjust your display image...
Owner's Manual (English)
Page 23
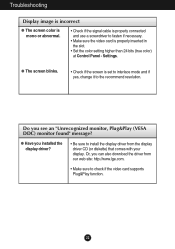
... yes, change it to fasten if necessary. • Make sure the video card is properly connected and use a screwdriver to the recommend resolution. Troubleshooting Display image is incorrect G The screen color is mono or abnormal. • Check if the signal cable is properly inserted in the slot. • Set the color setting higher than 24 bits (true color) at Control Panel - G Have you installed the display driver? • Be sure to check if the video card supports Plug&Play...
... yes, change it to fasten if necessary. • Make sure the video card is properly connected and use a screwdriver to the recommend resolution. Troubleshooting Display image is incorrect G The screen color is mono or abnormal. • Check if the signal cable is properly inserted in the slot. • Set the color setting higher than 24 bits (true color) at Control Panel - G Have you installed the display driver? • Be sure to check if the video card supports Plug&Play...
Owner's Manual (English)
Page 24
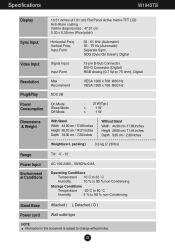
SOG (Sync On Green), Digital Video Input Signal Input Input Form 15 pin D-Sub Connector DVI-D Connector (Digital) RGB Analog (0.7 Vp-p/ 75 ohm), Digital Resolution Max Recommend VESA 1360 x 768 @60 Hz VESA 1360 x 768 @60 Hz Plug&Play DDC 2B Power Consumption On Mode Sleep Mode Off Mode : 21W(Typ.) ≤ 1 W ≤ 1 W Dimensions & Weight With Stand Width 44.90 cm / 17.68 inches Height 36.10 cm / 14.21 inches Depth 18.30 cm / 7.20 inches Without Stand Width 44.90...
SOG (Sync On Green), Digital Video Input Signal Input Input Form 15 pin D-Sub Connector DVI-D Connector (Digital) RGB Analog (0.7 Vp-p/ 75 ohm), Digital Resolution Max Recommend VESA 1360 x 768 @60 Hz VESA 1360 x 768 @60 Hz Plug&Play DDC 2B Power Consumption On Mode Sleep Mode Off Mode : 21W(Typ.) ≤ 1 W ≤ 1 W Dimensions & Weight With Stand Width 44.90 cm / 17.68 inches Height 36.10 cm / 14.21 inches Depth 18.30 cm / 7.20 inches Without Stand Width 44.90...
Owner's Manual (English)
Page 25
... 60 ˚C Humidity 5 % to 90 % non-Condensing Stand Base Attached ( ), Detached ( O ) Power cord Wall-outlet type NOTE Information in this document is subject to change without notice. 24 Vertical Freq. Specifications W1943SB Display Sync Input Video Input 18.51 inches (47.01 cm) Flat Panel Active matrix-TFT LCD Anti-Glare coating Visible diagonal size : 47.01 cm 0.30 x 0.30 mm (Pixel pitch) Horizontal Freq. Input Form 30 - 61 kHz (Automatic) 56 - 75...
... 60 ˚C Humidity 5 % to 90 % non-Condensing Stand Base Attached ( ), Detached ( O ) Power cord Wall-outlet type NOTE Information in this document is subject to change without notice. 24 Vertical Freq. Specifications W1943SB Display Sync Input Video Input 18.51 inches (47.01 cm) Flat Panel Active matrix-TFT LCD Anti-Glare coating Visible diagonal size : 47.01 cm 0.30 x 0.30 mm (Pixel pitch) Horizontal Freq. Input Form 30 - 61 kHz (Automatic) 56 - 75...

Owner's Manual (English)
Page 26
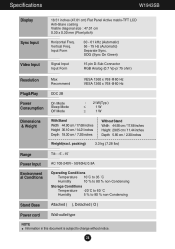
SOG (Sync On Green), Digital Video Input Signal Input Input Form 15 pin D-Sub Connector DVI-D Connector (Digital) RGB Analog (0.7 Vp-p/ 75 ohm), Digital Resolution Max Recommend VESA 1600 x 900 @60 Hz VESA 1600 x 900 @60 Hz Plug&Play DDC 2B Power Consumption On Mode Sleep Mode Off Mode : 25 W(Typ.) ≤ 0.5 W ≤ 0.5 W Dimensions & Weight With Stand Width 48.36 cm / 19.04 inches Height 37.68 cm / 14.83 inches Depth 18.30 cm / 7.20 inches Without Stand Width 48.36...
SOG (Sync On Green), Digital Video Input Signal Input Input Form 15 pin D-Sub Connector DVI-D Connector (Digital) RGB Analog (0.7 Vp-p/ 75 ohm), Digital Resolution Max Recommend VESA 1600 x 900 @60 Hz VESA 1600 x 900 @60 Hz Plug&Play DDC 2B Power Consumption On Mode Sleep Mode Off Mode : 25 W(Typ.) ≤ 0.5 W ≤ 0.5 W Dimensions & Weight With Stand Width 48.36 cm / 19.04 inches Height 37.68 cm / 14.83 inches Depth 18.30 cm / 7.20 inches Without Stand Width 48.36...

Owner's Manual (English)
Page 27
Specifications W2043SE Display 20.0 inches (50.8 cm) Flat Panel Active matrix-TFT LCD Anti-Glare coating Visible diagonal size : 50.8 cm 0.2766 x 0.2766 mm (Pixel pitch) Sync Input Horizontal Freq. SOG (Sync On Green) Video Input Signal Input Input Form 15 pin D-Sub Connector RGB Analog (0.7 Vp-p/ 75 ohm) Resolution Max Recommend VESA 1600 x 900 @60 Hz VESA 1600 x 900 @60 Hz Plug&Play DDC 2B Power Consumption On Mode Sleep Mode Off Mode : 25 W(Typ.) ≤ 0.5 W ≤ 0.5 W Dimensions & Weight With Stand Width...
Specifications W2043SE Display 20.0 inches (50.8 cm) Flat Panel Active matrix-TFT LCD Anti-Glare coating Visible diagonal size : 50.8 cm 0.2766 x 0.2766 mm (Pixel pitch) Sync Input Horizontal Freq. SOG (Sync On Green) Video Input Signal Input Input Form 15 pin D-Sub Connector RGB Analog (0.7 Vp-p/ 75 ohm) Resolution Max Recommend VESA 1600 x 900 @60 Hz VESA 1600 x 900 @60 Hz Plug&Play DDC 2B Power Consumption On Mode Sleep Mode Off Mode : 25 W(Typ.) ≤ 0.5 W ≤ 0.5 W Dimensions & Weight With Stand Width...
Owner's Manual (English)
Page 28
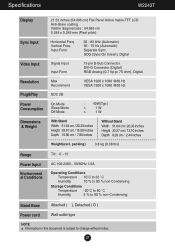
... cm / 7.80 inches Without Stand Width 51.64 cm / 20.33 inches Height 33.27 cm / 13.10 inches Depth 6.20 cm / 2.44 inches Weight(excl. Vertical Freq. Specifications W2243T Display 21.53 inches (54.686 cm) Flat Panel Active matrix-TFT LCD Anti-Glare coating Visible diagonal size : 54.686 cm 0.248 x 0.248 mm (Pixel pitch) Sync Input Horizontal Freq. packing) 3.8 kg (8.38 lbs) Range Power Input Environment al Conditions Tilt : -5˚...
... cm / 7.80 inches Without Stand Width 51.64 cm / 20.33 inches Height 33.27 cm / 13.10 inches Depth 6.20 cm / 2.44 inches Weight(excl. Vertical Freq. Specifications W2243T Display 21.53 inches (54.686 cm) Flat Panel Active matrix-TFT LCD Anti-Glare coating Visible diagonal size : 54.686 cm 0.248 x 0.248 mm (Pixel pitch) Sync Input Horizontal Freq. packing) 3.8 kg (8.38 lbs) Range Power Input Environment al Conditions Tilt : -5˚...

Owner's Manual (English)
Page 29
...;C Humidity 5 % to 90 % non-Condensing Stand Base Attached ( ), Detached ( O ) Power cord Wall-outlet type NOTE Information in this document is subject to change without notice. 28 SOG (Sync On Green) Signal Input Input Form 15 pin D-Sub Connector RGB Analog (0.7 Vp-p/ 75 ohm) Resolution Max Recommend VESA 1920 x 1080 @60 Hz VESA 1920 x 1080 @60 Hz Plug&Play DDC 2B Power Consumption On Mode Sleep Mode Off Mode : 40W(Typ.) ≤ 1 W ≤ 1 W Dimensions...
...;C Humidity 5 % to 90 % non-Condensing Stand Base Attached ( ), Detached ( O ) Power cord Wall-outlet type NOTE Information in this document is subject to change without notice. 28 SOG (Sync On Green) Signal Input Input Form 15 pin D-Sub Connector RGB Analog (0.7 Vp-p/ 75 ohm) Resolution Max Recommend VESA 1920 x 1080 @60 Hz VESA 1920 x 1080 @60 Hz Plug&Play DDC 2B Power Consumption On Mode Sleep Mode Off Mode : 40W(Typ.) ≤ 1 W ≤ 1 W Dimensions...


