User Guide
Page 3
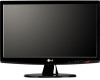
...the LCD screen with general household waste. If possible, use an aerosol directly on the screen. Do not use the recommended resolution to the regulations of mercury. Cover the openings with ventilation openings in its original material. On Cleaning Unplug the display before ...your local authority. Place the display near a swimming pool. On Disposal The fluorescent lamp used under any mode except the recommended resolution, some afterimages. However, this may cause some scaled or processed images may appear as this is characteristic of heat generated during operation...
...the LCD screen with general household waste. If possible, use an aerosol directly on the screen. Do not use the recommended resolution to the regulations of mercury. Cover the openings with ventilation openings in its original material. On Cleaning Unplug the display before ...your local authority. Place the display near a swimming pool. On Disposal The fluorescent lamp used under any mode except the recommended resolution, some afterimages. However, this may cause some scaled or processed images may appear as this is characteristic of heat generated during operation...
User Guide
Page 8
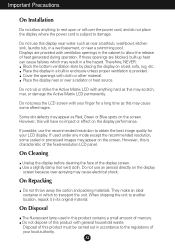
... entering the On Screen Display(OSD). Control Panel Functions Control AUTO/SET Button Function Use this button to the ideal settings for the current screen resolution size (display mode).
... entering the On Screen Display(OSD). Control Panel Functions Control AUTO/SET Button Function Use this button to the ideal settings for the current screen resolution size (display mode).
User Guide
Page 16
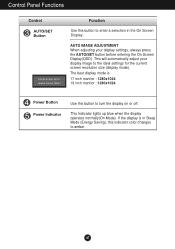
... voltage is mono or abnormal. Check Control Panel --> Display --> Settings and adjust the display to the recommended resolution or adjust the display image to the recommend resolution. Press the AUTO/SET button to automatically adjust your display image to the ideal setting. If the results are...screen display. Troubleshooting Display image is incorrect Display Position is set to interlace mode and if yes, change it to the recommend resolution. Press the AUTO/SET button to automatically adjust your display image to the ideal setting. Set the color setting higher than 24 ...
... voltage is mono or abnormal. Check Control Panel --> Display --> Settings and adjust the display to the recommended resolution or adjust the display image to the recommend resolution. Press the AUTO/SET button to automatically adjust your display image to the ideal setting. If the results are...screen display. Troubleshooting Display image is incorrect Display Position is set to interlace mode and if yes, change it to the recommend resolution. Press the AUTO/SET button to automatically adjust your display image to the ideal setting. Set the color setting higher than 24 ...
User Guide
Page 18
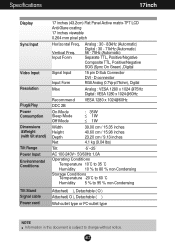
...) Separate TTL, Positive/Negative Composite TTL, Positive/Negative SOG (Sync On Green) ,Digital 15 pin D-Sub Connector DVI - Specifications 17inch Display Sync Input Video Input Resolution Plug&Play Power Consumption Dimensions &Weight (with tilt stand) Tilt Range Power Input Environmental Conditions Tilt Stand Signal cable Power cord 17 inches (43.2cm...
...) Separate TTL, Positive/Negative Composite TTL, Positive/Negative SOG (Sync On Green) ,Digital 15 pin D-Sub Connector DVI - Specifications 17inch Display Sync Input Video Input Resolution Plug&Play Power Consumption Dimensions &Weight (with tilt stand) Tilt Range Power Input Environmental Conditions Tilt Stand Signal cable Power cord 17 inches (43.2cm...
User Guide
Page 19
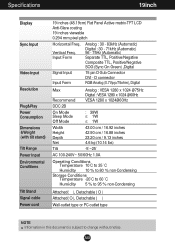
... Composite TTL, Positive/Negative SOG (Sync On Green) ,Digital Signal Input Input Form 15 pin D-Sub Connector DVI - Specifications 19inch Display Sync Input Video Input Resolution Plug&Play Power Consumption Dimensions &Weight (with tilt stand) Tilt Range Power Input Environmental Conditions Tilt Stand Signal cable Power cord 19 inches (48.19cm...
... Composite TTL, Positive/Negative SOG (Sync On Green) ,Digital Signal Input Input Form 15 pin D-Sub Connector DVI - Specifications 19inch Display Sync Input Video Input Resolution Plug&Play Power Consumption Dimensions &Weight (with tilt stand) Tilt Range Power Input Environmental Conditions Tilt Stand Signal cable Power cord 19 inches (48.19cm...
User Guide
Page 20
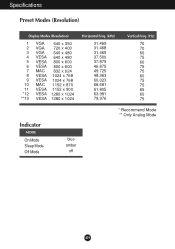
Specifications Preset Modes (Resolution) Display Modes (Resolution) 1 VGA 640 x 350 2 VGA 720 x 400 3 VGA 640 x 480 4 VESA 640 x 480 5 VESA 800 x 600 6 VESA 800 x 600 7 MAC 832 x 624 8 VESA 1024 x 768 9 VESA 1024 x 768 10 MAC 1152 x 870 11 VESA 1152 x 900 *12 VESA 1280 x 1024 **13 VESA 1280 x 1024 Horizontal Freq. (kHz) 31.469 31.468 31.469 37.500 37.879 46.875 49.725 48.363 60.023 68.681 61.805 63.981 79.976 Vertical Freq. (Hz) 70 70 60 75 60 75 75 60 75 75 65 60 75 Indicator MODE On Mode Sleep Mode Off Mode blue amber off * Recommend Mode ** Only Analog Mode A19
Specifications Preset Modes (Resolution) Display Modes (Resolution) 1 VGA 640 x 350 2 VGA 720 x 400 3 VGA 640 x 480 4 VESA 640 x 480 5 VESA 800 x 600 6 VESA 800 x 600 7 MAC 832 x 624 8 VESA 1024 x 768 9 VESA 1024 x 768 10 MAC 1152 x 870 11 VESA 1152 x 900 *12 VESA 1280 x 1024 **13 VESA 1280 x 1024 Horizontal Freq. (kHz) 31.469 31.468 31.469 37.500 37.879 46.875 49.725 48.363 60.023 68.681 61.805 63.981 79.976 Vertical Freq. (Hz) 70 70 60 75 60 75 75 60 75 75 65 60 75 Indicator MODE On Mode Sleep Mode Off Mode blue amber off * Recommend Mode ** Only Analog Mode A19


