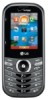
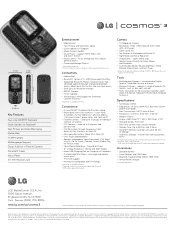
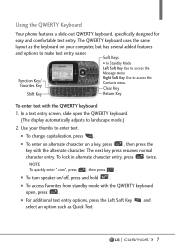
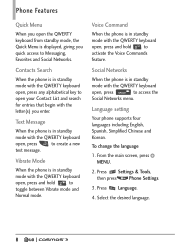
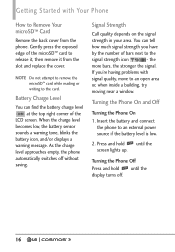
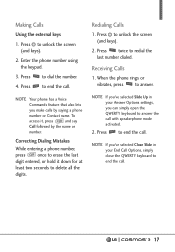
Data Sheet - English
Page 2
...; Bluetooth® Version: 2.1 + EDR (Enhanced Data Rate) • Supported Bluetooth Profiles: headset, hands-free, advanced audio distribution (stereo), phone book access, object push, file transfer, and message access • Save up to change . zoom, rotate, crop • Upload Images Directly...8226; 27 Unique Ringtones + Vibrate and Silent Modes • Micro USB Charging Port for Easy Messaging • Phone Book with phone. supports a variety of such marks by LG Corp. Other trademarks and trade names are subject to Facebook2 • Media Center Capable† • Music ...
Quick Start Guide - English
Page 1
... device comes with a Wall/USB charger and a USB cable which connect together to charge your LG phone. To charge your phone: NOTICE: Please use only an approved charging accessory to charge your phone. Insert the microSD Card If you see here are for that came with Your • Click on , press and hold... only an approved charging accessory to charge your disposal at 1-800-922-0204 or at verizonwireless.com/ myverizon, to learn how to use of the phone to end Set Up Voice Mail Dial *86 (*VM) and press the Send Key . Improper handling of a growing movement that the "B" side faces up . ...
Quick Start Guide - English
Page 2
...You can enter up within 45 days will restore your service provider or the manufacturer of accessing, collecting, storing and using this phone for services such as a picture message. 1. After taking the picture, select from the following the setup tutorial. Go to ...applicable terms and conditions and policies prior to using Location Information and disclosing Location Information to only acquire your service provider or phone retailer. NOTE: Voice mailboxes not set various camera settings. 3. Press the Left Soft Key [Turn On]. Camera Take pictures...
Additional Update - Cosmos3_vn251spp_users_guide_en
Page 3
... Removing the Battery 14 Charging the Battery 14 Charging with Your Phone 12 Setting Up Your Phone 12 Step 1. Insert the Battery 12 Step 3. Table of Contents Table of Contents 1 Phone Overview 5 Using the QWERTY Keyboard 7 Quick Menu 8 Contacts Search 8 Phone Features 8 Text Message 8 Vibrate Mode 8 Voice Command 8 ... Your microSD™ Card . .15 How to Remove Your microSD™ Card 16 Battery Charge Level 16 Signal Strength 16 Turning the Phone On and Off . . . . .16 Making Calls 17 Redialing Calls 17 Receiving Calls 17 Screen Icons 18 Quick Access to Convenient ...
Additional Update - Cosmos3_vn251spp_users_guide_en
Page 4
Favorites 29 5. In Case of Contents Storing a Number with Pauses . . . . . .24 Adding Another Phone Number . . . . .25 Changing the Default Number . . . . . .26 Deleting 26 Speed Dialing 27 Contacts 28 1. New Message 34 1.1 TXT Message 34 1.2 Picture Message 36 1.3 Voice Message ...
Additional Update - Cosmos3_vn251spp_users_guide_en
Page 5
... 3.6 Alarm Clock 65 3.7 Info Search 65 3.8 Stopwatch 65 3.9 World Clock 66 3.10 Notepad 66 3.11 Document Viewer 67 3.12 USB Mass Storage 67 4. Memory 92 3 Phone Settings 80 8.1 Airplane Mode 80 8.2 Set Shortcut Keys 81 8.3 Voice Commands 82 8.4 Language 83 8.5 Location 83 8.6 Current Country 84 8.7 Security 84 8.8 System Select 86 8.9 NAM...
Additional Update - Cosmos3_vn251spp_users_guide_en
Page 6
Table of Contents 11.1 Save Options 92 11.2 Phone Memory 92 11.3 Card Memory 92 12. Phone Info 93 12.1 My Number 93 12.2 SW/HW Version 93 12.3 Icon Glossary 93 13. Set-up Wizard 94 Important Safety Precautions . 96 Safety ...
Additional Update - Cosmos3_vn251spp_users_guide_en
Page 7
... a photo. If other compatible accessories. 6. Hand Strap Hole 9. 3.5 mm Headset Jack 10. Right Soft Key 14. LCD Screen Displays digital clock, phone status, and information you to the default "Grid" Menu Layout in standby mode* and the Earpiece Volume during a call. Hand Strap Hole Allows you...Left Soft Key 5. Volume Keys Use to select the function displayed at the bottom center of the display. * Standby mode is when the phone is waiting for convenient, hands-free conversations. 10. Speakerphone Key Use to change to display. 3. Send Key Use to adjust font sizes when...
Additional Update - Cosmos3_vn251spp_users_guide_en
Page 8
...3 seconds). Alphanumeric Keypad Use to standby mode. 16. Rear view microSD™ Slot Battery Back Cover NOTE The antenna is located inside your phone's ability to delete the entire word. Clear/ Voice Commands Key Deletes single spaces or characters with the antenna's ability to the Camera function. ... time. Also backs out of menus, one level at a time. NOTES • It's important to fully charge the battery before using the phone for quick access to receive a clear signal which affects call . Also returns to enter numbers and characters and select menu items. 18. TIP...
Additional Update - Cosmos3_vn251spp_users_guide_en
Page 9
... turn speaker on your thumbs to make text entry easier. G To access Favorites from standby mode with the alternate character. Using the QWERTY Keyboard Your phone features a slide-out QWERTY keyboard, specifically designed for easy and comfortable text entry. G To enter an alternate character on a key, press , then press the key...
Additional Update - Cosmos3_vn251spp_users_guide_en
Page 10
...with the QWERTY keyboard open, press and hold to toggle between Vibrate mode and Normal mode. Press Settings & Tools, then press Phone Settings. 3. Press Language. 4. Phone Features Quick Menu When you open the QWERTY keyboard from standby mode, the Quick Menu is displayed, giving you enter. Voice ...Command When the phone is in standby mode with the letter(s) you quick access to create a new text message. Select the desired language. 8 To change ...
Additional Update - Cosmos3_vn251spp_users_guide_en
Page 13
...Message 11. Balance Display 8. Set My Shortcuts 2. Confirm Choices 2. Language 5. Current Country 7. Restrictions 3. Restore Phone 8. One Touch Dial 7. Phone Info 1. Font Type 10. Clock Format 12. Prompts 5. Edit Codes 2. Call Forwarding 4. USB Mode 11. Save Options 2.... SW/HW Version 3. Phone Settings 1. Set Shortcut Keys 1. Voice Commands 1. Security 1. Auto Retry 5. Phone Memory 3. Menu Layout 2. Menu & List 3. Set Qwerty Shortcut 4. Location 6. System Select 9. ...
Additional Update - Cosmos3_vn251spp_users_guide_en
Page 14
Align the battery contacts with Your Phone Setting Up Your Phone Step 1. Push the battery down until it clicks into place. . 12 Replace the Back Cover Place the back cover over the battery compartment, then press it downward until it clicks into place. Remove the Back Cover 1. Step 2. Insert the Battery 1. Use the fingertip cutout at the top of the phone to pull the back cover off. Step 3. Getting Started with the terminals in the battery compartment. 2. Hold the phone securely with both hands. 2.
Additional Update - Cosmos3_vn251spp_users_guide_en
Page 15
...clicks into the Accessory/Charger Port of an incompatible charger, may cause damage to charge your phone and void the warranty. 1. Push the battery down until it fully. To charge your phone: NOTICE Please use the charger that the "B" side faces up before inserting a charger or ...USB cable into place. 4. Before turning on your LG phone. Install the back cover. Installing the Battery 1. Align the battery contacts...
Additional Update - Cosmos3_vn251spp_users_guide_en
Page 16
...with a Wall/USB charger and a USB cable which connect together to charge your phone. Turn the phone off and remove the back cover. 2. Improper handling of the Accessory/ Charger Port, as well as shown below, the LG logo on the USB cable should face toward you. Wall/USB charger 14 To ...charge your phone: NOTICE Please use of the battery using the fingertip cutout. Connect the USB cable into the cableless...
Additional Update - Cosmos3_vn251spp_users_guide_en
Page 17
Gently uncover the Accessory/ Charger Port, then plug the USB cable into it clicks into the slot. The LG USB Driver is sold separately. 1. How to charge your PC first. Remove the back cover and locate the microSD™ slot. 2. Insert the microSD™ ...card with the contacts facing downwards until it and the other end to have the necessary USB driver installed on your phone. 2. Charging with the USB cable, you need to a high-power USB port on your PC (commonly located on , a message pops up alerting you that the...
Additional Update - Cosmos3_vn251spp_users_guide_en
Page 18
... corner of the microSDTM card to Remove Your microSD™ Card Remove the back cover from the slot and replace the cover. Turning the Phone Off Press and hold until the display turns off without saving. When the charge level becomes low, the battery sensor sounds a warning tone,... blinks the battery icon, and/or displays a warning message. the more bars, the stronger the signal. Insert the battery and connect the phone to the signal strength icon - Signal Strength Call quality depends on the signal strength in your area. Gently press the exposed edge of the LCD...
Additional Update - Cosmos3_vn251spp_users_guide_en
Page 19
...by the name or number. To access it down for at least two seconds to end the call . Enter the phone number using the keypad. 3. Press twice to answer. When the phone rings or vibrates, press to redial the last number dialed. Press to delete all the digits. Making Calls Using ...the external keys 1. Press to end the call with speakerphone mode activated. 2. NOTE Your phone has a Voice Commands feature that also lets you 've selected Close Slide in your End Call Options, simply close the QWERTY keyboard to unlock the...
Additional Update - Cosmos3_vn251spp_users_guide_en
Page 20
To view the icons and their definitions, press [MENU] from the stanby mode, then press Settings & Tools and select Phone info. Getting Started with Your Phone Screen Icons When the phone is on, the top line of the LCD screen displays phone status icons. Then press Icon Glossary and select a subcategory. 18
Additional Update - Cosmos3_vn251spp_users_guide_en
Page 21
..., and lists (such as menus, sub-menus, call , press the Left Soft Key [Mute]. Mute Function The Mute function prevents the transmission of the phone. Press the Volume Up Key to increase and the Volume Down Key to Normal mode. Sounds Off Quickly deactivate your voice to the caller. Quick...the Volume Keys to small, medium or large. Press and hold again to return to decrease. Quick Access to Convenient Features Vibrate Mode Sets the phone to vibrate instead of ringing ( is 19 Press and hold again to return to normal sounds mode, press and hold . To Unmute, press the...