

Owners Manual
Page 4
.../SAP/MONO 16 • AUDIO OUTPUT (STEREO/LEFT/RIGHT 16 Displaying Disc Information on this unit 7 Using Memory Card 7 Front Panel 8 Remote Control 9 Rear Panel 10 Preparation 10-20 Connecting an Antenna or Cable TV 11 Basic TV Connections 11-12 Optional TV Connections 12 Resolution setting 12... - Contents Introduction 5-10 Moisture Condensation 5 Symbol Used in this Manual 5 About the Symbol Display 5 Notes on Discs 5 About the Remote Control 5 Types of Playable Discs 6 Regional code 6 Selecting the Viewing Source 6 Card usable on -screen . . . .17 Initial Settings -
.../SAP/MONO 16 • AUDIO OUTPUT (STEREO/LEFT/RIGHT 16 Displaying Disc Information on this unit 7 Using Memory Card 7 Front Panel 8 Remote Control 9 Rear Panel 10 Preparation 10-20 Connecting an Antenna or Cable TV 11 Basic TV Connections 11-12 Optional TV Connections 12 Resolution setting 12... - Contents Introduction 5-10 Moisture Condensation 5 Symbol Used in this Manual 5 About the Symbol Display 5 Notes on Discs 5 About the Remote Control 5 Types of Playable Discs 6 Regional code 6 Selecting the Viewing Source 6 Card usable on -screen . . . .17 Initial Settings -

Owners Manual
Page 5
...location. Do not expose the disc to direct sunlight or sources of heat and never leave it may appear on the rear of the remote control, and insert two (R03/AAA) size batteries with a clean cloth. Should the unit require service, contact an authorized service location. ... installation Detach the battery cover on your DVD+VCR. About the Remote Control Operation Range Point the remote control at the remote sensor and press the buttons. Symbol Used in each direction of the front of the remote sensor. AAA Introduction Introduction To ensure proper use of this product,...
...location. Do not expose the disc to direct sunlight or sources of heat and never leave it may appear on the rear of the remote control, and insert two (R03/AAA) size batteries with a clean cloth. Should the unit require service, contact an authorized service location. ... installation Detach the battery cover on your DVD+VCR. About the Remote Control Operation Range Point the remote control at the remote sensor and press the buttons. Symbol Used in each direction of the front of the remote sensor. AAA Introduction Introduction To ensure proper use of this product,...

Owners Manual
Page 7
... 23 ft (7 m) from the front of children. The Memory Card slot choice menu appears on the formatting. Note: For details on the rear of the remote control, and insert two (R03/AAA) size batteries with : FAT 12, FAT 16, or FAT 32 • Only use adapters to connect Mini SD, RS ...MMC, MMC Mobile, MS Duo and MS Pro Duo cards to write, erase or format the card. About the Remote Control Operation Range Point the remote control at the remote sensor and press the buttons. Inserting/Removing the Memory Card Insert CF, MD or ST1 MD card. Do not extract the memory...
... 23 ft (7 m) from the front of children. The Memory Card slot choice menu appears on the formatting. Note: For details on the rear of the remote control, and insert two (R03/AAA) size batteries with : FAT 12, FAT 16, or FAT 32 • Only use adapters to connect Mini SD, RS ...MMC, MMC Mobile, MS Duo and MS Pro Duo cards to write, erase or format the card. About the Remote Control Operation Range Point the remote control at the remote sensor and press the buttons. Inserting/Removing the Memory Card Insert CF, MD or ST1 MD card. Do not extract the memory...
Owners Manual
Page 8
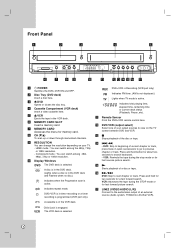
.... Component mode : You can switch among the 480p, 720p or 1080i resolution. - A cassette is in the VCR deck. Child Lock is selected. k Remote Sensor Point the DVD+VCR remote control here. l DVD/VCR (output select) Select one of your TV. - VCR: Advances the tape during the stop mode or for about two seconds...
.... Component mode : You can switch among the 480p, 720p or 1080i resolution. - A cassette is in the VCR deck. Child Lock is selected. k Remote Sensor Point the DVD+VCR remote control here. l DVD/VCR (output select) Select one of your TV. - VCR: Advances the tape during the stop mode or for about two seconds...

Owners Manual
Page 9
...Marker Search menu. RETURN Removes the setup menu. STOP ( Á ) Stops playback or recording. Adjusts manually the tape's picture onscreen. Remote Control POWER Switches DVD+VCR ON and OFF. DVD Select the DVD+VCR function mode to VCR. VCR Select the DVD+VCR function mode to.... A-B/ Repeats sequence between the clock, tape counter and tape remaining modes on your TV. * This button is not used. 9 Introduction TV Control Buttons (see p. 35) DISPLAY Accesses On-Screen Display. ENTER/OK Confirms menu selections. DISC MENU Accesses menu on the program list. Displays the...
...Marker Search menu. RETURN Removes the setup menu. STOP ( Á ) Stops playback or recording. Adjusts manually the tape's picture onscreen. Remote Control POWER Switches DVD+VCR ON and OFF. DVD Select the DVD+VCR function mode to VCR. VCR Select the DVD+VCR function mode to.... A-B/ Repeats sequence between the clock, tape counter and tape remaining modes on your TV. * This button is not used. 9 Introduction TV Control Buttons (see p. 35) DISPLAY Accesses On-Screen Display. ENTER/OK Confirms menu selections. DISC MENU Accesses menu on the program list. Displays the...
Owners Manual
Page 15
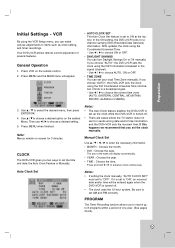
...). 15 The day of several features. PROGRAM The Timer Recording function allows you two ways to set to choose a desired option on the remote control. 2. Your DVD+VCR allows remote control adjustment of the week will display automatically. • YEAR : Choose the year. • TIME : Choose the time. Press VCR on the seleted Menu...
...). 15 The day of several features. PROGRAM The Timer Recording function allows you two ways to set to choose a desired option on the remote control. 2. Your DVD+VCR allows remote control adjustment of the week will display automatically. • YEAR : Choose the year. • TIME : Choose the time. Press VCR on the seleted Menu...
Owners Manual
Page 17
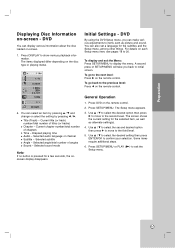
... seconds, the onscreen display disappears. For details on each Setup menu item, see pages 18 to the next level: Press B on the remote control. To go to 20. Current title (or track) number/total number of angles Sound - Selected audio language or channel Subtitle - Selected ...subtitle Angle - Press SETUP/MENU or PLAY (N) to the previous level: Press b on the remote control. Title (Track) - Selected angle/total number of titles (or tracks) Chapter - Use v / V to select the second desired option then press ...
... seconds, the onscreen display disappears. For details on each Setup menu item, see pages 18 to the next level: Press B on the remote control. To go to 20. Current title (or track) number/total number of angles Sound - Selected audio language or channel Subtitle - Selected ...subtitle Angle - Press SETUP/MENU or PLAY (N) to the previous level: Press b on the remote control. Title (Track) - Selected angle/total number of titles (or tracks) Chapter - Use v / V to select the second desired option then press ...
Owners Manual
Page 21
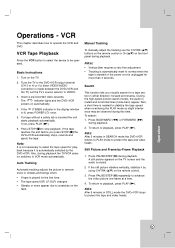
... playback. 2. Note: After 5 minutes in SEARCH mode the DVD+VCR returns to PLAY mode to protect the tape and video heads. Turn on the remote control. 3. Also, a short time is made between the DVD+VCR and the TV, set the TV's source selector to stabilize the tape speed when re...the end before you visually search for more than 3 seconds. Manual Tracking To manually adjust the tracking use the CH/TRK (v/V) buttons on the remote control or CH (v/V) on the front panel during playback the TV/VCR selector switches to playback, press PLAY (N). VCR This chapter describes how to stop...
... playback. 2. Note: After 5 minutes in SEARCH mode the DVD+VCR returns to PLAY mode to protect the tape and video heads. Turn on the remote control. 3. Also, a short time is made between the DVD+VCR and the TV, set the TV's source selector to stabilize the tape speed when re...the end before you visually search for more than 3 seconds. Manual Tracking To manually adjust the tracking use the CH/TRK (v/V) buttons on the remote control or CH (v/V) on the front panel during playback the TV/VCR selector switches to playback, press PLAY (N). VCR This chapter describes how to stop...

Owners Manual
Page 22
... recommend the connection of Hi-Fi audio and how to adjust the tracking. 3. STEREO/SAP Use the BROADCAST TYPE option to HI-FI on the Remote Control if necessary to record and play a tape in the STEREO position. The tape is 3 minutes. 3. When the search is useful for a second language or additional...
... recommend the connection of Hi-Fi audio and how to adjust the tracking. 3. STEREO/SAP Use the BROADCAST TYPE option to HI-FI on the Remote Control if necessary to record and play a tape in the STEREO position. The tape is 3 minutes. 3. When the search is useful for a second language or additional...

Owners Manual
Page 35
Switch the TV's input source. Adjust the volume of non-LG TVs as well. If your LG TV with the supplied remote. Set the appropriate code number again. Reference Controlling Your TV with the Supplied Remote You can Turn the TV on or off. By pressing POWER INPUT CH +/- While holding down through ...not function on the unit being connected, you find the one that works with the remote You can control the sound level, input source, and power switch of the TV. Release TV POWER button. Controlling other TVs with your TV using some or all buttons may be reset to the ...
Switch the TV's input source. Adjust the volume of non-LG TVs as well. If your LG TV with the supplied remote. Set the appropriate code number again. Reference Controlling Your TV with the Supplied Remote You can Turn the TV on or off. By pressing POWER INPUT CH +/- While holding down through ...not function on the unit being connected, you find the one that works with the remote You can control the sound level, input source, and power switch of the TV. Release TV POWER button. Controlling other TVs with your TV using some or all buttons may be reset to the ...

Owners Manual
Page 38
...guide. Replace the batteries with the playback side down . Symptom The DVD+VCR does not start playback. Video tape cannot be inserted. This remote control use the same buttons for VCR and DVD functions (ex.PLAY). Correction Insert a disc or tape. (Check that the disc or tape indicator.... No Hi-Fi sound Is the cassette compartment empty? Camcorder image via AV input to correct time. There is inserted. The remote control is dirty. Operate the remote control within the guide. When using a DVD, first press the DVD button. The disc is too far from the DVD+VCR. ...
...guide. Replace the batteries with the playback side down . Symptom The DVD+VCR does not start playback. Video tape cannot be inserted. This remote control use the same buttons for VCR and DVD functions (ex.PLAY). Correction Insert a disc or tape. (Check that the disc or tape indicator.... No Hi-Fi sound Is the cassette compartment empty? Camcorder image via AV input to correct time. There is inserted. The remote control is dirty. Operate the remote control within the guide. When using a DVD, first press the DVD button. The disc is too far from the DVD+VCR. ...

Owners Manual
Page 39
.../UHF/CATV) 1 V (p-p) 75 ohms, sync negative, RCA jack x 2 -6.0 dBm more than 95 dB (DVD/CD) Accessories: Video cable x 1, Audio cable (L/R) x 1, RF 75-ohm Coaxial Cable x 1, Remote control x 1, Batteries (R03/AAA) x 2 • Design and specifications are subject to -noise ratio Dynamic range Channel separation 1 V (p-p) 75 ohms, sync negative (Y) 1.0 V (p-p), 75 ohms, negative sync, Mini...
.../UHF/CATV) 1 V (p-p) 75 ohms, sync negative, RCA jack x 2 -6.0 dBm more than 95 dB (DVD/CD) Accessories: Video cable x 1, Audio cable (L/R) x 1, RF 75-ohm Coaxial Cable x 1, Remote control x 1, Batteries (R03/AAA) x 2 • Design and specifications are subject to -noise ratio Dynamic range Channel separation 1 V (p-p) 75 ohms, sync negative (Y) 1.0 V (p-p), 75 ohms, negative sync, Mini...


