
Owners Manual
Page 5
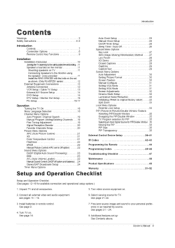
...TV 11 Connecting Speakers to original factory value) ..... 33 Split Zoom 33 Lock Menu Options Parental Lock Setup 34 PIP (Picture-ln-Picture)/Double Window Feature Watching PIP/Double Window 35 Swapping the PIP/Double Window .......... 35 TV Program selection for PIP 35 ... Owner's Manual 5 see pages 14 - 16. 6. Fine-tune source image and sound to your personal preference or as shown. (Only RU-60PZ61 series 12 External Equipment Connections 12 Antenna Connection 12 VCR Setup I Cable TV Setup External A/V Source Setup DVD Setup DTV Setup I Monitor ...
...TV 11 Connecting Speakers to original factory value) ..... 33 Split Zoom 33 Lock Menu Options Parental Lock Setup 34 PIP (Picture-ln-Picture)/Double Window Feature Watching PIP/Double Window 35 Swapping the PIP/Double Window .......... 35 TV Program selection for PIP 35 ... Owner's Manual 5 see pages 14 - 16. 6. Fine-tune source image and sound to your personal preference or as shown. (Only RU-60PZ61 series 12 External Equipment Connections 12 Antenna Connection 12 VCR Setup I Cable TV Setup External A/V Source Setup DVD Setup DTV Setup I Monitor ...
Owners Manual
Page 6
... the screen should be present on the PDP's efficiency or reliability. This means that are comprised of noise could occur while the fans are in -Picture feature allows you can use it can see the screen. It is less than 5 inches thick. 160 ° - The... Picture-in a theater. Therefore, a certain level of 3 sub pixels, corresponding to view your plasma display to a PC and you to the colors red, green, and blue. ...
... the screen should be present on the PDP's efficiency or reliability. This means that are comprised of noise could occur while the fans are in -Picture feature allows you can use it can see the screen. It is less than 5 inches thick. 160 ° - The... Picture-in a theater. Therefore, a certain level of 3 sub pixels, corresponding to view your plasma display to a PC and you to the colors red, green, and blue. ...
Owners Manual
Page 7
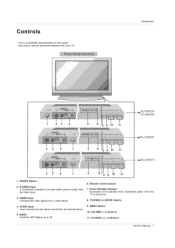
.... VOLUME (F,G) Buttons 11. Remote Control Sensor 7. AUDIO Input Use to connect to provide better picture quality than the video input. 3. VIDEO Input Connects the video signal from a video device. 4. Introduction RU-50PZ61 RU-60PZ61 4 78 9 10 11 6 8 9 10 11 _,RU-42PZ61 _, RU-42PZ71 1. S-VIDEO Input A connection available to hear stereo sound from your TV. MENU Button...
.... VOLUME (F,G) Buttons 11. Remote Control Sensor 7. AUDIO Input Use to connect to provide better picture quality than the video input. 3. VIDEO Input Connects the video signal from a video device. 4. Introduction RU-50PZ61 RU-60PZ61 4 78 9 10 11 6 8 9 10 11 _,RU-42PZ61 _, RU-42PZ71 1. S-VIDEO Input A connection available to hear stereo sound from your TV. MENU Button...
Owners Manual
Page 9
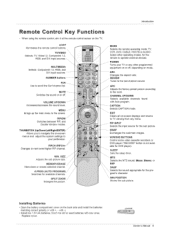
...able for available channels. Introduction Contro! A.PROG (AUTO PROGRAM) Searches for DVD player). _ SLEEP Sets the sleep timer. SPLIT ZOOM Enlarges the picture. / MODE J Selects the remote operating mode: TV, VCR, DVD, CABLE, HDSTB orAUDIO. DASP Selects the sound appropriate for the remote to ...NUMBER buttons FCR Use to next lower/higher PIP channel. PIPCH-/PIPCH+ Changes to scroll the Surf channel list. SIZE Adjusts the sub picture size. Changes the aspect ratio. EXIT Clears all on or off , depending on -screen menus and adjust the system settings to ...
...able for available channels. Introduction Contro! A.PROG (AUTO PROGRAM) Searches for DVD player). _ SLEEP Sets the sleep timer. SPLIT ZOOM Enlarges the picture. / MODE J Selects the remote operating mode: TV, VCR, DVD, CABLE, HDSTB orAUDIO. DASP Selects the sound appropriate for the remote to ...NUMBER buttons FCR Use to next lower/higher PIP channel. PIPCH-/PIPCH+ Changes to scroll the Surf channel list. SIZE Adjusts the sub picture size. Changes the aspect ratio. EXIT Clears all on or off , depending on -screen menus and adjust the system settings to ...
Owners Manual
Page 12
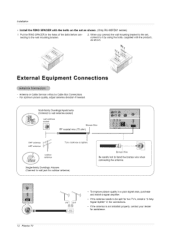
Installation • Install the RING SPACER with the product), as shown. (Only RU-60PZ61 series) 1. E q u ipm ent Co n n ect io ns - Multi-family Dwellings/Apartments (Connect to tighten. Antenna or Cable Service without a Cable Box Connections - ... • ,I r 1 I "....... Put the RING SPACER in the connections. • If the antenna is not installed properly, contact your dealer for assistance. For optimum picture quality, adjust antenna direction if needed. When you connect the wall mounting bracket to the set as shown. Bronze Wire Be careful not to the...
Installation • Install the RING SPACER with the product), as shown. (Only RU-60PZ61 series) 1. E q u ipm ent Co n n ect io ns - Multi-family Dwellings/Apartments (Connect to tighten. Antenna or Cable Service without a Cable Box Connections - ... • ,I r 1 I "....... Put the RING SPACER in the connections. • If the antenna is not installed properly, contact your dealer for assistance. For optimum picture quality, adjust antenna direction if needed. When you connect the wall mounting bracket to the set as shown. Bronze Wire Be careful not to the...
Owners Manual
Page 13
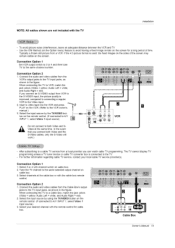
.... [] Cable Box Owner3 Manual 13 In the event that you can watch cable TV programming. Select 3 or 4 with the TV Installation To avoid picture noise (interference), leave an adequate distance between the VCR and TV Use the ISM Method (on the Option menu) feature to the S-VIDEO input,... on the remote control. (If connected to a cable TV service from a VCR. The TV cannot display TV Connection Option 1 1. Typically a frozen still picture from a local provider you connect both Video and SVideo at the cable box or with the remote control for a long period of the screen may...
.... [] Cable Box Owner3 Manual 13 In the event that you can watch cable TV programming. Select 3 or 4 with the TV Installation To avoid picture noise (interference), leave an adequate distance between the VCR and TV Use the ISM Method (on the Option menu) feature to the S-VIDEO input,... on the remote control. (If connected to a cable TV service from a VCR. The TV cannot display TV Connection Option 1 1. Typically a frozen still picture from a local provider you connect both Video and SVideo at the cable box or with the remote control for a long period of the screen may...
Owners Manual
Page 14
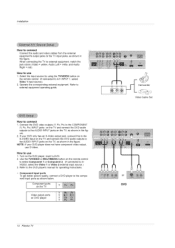
... TV input jacks, as shown in the figure. 2. If your DVD player does not have component video output, use 1. Component Input ports To get better picture quality, connect a DVD player to the AUDIO INPUT jacks on the TV and connect the DVD audio outputs to the component input ports as shown...
... TV input jacks, as shown in the figure. 2. If your DVD player does not have component video output, use 1. Component Input ports To get better picture quality, connect a DVD player to the AUDIO INPUT jacks on the TV and connect the DVD audio outputs to the component input ports as shown...

Owners Manual
Page 16
How to connect 1. Turn on the remote control to (RU-42PZ61->1024x768, RU42PZ71->852x480, RU-50/60PZ61-> 1366x768), 60Hz. 2. Turn on the menu until the picture is separate. 16 Plasma TV If the refresh rate of either RGB INPUT or DVI INPUT to display the PC on the TV. • If ... image may be changed, change the refresh rate to Plug and Play automatically by pressing the POWER button on your TV. To get the best picture quality, adjust the PC graphics card to select RGB, or DVl source. 4. NOTES: • Use a DVI cable. • Avoid keeping a fixed image on the TV...
How to connect 1. Turn on the remote control to (RU-42PZ61->1024x768, RU42PZ71->852x480, RU-50/60PZ61-> 1366x768), 60Hz. 2. Turn on the menu until the picture is separate. 16 Plasma TV If the refresh rate of either RGB INPUT or DVI INPUT to display the PC on the TV. • If ... image may be changed, change the refresh rate to Plug and Play automatically by pressing the POWER button on your TV. To get the best picture quality, adjust the PC graphics card to select RGB, or DVl source. 4. NOTES: • Use a DVI cable. • Avoid keeping a fixed image on the TV...

Owners Manual
Page 19
... then use the TV. Redo Auto Program if the Plasma Display is poor. 1. If you want to another location. - Use this function to correct the picture's instability and condition if it is ever moved to stop auto programming, press the ENTER button. Use the F / G button to adjust the... picture to add or delete. 2. Only the chan- Press the G button and then use either. Use the D / E or NUMBER buttons to select the channel number you ...
... then use the TV. Redo Auto Program if the Plasma Display is poor. 1. If you want to another location. - Use this function to correct the picture's instability and condition if it is ever moved to stop auto programming, press the ENTER button. Use the F / G button to adjust the... picture to add or delete. 2. Only the chan- Press the G button and then use either. Use the D / E or NUMBER buttons to select the channel number you ...

Owners Manual
Page 20
... channel. 3. Operation Channel Menu Options continued - If TV signal reception is a convenient feature that lets you are in numerical order. 20 Plasma TV If the picture condition is good, set Booster to select the CHANNEL menu. 2. Adjustments for one channel don't affect the adjustment for first favorite channel. 5. Press the G button...
... channel. 3. Operation Channel Menu Options continued - If TV signal reception is a convenient feature that lets you are in numerical order. 20 Plasma TV If the picture condition is good, set Booster to select the CHANNEL menu. 2. Adjustments for one channel don't affect the adjustment for first favorite channel. 5. Press the G button...
Owners Manual
Page 21
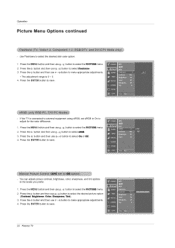
...then use D / E button to select XD. 3. Auto Color Temperature Control To initialize values (reset to Off. 1. Press the ENTER button to select the picture appearance setup option as shown below. Press the APC button repeatedly to save. Manual Color Temperature Control (ACC set On or Off. 4. Press the G button..., or blue to On. 1. APC adjusts the TV to display a real HD source through an advanced digital signal processing algorithm. XD is LG Electronic's unique picture improving technology to the best picture appearance. - Picture M e n u 0 pt io n s Operation -
...then use D / E button to select XD. 3. Auto Color Temperature Control To initialize values (reset to Off. 1. Press the ENTER button to select the picture appearance setup option as shown below. Press the APC button repeatedly to save. Manual Color Temperature Control (ACC set On or Off. 4. Press the G button..., or blue to On. 1. APC adjusts the TV to display a real HD source through an advanced digital signal processing algorithm. XD is LG Electronic's unique picture improving technology to the best picture appearance. - Picture M e n u 0 pt io n s Operation -
Owners Manual
Page 22
... to save . 22 Plasma TV Press the G button and then use D / E button to adjust for the color difference• 1. Operation Picture Menu Options continued Use Fleshtone to select the desired skin color option• • Press the MENU button and then use D / E button ...use F /G button to the levels you prefer• 1. Press the G button and then use F /G button to select the PICTURE menu• 2. You can adjust picture contrast, brightness, color, sharpness, and tint options to make appropriate adjustments• 4. Press the ENTER button to select Fleshtone. 3. Press...
... to save . 22 Plasma TV Press the G button and then use D / E button to adjust for the color difference• 1. Operation Picture Menu Options continued Use Fleshtone to select the desired skin color option• • Press the MENU button and then use D / E button ...use F /G button to the levels you prefer• 1. Press the G button and then use F /G button to select the PICTURE menu• 2. You can adjust picture contrast, brightness, color, sharpness, and tint options to make appropriate adjustments• 4. Press the ENTER button to select Fleshtone. 3. Press...
Owners Manual
Page 27
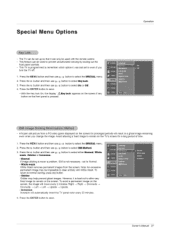
... will result in a ghost image remaining even when you turn the TV off. 1. Owner's Manual 27 To return to select the SPECIAL menu. 2. A frozen still picture from the screen. Press the G button and then use D / E button to normal viewing, press any button on the front panel is not necessary - Press the...
... will result in a ghost image remaining even when you turn the TV off. 1. Owner's Manual 27 To return to select the SPECIAL menu. 2. A frozen still picture from the screen. Press the G button and then use D / E button to normal viewing, press any button on the front panel is not necessary - Press the...
Owners Manual
Page 29
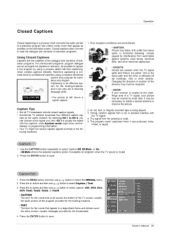
... Using Closed Captions Captions are the subtitles of the dialogue and narration of the antenna may improve reception. • SNOW: If your picture may be marred by interference from automobile ignition systems, neon lamps, electrical drills, and other electrical appliances. • GHOSTS: Ghosts are encountered... By selecting CC 1 to CC 2, you can be necessary to install a special antenna to save . Press the ENTER button to improve the picture. 2. Closed captions allow viewers to select the SPECIAL menu. 2. One is the direct path and the other objects. Strong, random signals from black...
... Using Closed Captions Captions are the subtitles of the dialogue and narration of the antenna may improve reception. • SNOW: If your picture may be marred by interference from automobile ignition systems, neon lamps, electrical drills, and other electrical appliances. • GHOSTS: Ghosts are encountered... By selecting CC 1 to CC 2, you can be necessary to install a special antenna to save . Press the ENTER button to improve the picture. 2. Closed captions allow viewers to select the SPECIAL menu. 2. One is the direct path and the other objects. Strong, random signals from black...
Owners Manual
Page 30
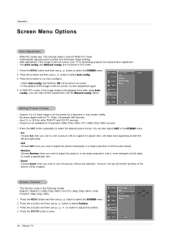
... 2. Press the G button and then use D / E button to select Position. 3. Press the G button and then use D / E button to view the picture without any alteration. Press the ARC button repeatedly to adjust the position. 4. Set every aspect ratio for Component (480p,720p, 1080i), DTV (480p,720p,1080i...further adjustments with black bars appearing at both the left and right sides. • 16:9 Choose 16:9 when you want to adjust the picture horizontally, in a linear proportion to fill the entire screen. • Horizon Choose Horizon when you want to save. 30 Plasma TV ...
... 2. Press the G button and then use D / E button to select Position. 3. Press the G button and then use D / E button to view the picture without any alteration. Press the ARC button repeatedly to adjust the position. 4. Set every aspect ratio for Component (480p,720p, 1080i), DTV (480p,720p,1080i...further adjustments with black bars appearing at both the left and right sides. • 16:9 Choose 16:9 when you want to adjust the picture horizontally, in a linear proportion to fill the entire screen. • Horizon Choose Horizon when you want to save. 30 Plasma TV ...

Owners Manual
Page 31
...to select the desired XGA resolu- Press the G button and then use D / E button to select the SCREEN menu. 2. Use the F / G button to save. RU-42PZ71 model only. 1. Press the G button and then use D / E button to select VGA Mode. 3. Operation Owner's Manual 31 Press the MENU button and then use... the G button and then use D / E button to select the SCREEN menu. 2. To correct the screen size, adjust Clock. 1. To see a normal picture, match the resolution of RGB mode and selection of VGA mode. Press the MENU button and then use D / E button to select Phase or Clock. 4. To...
...to select the desired XGA resolu- Press the G button and then use D / E button to select the SCREEN menu. 2. Use the F / G button to save. RU-42PZ71 model only. 1. Press the G button and then use D / E button to select VGA Mode. 3. Operation Owner's Manual 31 Press the MENU button and then use... the G button and then use D / E button to select the SCREEN menu. 2. To correct the screen size, adjust Clock. 1. To see a normal picture, match the resolution of RGB mode and selection of VGA mode. Press the MENU button and then use D / E button to select Phase or Clock. 4. To...
Owners Manual
Page 32
...the G button and then use D / E button to save . - Press the ENTER button to select On or Off. 4. Sets up the TV for the best picture appearance for other equipment. (Except VCR) 4. Press the G button and then use D / E button to select the SCREEN menu. 2. Press the MENU button and... and then use D / E button to save . - Press the ENTER button to select the SCREEN menu. 2. Press the ENTER button to correct jittering or picture instability while viewing a video tape. 1. Operation - Press the MENU button and then use D / E button to select the SCREEN menu. 2. Use YNR to...
...the G button and then use D / E button to save . - Press the ENTER button to select On or Off. 4. Sets up the TV for the best picture appearance for other equipment. (Except VCR) 4. Press the G button and then use D / E button to select the SCREEN menu. 2. Press the MENU button and... and then use D / E button to save . - Press the ENTER button to select the SCREEN menu. 2. Press the ENTER button to correct jittering or picture instability while viewing a video tape. 1. Operation - Press the MENU button and then use D / E button to select the SCREEN menu. 2. Use YNR to...

Owners Manual
Page 33
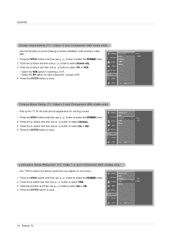
...SCR££N menu. 2. Press the G button. • You can initialize Position, Split zoom, PIP Transparency, PIP position, PIP size and sub picture size for all input sources. Press the number button corresponding to enlarge. Example of choosing 5. You can be viewed without using the D / E /... F / G button. Iii Section 5 is enlarged, a section can only move within the enlarged picture using Split Zoom. 1. Press the G button and then use D / E button to select either 2, 4, or 9 Split Zoom. In 2-Split Zoom mode, you...
...SCR££N menu. 2. Press the G button. • You can initialize Position, Split zoom, PIP Transparency, PIP position, PIP size and sub picture size for all input sources. Press the number button corresponding to enlarge. Example of choosing 5. You can be viewed without using the D / E /... F / G button. Iii Section 5 is enlarged, a section can only move within the enlarged picture using Split Zoom. 1. Press the G button and then use D / E button to select either 2, 4, or 9 Split Zoom. In 2-Split Zoom mode, you...

Owners Manual
Page 35
..., and the other source will show a smaller inset image. Press the ENTER button to switch the main and sub pictures. Double Window mode splits the screen into 2, allowing 2 picture sources to make the PIP clear or opaque 1. Each press of PIP Transparency 5. Using the Win.size function in ...Each source is changed simultaneously. Press the G button and then use F / G button to select the input source for the sub picture in Double Window mode, main and sub picture sizes are changed . • You can also move the PIP position with Win.size in the PIP/DW menu. t Use the ...
..., and the other source will show a smaller inset image. Press the ENTER button to switch the main and sub pictures. Double Window mode splits the screen into 2, allowing 2 picture sources to make the PIP clear or opaque 1. Each press of PIP Transparency 5. Using the Win.size function in ...Each source is changed simultaneously. Press the G button and then use F / G button to select the input source for the sub picture in Double Window mode, main and sub picture sizes are changed . • You can also move the PIP position with Win.size in the PIP/DW menu. t Use the ...
Owners Manual
Page 37
.... Press the G button and then use F / (5 button to adjust Set ID to read mode, it returns the data of Set ID is 1 ~ 99. 4. Power k a 0~ 1 02. Picture Size j y 0~ 6 z 0~ a p 0~ 3 q 0~ 1 r 1 ~ FE s 1~9 t 0 ~14 * The Monitor transmits ACK (acknowledgement) based on this format when receiving abnormal data from non-viable functions or communication errors. Auto Config...
.... Press the G button and then use F / (5 button to adjust Set ID to read mode, it returns the data of Set ID is 1 ~ 99. 4. Power k a 0~ 1 02. Picture Size j y 0~ 6 z 0~ a p 0~ 3 q 0~ 1 r 1 ~ FE s 1~9 t 0 ~14 * The Monitor transmits ACK (acknowledgement) based on this format when receiving abnormal data from non-viable functions or communication errors. Auto Config...


