Owners Manual
Page 1
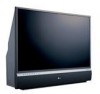
See the label attached on the back cover and quote this manual carefully before operating your dealer when you require service. Retain it for future reference. Record model number and serial number of the set . LCD Projection TV OWNER'S MANUAL MODEL: RU-44SZ80L Please read this information to your set . LG Electronics U.S.A., Inc.
See the label attached on the back cover and quote this manual carefully before operating your dealer when you require service. Retain it for future reference. Record model number and serial number of the set . LCD Projection TV OWNER'S MANUAL MODEL: RU-44SZ80L Please read this information to your set . LG Electronics U.S.A., Inc.

Owners Manual
Page 2
...equipment and receiver. • Connect the equipment into an outlet on a circuit different from LG Electronics Corporation. COMPLIANCE: The responsible party for compliance could void the user's authority to ...found to Article 820-40 of the FCC Rules. The lightning flash with the instruction manual, may be connected to the grounding system of the building, as close to the... risk of the cable entry as practical. NOTE TO CABLE/TV INSTALLER: This reminder is connected. • Consult the dealer or an experienced radio/TV technician for help. WARNING RISK OF ELECTRIC SHOCK DO NOT...
...equipment and receiver. • Connect the equipment into an outlet on a circuit different from LG Electronics Corporation. COMPLIANCE: The responsible party for compliance could void the user's authority to ...found to Article 820-40 of the FCC Rules. The lightning flash with the instruction manual, may be connected to the grounding system of the building, as close to the... risk of the cable entry as practical. NOTE TO CABLE/TV INSTALLER: This reminder is connected. • Consult the dealer or an experienced radio/TV technician for help. WARNING RISK OF ELECTRIC SHOCK DO NOT...

Owners Manual
Page 3
... tub, in electrical shock or fire hazards. Read Instructions All the safety and operating instructions should be blocked by the manufacturer. 8. Do not use this manual can result in a wet basement, or near a swimming pool. 7. Attachments Do not use attachments not recommended by the product manufacturer as a bookcase or rack unless...
... tub, in electrical shock or fire hazards. Read Instructions All the safety and operating instructions should be blocked by the manufacturer. 8. Do not use this manual can result in a wet basement, or near a swimming pool. 7. Attachments Do not use attachments not recommended by the product manufacturer as a bookcase or rack unless...
Owners Manual
Page 5
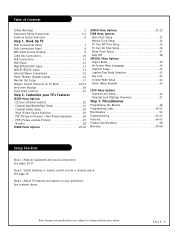
...Safety Instructions 3-4 Function Status Indicators 6 Step 1. See pages 10-17. Step 3. Hook Up TV Rear Connections Panel 7 Side Connections Panel 8 ANT/Cable Service Hookup 9 Cable Box Connections 10 VCR...AUDIO Menu Options 31-32 TIME Menu Options Auto Clock Setup 33 Manual Clock Setup 34 TV Turn Off Time Setup 35 TV Turn On Time Setup 36 Sleep Timer Setup 37 Auto Off 38...43 Cinema Mode Setup 44 Demo (Menu Review 45 LOCK Menu Options Parental Lock Setup 46 Parental Lock (Ratings Overview 47 Step 3. Note: Design and specifications are subject to your TV's Features SETUP Menu...
...Safety Instructions 3-4 Function Status Indicators 6 Step 1. See pages 10-17. Step 3. Hook Up TV Rear Connections Panel 7 Side Connections Panel 8 ANT/Cable Service Hookup 9 Cable Box Connections 10 VCR...AUDIO Menu Options 31-32 TIME Menu Options Auto Clock Setup 33 Manual Clock Setup 34 TV Turn Off Time Setup 35 TV Turn On Time Setup 36 Sleep Timer Setup 37 Auto Off 38...43 Cinema Mode Setup 44 Demo (Menu Review 45 LOCK Menu Options Parental Lock Setup 46 Parental Lock (Ratings Overview 47 Step 3. Note: Design and specifications are subject to your TV's Features SETUP Menu...

Owners Manual
Page 7
Rear Connections Panel Connecting cables and external equipment to your surround sound ...the appropriate input port. Monitor Out Connects to external Dolby Digital Center "preamp output." Refer to your TV. This includes the RF jack and the Audio/Video jacks that provides even better picture quality for further ..., either an external amplifier, or add a sub-woofer to your cable box. Picture and sound traveling through your DVD manual for Video 2. S-VIDEO In A connection available with netural detergent. Component Input 1-2 Connect a component video/audio device to...
Rear Connections Panel Connecting cables and external equipment to your surround sound ...the appropriate input port. Monitor Out Connects to external Dolby Digital Center "preamp output." Refer to your TV. This includes the RF jack and the Audio/Video jacks that provides even better picture quality for further ..., either an external amplifier, or add a sub-woofer to your cable box. Picture and sound traveling through your DVD manual for Video 2. S-VIDEO In A connection available with netural detergent. Component Input 1-2 Connect a component video/audio device to...

Owners Manual
Page 12
... not connect both the composite and the S-Video. If your DVD Player and connect them fol- Your video equipment manual will explain how this relates to your TV. DVD Player 1 Find the audio and component or S-Video jacks on the jack panel. Component input jacks on ...indicated below. Back AV Panel Audio L R Dolby Out Digital Component Video S-Video A/V Cables Not included with your equipment. lowing the instructions provided with TV RGB INPUT UPGRADE PORT COMPONENT INPUT2 INPUT1 Y PB PC/DTV (XGA/ 480p/ 720p/ 1080i) DVI INPUT PR (L) AUDIO (R) DTV/DVD (480i...
... not connect both the composite and the S-Video. If your DVD Player and connect them fol- Your video equipment manual will explain how this relates to your TV. DVD Player 1 Find the audio and component or S-Video jacks on the jack panel. Component input jacks on ...indicated below. Back AV Panel Audio L R Dolby Out Digital Component Video S-Video A/V Cables Not included with your equipment. lowing the instructions provided with TV RGB INPUT UPGRADE PORT COMPONENT INPUT2 INPUT1 Y PB PC/DTV (XGA/ 480p/ 720p/ 1080i) DVI INPUT PR (L) AUDIO (R) DTV/DVD (480i...

Owners Manual
Page 17
... 17 ed on the back of the second TV or monitor for Monitor Out. See the Operating Manual of your TV. ANT IN +75 Ω RGB INPUT UPGRADE PORT COMPONENT INPUT2 INPUT1 Y PB PC/DTV (XGA/ 480p/ 720p/ 1080i) DVI INPUT PR (L) AUDIO (R) DTV/DVD (480i/.../PC input sources for main picture cannot be used for further details regarding that device's input settings. ond TV or monitor. 2 Just connect the second TV or monitor to hook up a sec- Monitor Out Setup 1 Your TV has a special signal output capability which allows you to the MONITOR OUT Audio/Video jacks locat-
... 17 ed on the back of the second TV or monitor for Monitor Out. See the Operating Manual of your TV. ANT IN +75 Ω RGB INPUT UPGRADE PORT COMPONENT INPUT2 INPUT1 Y PB PC/DTV (XGA/ 480p/ 720p/ 1080i) DVI INPUT PR (L) AUDIO (R) DTV/DVD (480i/.../PC input sources for main picture cannot be used for further details regarding that device's input settings. ond TV or monitor. 2 Just connect the second TV or monitor to hook up a sec- Monitor Out Setup 1 Your TV has a special signal output capability which allows you to the MONITOR OUT Audio/Video jacks locat-
Owners Manual
Page 29
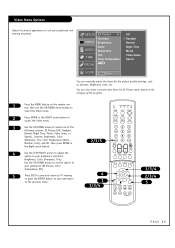
...arrow button to access the Video menu. 3 Use the UP/DOWN arrows to your preference (Contrast, Brightness, Color, Sharpness, Tint). You can manually adjust the levels for the picture quality settings, such as Contrast, Brightness, Color, etc. PIPCH+ SWAP RATIO CC FREEZE PIP INPUT MENU EXIT PLAY... LEFT/RIGHT arrows to adjust the option to your preference (EZ Picture, Color Temperature, XD). 5 Press EXIT to save and return to TV viewing or press the ENTER button to save and return to suit your preference and viewing situations. Video Menu Options Adjust the picture appearance to...
...arrow button to access the Video menu. 3 Use the UP/DOWN arrows to your preference (Contrast, Brightness, Color, Sharpness, Tint). You can manually adjust the levels for the picture quality settings, such as Contrast, Brightness, Color, etc. PIPCH+ SWAP RATIO CC FREEZE PIP INPUT MENU EXIT PLAY... LEFT/RIGHT arrows to adjust the option to your preference (EZ Picture, Color Temperature, XD). 5 Press EXIT to save and return to TV viewing or press the ENTER button to save and return to suit your preference and viewing situations. Video Menu Options Adjust the picture appearance to...

Owners Manual
Page 30
... picture. Video Menu Options SETUP Contrast 90 F G VIDEO E AUDIO TIME SPECIAL LOCK • EZ Picture Lets you adjust the picture manually to your preferences. Off Lets you choose a preset value for the picture settings. Movie Adjusts Video settings to their original settings. Sports.... • Color Temperature Adjusts levels of all colors. • Sharpness Adjusts the level of crispness in the TV picture: Warm, Medium, or Cool. • LG electronic's unique picture improving technology to display a real HD source through an advanced digital signal processing algorithm.
... picture. Video Menu Options SETUP Contrast 90 F G VIDEO E AUDIO TIME SPECIAL LOCK • EZ Picture Lets you adjust the picture manually to your preferences. Off Lets you choose a preset value for the picture settings. Movie Adjusts Video settings to their original settings. Sports.... • Color Temperature Adjusts levels of all colors. • Sharpness Adjusts the level of crispness in the TV picture: Warm, Medium, or Cool. • LG electronic's unique picture improving technology to display a real HD source through an advanced digital signal processing algorithm.

Owners Manual
Page 32
... sound to create more open and expanded sound. • TV Speaker Allows you to use the internal TV speakers as a center speaker to emphasize the human voice. If you are watching. • EZ Sound Chooses the sound options manually. Music Increases both high and low frequency sounds, in addition... to the front surround sound, to create the sensation you would experience in a stadium. PAGE 32 Off Lets you may use your external hi-fi stereo system, turn off the internal TV speakers. Stadium...
... sound to create more open and expanded sound. • TV Speaker Allows you to use the internal TV speakers as a center speaker to emphasize the human voice. If you are watching. • EZ Sound Chooses the sound options manually. Music Increases both high and low frequency sounds, in addition... to the front surround sound, to create the sensation you would experience in a stadium. PAGE 32 Off Lets you may use your external hi-fi stereo system, turn off the internal TV speakers. Stadium...
Owners Manual
Page 33
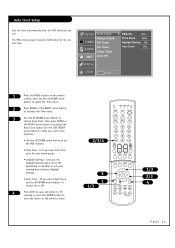
... Off, depending on the remote control, then use the UP/DOWN arrow button to choose On or Off. 4 Press EXIT to save and return to TV viewing or press the ENTER button to save and return to set the PBS channel. • Time Zone - If you select Auto Clock, use the... activate the Auto Clock option.Use the LEFT/RIGHT arrow button to make your viewing area. • Daylight Savings - SETUP VIDEO AUDIO TIME Auto Clock Manual Clock Off Timer On Timer Sleep Timer Auto Off G PBS Ch. The PBS channel signal includes information for your auto clock selection. • Use the...
... Off, depending on the remote control, then use the UP/DOWN arrow button to choose On or Off. 4 Press EXIT to save and return to TV viewing or press the ENTER button to save and return to set the PBS channel. • Time Zone - If you select Auto Clock, use the... activate the Auto Clock option.Use the LEFT/RIGHT arrow button to make your viewing area. • Daylight Savings - SETUP VIDEO AUDIO TIME Auto Clock Manual Clock Off Timer On Timer Sleep Timer Auto Off G PBS Ch. The PBS channel signal includes information for your auto clock selection. • Use the...

Owners Manual
Page 34
...the UP/DOWN arrow to set the Year, Date, and Time. 6 Press EXIT to save and return to TV viewing or press the ENTER button to save and return to make your Manual Clock selection. PIPCH+ SWAP RATIO CC FREEZE PIP INPUT MENU EXIT PLAY PAUSE STOP RECORD REW FF SKIP 1/3/5 ...2/3/4 6 PAGE 34 Manual Clock Setup SETUP Auto Clock Manual Clock G Year 2 0 0 4 VIDEO Off Timer Date 0 1 / 1 0 On Timer AUDIO Sleep Timer Time AM 10 : 44 TIME Auto Off SPECIAL LOCK MENU Prev. 1 Press the MENU button on the remote control...
...the UP/DOWN arrow to set the Year, Date, and Time. 6 Press EXIT to save and return to TV viewing or press the ENTER button to save and return to make your Manual Clock selection. PIPCH+ SWAP RATIO CC FREEZE PIP INPUT MENU EXIT PLAY PAUSE STOP RECORD REW FF SKIP 1/3/5 ...2/3/4 6 PAGE 34 Manual Clock Setup SETUP Auto Clock Manual Clock G Year 2 0 0 4 VIDEO Off Timer Date 0 1 / 1 0 On Timer AUDIO Sleep Timer Time AM 10 : 44 TIME Auto Off SPECIAL LOCK MENU Prev. 1 Press the MENU button on the remote control...
Owners Manual
Page 35
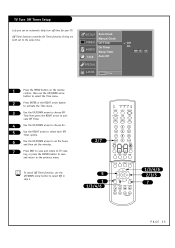
... and return to select Off in step 4. 2/7 5 1 1/3/4/6 TV VCR CABLE DVD SAT MODE LIGHT POWER TV/VIDEO SIDE DVI COMP1 COMP2 RGB 123 456 789 ENTER 0 MUTE FLASHBK SURF SAP VOL VIDEO CH PIP PIPCH- SETUP VIDEO AUDIO TIME Auto Clock Manual Clock Off Timer On Timer Sleep Timer Auto Off... 3 Use the UP/DOWN arrow to choose Off Time then press the RIGHT arrow to the previous menu. TV Turn Off Timer Setup Lets you set an automatic daily turn off time for your TV. PIPCH+ SWAP RATIO CC FREEZE PIP INPUT MENU EXIT PLAY PAUSE STOP RECORD REW FF SKIP 1/3/4/6 2/3/5 ...
... and return to select Off in step 4. 2/7 5 1 1/3/4/6 TV VCR CABLE DVD SAT MODE LIGHT POWER TV/VIDEO SIDE DVI COMP1 COMP2 RGB 123 456 789 ENTER 0 MUTE FLASHBK SURF SAP VOL VIDEO CH PIP PIPCH- SETUP VIDEO AUDIO TIME Auto Clock Manual Clock Off Timer On Timer Sleep Timer Auto Off... 3 Use the UP/DOWN arrow to choose Off Time then press the RIGHT arrow to the previous menu. TV Turn Off Timer Setup Lets you set an automatic daily turn off time for your TV. PIPCH+ SWAP RATIO CC FREEZE PIP INPUT MENU EXIT PLAY PAUSE STOP RECORD REW FF SKIP 1/3/4/6 2/3/5 ...

Owners Manual
Page 36
.... 2 0 1 Press the MENU button on . 7 Press EXIT to save and return to TV viewing, or press the ENTER button to save and return to acti- SETUP VIDEO AUDIO TIME Auto Clock Manual Clock Off Time On Time G Sleep Timer Auto Off SPECIAL LOCK MENU Prev. Unless a button is pressed within ...two hours after the TV is set Time, Channel, and Volume at turn on the remote control, then...
.... 2 0 1 Press the MENU button on . 7 Press EXIT to save and return to TV viewing, or press the ENTER button to save and return to acti- SETUP VIDEO AUDIO TIME Auto Clock Manual Clock Off Time On Time G Sleep Timer Auto Off SPECIAL LOCK MENU Prev. Unless a button is pressed within ...two hours after the TV is set Time, Channel, and Volume at turn on the remote control, then...

Owners Manual
Page 37
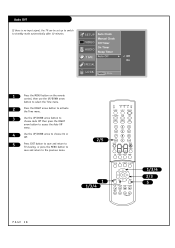
...return to the previous menu. Set it again if necessary. 2/5 TV VCR CABLE DVD SAT MODE LIGHT POWER TV/VIDEO SIDE DVI COMP1 COMP2 RGB 123 456 789 ENTER 0 MUTE FLASHBK SURF SAP VOL VIDEO CH PIP PIPCH- SETUP VIDEO Auto Clock Manual Clock Off Time On Time AUDIO Sleep Timer G TIME Auto...to choose Sleep Timer then press the RIGHT arrow to access the Sleep Timer menu. 4 Use the UP/DOWN arrow to choose a preset turn your TV off automatically. Sleep Timer Setup Select a preset time to turn off after setting sleep timer, the setting will be erased. PIPCH+ SWAP RATIO CC ...
...return to the previous menu. Set it again if necessary. 2/5 TV VCR CABLE DVD SAT MODE LIGHT POWER TV/VIDEO SIDE DVI COMP1 COMP2 RGB 123 456 789 ENTER 0 MUTE FLASHBK SURF SAP VOL VIDEO CH PIP PIPCH- SETUP VIDEO Auto Clock Manual Clock Off Time On Time AUDIO Sleep Timer G TIME Auto...to choose Sleep Timer then press the RIGHT arrow to access the Sleep Timer menu. 4 Use the UP/DOWN arrow to choose a preset turn your TV off automatically. Sleep Timer Setup Select a preset time to turn off after setting sleep timer, the setting will be erased. PIPCH+ SWAP RATIO CC ...
Owners Manual
Page 38
... STOP RECORD REW FF SKIP 1/3/4 2/3 5 PAGE 38 Auto Off If there is no input signal, the TV can be set up to switch to the previous menu. 2/5 TV VCR CABLE DVD SAT MODE LIGHT POWER TV/VIDEO SIDE DVI COMP1 COMP2 RGB 123 456 789 ENTER 0 MUTE FLASHBK SURF SAP VOL VIDEO CH... PIP PIPCH- SETUP VIDEO Auto Clock Manual Clock Off Timer On Timer AUDIO Sleep Timer TIME Auto Off...
... STOP RECORD REW FF SKIP 1/3/4 2/3 5 PAGE 38 Auto Off If there is no input signal, the TV can be set up to switch to the previous menu. 2/5 TV VCR CABLE DVD SAT MODE LIGHT POWER TV/VIDEO SIDE DVI COMP1 COMP2 RGB 123 456 789 ENTER 0 MUTE FLASHBK SURF SAP VOL VIDEO CH... PIP PIPCH- SETUP VIDEO Auto Clock Manual Clock Off Timer On Timer AUDIO Sleep Timer TIME Auto Off...
Owners Manual
Page 53
... the power cord to wipe the cabinet. 2. Maintenance Early malfunctions can leave a permanent impression on . Please read pages 2-3-4 in a mixture of the manual and follow the recommendations provided. EXTENDED ABSENCE If you intend to turn on the following pages. Be sure to leave your viewing pleasure. SCREEN CLEANING... wipe the screen. 2. Wring the cloth until it's almost dry, and then use an off and pull out the plug before turning the TV on the TV screen. CABINET CLEANING 1. Let the cabinet air-dry before you use it from dirt and dust, as well as a photo-CD player,...
... the power cord to wipe the cabinet. 2. Maintenance Early malfunctions can leave a permanent impression on . Please read pages 2-3-4 in a mixture of the manual and follow the recommendations provided. EXTENDED ABSENCE If you intend to turn on the following pages. Be sure to leave your viewing pleasure. SCREEN CLEANING... wipe the screen. 2. Wring the cloth until it's almost dry, and then use an off and pull out the plug before turning the TV on the TV screen. CABINET CLEANING 1. Let the cabinet air-dry before you use it from dirt and dust, as well as a photo-CD player,...

Owners Manual
Page 55
...Time is incorrect. • Make sure the batteries are fresh and installed properly. • Try unplugging your TV for a few minutes, then plug it back in. • Check to see if the source equipment has... been turned on. • Make sure that the connections are secure on the back of your TV and on the source equipment. • Check to see if all the connections are secure. •...for PIP is set correctly. • Look to see if the TV/VCR button on . • You might want to another source. • Reset clock manually. No stereo sound is present under the PIP menu. • Check...
...Time is incorrect. • Make sure the batteries are fresh and installed properly. • Try unplugging your TV for a few minutes, then plug it back in. • Check to see if the source equipment has... been turned on. • Make sure that the connections are secure on the back of your TV and on the source equipment. • Check to see if all the connections are secure. •...for PIP is set correctly. • Look to see if the TV/VCR button on . • You might want to another source. • Reset clock manually. No stereo sound is present under the PIP menu. • Check...
Owners Manual
Page 60
...OTHERWISE. Some states do not allow the exclusion or limitation of improper installation, including incorrect or insufficient AC supply (please consult the owner's manual for proof of warranty, and submit a copy of the bill of sale to the original purchaser of warranted parts by other product G ...or incorporated into any way. G product where the original factory serial numbers have other components in any other than an LG® Brand authorized service centers. Limited Warranty Your LG® brand LCD Rear Projection Television will be new or remanufactured.
...OTHERWISE. Some states do not allow the exclusion or limitation of improper installation, including incorrect or insufficient AC supply (please consult the owner's manual for proof of warranty, and submit a copy of the bill of sale to the original purchaser of warranted parts by other product G ...or incorporated into any way. G product where the original factory serial numbers have other components in any other than an LG® Brand authorized service centers. Limited Warranty Your LG® brand LCD Rear Projection Television will be new or remanufactured.

