
Owners Manual
Page 5
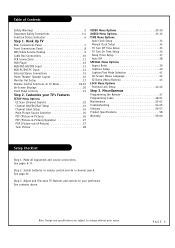
... fine-tune TV features and options to change without prior notice. Hook Up TV Rear Connections Panel ...7 Front Connections Panel 8 ANT/Cable Service Hookup 9 Cable Box Connections 10 VCR Connections 11 DVD Player 12 RGB/DVI-HD/STB Input 13 RGB-PC/DVI-PC Input 14 External Stereo Connections 15 Home Theater: Speaker Layout 16 Monitor Out Setup 17 Remote... Control Functions In TV Mode 18-19...to your TV's Features SETUP...remote control and do a channel search. Step 3. Step 2. Miscellaneous Programming the Remote... 34 TV Turn Off Time Setup 35 TV Turn...
... fine-tune TV features and options to change without prior notice. Hook Up TV Rear Connections Panel ...7 Front Connections Panel 8 ANT/Cable Service Hookup 9 Cable Box Connections 10 VCR Connections 11 DVD Player 12 RGB/DVI-HD/STB Input 13 RGB-PC/DVI-PC Input 14 External Stereo Connections 15 Home Theater: Speaker Layout 16 Monitor Out Setup 17 Remote... Control Functions In TV Mode 18-19...to your TV's Features SETUP...remote control and do a channel search. Step 3. Step 2. Miscellaneous Programming the Remote... 34 TV Turn Off Time Setup 35 TV Turn...
Owners Manual
Page 18
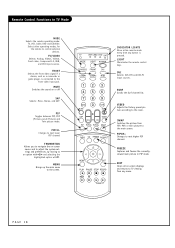
... and to an option withF D E G and selecting the highlighted option with . LIGHT Illuminates the remote control keys. FREEZE Captures and freezes the currentlyviewed main picture in TV Mode MODE Selects the remote operating mode: TV, VCR, Cable, DVD and Satellite. TV/VIDEO Selects: Analog, Video1, Video2, Front video, Component1-2, RGB, and DVI input sources. FRONT...
... and to an option withF D E G and selecting the highlighted option with . LIGHT Illuminates the remote control keys. FREEZE Captures and freezes the currentlyviewed main picture in TV Mode MODE Selects the remote operating mode: TV, VCR, Cable, DVD and Satellite. TV/VIDEO Selects: Analog, Video1, Video2, Front video, Component1-2, RGB, and DVI input sources. FRONT...

Owners Manual
Page 19
...the input source for displaying captioning information if available on program. NUMBER KEYPAD For direct channel selection and programming functions. ENTER When in TV Mode COMPONENT 1, 2 Selects component signal sources, such as DVD or HD receiver. FLASHBK Tunes to the last channel viewed. CC ...Selects a closed caption mode for the sub picture. Remote Control Functions in the menu system and other on-screen displays, selects highlighted options. CHANNEL UP/DOWN Scrolls through available channels in ...
...the input source for displaying captioning information if available on program. NUMBER KEYPAD For direct channel selection and programming functions. ENTER When in TV Mode COMPONENT 1, 2 Selects component signal sources, such as DVD or HD receiver. FLASHBK Tunes to the last channel viewed. CC ...Selects a closed caption mode for the sub picture. Remote Control Functions in the menu system and other on-screen displays, selects highlighted options. CHANNEL UP/DOWN Scrolls through available channels in ...

Owners Manual
Page 20
Main Channel Display Displays current channel number. TV 13 MONO ABC PIP Display This display appears when PIP is muted. Channel Label If a channel label has been set, then it will appear here. TV 6 AM 03:00 10 Timer 10 min : Mute Appears when sound is active. Time Appears when pressing the enter button on -screen display and information banner options. PAGE 20 Volume Volume level is displayed while adjusting the sound. On-Screen Displays This page describes your on remote control.
Main Channel Display Displays current channel number. TV 13 MONO ABC PIP Display This display appears when PIP is muted. Channel Label If a channel label has been set, then it will appear here. TV 6 AM 03:00 10 Timer 10 min : Mute Appears when sound is active. Time Appears when pressing the enter button on -screen display and information banner options. PAGE 20 Volume Volume level is displayed while adjusting the sound. On-Screen Displays This page describes your on remote control.
Owners Manual
Page 21
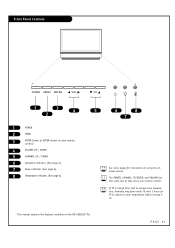
... page 6). 8 Temperature indicator. (See page 6). PAGE 21 Front Panel Controls POWER MENU ENTER VOL 1 3 4 2 1 POWER 2 MENU 3 ENTER (Same as they do on your remote control. If TV is moved from cold to room temperature before turning it on the RU-52SZ61D TVs. This manual explains the features available on . - CH 5 6 8 7 See menu pages for...
... page 6). 8 Temperature indicator. (See page 6). PAGE 21 Front Panel Controls POWER MENU ENTER VOL 1 3 4 2 1 POWER 2 MENU 3 ENTER (Same as they do on your remote control. If TV is moved from cold to room temperature before turning it on the RU-52SZ61D TVs. This manual explains the features available on . - CH 5 6 8 7 See menu pages for...
Owners Manual
Page 22
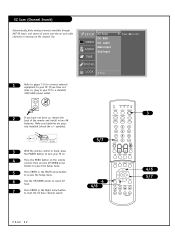
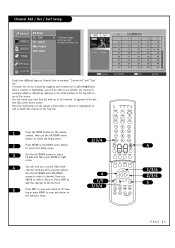
.... G Press ( ) to start 2 If you have not done so, remove the back of remote 3 With the remote control in hand, press the POWER button to turn your TV. If you have not done so, plug in your TV to your TV on. 4 Press the MENU button on the channel list. 1 Refer to pages 7-15 to... the remote control, then use the UP/DOWN arrow button to select the Setup menu. 5 Press ENTER or the RIGHT arrow button to access the Setup menu. 6 Use the UP/DOWN arrows to select EZ Scan. 7 Press ENTER or the Right arrow button to start the EZ Scan channel search. 5/7 TV VCR...
.... G Press ( ) to start 2 If you have not done so, remove the back of remote 3 With the remote control in hand, press the POWER button to turn your TV. If you have not done so, plug in your TV to your TV on. 4 Press the MENU button on the channel list. 1 Refer to pages 7-15 to... the remote control, then use the UP/DOWN arrow button to select the Setup menu. 5 Press ENTER or the RIGHT arrow button to access the Setup menu. 6 Use the UP/DOWN arrows to select EZ Scan. 7 Press ENTER or the Right arrow button to start the EZ Scan channel search. 5/7 TV VCR...
Owners Manual
Page 23
... 20 24 25 29 30 34 35 39 40 44 45 ( ( ( Move ) 1 Press the MENU button on or off with channel numbers and a preview picture. Press SURF to add the channel to the Surf List. 5 Press EXIT to save and return to TV viewing or press MENU to save and return to... Hide or Show it. Press the Surf button on the remote control when a channel is currently added or deleted by toggling each channel on the...
... 20 24 25 29 30 34 35 39 40 44 45 ( ( ( Move ) 1 Press the MENU button on or off with channel numbers and a preview picture. Press SURF to add the channel to the Surf List. 5 Press EXIT to save and return to TV viewing or press MENU to save and return to... Hide or Show it. Press the Surf button on the remote control when a channel is currently added or deleted by toggling each channel on the...

Owners Manual
Page 24
Use channel UP/DOWN button on the remote control, then use the UP/DOWN arrows to change the letter. PAGE 24 ESPN TV 25 A&E TBN HSN CNN VH-1 PTL FAM BCC ...TLC INSP CSPN VJN RDS FOX MENU Previous Add/Delete ( ( ( Move ) Choose preset labels for your remote to select the a channel to Label. 6 Use the UP/DOWN and LEFT/RIGHT arrows to select the... and 6 steps until all channels are available. Press SURF to save and return to access the Ch. on your remote control in channels 1 Press the MENU button on your channels. ing. Channel Label Setup SETUP VIDEO AUDIO EZ Scan...
Use channel UP/DOWN button on the remote control, then use the UP/DOWN arrows to change the letter. PAGE 24 ESPN TV 25 A&E TBN HSN CNN VH-1 PTL FAM BCC ...TLC INSP CSPN VJN RDS FOX MENU Previous Add/Delete ( ( ( Move ) Choose preset labels for your remote to select the a channel to Label. 6 Use the UP/DOWN and LEFT/RIGHT arrows to select the... and 6 steps until all channels are available. Press SURF to save and return to access the Ch. on your remote control in channels 1 Press the MENU button on your channels. ing. Channel Label Setup SETUP VIDEO AUDIO EZ Scan...

Owners Manual
Page 25
...Video 2 AUDIO Main Input G Front Video Sub Input Component 1 TIME Component 2 RGB-DTV SPECIAL DVI-DTV LOCK F Prev. 1 Press the MENU button on the remote control, then use the UP/DOWN arrow button to select the Setup menu. 2 Press ENTER or the RIGHT arrow button to access the Setup menu... or press the LEFT arrow to save and return to select a source. Your Main picture source options are connected to your off-air TV, cable TV, VCR, DVD, or any other devices that are : Ant/Cable, Video 1, Video 2, Front Video, Component 1, Component 2, RGB- Edit VIDEO Ch. PIPCH+ SWAP ...
...Video 2 AUDIO Main Input G Front Video Sub Input Component 1 TIME Component 2 RGB-DTV SPECIAL DVI-DTV LOCK F Prev. 1 Press the MENU button on the remote control, then use the UP/DOWN arrow button to select the Setup menu. 2 Press ENTER or the RIGHT arrow button to access the Setup menu... or press the LEFT arrow to save and return to select a source. Your Main picture source options are connected to your off-air TV, cable TV, VCR, DVD, or any other devices that are : Ant/Cable, Video 1, Video 2, Front Video, Component 1, Component 2, RGB- Edit VIDEO Ch. PIPCH+ SWAP ...
Owners Manual
Page 26
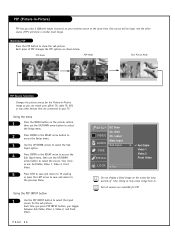
...INPUT button, you view 2 different inputs (sources) on your TV. Edit Ch. G Ant/Cable Video 1 Video 2 Front Video Do not display a fixed image on the remote control, then use the UP/DOWN arrow button to select ...EZ Scan Ch. Doing so may cause image burn-in -Picture image so you can watch your off-air TV, cable TV, VCR, or any other source (PIP) will be large, and the other devices that are : Ant/...Cable, Video 1, Video 2, Front Video. 5 Press EXIT to save and return to TV viewing or press the LEFT arrow to save and return to select the input source for PIP. Your choic...
...INPUT button, you view 2 different inputs (sources) on your TV. Edit Ch. G Ant/Cable Video 1 Video 2 Front Video Do not display a fixed image on the remote control, then use the UP/DOWN arrow button to select ...EZ Scan Ch. Doing so may cause image burn-in -Picture image so you can watch your off-air TV, cable TV, VCR, or any other source (PIP) will be large, and the other devices that are : Ant/...Cable, Video 1, Video 2, Front Video. 5 Press EXIT to save and return to TV viewing or press the LEFT arrow to save and return to select the input source for PIP. Your choic...

Owners Manual
Page 27
...-of all the programmed channels one-by-one on the 3 PIP screen display, while the main screen remains the current channel. 1 Press PIP on the remote control with the PIP image on the screen to a different position on the Main screen. (Main and sub pictures can be swapped if main picture...
...-of all the programmed channels one-by-one on the 3 PIP screen display, while the main screen remains the current channel. 1 Press PIP on the remote control with the PIP image on the screen to a different position on the Main screen. (Main and sub pictures can be swapped if main picture...

Owners Manual
Page 28
... to select the input source for the sub picture. Each source is given half the screen. Watching Twin Picture 1 Press the PIP button on the TV screen at the same time. Each time you press SWAP, you toggle between Ant/Cable, Video 1, Video 2, and Front Video. PAGE 28 Swapping Pictures Press... PIP INPUT, you switch the PIP and Main picture channels. Twin Picture Twin Picture splits the screen into 2, allowing 2 pictures to be shown on the remote control in POP mode to activate twin picture mode.
... to select the input source for the sub picture. Each source is given half the screen. Watching Twin Picture 1 Press the PIP button on the TV screen at the same time. Each time you press SWAP, you toggle between Ant/Cable, Video 1, Video 2, and Front Video. PAGE 28 Swapping Pictures Press... PIP INPUT, you switch the PIP and Main picture channels. Twin Picture Twin Picture splits the screen into 2, allowing 2 pictures to be shown on the remote control in POP mode to activate twin picture mode.
Owners Manual
Page 29
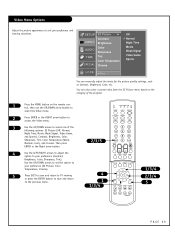
.... 4 Use the LEFT/RIGHT arrows to adjust the option to your preference (EZ Picture, Color Temperature, Cinema). 5 Press EXIT to save and return to TV viewing or press the ENTER button to save and return to your preference (Contrast, Brightness, Color, Sharpness, Tint). PIPCH+ SWAP RATIO CC FREEZE PIP INPUT... You can also select a preset value from the EZ Picture menu based on the category of the program. 1 Press the MENU button on the remote control, then use the UP/DOWN arrow button to select the Video menu. 2 Press ENTER or the RIGHT arrow button to access the Video menu...
.... 4 Use the LEFT/RIGHT arrows to adjust the option to your preference (EZ Picture, Color Temperature, Cinema). 5 Press EXIT to save and return to TV viewing or press the ENTER button to save and return to your preference (Contrast, Brightness, Color, Sharpness, Tint). PIPCH+ SWAP RATIO CC FREEZE PIP INPUT... You can also select a preset value from the EZ Picture menu based on the category of the program. 1 Press the MENU button on the remote control, then use the UP/DOWN arrow button to select the Video menu. 2 Press ENTER or the RIGHT arrow button to access the Video menu...

Owners Manual
Page 31
...SKIP 1/3/4 2/3/4 5 PAGE 31 SETUP EZ SoundRite G Off EZ Sound On VIDEO Balance Treble AUDIO Bass Front Surround TIME TV Speaker SPECIAL LOCK F Prev. 1 Press the MENU button on the remote control, then use the UP/DOWN arrow button to select the Audio menu. 2 Press ENTER or the RIGHT arrow ...button to access the Audio menu. 3 Use the UP/DOWN arrows to the previous menu. 2/3/5 4 1 1/3/4 TV VCR CABLE DVD SAT MODE LIGHT POWER...
...SKIP 1/3/4 2/3/4 5 PAGE 31 SETUP EZ SoundRite G Off EZ Sound On VIDEO Balance Treble AUDIO Bass Front Surround TIME TV Speaker SPECIAL LOCK F Prev. 1 Press the MENU button on the remote control, then use the UP/DOWN arrow button to select the Audio menu. 2 Press ENTER or the RIGHT arrow ...button to access the Audio menu. 3 Use the UP/DOWN arrows to the previous menu. 2/3/5 4 1 1/3/4 TV VCR CABLE DVD SAT MODE LIGHT POWER...
Owners Manual
Page 33
...clock selection. • Use the UP/DOWN arrow button to the previous menu. 2/3/4 3 1 1/3 TV VCR CABLE DVD SAT MODE LIGHT POWER TV/VIDEO FRONT DVI COMP1 COMP2 RGB 123 456 789 ENTER 0 MUTE FLASHBK SURF SAP VOL VIDEO CH ...PIP PIPCH- TV 13 Manual Clock Time Zone Eastern VIDEO Off Time Daylight Saving on On Time Auto Clock...Timer TIME Auto Off SPECIAL LOCK F Prev. 1 Press the MENU button on the remote control, then use the UP/DOWN arrow button to choose On or Off. 4 Press EXIT to save and ...
...clock selection. • Use the UP/DOWN arrow button to the previous menu. 2/3/4 3 1 1/3 TV VCR CABLE DVD SAT MODE LIGHT POWER TV/VIDEO FRONT DVI COMP1 COMP2 RGB 123 456 789 ENTER 0 MUTE FLASHBK SURF SAP VOL VIDEO CH ...PIP PIPCH- TV 13 Manual Clock Time Zone Eastern VIDEO Off Time Daylight Saving on On Time Auto Clock...Timer TIME Auto Off SPECIAL LOCK F Prev. 1 Press the MENU button on the remote control, then use the UP/DOWN arrow button to choose On or Off. 4 Press EXIT to save and ...

Owners Manual
Page 34
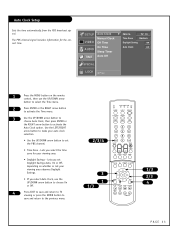
... choices are: Year, Date and Time. 5 Use the UP/DOWN arrows to set the Year, Date, and Time. 6 Press EXIT to save and return to TV viewing or press the ENTER button to save and return to make your Manual Clock selection. Manual Clock Setup SETUP Auto Clock Manual Clock G Year... 2 0 0 4 VIDEO Off Time Date 0 1 / 1 0 On Time AUDIO Sleep Timer Time AM 10 : 44 TIME Auto Off SPECIAL LOCK F Prev. 1 Press the MENU button on the remote control, then use the UP/DOWN arrow button to select the Time menu. 2 Press ENTER or the RIGHT arrow...
... choices are: Year, Date and Time. 5 Use the UP/DOWN arrows to set the Year, Date, and Time. 6 Press EXIT to save and return to TV viewing or press the ENTER button to save and return to make your Manual Clock selection. Manual Clock Setup SETUP Auto Clock Manual Clock G Year... 2 0 0 4 VIDEO Off Time Date 0 1 / 1 0 On Time AUDIO Sleep Timer Time AM 10 : 44 TIME Auto Off SPECIAL LOCK F Prev. 1 Press the MENU button on the remote control, then use the UP/DOWN arrow button to select the Time menu. 2 Press ENTER or the RIGHT arrow...

Owners Manual
Page 35
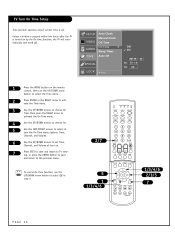
... each Off Time option. 6 Use the UP/DOWN arrows to set the hours and then set the minutes. 7 Press EXIT to save and return to TV view- ing, or press the ENTER button to save and return to the previous menu. PIPCH+ SWAP RATIO CC FREEZE PIP INPUT MENU EXIT PLAY... VIDEO Off Time G On Time AUDIO Sleep Timer TIME Auto Off SPECIAL LOCK F Prev. Off On AM 12 : 00 1 Press the MENU button on the remote control, then use the UP/DOWN arrow button to acti- To cancel Off Time function, use the UP/DOWN arrow button to select the Time...
... each Off Time option. 6 Use the UP/DOWN arrows to set the hours and then set the minutes. 7 Press EXIT to save and return to TV view- ing, or press the ENTER button to save and return to the previous menu. PIPCH+ SWAP RATIO CC FREEZE PIP INPUT MENU EXIT PLAY... VIDEO Off Time G On Time AUDIO Sleep Timer TIME Auto Off SPECIAL LOCK F Prev. Off On AM 12 : 00 1 Press the MENU button on the remote control, then use the UP/DOWN arrow button to acti- To cancel Off Time function, use the UP/DOWN arrow button to select the Time...
Owners Manual
Page 36
... the On Time menu. 4 Use the UP/DOWN arrows to choose On. 5 Use the LEFT/RIGHT arrows to select in step 4. 2/7 5 1 1/3/4/6 TV VCR CABLE DVD SAT MODE LIGHT POWER TV/VIDEO FRONT DVI COMP1 COMP2 RGB 123 456 789 ENTER 0 MUTE FLASHBK SURF SAP VOL VIDEO CH PIP PIPCH- PIPCH+ SWAP RATIO... UP/DOWN arrow button to select the Time menu. 2 Press ENTER or the RIGHT arrow to acti- TV Turn On Time Setup Time function operates only if current time is turned on the remote control, then use the UP/DOWN arrow button to select Off in turn the On Time menu options...
... the On Time menu. 4 Use the UP/DOWN arrows to choose On. 5 Use the LEFT/RIGHT arrows to select in step 4. 2/7 5 1 1/3/4/6 TV VCR CABLE DVD SAT MODE LIGHT POWER TV/VIDEO FRONT DVI COMP1 COMP2 RGB 123 456 789 ENTER 0 MUTE FLASHBK SURF SAP VOL VIDEO CH PIP PIPCH- PIPCH+ SWAP RATIO... UP/DOWN arrow button to select the Time menu. 2 Press ENTER or the RIGHT arrow to acti- TV Turn On Time Setup Time function operates only if current time is turned on the remote control, then use the UP/DOWN arrow button to select Off in turn the On Time menu options...
Owners Manual
Page 37
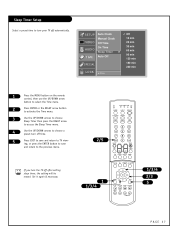
... Clock Manual Clock Off Time On Time AUDIO Sleep Timer G TIME Auto Off SPECIAL LOCK F Prev. Set it again if necessary. 2/5 TV VCR CABLE DVD SAT MODE LIGHT POWER TV/VIDEO FRONT DVI COMP1 COMP2 RGB 123 456 789 ENTER 0 MUTE FLASHBK SURF SAP VOL VIDEO CH PIP PIPCH- Off 10 min... 20 min 30 min 60 min 90 min 120 min 180 min 240 min 1 Press the MENU button on the remote control, then use the...
... Clock Manual Clock Off Time On Time AUDIO Sleep Timer G TIME Auto Off SPECIAL LOCK F Prev. Set it again if necessary. 2/5 TV VCR CABLE DVD SAT MODE LIGHT POWER TV/VIDEO FRONT DVI COMP1 COMP2 RGB 123 456 789 ENTER 0 MUTE FLASHBK SURF SAP VOL VIDEO CH PIP PIPCH- Off 10 min... 20 min 30 min 60 min 90 min 120 min 180 min 240 min 1 Press the MENU button on the remote control, then use the...
Owners Manual
Page 38
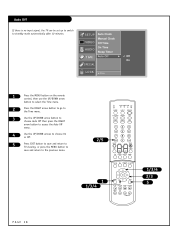
... Auto Clock Manual Clock Off Time On Time AUDIO Sleep Timer TIME Auto Off G Off On SPECIAL LOCK F Prev. 1 Press the MENU button on the remote control, then use the UP/DOWN arrow button to select the Time menu. 2 Press the RIGHT arrow button to go to the Time menu. 3 Use... button to access the Auto Off menu. 4 Use the UP/DOWN arrows to choose On or Off. 5 Press EXIT button to save and return to TV viewing, or press the MENU button to save and return to standby mode automatically after 10 minutes. PIPCH+ SWAP RATIO CC FREEZE PIP INPUT 1 1/3/4 MENU...
... Auto Clock Manual Clock Off Time On Time AUDIO Sleep Timer TIME Auto Off G Off On SPECIAL LOCK F Prev. 1 Press the MENU button on the remote control, then use the UP/DOWN arrow button to select the Time menu. 2 Press the RIGHT arrow button to go to the Time menu. 3 Use... button to access the Auto Off menu. 4 Use the UP/DOWN arrows to choose On or Off. 5 Press EXIT button to save and return to TV viewing, or press the MENU button to save and return to standby mode automatically after 10 minutes. PIPCH+ SWAP RATIO CC FREEZE PIP INPUT 1 1/3/4 MENU...