Owner's Manual (English)
Page 1
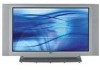
Record model number and serial number of the TV in the spaces provided below. See the label attached on the back cover and relate this manual carefully and completely before operating your dealer if you require service. PLASMA TV OWNER'S MANUAL MODELS: RU-42PX10/10C/10H/11/11C/11H RU-50PX10/10C/10H/11/11C/11H Please read this information to your TV. Model Number : Serial Number : LG Electronics U.S.A., Inc. Retain this manual for future reference.
Record model number and serial number of the TV in the spaces provided below. See the label attached on the back cover and relate this manual carefully and completely before operating your dealer if you require service. PLASMA TV OWNER'S MANUAL MODELS: RU-42PX10/10C/10H/11/11C/11H RU-50PX10/10C/10H/11/11C/11H Please read this information to your TV. Model Number : Serial Number : LG Electronics U.S.A., Inc. Retain this manual for future reference.

Owner's Manual (English)
Page 3
... other apparatus (including amplifiers)that illustrates the intent of the following safety instructions shall be included where applicable, and, when used . PORTABLE CART WARNING Owner's Manual 3 This information shall be verbatim as radiators, heat registers, stoves, or other . Clean only with the apparatus. When a cart is intended to that safety instruction...
... other apparatus (including amplifiers)that illustrates the intent of the following safety instructions shall be included where applicable, and, when used . PORTABLE CART WARNING Owner's Manual 3 This information shall be verbatim as radiators, heat registers, stoves, or other . Clean only with the apparatus. When a cart is intended to that safety instruction...
Owner's Manual (English)
Page 4
CAUTION concerning the Power Cord : Most appliances recommend they be placed on the apparatus. 4 Plasma TV Do not overload wall outlets. To Reduce The Risk Of Fire Or Electric Shock, Do Not Expose This Appliance To Rain Or Moisture. 17. Servicing ... of your appliance, and if its appearance indicates damage or deterioration, unplug it, discontinue use of time. 14. Outdoor Use Marking : WARNING - Unplug this owner's manual to dripping or splashing and no additional outlets or branch circuits. Overloaded wall outlets, loose or damaged wall outlets, extension cords, frayed power cords, or...
CAUTION concerning the Power Cord : Most appliances recommend they be placed on the apparatus. 4 Plasma TV Do not overload wall outlets. To Reduce The Risk Of Fire Or Electric Shock, Do Not Expose This Appliance To Rain Or Moisture. 17. Servicing ... of your appliance, and if its appearance indicates damage or deterioration, unplug it, discontinue use of time. 14. Outdoor Use Marking : WARNING - Unplug this owner's manual to dripping or splashing and no additional outlets or branch circuits. Overloaded wall outlets, loose or damaged wall outlets, extension cords, frayed power cords, or...
Owner's Manual (English)
Page 5
... setup options.) 1. See pages 19 ~ 22. 8. See page 16. 7. Additional features set up See Contents above. Owner's Manual 5 See page 9. 3 Install batteries in remote control. Turn TV on . 2. Connect all accessories. 5. Introduction Contents Warning/Caution 2 Safety Instructions 3~4 Introduction Controls 7 Connection Options 8 Remote Control... 32 External Control Device Setup 33~38 IR Codes 39~40 Troubleshooting Checklist 41 Maintenance 42 Product Specifications 42 Warranty 43~44 Setup and Operation Checklist Setup and Operation Checklist (See pages 11~15 for...
... setup options.) 1. See pages 19 ~ 22. 8. See page 16. 7. Additional features set up See Contents above. Owner's Manual 5 See page 9. 3 Install batteries in remote control. Turn TV on . 2. Connect all accessories. 5. Introduction Contents Warning/Caution 2 Safety Instructions 3~4 Introduction Controls 7 Connection Options 8 Remote Control... 32 External Control Device Setup 33~38 IR Codes 39~40 Troubleshooting Checklist 41 Maintenance 42 Product Specifications 42 Warranty 43~44 Setup and Operation Checklist Setup and Operation Checklist (See pages 11~15 for...
Owner's Manual (English)
Page 7
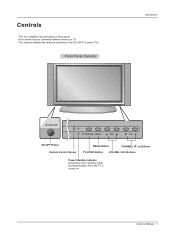
Owner's Manual 7 Here shown may be somewhat different from your TV. - Front Panel Controls Introduction ON/OFF TV/VIDEO MENU VOL CH ON/OFF Button Remote Control Sensor MENU Button CHANNEL (E, D) Buttons TV/VIDEO Button VOLUME (F,G) Buttons Power Standby Indicator Illuminates red in standby mode, Illuminates green when the TV is a simplified representation of front panel. This is turned on the RU-42PX10 series TVs. This manual explains the features available on . Controls -
Owner's Manual 7 Here shown may be somewhat different from your TV. - Front Panel Controls Introduction ON/OFF TV/VIDEO MENU VOL CH ON/OFF Button Remote Control Sensor MENU Button CHANNEL (E, D) Buttons TV/VIDEO Button VOLUME (F,G) Buttons Power Standby Indicator Illuminates red in standby mode, Illuminates green when the TV is a simplified representation of front panel. This is turned on the RU-42PX10 series TVs. This manual explains the features available on . Controls -

Owner's Manual (English)
Page 9
... last channel viewed. Installing Batteries • Open the battery compartment cover on the TV. Adjusts menu settings. MEMORY/ERASE Memorizes or erases selected channel. SIZE Adjusts the sub picture size. Owner's Manual 9 ARC Changes the picture format. with new ones. Replace cover. Switches the... set on from standby CHANNEL UP/DOWN Selects available channels found with regular ration. ENTER Accepts your TV on or off . SWAP Exchanges the main...
... last channel viewed. Installing Batteries • Open the battery compartment cover on the TV. Adjusts menu settings. MEMORY/ERASE Memorizes or erases selected channel. SIZE Adjusts the sub picture size. Owner's Manual 9 ARC Changes the picture format. with new ones. Replace cover. Switches the... set on from standby CHANNEL UP/DOWN Selects available channels found with regular ration. ENTER Accepts your TV on or off . SWAP Exchanges the main...
Owner's Manual (English)
Page 10
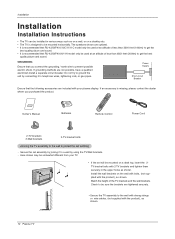
... Manual Batteries Remote Control Power Cord 2-TV brackets 2-Wall brackets 2-TV bracket bolts Joinning the TV assembly to the wall to telephone wires, lightening rods, or gas pipes. Install the wall brackets on a desk top, insert the 2TV bracket bolts with the product), as shown. 10 Plasma TV ...Installation Installation Installation Instructions • The TV can be installed in the upper holes as shown. If grounding methods are optional. • It is recommended that RU-42/50PX10/10C/11/11C model only be used at an...
... Manual Batteries Remote Control Power Cord 2-TV brackets 2-Wall brackets 2-TV bracket bolts Joinning the TV assembly to the wall to telephone wires, lightening rods, or gas pipes. Install the wall brackets on a desk top, insert the 2TV bracket bolts with the product), as shown. 10 Plasma TV ...Installation Installation Installation Instructions • The TV can be installed in the upper holes as shown. If grounding methods are optional. • It is recommended that RU-42/50PX10/10C/11/11C model only be used at an...
Owner's Manual (English)
Page 11
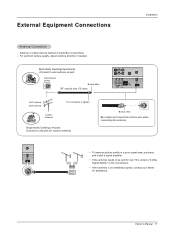
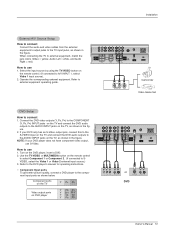
... L/MONO MONITOR OUTPUT A/V INPUT 1 S-VIDEO AUDIO VIDEO Antenna VHF antenna UHF antenna outdoor antenna Turn clockwise to be split for two TV's, install a "2-Way Signal Splitter" in a poor signal area, purchase and install a signal amplifier. For optimum picture quality, adjust antenna direction ...if needed. Owner's Manual 11 Single-family Dwellings /Houses (Connect to wall jack for assistance. Signal Amplifier • If the antenna is not installed properly, ...
... L/MONO MONITOR OUTPUT A/V INPUT 1 S-VIDEO AUDIO VIDEO Antenna VHF antenna UHF antenna outdoor antenna Turn clockwise to be split for two TV's, install a "2-Way Signal Splitter" in a poor signal area, purchase and install a signal amplifier. For optimum picture quality, adjust antenna direction ...if needed. Owner's Manual 11 Single-family Dwellings /Houses (Connect to wall jack for assistance. Signal Amplifier • If the antenna is not installed properly, ...
Owner's Manual (English)
Page 12
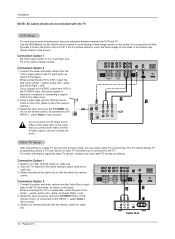
...at the same time. Select the input source by the TV/VIDEO button on the remote control. (If connected to the VCR owner's manual.) 3. Typically a frozen still picture from the VCR's output jacks to the TV input jacks, as shown in the figure. Connection Option ... AUDIO VIDEO 2 Antenna 1 AC INPUT (R) AUDIO (L) VIDEO TV VCR OUTPUT SWITCH 34 RF Cable Cable Box 12 Plasma TV The TV cannot display TV programming unless a TV tuner device or cable TV converter box is used; Select your local cable TV service provider(s). To avoid picture noise (interference), leave an adequate...
...at the same time. Select the input source by the TV/VIDEO button on the remote control. (If connected to the VCR owner's manual.) 3. Typically a frozen still picture from the VCR's output jacks to the TV input jacks, as shown in the figure. Connection Option ... AUDIO VIDEO 2 Antenna 1 AC INPUT (R) AUDIO (L) VIDEO TV VCR OUTPUT SWITCH 34 RF Cable Cable Box 12 Plasma TV The TV cannot display TV programming unless a TV tuner device or cable TV converter box is used; Select your local cable TV service provider(s). To avoid picture noise (interference), leave an adequate...
Owner's Manual (English)
Page 13
... connect Connect the audio and video cables from the external equipment's output jacks to the TV input jacks, as shown below. Refer to the DVD player's manual for operating instructions. • Component Input ports To get better picture quality, connect a... OUTPUT A/V INPUT 1 S-VIDEO AUDIO VIDEO Antenna AC INPUT B R (R) AUDIO (L) or S-VIDEO (R) AUDIO (L) DVD Owner's Manual 13 Refer to A/V INPUT 1, select Video 1 input source). 2. Component ports on the TV Y PB PR Video output ports on the remote control. (If connected to external equipment operating guide.
... connect Connect the audio and video cables from the external equipment's output jacks to the TV input jacks, as shown below. Refer to the DVD player's manual for operating instructions. • Component Input ports To get better picture quality, connect a... OUTPUT A/V INPUT 1 S-VIDEO AUDIO VIDEO Antenna AC INPUT B R (R) AUDIO (L) or S-VIDEO (R) AUDIO (L) DVD Owner's Manual 13 Refer to A/V INPUT 1, select Video 1 input source). 2. Component ports on the TV Y PB PR Video output ports on the remote control. (If connected to external equipment operating guide.
Owner's Manual (English)
Page 14
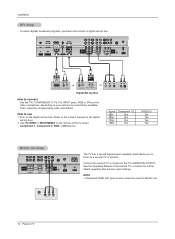
How to select Component 1, Component 2, RGB, or DVI source. S-VIDEO IN (R) AUDIO (L) VIDEO 14 Plasma TV See the Operating Manual of the second TV or monitor for the digital set-top box.) 2. REMOTE CONTROL RS-232C INPUT (CONTROL/SERVICE) DVI INPUT AUDIO INPUT RGB ... or or DVI-DTV OUTPUT (R) AUDIO (L) (R) AUDIO (L) RGB-DTV OUTPUT Digital Set-top Box How to the owner's manual for further details regarding that device's input settings. Use TV/VIDEO or MULTIMEDIA on the remote control to use 1. Then, make the corresponding audio connections. Connect the second...
How to select Component 1, Component 2, RGB, or DVI source. S-VIDEO IN (R) AUDIO (L) VIDEO 14 Plasma TV See the Operating Manual of the second TV or monitor for the digital set-top box.) 2. REMOTE CONTROL RS-232C INPUT (CONTROL/SERVICE) DVI INPUT AUDIO INPUT RGB ... or or DVI-DTV OUTPUT (R) AUDIO (L) (R) AUDIO (L) RGB-DTV OUTPUT Digital Set-top Box How to the owner's manual for further details regarding that device's input settings. Use TV/VIDEO or MULTIMEDIA on the remote control to use 1. Then, make the corresponding audio connections. Connect the second...
Owner's Manual (English)
Page 15
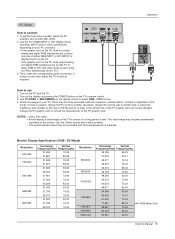
...487 85.00 68.681 75.06 60.023 60.02 63.981 60.02 RGB Mode Only Owner's Manual 15 If using a sound card, adjust the PC sound as required. Use TV/VIDEO or MULTIMEDIA on the remote control to use 1. The fixed image may be changed, change the refresh... resolution, vertical pattern, contrast or brightness in PC mode. Turn on the menu until the picture is separate. There may become permanently imprinted on the TV's remote control. 3. Use the Orbiter screen saver when possible. • The synchronization input form for Horizontal and Vertical frequencies is clear. PC Setup ...
...487 85.00 68.681 75.06 60.023 60.02 63.981 60.02 RGB Mode Only Owner's Manual 15 If using a sound card, adjust the PC sound as required. Use TV/VIDEO or MULTIMEDIA on the remote control to use 1. The fixed image may be changed, change the refresh... resolution, vertical pattern, contrast or brightness in PC mode. Turn on the menu until the picture is separate. There may become permanently imprinted on the TV's remote control. 3. Use the Orbiter screen saver when possible. • The synchronization input form for Horizontal and Vertical frequencies is clear. PC Setup ...
Owner's Manual (English)
Page 16
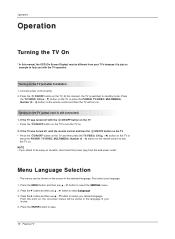
... the TV On * In this manual, the OSD (On Screen Display) may be different from the wall power outlet. Connect power cord correctly. 2. The menus can be shown on . First select your TV's because it is still connected) 1. Press the TV/VIDEO, CH (D / E) button on the TV or press the POWER, TV/VIDEO,...mode. Press the MENU button and then use D / E button to be shown in the selected language. From this moment, the TV is switched to save. 16 Plasma TV Press the ON/OFF button on vacation, disconnect the power plug from your language. 1. NOTE • If you with the remote control...
... the TV On * In this manual, the OSD (On Screen Display) may be different from the wall power outlet. Connect power cord correctly. 2. The menus can be shown on . First select your TV's because it is still connected) 1. Press the TV/VIDEO, CH (D / E) button on the TV or press the POWER, TV/VIDEO,...mode. Press the MENU button and then use D / E button to be shown in the selected language. From this moment, the TV is switched to save. 16 Plasma TV Press the ON/OFF button on vacation, disconnect the power plug from your language. 1. NOTE • If you with the remote control...
Owner's Manual (English)
Page 17
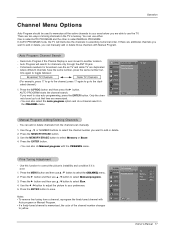
...preference. 5. Redo Auto Program if the Plasma Display is poor. 1. To start Manual Program: Adding/Deleting Channels - You can use either. Press the ENTER button to select Memory or Erase. 4. CHANNEL Auto program Manual program G TV 2 PICTURE Favorite channel Memory On SOUND Fine...the color of storing channels in the TV's memory. Press the MEMORY/ERASE button. 3. One is called MANUAL PROGRAM. Auto Program will memorize the channels in the CHANNEL menu. CHANNEL PICTURE SOUND Auto program G Manual program Favorite channel TIMER SPECIAL SCREEN PIP...
...preference. 5. Redo Auto Program if the Plasma Display is poor. 1. To start Manual Program: Adding/Deleting Channels - You can use either. Press the ENTER button to select Memory or Erase. 4. CHANNEL Auto program Manual program G TV 2 PICTURE Favorite channel Memory On SOUND Fine...the color of storing channels in the TV's memory. Press the MEMORY/ERASE button. 3. One is called MANUAL PROGRAM. Auto Program will memorize the channels in the CHANNEL menu. CHANNEL PICTURE SOUND Auto program G Manual program Favorite channel TIMER SPECIAL SCREEN PIP...
Owner's Manual (English)
Page 18
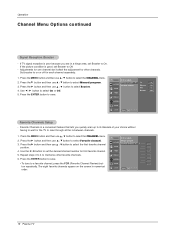
... TIMER SPECIAL SCREEN PIP/DW LOCK Menu Prev. CHANNEL PICTURE Auto program Manual program Favorite channel G SOUND TIMER SPECIAL SCREEN PIP/DW LOCK Menu Prev. 18 Plasma TV Press the G button and then use D / E button to select On or Off. 5. If TV signal reception is good, set the desired channel number for each channel...
... TIMER SPECIAL SCREEN PIP/DW LOCK Menu Prev. CHANNEL PICTURE Auto program Manual program Favorite channel G SOUND TIMER SPECIAL SCREEN PIP/DW LOCK Menu Prev. 18 Plasma TV Press the G button and then use D / E button to select On or Off. 5. If TV signal reception is good, set the desired channel number for each channel...
Owner's Manual (English)
Page 19
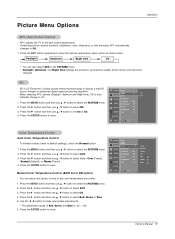
...TV to select the picture appearance setup option as shown below. Press the APC button repeatedly to the best picture appearance. - Press the G button and then use D / E button to select ACC . 3. If adjusting picture options (contrast, brightness, color, sharpness, or tint) manually..., APC automatically changes to display a real HD source through an advanced digital signal processing algorithm. - XD is LG Electronic's unique picture improving technology to Off. 1. Press the G button ...
...TV to select the picture appearance setup option as shown below. Press the APC button repeatedly to the best picture appearance. - Press the G button and then use D / E button to select ACC . 3. If adjusting picture options (contrast, brightness, color, sharpness, or tint) manually..., APC automatically changes to display a real HD source through an advanced digital signal processing algorithm. - XD is LG Electronic's unique picture improving technology to Off. 1. Press the G button ...
Owner's Manual (English)
Page 20
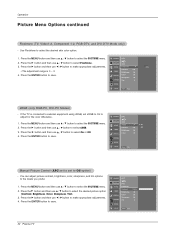
... Prev. CHANNEL APC PICTURE SOUND TIMER SPECIAL SCREEN ACC Fleshtone Contrast Brightness Color Sharpness Tint 100 G 60 50 50 0 PIP/DW LOCK Menu Prev. 20 Plasma TV sRGB (only RGB-PC, DVI-PC Modes) - Press the G button and then use D / E button to select sRGB. 3. You can adjust picture... 0 ~ 3. Operation Picture Menu Options continued Fleshtone (TV, Video1-2, Component 1-2, RGB-DTV, and DVI-DTV Mode only) - Use Fleshtone to the levels you prefer. 1. Press the G button and then use F / G button to select On or Off. 4. Manual Picture Control (APC set to set sRGB to On to ...
... Prev. CHANNEL APC PICTURE SOUND TIMER SPECIAL SCREEN ACC Fleshtone Contrast Brightness Color Sharpness Tint 100 G 60 50 50 0 PIP/DW LOCK Menu Prev. 20 Plasma TV sRGB (only RGB-PC, DVI-PC Modes) - Press the G button and then use D / E button to select sRGB. 3. You can adjust picture... 0 ~ 3. Operation Picture Menu Options continued Fleshtone (TV, Video1-2, Component 1-2, RGB-DTV, and DVI-DTV Mode only) - Use Fleshtone to the levels you prefer. 1. Press the G button and then use F / G button to select On or Off. 4. Manual Picture Control (APC set to set sRGB to On to ...
Owner's Manual (English)
Page 21
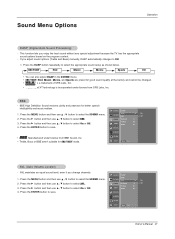
...lets you change channels. 1. AVL maintains an equal sound level; even if you enjoy the best sound without any special adjustment because the TV has the appropriate sound options based on the program content. - CHANNEL PICTURE SOUND TIMER DASP BBE AVL Balance Treble Bass SPECIAL G On...under license from BBE Sound, Inc. • Treble, Bass or BBE aren't suitable for better speech intelligibility and music realism. 1. BBE - Owner's Manual 21 Press the DASP button repeatedly to select On or Off. 4. Press the MENU button and then use D / E button to select the appropriate...
...lets you change channels. 1. AVL maintains an equal sound level; even if you enjoy the best sound without any special adjustment because the TV has the appropriate sound options based on the program content. - CHANNEL PICTURE SOUND TIMER DASP BBE AVL Balance Treble Bass SPECIAL G On...under license from BBE Sound, Inc. • Treble, Bass or BBE aren't suitable for better speech intelligibility and music realism. 1. BBE - Owner's Manual 21 Press the DASP button repeatedly to select On or Off. 4. Press the MENU button and then use D / E button to select the appropriate...
Owner's Manual (English)
Page 22
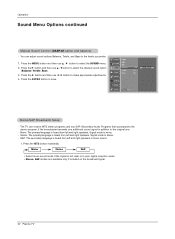
Operation Sound Menu Options continued Manual Sound Control (DASP off option and balance) - Press the MENU button and then use D...primary language is heard from left and right speakers. Signal mode is stereo. - Signal mode is mono. - The TV can adjust sound options Balance, Treble, and Bass to select the SOUND menu. Stereo: The primary language is heard ... signal reception areas. • Stereo, SAP modes are available only if included on the broadcast signal. 22 Plasma TV Mono Stereo SAP • Select mono sound mode if the signal is heard from left and right speakers. ...
Operation Sound Menu Options continued Manual Sound Control (DASP off option and balance) - Press the MENU button and then use D...primary language is heard from left and right speakers. Signal mode is stereo. - Signal mode is mono. - The TV can adjust sound options Balance, Treble, and Bass to select the SOUND menu. Stereo: The primary language is heard ... signal reception areas. • Stereo, SAP modes are available only if included on the broadcast signal. 22 Plasma TV Mono Stereo SAP • Select mono sound mode if the signal is heard from left and right speakers. ...
Owner's Manual (English)
Page 23
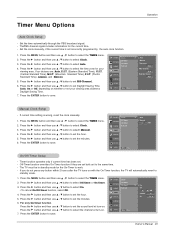
... SOUND Clock Off timer On timer Auto off TIMER SPECIAL SCREEN PIP/DW LOCK Menu Prev. G Auto Manual - - : - - G Auto Manual Time zone Auto PBS Channel TV 2 Daylight Saving Auto Manual Clock Setup - Press the G button and then use D / E button to select On. •...4. Press the G button and then use D / E button to select Auto. 4. Press the G button and then use D / E button to selectt Manual. 4. TV 2 Owner's Manual 23 Press the G button and then use D / E button to work. - Off-Timer function overrides On-Timer function if they are : Auto, E.S.T....
... SOUND Clock Off timer On timer Auto off TIMER SPECIAL SCREEN PIP/DW LOCK Menu Prev. G Auto Manual - - : - - G Auto Manual Time zone Auto PBS Channel TV 2 Daylight Saving Auto Manual Clock Setup - Press the G button and then use D / E button to select On. •...4. Press the G button and then use D / E button to select Auto. 4. Press the G button and then use D / E button to selectt Manual. 4. TV 2 Owner's Manual 23 Press the G button and then use D / E button to work. - Off-Timer function overrides On-Timer function if they are : Auto, E.S.T....

