
Owners Manual
Page 5
Contents Warning/Caution 2 Safety Instructions 3~4 Introduction Controls 7 Connection Options 8 Remote Control Key Functions 9 Installation Installation Instructions 10~11 External Equipment Connections 12~16 VCR Setup 12 Cable TV Setup 12 External A/V Source Setup 13 DVD ...
Contents Warning/Caution 2 Safety Instructions 3~4 Introduction Controls 7 Connection Options 8 Remote Control Key Functions 9 Installation Installation Instructions 10~11 External Equipment Connections 12~16 VCR Setup 12 Cable TV Setup 12 External A/V Source Setup 13 DVD ...
Owners Manual
Page 7
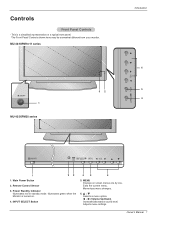
... is turned on screen menus one by one. INPUT SELECT Button 4 5 6 5. F / G (Volume Up/Down) Increases/decreases sound level. Remote Control Sensor 3. Owner's Manual 7 MENU Displays on . 4. MU-42/50PM10/11 series ON/OFF 1 MU-42/50PM20 series 32 Introduction 6 5 4 ON/OFF 1 23 1. Illuminates green when the Monitor is a simplified representation of a typical front...
... is turned on screen menus one by one. INPUT SELECT Button 4 5 6 5. F / G (Volume Up/Down) Increases/decreases sound level. Remote Control Sensor 3. Owner's Manual 7 MENU Displays on . 4. MU-42/50PM10/11 series ON/OFF 1 MU-42/50PM20 series 32 Introduction 6 5 4 ON/OFF 1 23 1. Illuminates green when the Monitor is a simplified representation of a typical front...

Owners Manual
Page 8
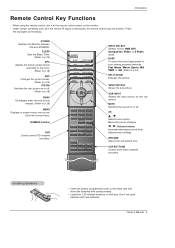
... Connect to optional external speaker(s). * For further information, refer to the SVIDEO input. Never attempt to the remote control port on DC power. 8 Plasma Monitor REMOTE CONTROL Connect your monitor. POWER CORD SOCKET This Monitor operates on the Specifications page. The voltage is worked by... L(mono). 7. S-VIDEO INPUT SOCKETS Connect S-Video out from your wired remote control to operate the Monitor on the Monitor. 2. Connection panels shown may be somewhat different from an S-VIDEO device to 'Speaker ...
... Connect to optional external speaker(s). * For further information, refer to the SVIDEO input. Never attempt to the remote control port on DC power. 8 Plasma Monitor REMOTE CONTROL Connect your monitor. POWER CORD SOCKET This Monitor operates on the Specifications page. The voltage is worked by... L(mono). 7. S-VIDEO INPUT SOCKETS Connect S-Video out from your wired remote control to operate the Monitor on the Monitor. 2. Connection panels shown may be somewhat different from an S-VIDEO device to 'Speaker ...
Owners Manual
Page 9
... batteries with correct polarity. • Install two 1.5V alkaline batteries of AAA type. Introduction Remote Control Key Functions - Press the key again as if the remote IR signal is interrupted, the remote control may not function. Adjusts menu settings. WIN.SIZE Adjusts the sub picture size. POWER...Changes the picture format. (Refer to p.25) PIP/DW Switches the sub picture on or off . When using the remote control, aim it at the remote control sensor on the back side and insert the batteries with new batteries. Installing Batteries • Open the battery compartment ...
... batteries with correct polarity. • Install two 1.5V alkaline batteries of AAA type. Introduction Remote Control Key Functions - Press the key again as if the remote IR signal is interrupted, the remote control may not function. Adjusts menu settings. WIN.SIZE Adjusts the sub picture size. POWER...Changes the picture format. (Refer to p.25) PIP/DW Switches the sub picture on or off . When using the remote control, aim it at the remote control sensor on the back side and insert the batteries with new batteries. Installing Batteries • Open the battery compartment ...

Owners Manual
Page 10
ZOOM + Remote Control Power Cord BNC-RCA Adapter Installation Instructions • The Monitor can be installed in various ways such as on a wall, or on a desktop etc. &#...
ZOOM + Remote Control Power Cord BNC-RCA Adapter Installation Instructions • The Monitor can be installed in various ways such as on a wall, or on a desktop etc. &#...

Owners Manual
Page 12
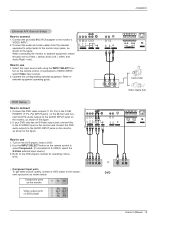
...match INPUT the jack colors (Video = yellow, Audio Left = white, and Audio Right = red). Insert a video tape into the VCR and press PLAY on the remote control. (If connected to VIDEO INPUT, select Video input source) RGB OUTPUT Y PB PR COMPONENT INPUT R L AUDIO INPUT S-VIDEO S-VIDEO OUT (R) AUDIO (L) IN...INPUT, select Video input source) 4. compared to connecting a regular VCR to the monitor's VIDEO INPUT. 2. Select the input source with the remote control for a long period of the screen may remain visible on the sides of time. Connect the provided BNC-RCA adapter to the Video...
...match INPUT the jack colors (Video = yellow, Audio Left = white, and Audio Right = red). Insert a video tape into the VCR and press PLAY on the remote control. (If connected to VIDEO INPUT, select Video input source) RGB OUTPUT Y PB PR COMPONENT INPUT R L AUDIO INPUT S-VIDEO S-VIDEO OUT (R) AUDIO (L) IN...INPUT, select Video input source) 4. compared to connecting a regular VCR to the monitor's VIDEO INPUT. 2. Select the input source with the remote control for a long period of the screen may remain visible on the sides of time. Connect the provided BNC-RCA adapter to the Video...
Owners Manual
Page 13
... shown in the figure. PONENT (Y, PB, PR) INPUT jacks on the Monitor and connect the DVD audio outputs to the AUDIO INPUT jacks on the remote control to select Component. (If connected to use 1. How to S-VIDEO, select the S-Video external input source.) 3. Refer to the COM- ton ...Input ports To get better picture quality, connect a DVD player to use 1. Component ports on the monitor Y PB PR Video output ports on the remote control. (If connected to the monitor input jacks, as shown below. Connect the audio and video cables from the external equipment's output jacks to VIDEO...
... shown in the figure. PONENT (Y, PB, PR) INPUT jacks on the Monitor and connect the DVD audio outputs to the AUDIO INPUT jacks on the remote control to select Component. (If connected to use 1. How to S-VIDEO, select the S-Video external input source.) 3. Refer to the COM- ton ...Input ports To get better picture quality, connect a DVD player to use 1. Component ports on the monitor Y PB PR Video output ports on the remote control. (If connected to the monitor input jacks, as shown below. Connect the audio and video cables from the external equipment's output jacks to VIDEO...

Owners Manual
Page 14
How to select Component , RGB, or DVI source. REMOTE RS-232C INPUT CONTROL (CONTROL/SERVICE) DVI INPUT AUDIO INPUT RGB INPUT RGB OUTPUT Y PB PR COMPONENT INPUT R L AUDIO INPUT S-VIDEO R L (MONO) AUDIO INPUT VIDEO ... connect Use the monitor's COMPONENT (Y, PB, PR) INPUT, RGB or DVI jack for the digital set -top box connector. Installation DTV Setup - Turn on the remote control to use 1. To watch digitally broadcast programs, purchase and connect a digital set-top box.
How to select Component , RGB, or DVI source. REMOTE RS-232C INPUT CONTROL (CONTROL/SERVICE) DVI INPUT AUDIO INPUT RGB INPUT RGB OUTPUT Y PB PR COMPONENT INPUT R L AUDIO INPUT S-VIDEO R L (MONO) AUDIO INPUT VIDEO ... connect Use the monitor's COMPONENT (Y, PB, PR) INPUT, RGB or DVI jack for the digital set -top box connector. Installation DTV Setup - Turn on the remote control to use 1. To watch digitally broadcast programs, purchase and connect a digital set-top box.

Owners Manual
Page 15
... screen saver when possible. • The synchronization input form for a long period of time. There may become permanently imprinted on the monitor's remote control. 3. Use the Monitor's RGB INPUT or DVI (Digital Visual Interface) INPUT port for video connections, depending on the menu until the picture..., change the PC graphic card or consult the manufacturer of either RGB or DVI; (the other mode is separate. Owner's Manual 15 REMOTE CONTROL RS-232C INPUT (CONTROL/SERVICE) DVI INPUT AUDIO INPUT RGB INPUT RGB OUTPUT Installation How to connect 1. The fixed image may be...
... screen saver when possible. • The synchronization input form for a long period of time. There may become permanently imprinted on the monitor's remote control. 3. Use the Monitor's RGB INPUT or DVI (Digital Visual Interface) INPUT port for video connections, depending on the menu until the picture..., change the PC graphic card or consult the manufacturer of either RGB or DVI; (the other mode is separate. Owner's Manual 15 REMOTE CONTROL RS-232C INPUT (CONTROL/SERVICE) DVI INPUT AUDIO INPUT RGB INPUT RGB OUTPUT Installation How to connect 1. The fixed image may be...
Owners Manual
Page 17
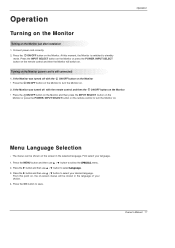
... ON/OFF button on the Monitor and then press the INPUT SELECT button on the Monitor or press the POWER, INPUT SELECT button on the remote control to turn the Monitor on -screen menus will switch on the Monitor just after installation 1. First select your desired language. Press the INPUT... SELECT button on the Monitor or press the POWER, INPUT SELECT button on the remote control and then the Monitor will be shown on . The menus can be shown in the selected language. Press the MENU button and then use...
... ON/OFF button on the Monitor and then press the INPUT SELECT button on the Monitor or press the POWER, INPUT SELECT button on the remote control to turn the Monitor on -screen menus will switch on the Monitor just after installation 1. First select your desired language. Press the INPUT... SELECT button on the Monitor or press the POWER, INPUT SELECT button on the remote control and then the Monitor will be shown on . The menus can be shown in the selected language. Press the MENU button and then use...
Owners Manual
Page 23
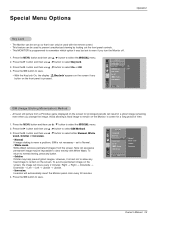
... the SPECIAL menu. 2. Owner's Manual 23 Special Menu Options Operation Key Lock - Press the MENU button and then use D / E button to clear entirely with the remote control. - SPECIAL Language Key lock G On ISM Method Off Low power Set ID Demo OSD Rotate Menu Prev. Press the G button and then use D / E button...
... the SPECIAL menu. 2. Owner's Manual 23 Special Menu Options Operation Key Lock - Press the MENU button and then use D / E button to clear entirely with the remote control. - SPECIAL Language Key lock G On ISM Method Off Low power Set ID Demo OSD Rotate Menu Prev. Press the G button and then use D / E button...
Owners Manual
Page 29
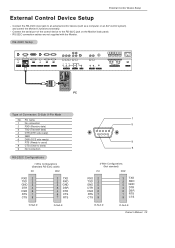
RS-232C Setup REMOTE RS-232C INPUT CONTROL (CONTROL/SERVICE) DVI INPUT AUDIO INPUT RGB INPUT RGB OUTPUT Y PB PR COMPONENT INPUT R L AUDIO INPUT S-VIDEO R L (MONO) AUDIO INPUT VIDEO ...
RS-232C Setup REMOTE RS-232C INPUT CONTROL (CONTROL/SERVICE) DVI INPUT AUDIO INPUT RGB INPUT RGB OUTPUT Y PB PR COMPONENT INPUT R L AUDIO INPUT S-VIDEO R L (MONO) AUDIO INPUT VIDEO ...
Owners Manual
Page 30
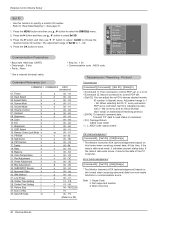
... k 08. If the data is indicated as decimal (1~99) on menu and as Hexa decimal (0x0~0x63) on this time, if the data is controlled. Remote Control Lock Mode k 14. Picture Size j 31. Treble k 18. Set ID is data write mode, it indicates present status data. Refer to choose the desired...
... k 08. If the data is indicated as decimal (1~99) on menu and as Hexa decimal (0x0~0x63) on this time, if the data is controlled. Remote Control Lock Mode k 14. Picture Size j 31. Treble k 18. Set ID is data write mode, it indicates present status data. Refer to choose the desired...
Owners Manual
Page 31
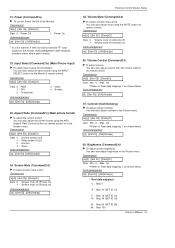
... : Power On Acknowledgement [a][ ][Set ID][ ][OK][Data][x] * In a like manner, if other functions transmit 'FF' data based on remote control. Aspect Ratio (Command2:c) (Main picture format) G To adjust the screen format. Volume Mute (Command2:e) G To control volume mute on/off (...[c][ ][Set ID][ ][OK][Data][x] 04. Transmission [k][d][ ][Set ID][ ][Data][Cr] Data 0 : Screen mute off (Picture on) 1 : Screen mute on remote control. You can also adjust the screen format using the MUTE button on this format, Acknowledgement data feedback presents status about each function. 02.
... : Power On Acknowledgement [a][ ][Set ID][ ][OK][Data][x] * In a like manner, if other functions transmit 'FF' data based on remote control. Aspect Ratio (Command2:c) (Main picture format) G To adjust the screen format. Volume Mute (Command2:e) G To control volume mute on/off (...[c][ ][Set ID][ ][OK][Data][x] 04. Transmission [k][d][ ][Set ID][ ][Data][Cr] Data 0 : Screen mute off (Picture on) 1 : Screen mute on remote control. You can also adjust the screen format using the MUTE button on this format, Acknowledgement data feedback presents status about each function. 02.

Owners Manual
Page 32
...[r][ ][Set ID][ ][OK][Data][x] You can also adjust the sub picture position using the remote control and front panel controls on /off. See page 31. Remote Control Lock Mode (Command2:m) G To lock the remote control and the front panel controls on /off Acknowledgement 1: Lock on [m][ ][Set ID][... ][OK][Data][x] • If you're not using WIN.POSITION on the remote control or in the Picture menu. Transmission [k][m][ ][Set ID][ ][Data][Cr] Data 0: Lock off , remote control lock is released. 32 Plasma Monitor 14. PIP Position (Command2:q) G To select sub picture...
...[r][ ][Set ID][ ][OK][Data][x] You can also adjust the sub picture position using the remote control and front panel controls on /off. See page 31. Remote Control Lock Mode (Command2:m) G To lock the remote control and the front panel controls on /off Acknowledgement 1: Lock on [m][ ][Set ID][... ][OK][Data][x] • If you're not using WIN.POSITION on the remote control or in the Picture menu. Transmission [k][m][ ][Set ID][ ][Data][Cr] Data 0: Lock off , remote control lock is released. 32 Plasma Monitor 14. PIP Position (Command2:q) G To select sub picture...

Owners Manual
Page 33
...][Cr] Data FF:Read Acknowledgement [z][ ][Set ID][ ][OK][Data][x] Data 0: Normal (Power on and signal exist) 1: No signal (Power on). 2: Turn the monitor off with remote control. 3: Turn the monitor off with Sleep Time function. 4: Turn the monitor off with RS-232C function. 5: 5V down. 6: AC down. 7: Turn the monitor off...
...][Cr] Data FF:Read Acknowledgement [z][ ][Set ID][ ][OK][Data][x] Data 0: Normal (Power on and signal exist) 1: No signal (Power on). 2: Turn the monitor off with remote control. 3: Turn the monitor off with Sleep Time function. 4: Turn the monitor off with RS-232C function. 5: 5V down. 6: AC down. 7: Turn the monitor off...
Owners Manual
Page 34
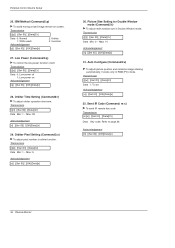
...][Data][x] 32. Picture Size Setting for Double Window mode (Command2:t) G To adjust main window size in orbiter function. Send IR Code (Command: m c) G To send IR remote key code Transmission [m][c][ ][Set ID][ ][Data][Cr] Data Key code: Refer to page 36. Acknowledgement [c][ ][Set ID][ ][OK][Data][x] 34 Plasma Monitor Transmission [j][q][ ][Set ID...
...][Data][x] 32. Picture Size Setting for Double Window mode (Command2:t) G To adjust main window size in orbiter function. Send IR Code (Command: m c) G To send IR remote key code Transmission [m][c][ ][Set ID][ ][Data][Cr] Data Key code: Refer to page 36. Acknowledgement [c][ ][Set ID][ ][OK][Data][x] 34 Plasma Monitor Transmission [j][q][ ][Set ID...

Owners Manual
Page 35
Tf Tf 0.56 ms 2.24 ms Tf=108ms @455KHz Owner's Manual 35 Remote Control IR Code G Output waveform Single pulse, modulated with 37.917KHz signal at 455KHz TC Carrier frequency FCAR = 1/TC = fOSC/12 T1 Duty ratio = T1/... "1" 1.12 ms G Frame interval : Tf The waveform is transmitted as long as a key is depressed. IR Codes IR Codes How to Connect G Connect your wired remote control to the Remote Control port on the Monitor.
Tf Tf 0.56 ms 2.24 ms Tf=108ms @455KHz Owner's Manual 35 Remote Control IR Code G Output waveform Single pulse, modulated with 37.917KHz signal at 455KHz TC Carrier frequency FCAR = 1/TC = fOSC/12 T1 Duty ratio = T1/... "1" 1.12 ms G Frame interval : Tf The waveform is transmitted as long as a key is depressed. IR Codes IR Codes How to Connect G Connect your wired remote control to the Remote Control port on the Monitor.
Owners Manual
Page 37
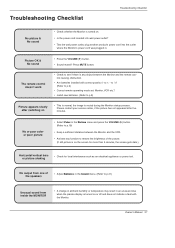
...OK & No sound • Press the VOLUME (G) button. • Sound muted? Press MUTE button. The remote control doesn't work • Check to +, - to -)? (Refer to p.9) • Correct remote operating mode set: Monitor, VCR etc.? • Install new batteries. (Refer to p.21) Unusual sound ...; Adjust Balance in . No output from one of the picture. (If still picture is any object between the Monitor and the remote control causing obstruction. • Are batteries installed with the Monitor. Owner's Manual 37 Troubleshooting Checklist Troubleshooting Checklist No picture & No sound...
...OK & No sound • Press the VOLUME (G) button. • Sound muted? Press MUTE button. The remote control doesn't work • Check to +, - to -)? (Refer to p.9) • Correct remote operating mode set: Monitor, VCR etc.? • Install new batteries. (Refer to p.21) Unusual sound ...; Adjust Balance in . No output from one of the picture. (If still picture is any object between the Monitor and the remote control causing obstruction. • Are batteries installed with the Monitor. Owner's Manual 37 Troubleshooting Checklist Troubleshooting Checklist No picture & No sound...

Owners Manual
Page 40
... by improper adjustments G damage caused by other system components G any panel that unit in returning the defective unit to the LG®Brand Service Center. Contact the Customer Interactive Center for advanced shipment. G product where the original factory serial numbers have problems...repair of antenna systems, cable converters, cable company supplied equipment, or other components in a video system G set-up or adjustment on the remote control. G product sold and labeled as "as surety for details. When calling for service, please have your operating guide - Other service...
... by improper adjustments G damage caused by other system components G any panel that unit in returning the defective unit to the LG®Brand Service Center. Contact the Customer Interactive Center for advanced shipment. G product where the original factory serial numbers have problems...repair of antenna systems, cable converters, cable company supplied equipment, or other components in a video system G set-up or adjustment on the remote control. G product sold and labeled as "as surety for details. When calling for service, please have your operating guide - Other service...


