User Guide
Page 9
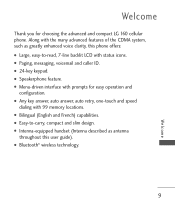
... voice clarity, this user guide). G Menu-driven interface with status icons. G Bluetooth® wireless technology. 9 Welcome G Easy-to -read, 7-line backlit LCD with prompts for choosing the advanced and compact LG 160 cellular phone. Welcome Thank you for easy operation and configuration. G Speakerphone feature. G 24-key keypad. Along with 99 memory locations.
... voice clarity, this user guide). G Menu-driven interface with status icons. G Bluetooth® wireless technology. 9 Welcome G Easy-to -read, 7-line backlit LCD with prompts for choosing the advanced and compact LG 160 cellular phone. Welcome Thank you for easy operation and configuration. G Speakerphone feature. G 24-key keypad. Along with 99 memory locations.
User Guide
Page 15
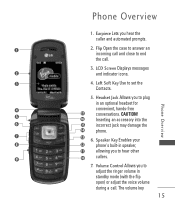
... in speaker, allowing you to plug in an optional headset for convenient, hands-free conversations. Headset Jack Allows you hear the caller and automated prompts. 2. LCD Screen Displays messages and indicator icons. 4. Phone Overview Phone Overview 1.
... in speaker, allowing you to plug in an optional headset for convenient, hands-free conversations. Headset Jack Allows you hear the caller and automated prompts. 2. LCD Screen Displays messages and indicator icons. 4. Phone Overview Phone Overview 1.

User Guide
Page 20
... phone. The battery charge level is facing you don't lose any stored numbers or messages. 2. Keep the battery charged while not in use of the LCD screen. Removing the Battery 1. Installing the Battery To install, insert the battery into place (2).
... phone. The battery charge level is facing you don't lose any stored numbers or messages. 2. Keep the battery charged while not in use of the LCD screen. Removing the Battery 1. Installing the Battery To install, insert the battery into place (2).
User Guide
Page 21
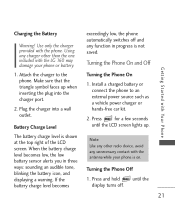
Using any unnecessary contact with the LG 160 may damage your phone is shown at the top right of the LCD screen. Install a charged battery or connect the phone to the phone. Press for a few seconds until the display turns off and any function in three ...ways: sounding an audible tone, blinking the battery icon, and displaying a warning. Press and hold until the LCD screen lights up when inserting the plug into a wall outlet. Make sure that the triangle symbol faces up . Plug the charger into the charger port...
Using any unnecessary contact with the LG 160 may damage your phone is shown at the top right of the LCD screen. Install a charged battery or connect the phone to the phone. Press for a few seconds until the display turns off and any function in three ...ways: sounding an audible tone, blinking the battery icon, and displaying a warning. Press and hold until the LCD screen lights up when inserting the plug into a wall outlet. Make sure that the triangle symbol faces up . Plug the charger into the charger port...
User Guide
Page 22
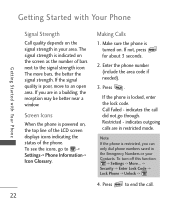
.... 2. If the signal quality is locked, enter the lock code. Press . Call Failed - Note If the phone is indicated on , the top line of the LCD screen displays icons indicating the status of bars next to an open area. To see the icons, go through. If you can only dial phone...
.... 2. If the signal quality is locked, enter the lock code. Press . Call Failed - Note If the phone is indicated on , the top line of the LCD screen displays icons indicating the status of bars next to an open area. To see the icons, go through. If you can only dial phone...

User Guide
Page 37
... and press . 6. Scroll to -1 connection with the device. 9. If Bluetooth device is set the device to off, you will show at the top of the LCD screen. Press , . 2. For pairing new Bluetooth® device 1. Follow the Bluetooth accessory instructions to set to pairing mode. 4. Highlight the device and press . 7. Once pairing...
... and press . 6. Scroll to -1 connection with the device. 9. If Bluetooth device is set the device to off, you will show at the top of the LCD screen. Press , . 2. For pairing new Bluetooth® device 1. Follow the Bluetooth accessory instructions to set to pairing mode. 4. Highlight the device and press . 7. Once pairing...

User Guide
Page 42
... to set one of the available alarm ring types and press . 9. At the alarm time, Alarm 1 (or 2, 3 or Quick Alarm) will be displayed on the LCD screen and the alarm will sound. 1. Set the time for alarm and press . 5.
... to set one of the available alarm ring types and press . 9. At the alarm time, Alarm 1 (or 2, 3 or Quick Alarm) will be displayed on the LCD screen and the alarm will sound. 1. Set the time for alarm and press . 5.

User Guide
Page 54
.... 1.1.4 Foregrounds 1.1.4.1 Clock & Calendar Allows you to choose the kind of greeting up to be displayed on the LCD screen. 1. Press . 1.1.4.2 Greeting Allows you to enter a string of clock to 16 characters displayed on the LCD screen. 1. Dim Only/ 8 seconds/ 15 seconds/ Flip Open 1.1.3 Menu Styles Allows you to set the duration for...
.... 1.1.4 Foregrounds 1.1.4.1 Clock & Calendar Allows you to choose the kind of greeting up to be displayed on the LCD screen. 1. Press . 1.1.4.2 Greeting Allows you to enter a string of clock to 16 characters displayed on the LCD screen. 1. Dim Only/ 8 seconds/ 15 seconds/ Flip Open 1.1.3 Menu Styles Allows you to set the duration for...

User Guide
Page 56
... to select Always Off/ 8 seconds/ 15 seconds/ 30 seconds, then press . 1.5 Language Allows you to set the bilingual feature according to be displayed on the LCD screen. 1. Press , , , . 2. Select the menu to select English or French, then press . 56 Settings Press , , , . 2.
... to select Always Off/ 8 seconds/ 15 seconds/ 30 seconds, then press . 1.5 Language Allows you to set the bilingual feature according to be displayed on the LCD screen. 1. Press , , , . 2. Select the menu to select English or French, then press . 56 Settings Press , , , . 2.


