User Guide
Page 5
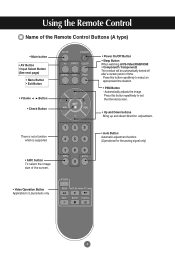
... Button • Volume Button • Check Button There is not a function which is supported • Power On/Off Button • Sleep Button When watching AV/S-Video/RGB/HDMI • Component1/ Component2 The product will be automatically turned off after a certain period of the screen. •...
... Button • Volume Button • Check Button There is not a function which is supported • Power On/Off Button • Sleep Button When watching AV/S-Video/RGB/HDMI • Component1/ Component2 The product will be automatically turned off after a certain period of the screen. •...
User Guide
Page 7
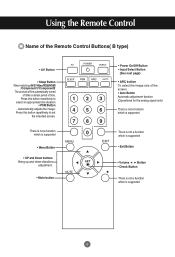
... time duration • PSM Button - Using the Remote Control Name of the Remote Control Buttons( B type) • AV Button • Sleep Button When watching AV/S-Video/RGB/HDMI /Component1/ Component2 The product will be automatically turned off after a certain period of the screen. • Auto Button Automatic adjustment function (Operational for...
... time duration • PSM Button - Using the Remote Control Name of the Remote Control Buttons( B type) • AV Button • Sleep Button When watching AV/S-Video/RGB/HDMI /Component1/ Component2 The product will be automatically turned off after a certain period of the screen. • Auto Button Automatic adjustment function (Operational for...
User Guide
Page 10
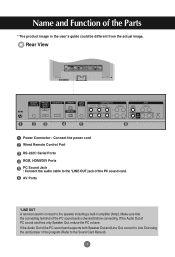
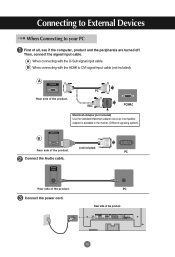
... CONTROL IN RS-232C (CONTROL& SERVICE) OUT HDMI/DVI IN IN RGB IN RGB OUT AUDIO (RGB/DVI) COMPONENT IN VIDEO Y P B P R L-AUDIO-R 1 2 VIDEO AV IN L-AUDIO-R AV OUT S-VIDEO Power Connector : Connect the power cord Wired Remote Control Port RS-232C Serial Ports RGB, HDMI/DVI Ports PC Sound Jack : Connect the audio...
... CONTROL IN RS-232C (CONTROL& SERVICE) OUT HDMI/DVI IN IN RGB IN RGB OUT AUDIO (RGB/DVI) COMPONENT IN VIDEO Y P B P R L-AUDIO-R 1 2 VIDEO AV IN L-AUDIO-R AV OUT S-VIDEO Power Connector : Connect the power cord Wired Remote Control Port RS-232C Serial Ports RGB, HDMI/DVI Ports PC Sound Jack : Connect the audio...
User Guide
Page 11
... product. REMOTE CONTROL IN RS-232C (CONTROL& SERVICE) OUT IN HDMI/DVI IN RGB IN RGB OUT AUDIO (RGB/DVI) COMPONENT IN VIDEO Y P B P R L-AUDIO-R 1 2 VIDEO AV IN L-AUDIO-R AV OUT S-VIDEO 10 PC MAC PC/MAC Macintosh Adapter (not included) Use the standard Macintosh adapter since an incompatible adapter is available in the...
... product. REMOTE CONTROL IN RS-232C (CONTROL& SERVICE) OUT IN HDMI/DVI IN RGB IN RGB OUT AUDIO (RGB/DVI) COMPONENT IN VIDEO Y P B P R L-AUDIO-R 1 2 VIDEO AV IN L-AUDIO-R AV OUT S-VIDEO 10 PC MAC PC/MAC Macintosh Adapter (not included) Use the standard Macintosh adapter since an incompatible adapter is available in the...

User Guide
Page 14
...INPUT button on the back of the product. Product AV IN VIDEO L-AUDIO-R AV OUT S-VIDEO Product AV IN VIDEO L-AUDIO-R AV OUT S-VIDEO Audio Cable (not included) BNC Cable (not included) Audio Cable (not included) S-Video Cable (not included) VCR/DVD Receiver VCR/DVD Receiver Select ...A When connecting with a BNC cable. • Connect the input terminal with an S-Video cable. • Select AV. Note • When the BNC cable is connected simultaneously with S-Video cable, S-Video cable is first. 13 INPUT SET Input Or, press the SOURCE button on the remote ...
...INPUT button on the back of the product. Product AV IN VIDEO L-AUDIO-R AV OUT S-VIDEO Product AV IN VIDEO L-AUDIO-R AV OUT S-VIDEO Audio Cable (not included) BNC Cable (not included) Audio Cable (not included) S-Video Cable (not included) VCR/DVD Receiver VCR/DVD Receiver Select ...A When connecting with a BNC cable. • Connect the input terminal with an S-Video cable. • Select AV. Note • When the BNC cable is connected simultaneously with S-Video cable, S-Video cable is first. 13 INPUT SET Input Or, press the SOURCE button on the remote ...

User Guide
Page 15
... SOURCE button on the remote control to External Devices When watching HDTV/DVD(480p/576p/720p/1080i/480i/576i) Connect the video/audio cable as shown in the below figure and then, connect the power cord (See page 10). • Connect ...terminal with a proper color match. SOURCE AUTO/SET Input Input A • Select Component 1 B • Select Component 2 14 A Product COMPONENT IN VIDEO Y P B P R L-AUDIO-R 1 2 B Product COMPONENT IN VIDEO Y P B P R L-AUDIO-R 1 2 BNC Cable Audio Cable (not included) (not included) BNC Cable Audio Cable (not included) (not included...
... SOURCE button on the remote control to External Devices When watching HDTV/DVD(480p/576p/720p/1080i/480i/576i) Connect the video/audio cable as shown in the below figure and then, connect the power cord (See page 10). • Connect ...terminal with a proper color match. SOURCE AUTO/SET Input Input A • Select Component 1 B • Select Component 2 14 A Product COMPONENT IN VIDEO Y P B P R L-AUDIO-R 1 2 B Product COMPONENT IN VIDEO Y P B P R L-AUDIO-R 1 2 BNC Cable Audio Cable (not included) (not included) BNC Cable Audio Cable (not included) (not included...

User Guide
Page 16
... OUT RGB OUT HDMI to External Devices When watching HDMI/DVI/RGB from the VCR/DVD/Set-top Box (480p/576p/720p/1080i) Connect the video/audio cable as shown in the below figure and then connect the power cord (See page 10).
... OUT RGB OUT HDMI to External Devices When watching HDMI/DVI/RGB from the VCR/DVD/Set-top Box (480p/576p/720p/1080i) Connect the video/audio cable as shown in the below figure and then connect the power cord (See page 10).

User Guide
Page 17
Connecting to External Devices Watching AV Outputs • When you set the input signal of the main screen as 'AV (CVBS)', you can transmit the signal that you 're watching to be less damaged are recommended. Video/TV BNC Cable (not included) Audio Cable (not included) VIDEO AV IN L-AUDIO-R AV OUT S-VIDEO Product BNC Cable (not included) Audio Cable (not included) Video/TV Note • When multi-connecting in/out cascade format, cables to the AV output terminal. We recommend that you should use cable distributor. 16
Connecting to External Devices Watching AV Outputs • When you set the input signal of the main screen as 'AV (CVBS)', you can transmit the signal that you 're watching to be less damaged are recommended. Video/TV BNC Cable (not included) Audio Cable (not included) VIDEO AV IN L-AUDIO-R AV OUT S-VIDEO Product BNC Cable (not included) Audio Cable (not included) Video/TV Note • When multi-connecting in/out cascade format, cables to the AV output terminal. We recommend that you should use cable distributor. 16
User Guide
Page 18
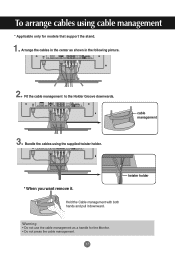
... the cables using cable management * Applicable only for the Monitor. • Do not press the cable management. 17 OUT RGB OUT IN 1 S-VIDEO 2 AV OUT 2. Warning • Do not use the cable management as shown in the following picture. Fit the cable management to the Holder Groove downwards. ...
... the cables using cable management * Applicable only for the Monitor. • Do not press the cable management. 17 OUT RGB OUT IN 1 S-VIDEO 2 AV OUT 2. Warning • Do not use the cable management as shown in the following picture. Fit the cable management to the Holder Groove downwards. ...

User Guide
Page 21
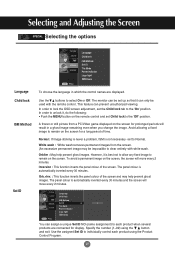
Selecting and Adjusting the Screen Name of the Buttons in the Screen Adjustment Unit AUTO/SET Button [For PC Analog signal] Auto in progress For opimal display change resolution to 1360 X 768 [When XGA Mode is active and 1360 X768 is selected] SOURCE Button SOURCE AUTO/SET • Select the input signal Input AV Component 1 Component 2 RGB HDMI/DVI Composite Video, Separate Video HDTV, DVD HDTV, DVD 15-pin D-Sub analog signal Digital signal IR Receiver • The unit that receives the signal from the remote control. 20
Selecting and Adjusting the Screen Name of the Buttons in the Screen Adjustment Unit AUTO/SET Button [For PC Analog signal] Auto in progress For opimal display change resolution to 1360 X 768 [When XGA Mode is active and 1360 X768 is selected] SOURCE Button SOURCE AUTO/SET • Select the input signal Input AV Component 1 Component 2 RGB HDMI/DVI Composite Video, Separate Video HDTV, DVD HDTV, DVD 15-pin D-Sub analog signal Digital signal IR Receiver • The unit that receives the signal from the remote control. 20

User Guide
Page 22
Note OSD(On Screen Display) The OSD function enables you prefer. Adjusts the audio function. Adjusts the screen video. Selecting and Adjusting the Screen OSD Menu Icon Function Description PICTURE SOUND TIMER SPECIAL SCREEN Adjusts screen brightness, contrast and color that you to the circumstances. Adjusts the screen status according to adjust the screen status conveniently since it provides graphical presentation. 21 Adjusts the timer function.
Note OSD(On Screen Display) The OSD function enables you prefer. Adjusts the audio function. Adjusts the screen video. Selecting and Adjusting the Screen OSD Menu Icon Function Description PICTURE SOUND TIMER SPECIAL SCREEN Adjusts screen brightness, contrast and color that you to the circumstances. Adjusts the screen status according to adjust the screen status conveniently since it provides graphical presentation. 21 Adjusts the timer function.

User Guide
Page 26
...with the dynamic surround effects. If you set . To use this option to use your computer and the 'SSM' setting in the audio menu is Flat, Music, Movie or Sports, the available menus are Balance, AVL and Surround MAX . 25 Balance Use this function to your external hi-fi stereo ... of the set the Surround MAX on, user audio setting can adjust internal speaker status. AVL • Surround MAX : Set the Surround MAX on the video type that you want to watch sports broadcasting. • User : Select this feature, select On. If you 're currently watching. User 120Hz 200Hz 500Hz 1....
...with the dynamic surround effects. If you set . To use this option to use your computer and the 'SSM' setting in the audio menu is Flat, Music, Movie or Sports, the available menus are Balance, AVL and Surround MAX . 25 Balance Use this function to your external hi-fi stereo ... of the set the Surround MAX on, user audio setting can adjust internal speaker status. AVL • Surround MAX : Set the Surround MAX on the video type that you want to watch sports broadcasting. • User : Select this feature, select On. If you 're currently watching. User 120Hz 200Hz 500Hz 1....
User Guide
Page 28
...be used with white wash. In order to lock the OSD screen adjustment, set Child lock to individually control each product when several products are displayed. However, it is not necessary -set up so that it , do the following : • Push the MENU button on the remote ... any fixed image to the 'On' position. Orb.+Inv. : This function inverts the panel colour of the screen. White wash : White wash removes permanent images from a PC/Video game displayed on the screen. The panel colour is automatically inverted every 30 minutes and the screen will move every 2 minutes. Selecting...
...be used with white wash. In order to lock the OSD screen adjustment, set Child lock to individually control each product when several products are displayed. However, it is not necessary -set up so that it , do the following : • Push the MENU button on the remote ... any fixed image to the 'On' position. Orb.+Inv. : This function inverts the panel colour of the screen. White wash : White wash removes permanent images from a PC/Video game displayed on the screen. The panel colour is automatically inverted every 30 minutes and the screen will move every 2 minutes. Selecting...
User Guide
Page 34
... to the Specifications in this function in the product only.) Note * Vertical frequency: To enable the user to watch the product display, screen image should be tabulated as the horizontal frequency. The unit is Hz. * Horizontal frequency: The horizontal interval is the times of image... cable between PC and product is blue but • Adjust brightness and contrast again. The vertical frequency or refresh rate is the time to the video card user manual. 'Controls Locked' message appears. When 1 is supported by the horizontal interval, the number of range' message appear? •...
... to the Specifications in this function in the product only.) Note * Vertical frequency: To enable the user to watch the product display, screen image should be tabulated as the horizontal frequency. The unit is Hz. * Horizontal frequency: The horizontal interval is the times of image... cable between PC and product is blue but • Adjust brightness and contrast again. The vertical frequency or refresh rate is the time to the video card user manual. 'Controls Locked' message appears. When 1 is supported by the horizontal interval, the number of range' message appear? •...
User Guide
Page 35
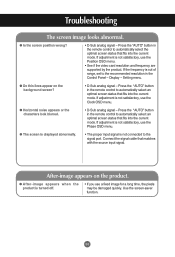
...select the optimal screen status that fits into the current mode. G The screen is displayed abnormally. • The proper input signal is not satisfactory, use the Position OSD menu. • See if the video card resolution and frequency are supported by the product. Press the "AUTO" button ... Use the screen-saver function. 34 If adjustment is not satisfactory, use the Clock OSD menu. Press the "AUTO" button in the Control Panel - Troubleshooting The screen image looks abnormal. If the frequency is turned off. • If you use the Phase OSD menu. Connect the ...
...select the optimal screen status that fits into the current mode. G The screen is displayed abnormally. • The proper input signal is not satisfactory, use the Position OSD menu. • See if the video card resolution and frequency are supported by the product. Press the "AUTO" button ... Use the screen-saver function. 34 If adjustment is not satisfactory, use the Clock OSD menu. Press the "AUTO" button in the Control Panel - Troubleshooting The screen image looks abnormal. If the frequency is turned off. • If you use the Phase OSD menu. Connect the ...
User Guide
Page 36
... color is not a malfunction of the LCD. 35 Display - G Do black spots appear on the screen? • Several pixels (red, green, white or black color) may appear on the screen, which can be attributable to more than 24 bits (true color) Select Control Panel - Troubleshooting The audio function does not ...colors to the unique characteristics of the signal cable. colored. Color Table menu in Windows. G Screen color is too dull. Or, re-insert the PC video card. G No sound? • See if the audio cable is connected properly. • Adjust the volume. • See if the sound is too...
... color is not a malfunction of the LCD. 35 Display - G Do black spots appear on the screen? • Several pixels (red, green, white or black color) may appear on the screen, which can be attributable to more than 24 bits (true color) Select Control Panel - Troubleshooting The audio function does not ...colors to the unique characteristics of the signal cable. colored. Color Table menu in Windows. G Screen color is too dull. Or, re-insert the PC video card. G No sound? • See if the audio cable is connected properly. • Adjust the volume. • See if the sound is too...
User Guide
Page 38
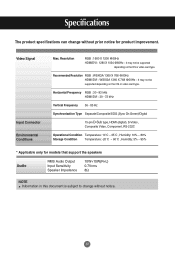
... HDMI/DVI : 30 - 72 kHz Vertical Frequency 56 - 85 Hz Synchronization Type Separate/Composite/SOG (Sync On Green)/Digital 15-pin D-Sub type, HDMI (digital), S-Video, Composite Video, Component, RS-232C Operational Condition Temperature: 10˚C ~ 35˚C , Humidity: 10% ~ 80% Storage Condition Temperature: -20˚C ~ 60˚C , Humidity: 5% ~ 95% * Applicable only... notice. 37 Recommended Resolution RGB : WSXGA 1360 X 768 @60Hz HDMI/DVI : WSXGA 1360 X 768 @60Hz - It may not be supported depending on the OS or video card type. It may not be supported depending on the OS or...
... HDMI/DVI : 30 - 72 kHz Vertical Frequency 56 - 85 Hz Synchronization Type Separate/Composite/SOG (Sync On Green)/Digital 15-pin D-Sub type, HDMI (digital), S-Video, Composite Video, Component, RS-232C Operational Condition Temperature: 10˚C ~ 35˚C , Humidity: 10% ~ 80% Storage Condition Temperature: -20˚C ~ 60˚C , Humidity: 5% ~ 95% * Applicable only... notice. 37 Recommended Resolution RGB : WSXGA 1360 X 768 @60Hz HDMI/DVI : WSXGA 1360 X 768 @60Hz - It may not be supported depending on the OS or video card type. It may not be supported depending on the OS or...

User Guide
Page 48
L L RS-232C Controlling the Multiple Product Transmission / Receiving Protocol 09. Color(Command : i) (Video only) To adjust the screen color. Acknowledgement [i][ ][Set ID][ ][OK][Data][x] Data Min : 00H ~ Max : 64H 10. You can also adjust the color in the ...: 00H ~ Green: 64H * Tint Real data mapping 0 : Step -50 : 64 : Step 50 A8 You can also adjust the tint in the Picture menu. Tint(Command : j) (Video only) To adjust the screen tint.
L L RS-232C Controlling the Multiple Product Transmission / Receiving Protocol 09. Color(Command : i) (Video only) To adjust the screen color. Acknowledgement [i][ ][Set ID][ ][OK][Data][x] Data Min : 00H ~ Max : 64H 10. You can also adjust the color in the ...: 00H ~ Green: 64H * Tint Real data mapping 0 : Step -50 : 64 : Step 50 A8 You can also adjust the tint in the Picture menu. Tint(Command : j) (Video only) To adjust the screen tint.

User Guide
Page 49
...] Data Min : 00H ~ Max : 64H (Hexadecimal code) • Refer to the set . OSD Select(Command : l) To control OSD on /off to the set . Sharpness(Command : k) (Video only) To adjust the screen Sharpness. L Transmission [k][l][ ][Set ID][ ][Data][Cr] Data 0 : OSD Off 1 : OSD On Acknowledgement [l][ ][Set ID][ ][OK][Data][x] Data 0 : OSD Off 1 : OSD...
...] Data Min : 00H ~ Max : 64H (Hexadecimal code) • Refer to the set . OSD Select(Command : l) To control OSD on /off to the set . Sharpness(Command : k) (Video only) To adjust the screen Sharpness. L Transmission [k][l][ ][Set ID][ ][Data][Cr] Data 0 : OSD Off 1 : OSD On Acknowledgement [l][ ][Set ID][ ][OK][Data][x] Data 0 : OSD Off 1 : OSD...


