User Guide
Page 3
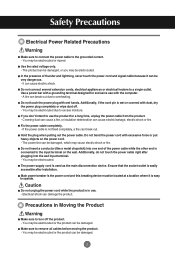
.... - Fix the power cable completely. - The power line can be very dangerous. - Ensure that the socket-outlet is easily accessible after plugging into one end of thunder and lightning, never touch the power cord and signal cable because it is in Moving the Product Warning Make sure to turn off . - Main power breaker is the power cord and this breaking device must be located at a location...
.... - Fix the power cable completely. - The power line can be very dangerous. - Ensure that the socket-outlet is easily accessible after plugging into one end of thunder and lightning, never touch the power cord and signal cable because it is in Moving the Product Warning Make sure to turn off . - Main power breaker is the power cord and this breaking device must be located at a location...
User Guide
Page 4
.... - Your vision may be deformed. Set the appropriate resolution and clock by referring to careless handling...panel with a product to move . Contact with a product for check, calibration or repair. Keep the product clean at all times. Take a regular break when working with a hand or sharp object such as nail, pencil or pen, or make a scratch on it with a wet cloth. Use it . - When cleaning the brown tube surface, unplug the power cord... box. Take a rest from time to time to prevent scratching. Use authorized detergent only when cleaning the product. (Do not use ...
.... - Your vision may be deformed. Set the appropriate resolution and clock by referring to careless handling...panel with a product to move . Contact with a product for check, calibration or repair. Keep the product clean at all times. Take a regular break when working with a hand or sharp object such as nail, pencil or pen, or make a scratch on it with a wet cloth. Use it . - When cleaning the brown tube surface, unplug the power cord... box. Take a rest from time to time to prevent scratching. Use authorized detergent only when cleaning the product. (Do not use ...
User Guide
Page 5
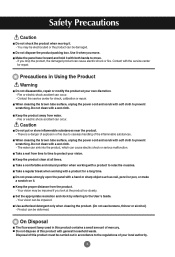
... Button - Using the Remote Control Name of the Remote Control Buttons (A type) • Mute button • AV Button • Input Select Button (See next page) • Menu Button • Exit Button • Volume Button • Check Button There is not a function which is supported • Power On/Off Button • Sleep Button When watching AV/S-Video/RGB/HDMI • Component1/ Component2 The product will be automatically turned off after a certain period of the screen. • Video Operation Button Applicable for LG...
... Button - Using the Remote Control Name of the Remote Control Buttons (A type) • Mute button • AV Button • Input Select Button (See next page) • Menu Button • Exit Button • Volume Button • Check Button There is not a function which is supported • Power On/Off Button • Sleep Button When watching AV/S-Video/RGB/HDMI • Component1/ Component2 The product will be automatically turned off after a certain period of the screen. • Video Operation Button Applicable for LG...
User Guide
Page 7
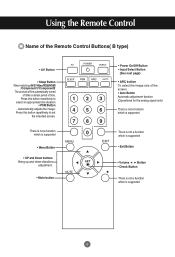
...) • ARC button To select the image size of time. Automatically adjusts the image. Press this button repetitively to select an appropriate time duration • PSM Button - Using the Remote Control Name of the Remote Control Buttons( B type) • AV Button • Sleep Button When watching AV/S-Video/RGB/HDMI /Component1/ Component2 The product will be automatically turned off after a certain period of the screen. • Auto Button Automatic adjustment function (Operational for the analog signal only) There...
...) • ARC button To select the image size of time. Automatically adjusts the image. Press this button repetitively to select an appropriate time duration • PSM Button - Using the Remote Control Name of the Remote Control Buttons( B type) • AV Button • Sleep Button When watching AV/S-Video/RGB/HDMI /Component1/ Component2 The product will be automatically turned off after a certain period of the screen. • Auto Button Automatic adjustment function (Operational for the analog signal only) There...
User Guide
Page 10
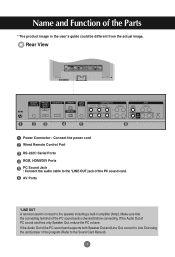
... the PC sound card. Rear View REMOTE CONTROL IN RS-232C (CONTROL& SERVICE) OUT HDMI/DVI IN IN RGB IN RGB OUT AUDIO (RGB/DVI) COMPONENT IN VIDEO Y P B P R L-AUDIO-R 1 2 VIDEO AV IN L-AUDIO-R AV OUT S-VIDEO REMOTE CONTROL IN RS-232C (CONTROL& SERVICE) OUT HDMI/DVI IN IN RGB IN RGB OUT AUDIO (RGB/DVI) COMPONENT IN VIDEO Y P B P R L-AUDIO-R 1 2 VIDEO AV IN L-AUDIO-R AV OUT S-VIDEO Power Connector : Connect the power cord Wired Remote Control Port RS-232C Serial Ports RGB, HDMI/DVI Ports PC Sound Jack : Connect the audio cable to...
... the PC sound card. Rear View REMOTE CONTROL IN RS-232C (CONTROL& SERVICE) OUT HDMI/DVI IN IN RGB IN RGB OUT AUDIO (RGB/DVI) COMPONENT IN VIDEO Y P B P R L-AUDIO-R 1 2 VIDEO AV IN L-AUDIO-R AV OUT S-VIDEO REMOTE CONTROL IN RS-232C (CONTROL& SERVICE) OUT HDMI/DVI IN IN RGB IN RGB OUT AUDIO (RGB/DVI) COMPONENT IN VIDEO Y P B P R L-AUDIO-R 1 2 VIDEO AV IN L-AUDIO-R AV OUT S-VIDEO Power Connector : Connect the power cord Wired Remote Control Port RS-232C Serial Ports RGB, HDMI/DVI Ports PC Sound Jack : Connect the audio cable to...
User Guide
Page 11
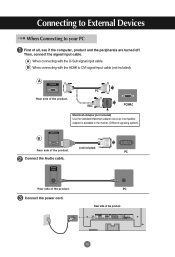
.... REMOTE CONTROL IN RS-232C (CONTROL& SERVICE) OUT IN HDMI/DVI IN RGB IN RGB OUT AUDIO (RGB/DVI) COMPONENT IN VIDEO Y P B P R L-AUDIO-R 1 2 VIDEO AV IN L-AUDIO-R AV OUT S-VIDEO 10 B When connecting with the D-Sub signal input cable. A When connecting with the HDMI to your PC First of all, see if the computer, product and the peripherals are turned off. A RGB IN Rear side of the product. Connect the power cord. PC...
.... REMOTE CONTROL IN RS-232C (CONTROL& SERVICE) OUT IN HDMI/DVI IN RGB IN RGB OUT AUDIO (RGB/DVI) COMPONENT IN VIDEO Y P B P R L-AUDIO-R 1 2 VIDEO AV IN L-AUDIO-R AV OUT S-VIDEO 10 B When connecting with the D-Sub signal input cable. A When connecting with the HDMI to your PC First of all, see if the computer, product and the peripherals are turned off. A RGB IN Rear side of the product. Connect the power cord. PC...

User Guide
Page 12
... D-Sub analog signal. Connecting to External Devices 1 Turn on power by pressing the power button on the product. 2 Turn on the wall or a power bar with a ground wire. 11 Press the INPUT button on the back of the product. SOURCE AUTO/SET Input Input A When connecting with a HDMI to DVI signal input cable. • Select HDMI/DVI : HDMI to select the input signal. Note • How to connect to each computer. INPUT SET Or, press the SOURCE button on the remote control to DVI Digital signal.
... D-Sub analog signal. Connecting to External Devices 1 Turn on power by pressing the power button on the product. 2 Turn on the wall or a power bar with a ground wire. 11 Press the INPUT button on the back of the product. SOURCE AUTO/SET Input Input A When connecting with a HDMI to DVI signal input cable. • Select HDMI/DVI : HDMI to select the input signal. Note • How to connect to each computer. INPUT SET Or, press the SOURCE button on the remote control to DVI Digital signal.

User Guide
Page 14
.... INPUT SET Input Or, press the SOURCE button on the remote control to External Devices When watching VCR / DVD Connect the video cable as shown in the below figure and then connect the power cord (See page 10). Product AV IN VIDEO L-AUDIO-R AV OUT S-VIDEO Product AV IN VIDEO L-AUDIO-R AV OUT S-VIDEO Audio Cable (not included) BNC Cable (not included) Audio Cable (not included) S-Video Cable (not included) VCR/DVD Receiver VCR/DVD Receiver Select an input signal. B When connecting with a proper color match...
.... INPUT SET Input Or, press the SOURCE button on the remote control to External Devices When watching VCR / DVD Connect the video cable as shown in the below figure and then connect the power cord (See page 10). Product AV IN VIDEO L-AUDIO-R AV OUT S-VIDEO Product AV IN VIDEO L-AUDIO-R AV OUT S-VIDEO Audio Cable (not included) BNC Cable (not included) Audio Cable (not included) S-Video Cable (not included) VCR/DVD Receiver VCR/DVD Receiver Select an input signal. B When connecting with a proper color match...

User Guide
Page 15
... A Product COMPONENT IN VIDEO Y P B P R L-AUDIO-R 1 2 B Product COMPONENT IN VIDEO Y P B P R L-AUDIO-R 1 2 BNC Cable Audio Cable (not included) (not included) BNC Cable Audio Cable (not included) (not included) HDTV Receiver HDTV Receiver Select an input signal. INPUT SET Or, press the SOURCE button on the remote control to External Devices When watching HDTV/DVD(480p/576p/720p/1080i/480i/576i) Connect the video/audio cable as shown in the below figure and then, connect the power cord (See page 10). • Connect the input terminal with a proper color match.
... A Product COMPONENT IN VIDEO Y P B P R L-AUDIO-R 1 2 B Product COMPONENT IN VIDEO Y P B P R L-AUDIO-R 1 2 BNC Cable Audio Cable (not included) (not included) BNC Cable Audio Cable (not included) (not included) HDTV Receiver HDTV Receiver Select an input signal. INPUT SET Or, press the SOURCE button on the remote control to External Devices When watching HDTV/DVD(480p/576p/720p/1080i/480i/576i) Connect the video/audio cable as shown in the below figure and then, connect the power cord (See page 10). • Connect the input terminal with a proper color match.
User Guide
Page 19
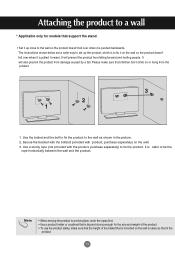
... for models that support the stand. • Set it up the product, which is to fix it on the wall. 3. Use a sturdy rope (not provided with product, purchase separately) on the wall so the product doesn't fall over when it is pushed backwards. Attaching the product to a wall * Applicable only for the size and weight of the product. • To use the...
... for models that support the stand. • Set it up the product, which is to fix it on the wall. 3. Use a sturdy rope (not provided with product, purchase separately) on the wall so the product doesn't fall over when it is pushed backwards. Attaching the product to a wall * Applicable only for the size and weight of the product. • To use the...

User Guide
Page 20
... lights up and down. • Adjust the volume. 19 Press this button to turn on mode). MENU Button • Use this button again to show/hide the OSD (On Screen Display) menu screen. If the display is in sleep (Energy Saving) mode, this button to select an icon or adjust the setting in the Screen Adjustment Unit SOURCE SOURCE AUTO/SET ON/OFF AUTO/SET ON/OFF Power Button • Press this button to amber. OSD Select / Adjust Button • Use this indicator colour changes...
... lights up and down. • Adjust the volume. 19 Press this button to turn on mode). MENU Button • Use this button again to show/hide the OSD (On Screen Display) menu screen. If the display is in sleep (Energy Saving) mode, this button to select an icon or adjust the setting in the Screen Adjustment Unit SOURCE SOURCE AUTO/SET ON/OFF AUTO/SET ON/OFF Power Button • Press this button to amber. OSD Select / Adjust Button • Use this indicator colour changes...

User Guide
Page 21
Selecting and Adjusting the Screen Name of the Buttons in the Screen Adjustment Unit AUTO/SET Button [For PC Analog signal] Auto in progress For opimal display change resolution to 1360 X 768 [When XGA Mode is active and 1360 X768 is selected] SOURCE Button SOURCE AUTO/SET • Select the input signal Input AV Component 1 Component 2 RGB HDMI/DVI Composite Video, Separate Video HDTV, DVD HDTV, DVD 15-pin D-Sub analog signal Digital signal IR Receiver • The unit that receives the signal from the remote control. 20
Selecting and Adjusting the Screen Name of the Buttons in the Screen Adjustment Unit AUTO/SET Button [For PC Analog signal] Auto in progress For opimal display change resolution to 1360 X 768 [When XGA Mode is active and 1360 X768 is selected] SOURCE Button SOURCE AUTO/SET • Select the input signal Input AV Component 1 Component 2 RGB HDMI/DVI Composite Video, Separate Video HDTV, DVD HDTV, DVD 15-pin D-Sub analog signal Digital signal IR Receiver • The unit that receives the signal from the remote control. 20

User Guide
Page 23
... and a new computer or changing the mode. How to adjust the screen automatically You need to adjust screen position, clock and phase in the PC analog signal. Selecting and Adjusting the Screen How to adjust the OSD (On Screen Display) screen (A Type) Pops up the menu screen Move where you want to adjust Select a menu icon Move where you want becomes highlighted, press the SET Button. 4 Use the Buttons to adjust the item to the...
... and a new computer or changing the mode. How to adjust the screen automatically You need to adjust screen position, clock and phase in the PC analog signal. Selecting and Adjusting the Screen How to adjust the OSD (On Screen Display) screen (A Type) Pops up the menu screen Move where you want to adjust Select a menu icon Move where you want becomes highlighted, press the SET Button. 4 Use the Buttons to adjust the item to the...

User Guide
Page 26
... watch sports broadcasting. • User : Select this option to your external hi-fi stereo system, turn off the internal speakers of the set the Surround MAX on, user audio setting can adjust internal speaker status. This function plays back the mono or stereo sound input with the dynamic surround effects. It will be adjusted. • Flat : The most appropriate level. Note When connected to use the user-defined audio settings.
... watch sports broadcasting. • User : Select this option to your external hi-fi stereo system, turn off the internal speakers of the set the Surround MAX on, user audio setting can adjust internal speaker status. This function plays back the mono or stereo sound input with the dynamic surround effects. It will be adjusted. • Flat : The most appropriate level. Note When connected to use the user-defined audio settings.
User Guide
Page 28
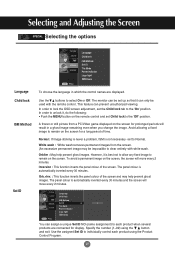
... of the screen and may be set Child lock to the 'On' position. The panel colour is not necessary -set the Child lock tab to the 'Off' position. White wash : White wash removes permanent images from a PC/Video game displayed on the screen. Selecting and Adjusting the Screen Selecting the options Language Child lock ISM Method Set ID Tile Mode Power Indicator Logo light Demo Language Child lock ISM Method Set ID To...
... of the screen and may be set Child lock to the 'On' position. The panel colour is not necessary -set the Child lock tab to the 'Off' position. White wash : White wash removes permanent images from a PC/Video game displayed on the screen. Selecting and Adjusting the Screen Selecting the options Language Child lock ISM Method Set ID Tile Mode Power Indicator Logo light Demo Language Child lock ISM Method Set ID To...

User Guide
Page 29
... lock ISM Method Set ID Tile Mode Power Indicator Logo light Demo Tile Mode Tile ID H-Size V-Size H-Position V-Position Reset Off 0 0 0 To set location. * Only after pressing the SET button the adjustments made to set It is also available as well as configuration of One by one Display. - Tile mode : row x column ( r = 1, 2, 3, 4 c = 1, 2, 3, 4) - 4 x 4 available. - Configuration of an integration screen is used to enlarge the screen and also used with several products to view screen...
... lock ISM Method Set ID Tile Mode Power Indicator Logo light Demo Tile Mode Tile ID H-Size V-Size H-Position V-Position Reset Off 0 0 0 To set location. * Only after pressing the SET button the adjustments made to set It is also available as well as configuration of One by one Display. - Tile mode : row x column ( r = 1, 2, 3, 4 c = 1, 2, 3, 4) - 4 x 4 available. - Configuration of an integration screen is used to enlarge the screen and also used with several products to view screen...

User Guide
Page 31
... Tile recall and the screen returns to initialize and release Tile. If you set Off, it to On or Off. Logo Light Use this function to On or Off. Selecting and Adjusting the Screen Selecting the options Language Child lock ISM Method Set ID Tile Mode Power Indicator Logo light Demo Tile Mode Tile ID H-Size V-Size H-Position V-Position Reset Off 0 0 0 To set • Tile ID Select the location...
... Tile recall and the screen returns to initialize and release Tile. If you set Off, it to On or Off. Logo Light Use this function to On or Off. Selecting and Adjusting the Screen Selecting the options Language Child lock ISM Method Set ID Tile Mode Power Indicator Logo light Demo Tile Mode Tile ID H-Size V-Size H-Position V-Position Reset Off 0 0 0 To set • Tile ID Select the location...
User Guide
Page 34
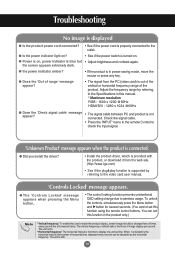
... product is the times of horizontal lines displayed every second can set this function in the remote Control to the video card user manual. 'Controls Locked' message appears. G The 'Controls Locked' message appears when pressing the Menu button. G Power is on . Troubleshooting No image is displayed G Is the product power cord connected? • See if the power cord is properly connected to display one vertical line. Check the signal cable. • Press the 'INPUT' menu in the product...
... product is the times of horizontal lines displayed every second can set this function in the remote Control to the video card user manual. 'Controls Locked' message appears. G The 'Controls Locked' message appears when pressing the Menu button. G Power is on . Troubleshooting No image is displayed G Is the product power cord connected? • See if the power cord is properly connected to display one vertical line. Check the signal cable. • Press the 'INPUT' menu in the product...
User Guide
Page 35
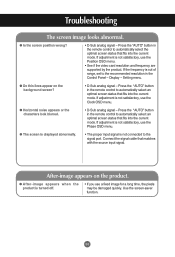
... current mode. If the frequency is not satisfactory, use the Phase OSD menu. Press the "AUTO" button in the Control Panel - G Do thin lines appear on the product. If adjustment is out of range, set to the recommended resolution in the remote control to the signal port. Troubleshooting The screen image looks abnormal. Display - If adjustment is not connected to automatically select an optimal screen status that matches with the source input signal...
... current mode. If the frequency is not satisfactory, use the Phase OSD menu. Press the "AUTO" button in the Control Panel - G Do thin lines appear on the product. If adjustment is out of range, set to the recommended resolution in the remote control to the signal port. Troubleshooting The screen image looks abnormal. Display - If adjustment is not connected to automatically select an optimal screen status that matches with the source input signal...
User Guide
Page 36
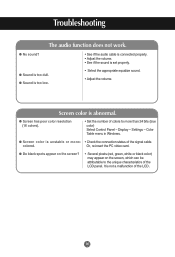
... volume. Screen color is set properly. G Screen has poor color resolution (16 colors). • Set the number of the LCD panel. G Do black spots appear on the screen? • Several pixels (red, green, white or black color) may appear on the screen, which can be attributable to the unique characteristics of colors to more than 24 bits (true color) Select Control Panel - Or, re-insert the PC video card. G No sound? • See if the audio cable is connected...
... volume. Screen color is set properly. G Screen has poor color resolution (16 colors). • Set the number of the LCD panel. G Do black spots appear on the screen? • Several pixels (red, green, white or black color) may appear on the screen, which can be attributable to the unique characteristics of colors to more than 24 bits (true color) Select Control Panel - Or, re-insert the PC video card. G No sound? • See if the audio cable is connected...


