
Owner's Manual (English)
Page 1
Sellers or users should understand that this device is for future reference. See the label attached on the product and give the information to read the Safety Precautions before using the product. User's Guide M3202C M3702C Make sure to your dealer when you ask for service. Keep the User's Guide(CD) in an accessible place for public use, not home use.
Sellers or users should understand that this device is for future reference. See the label attached on the product and give the information to read the Safety Precautions before using the product. User's Guide M3202C M3702C Make sure to your dealer when you ask for service. Keep the User's Guide(CD) in an accessible place for public use, not home use.

Owner's Manual (English)
Page 2
Only on the table and put the product with the screen facing downward. Take the parts for the stand out of the product as shown in the following parts are all present. Use the screws to secure the stand on the rear side of the box and assemble them as shown in the diagram. 1 Parts First, check if the following picture. 3. Screws (6) Stand (1) Stand Cover(1) 2. Connecting the stand - Connect the stand as shown in the picture. Place a soft cloth on some models. 1.
Only on the table and put the product with the screen facing downward. Take the parts for the stand out of the product as shown in the following parts are all present. Use the screws to secure the stand on the rear side of the box and assemble them as shown in the diagram. 1 Parts First, check if the following picture. 3. Screws (6) Stand (1) Stand Cover(1) 2. Connecting the stand - Connect the stand as shown in the picture. Place a soft cloth on some models. 1.

Owner's Manual (English)
Page 4
Mount the product onto the speaker by using a screw as shown in the following connect the speaker cable. Connecting the Speakers - Only on some models. Type 1 When the speaker is installed. *Connect the input terminal with a proper color match. 3
Mount the product onto the speaker by using a screw as shown in the following connect the speaker cable. Connecting the Speakers - Only on some models. Type 1 When the speaker is installed. *Connect the input terminal with a proper color match. 3
Owner's Manual (English)
Page 5
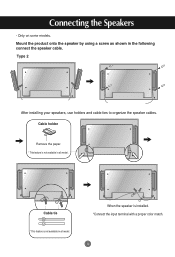
Type 2 After installing your speakers, use holders and cable ties to organize the speaker cables. When the speaker is not available in the following connect the speaker cable. Only on some models. Cable tie * This feature is not available in all model. Cable holder Remove the paper. * This feature is installed. *Connect the input terminal with a proper color match. 4 Connecting the Speakers - Mount the product onto the speaker by using a screw as shown in all model.
Type 2 After installing your speakers, use holders and cable ties to organize the speaker cables. When the speaker is not available in the following connect the speaker cable. Only on some models. Cable tie * This feature is not available in all model. Cable holder Remove the paper. * This feature is installed. *Connect the input terminal with a proper color match. 4 Connecting the Speakers - Mount the product onto the speaker by using a screw as shown in all model.

Owner's Manual (English)
Page 7
... page) • ARC button Aspect Ratio Correction. Toggles through preset video settings. Press this button repetitively to select an appropriate time duration • PSM Button - Using the Remote Control Name of the Remote Control Buttons • AV Button • Sleep Button When watching AV, RGB PC,HDMI/DVI ,Component1, Component2 The...
... page) • ARC button Aspect Ratio Correction. Toggles through preset video settings. Press this button repetitively to select an appropriate time duration • PSM Button - Using the Remote Control Name of the Remote Control Buttons • AV Button • Sleep Button When watching AV, RGB PC,HDMI/DVI ,Component1, Component2 The...

Owner's Manual (English)
Page 8
... the batteries with correct polarity (+/-). 3. Slide off the battery cover. 2. Input AV Component1 Component2 RGB PC HDMI/DVI * Inserting batteries into remote control. AAA Type 1. Using the Remote Control • AV Button Toggles through video AV Component1 Component2 RGB PC HDMI/DVI 123 456 789 0 • Input Select Button If you...
... the batteries with correct polarity (+/-). 3. Slide off the battery cover. 2. Input AV Component1 Component2 RGB PC HDMI/DVI * Inserting batteries into remote control. AAA Type 1. Using the Remote Control • AV Button Toggles through video AV Component1 Component2 RGB PC HDMI/DVI 123 456 789 0 • Input Select Button If you...

Owner's Manual (English)
Page 9
... connecting terminal of PC sound card has only Speaker Out, reduce the PC volume. Wired Remote Control Port AV Ports Speaker Ports *LINE OUT A terminal used to connect to the *LINE OUT jack of the PC sound card. PC Sound Jack : Connect the audio cable to the speaker including a built-in... from the actual image. If the Audio Out of the PC sound card supports both Speaker Out and Line Out, convert to Line Out using the card jumper of the program (Refer to display HD signals. Name and Function of the Parts * The product image in order to the Sound Card Manual). 8
... connecting terminal of PC sound card has only Speaker Out, reduce the PC volume. Wired Remote Control Port AV Ports Speaker Ports *LINE OUT A terminal used to connect to the *LINE OUT jack of the PC sound card. PC Sound Jack : Connect the audio cable to the speaker including a built-in... from the actual image. If the Audio Out of the PC sound card supports both Speaker Out and Line Out, convert to Line Out using the card jumper of the program (Refer to display HD signals. Name and Function of the Parts * The product image in order to the Sound Card Manual). 8
Owner's Manual (English)
Page 10
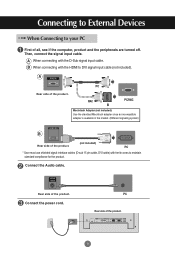
B When connecting with the HDMI to maintain standard compliance for the product. PC Rear side of the product. PC * User must use shielded signal interface cables (D-sub 15 pin cable, DVI cable) with the D-Sub signal input cable. Connect the power cord. Then, connect... of the product. 9 Connecting to External Devices When Connecting to your PC First of the product. PC MAC PC/MAC Macintosh Adapter (not included) Use the standard Macintosh adapter since an incompatible adapter is available in the market. (Different signaling system) B (not included) Rear side of all, see...
B When connecting with the HDMI to maintain standard compliance for the product. PC Rear side of the product. PC * User must use shielded signal interface cables (D-sub 15 pin cable, DVI cable) with the D-Sub signal input cable. Connect the power cord. Then, connect... of the product. 9 Connecting to External Devices When Connecting to your PC First of the product. PC MAC PC/MAC Macintosh Adapter (not included) Use the standard Macintosh adapter since an incompatible adapter is available in the market. (Different signaling system) B (not included) Rear side of all, see...

Owner's Manual (English)
Page 11
... the input signal. INPUT AUTO/SET Power button Select an input signal. Press the INPUT button on the remote control to select the computer to use. • Directly connect to DVI Digital signal. B When connecting with a D-Sub signal input cable. • Select RGB PC : 15-pin D-Sub analog signal. Press the...
... the input signal. INPUT AUTO/SET Power button Select an input signal. Press the INPUT button on the remote control to select the computer to use. • Directly connect to DVI Digital signal. B When connecting with a D-Sub signal input cable. • Select RGB PC : 15-pin D-Sub analog signal. Press the...

Owner's Manual (English)
Page 12
Connecting to External Devices Daisy Chain Monitors Use this function when displaying ANALOG RGB inputs of other product. • To use cable distributor. 11 We recommend that you should use different products connected to each other Connect one end of the signal input cable(15-pin D-Sub Signal Cable) to the RGB OUT connector of...
Connecting to External Devices Daisy Chain Monitors Use this function when displaying ANALOG RGB inputs of other product. • To use cable distributor. 11 We recommend that you should use different products connected to each other Connect one end of the signal input cable(15-pin D-Sub Signal Cable) to the RGB OUT connector of...

Owner's Manual (English)
Page 17
We recommend that you can connect the AV Out to External Devices Watching AV Outputs - Video/TV BNC Cable (not included) Audio Cable (not included) IN Product OUT BNC Cable (not included) Audio Cable (not included) Video/TV Note • When multi-connecting in/out cascade format, no loss cables are recommended. Connecting to other monitors. When using AV input, you should use cable distributor. 16
We recommend that you can connect the AV Out to External Devices Watching AV Outputs - Video/TV BNC Cable (not included) Audio Cable (not included) IN Product OUT BNC Cable (not included) Audio Cable (not included) Video/TV Note • When multi-connecting in/out cascade format, no loss cables are recommended. Connecting to other monitors. When using AV input, you should use cable distributor. 16
Owner's Manual (English)
Page 18
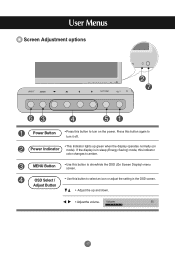
... lights up and down. • Adjust the volume. If the display is in the OSD screen. • Adjust the up green when the display operates normally (on the power. Volume 35 17 OSD Select / Adjust Button • Use this button to select an icon or adjust the setting in sleep ...(Energy Saving) mode, this indicator color changes to amber. MENU Button • Use this button to show/hide the OSD (On Screen Display) menu screen. Press this button again to turn on mode). User Menus Screen Adjustment options INPUT AUTO/SET Power Button...
... lights up and down. • Adjust the volume. If the display is in the OSD screen. • Adjust the up green when the display operates normally (on the power. Volume 35 17 OSD Select / Adjust Button • Use this button to select an icon or adjust the setting in sleep ...(Energy Saving) mode, this indicator color changes to amber. MENU Button • Use this button to show/hide the OSD (On Screen Display) menu screen. Press this button again to turn on mode). User Menus Screen Adjustment options INPUT AUTO/SET Power Button...

Owner's Manual (English)
Page 21
... is not satisfactory, you want becomes highlighted, press the SET Button. 4 Use the Buttons to adjust the item to adjust the screen automatically Press the AUTO... Button. 6 Exit the OSD by pressing the EXIT Button. User Menus How to adjust the OSD (On Screen Display) screen Pops up the menu screen Move where you want to adjust Select a menu icon Move where you want to... adjust Select a Adjust the status menu icon Save Exit from the adjustment menu screen. • Use the remote control to adjust the OSD screen. 1 Press the MENU Button, then the main menu of the OSD appears...
... is not satisfactory, you want becomes highlighted, press the SET Button. 4 Use the Buttons to adjust the item to adjust the screen automatically Press the AUTO... Button. 6 Exit the OSD by pressing the EXIT Button. User Menus How to adjust the OSD (On Screen Display) screen Pops up the menu screen Move where you want to adjust Select a menu icon Move where you want to... adjust Select a Adjust the status menu icon Save Exit from the adjustment menu screen. • Use the remote control to adjust the OSD screen. 1 Press the MENU Button, then the main menu of the OSD appears...

Owner's Manual (English)
Page 22
...the screen. Contrast : Adjust the difference between screen presets. • Vivid : Select this option to display with a sharp image. • Standard : The most general and natural screen display status. • Cinema : Select this option to lower brightness by one level. • Sport :...Select this option to display with a soft image. • Game : To enjoy dynamic image when playing a game. • User1,2 : Select this option to use the user-defined settings. Color : To adjust the color to desired level. Sharpness : To adjust the clearness of LCD panel. Expert : To compensate...
...the screen. Contrast : Adjust the difference between screen presets. • Vivid : Select this option to display with a sharp image. • Standard : The most general and natural screen display status. • Cinema : Select this option to lower brightness by one level. • Sport :...Select this option to display with a soft image. • Game : To enjoy dynamic image when playing a game. • User1,2 : Select this option to use the user-defined settings. Color : To adjust the color to desired level. Sharpness : To adjust the clearness of LCD panel. Expert : To compensate...

Owner's Manual (English)
Page 23
User Red 0 Green 0 Blue 0 MENU Red / Green / Blue Set your own color levels. 22 User Menus Adjusting Screen Color Color Temperature Picture Picture Mode Color Temperature Advanced Aspect Ratio Picture Reset Screen Cool Medium Warm User MENU Color Settings • Cool : Slightly purplish white. • Medium : Slightly bluish white. • Warm : Slightly reddish white. • User : Select this option to use the user-defined settings.
User Red 0 Green 0 Blue 0 MENU Red / Green / Blue Set your own color levels. 22 User Menus Adjusting Screen Color Color Temperature Picture Picture Mode Color Temperature Advanced Aspect Ratio Picture Reset Screen Cool Medium Warm User MENU Color Settings • Cool : Slightly purplish white. • Medium : Slightly bluish white. • Warm : Slightly reddish white. • User : Select this option to use the user-defined settings.

Owner's Manual (English)
Page 24
AV(NTSC), HDMI/DVI adjusts the contrast and the brightness of the screen using the black level of the screen. • Low : The reflection of the screen gets brighter. • High : The reflection of the screen gets darker. • ...) When you watch a movie, this function adjusts the set MENU • Gamma : Set your own gamma value. : -50/0/50 On the monitor, high gamma values display whitish images and low gamma values display high contrast images. • Film Mode : (Function works in the following mode -
AV(NTSC), HDMI/DVI adjusts the contrast and the brightness of the screen using the black level of the screen. • Low : The reflection of the screen gets brighter. • High : The reflection of the screen gets darker. • ...) When you watch a movie, this function adjusts the set MENU • Gamma : Set your own gamma value. : -50/0/50 On the monitor, high gamma values display whitish images and low gamma values display high contrast images. • Film Mode : (Function works in the following mode -

Owner's Manual (English)
Page 25
... cut off . This picture format is set by the program being watched. It is 4:3 aspect ratio. The aspect ratio is not adjusted from the original. Used in PC mode. (Only HDMI/ DVI PC, RGB PC) 14:9 programs are viewed normally in 14:9 with black bars added to enjoy the transmitted data...
... cut off . This picture format is set by the program being watched. It is 4:3 aspect ratio. The aspect ratio is not adjusted from the original. Used in PC mode. (Only HDMI/ DVI PC, RGB PC) 14:9 programs are viewed normally in 14:9 with black bars added to enjoy the transmitted data...

Owner's Manual (English)
Page 27
... or signals automatically to your external hi-fi stereo system, turn off the internal speakers of the set. Balance Use this function to use the user-defined audio settings. To use this option to use your computer and the 'Sound Mode' setting in the audio menu is Clear Voice, Standard, Music, Cinema or Sport...
... or signals automatically to your external hi-fi stereo system, turn off the internal speakers of the set. Balance Use this function to use the user-defined audio settings. To use this option to use your computer and the 'Sound Mode' setting in the audio menu is Clear Voice, Standard, Music, Cinema or Sport...

Owner's Manual (English)
Page 28
... If the current time is incorrect, reset the clock manually. 1) Press the MENU button and then use button to select the Time menu. 2) Press the button and then use button to select the Clock menu. 3) Press the button and then use button to set the hour(00~23). 4) Press the button and then... Sleep is active and there is passed. 1) Press the MENU button and then use button to select the Sleep Time menu. 2) Press the button and then use button to set the hour(00~23). 3) Press the button and then use button to set switches to off . 27 Once the on as it was...
... If the current time is incorrect, reset the clock manually. 1) Press the MENU button and then use button to select the Time menu. 2) Press the button and then use button to select the Clock menu. 3) Press the button and then use button to set the hour(00~23). 4) Press the button and then... Sleep is active and there is passed. 1) Press the MENU button and then use button to select the Sleep Time menu. 2) Press the button and then use button to set the hour(00~23). 3) Press the button and then use button to set switches to off . 27 Once the on as it was...

Owner's Manual (English)
Page 29
This helps removes permanent images burned into the screen. To avoid a permanent image on the screen. The panel color is automatically moved every 5 second. Power Indicator Use this function to set the Logo Light on the front side of the product to clear entirely with white wash. The ... : May help prevent ghost images. The black dots is automatically inverted every 30 minutes. A frozen or still picture from a PC/Video game displayed on the screen for prolonged periods could result in a ghost image remaining even when you don't foresee image burn in which the control names are...
This helps removes permanent images burned into the screen. To avoid a permanent image on the screen. The panel color is automatically moved every 5 second. Power Indicator Use this function to set the Logo Light on the front side of the product to clear entirely with white wash. The ... : May help prevent ghost images. The black dots is automatically inverted every 30 minutes. A frozen or still picture from a PC/Video game displayed on the screen for prolonged periods could result in a ghost image remaining even when you don't foresee image burn in which the control names are...


