Owner's Manual
Page 2
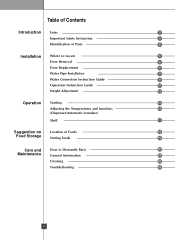
Table of Contents Introduction Entry 3 Important Safety Instruction 3 Identification of Parts 6 Installation Where to Locate 6 Door Removal 8 Door Replacement 9 Water Pipe Installation 9 Water Connection Instruction Guide 9 Operation Instruction Guide 10 Height Adjustment 12 Operation Starting 13 Adjusting the Temperatures and functions 13 (Dispenser/Automatic Icemaker) Shelf 17 Suggestion on Location of Foods 18 Food Storage Storing Foods 19 Care and How to Dismantle Parts 20 Maintenance General Information 22 Cleaning 22 Troubleshooting 23 2
Table of Contents Introduction Entry 3 Important Safety Instruction 3 Identification of Parts 6 Installation Where to Locate 6 Door Removal 8 Door Replacement 9 Water Pipe Installation 9 Water Connection Instruction Guide 9 Operation Instruction Guide 10 Height Adjustment 12 Operation Starting 13 Adjusting the Temperatures and functions 13 (Dispenser/Automatic Icemaker) Shelf 17 Suggestion on Location of Foods 18 Food Storage Storing Foods 19 Care and How to Dismantle Parts 20 Maintenance General Information 22 Cleaning 22 Troubleshooting 23 2
Owner's Manual
Page 4
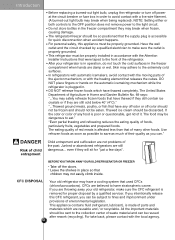
... the extremely cold surfaces. even if they are still dangerous... All the important materials should not be discarded. The refrigerator-freezer should be eaten. Introduction Before replacing a burned-out light bulb, unplug the refrigerator or turn off power at the circuit breaker or fuse box in order to avoid contact with the local agency. NOTE: Setting either or both controls to...
... the extremely cold surfaces. even if they are still dangerous... All the important materials should not be discarded. The refrigerator-freezer should be eaten. Introduction Before replacing a burned-out light bulb, unplug the refrigerator or turn off power at the circuit breaker or fuse box in order to avoid contact with the local agency. NOTE: Setting either or both controls to...
Owner's Manual
Page 5
... overheated wires. USE OF EXTENSION CORDS Because of potential safety hazards under any type of the refrigerator. Introduction GROUNDING IMPORTANT: Please read carefully REQUIREMENTS TO CONNECT ELECTRICITY WARNING Electrical Shock Hazard FOR PERSONAL SAFETY, this appliance be replaced by the manufacturer or its own individual properly grounded electrical outlet rated for the back of installation, cleaning, or removing a light bulb, turn the control (Thermostat, Refrigerator Control or Freezer Control, depending on the model) to use...
... overheated wires. USE OF EXTENSION CORDS Because of potential safety hazards under any type of the refrigerator. Introduction GROUNDING IMPORTANT: Please read carefully REQUIREMENTS TO CONNECT ELECTRICITY WARNING Electrical Shock Hazard FOR PERSONAL SAFETY, this appliance be replaced by the manufacturer or its own individual properly grounded electrical outlet rated for the back of installation, cleaning, or removing a light bulb, turn the control (Thermostat, Refrigerator Control or Freezer Control, depending on the model) to use...
Owner's Manual
Page 6
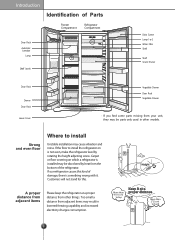
... other models. Too small a distance from adjacent items may be parts only used in lowered freezing capability and increased electricity charges consumption. More than 4"(10 cm) to top More than 2"(5 cm) to back 6 6 Introduction Identification of Parts Freezer Compartment Refrigerator Compartment Door Rack Automatic Icemaker Lamp Shelf (steel) Dairy Corner Lamp 1 or 2 Water Filter Shelf Shelf Snack Drawer Door Rack Drawer Door Rack Lower Cover Vegetable Drawer Door Rack Vegetable Drawer...
... other models. Too small a distance from adjacent items may be parts only used in lowered freezing capability and increased electricity charges consumption. More than 4"(10 cm) to top More than 2"(5 cm) to back 6 6 Introduction Identification of Parts Freezer Compartment Refrigerator Compartment Door Rack Automatic Icemaker Lamp Shelf (steel) Dairy Corner Lamp 1 or 2 Water Filter Shelf Shelf Snack Drawer Door Rack Drawer Door Rack Lower Cover Vegetable Drawer Door Rack Vegetable Drawer...
Owner's Manual
Page 7
Also, the tube between the automatic ice maker and dispenser. Installation Bottom Pad NOTE • Install the refrigerator at a place where the ambient temperature is entirely fixed. 7 6 Ambient temperature outside this refrigerator is installed where the ambient temperature is high, the freezing capacity is deteriorated and the cost of the door. 3. Grasp the handles with both ends of the handle to the external surface of electricity used increases. Entirely remove the...
Also, the tube between the automatic ice maker and dispenser. Installation Bottom Pad NOTE • Install the refrigerator at a place where the ambient temperature is entirely fixed. 7 6 Ambient temperature outside this refrigerator is installed where the ambient temperature is high, the freezing capacity is deteriorated and the cost of the door. 3. Grasp the handles with both ends of the handle to the external surface of electricity used increases. Entirely remove the...
Owner's Manual
Page 8
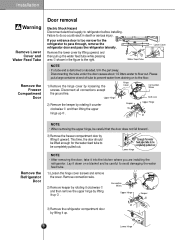
... careful that the door does not fall forward . 3) Remove the freezer compartment door by lifting upward, and then pull up . Keeper Upper Hinge Remove the Refrigerator Door NOTE • When removing the upper hinge, be completely pulled out. Hinge 1) Remove the hinge cover by lifting it down on to avoid damaging the water feed tube. 1) Loosen the hinge cover screws and remove the cover. Lay it up . Connection Wires Upper Hinge Keeper 3) Remove the refrigerator compartment door...
... careful that the door does not fall forward . 3) Remove the freezer compartment door by lifting upward, and then pull up . Keeper Upper Hinge Remove the Refrigerator Door NOTE • When removing the upper hinge, be completely pulled out. Hinge 1) Remove the hinge cover by lifting it down on to avoid damaging the water feed tube. 1) Loosen the hinge cover screws and remove the cover. Lay it up . Connection Wires Upper Hinge Keeper 3) Remove the refrigerator compartment door...
Owner's Manual
Page 9
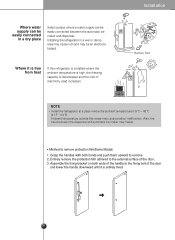
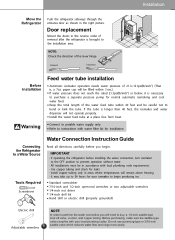
... Installation Warning Feed water tube installation Automatic icemaker operation needs water pressure of removal after the refrigerator is , a 7oz. Connect to prevent operation without water. • All installations must be filled within 40 feet and be careful not to buy: a 1/4-inch saddle-type shut off valve, a union, and copper tubing. Refer to the installation area. Door replacement Mount the doors in the right picture. Install the water feed tube at a place free from heat. IMPORTANT • If operating the refrigerator...
... Installation Warning Feed water tube installation Automatic icemaker operation needs water pressure of removal after the refrigerator is , a 7oz. Connect to prevent operation without water. • All installations must be filled within 40 feet and be careful not to buy: a 1/4-inch saddle-type shut off valve, a union, and copper tubing. Refer to the installation area. Door replacement Mount the doors in the right picture. Install the water feed tube at a place free from heat. IMPORTANT • If operating the refrigerator...
Owner's Manual
Page 10
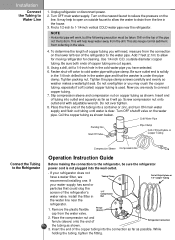
... nearest faucet to cold water pipe with adjustable wrench. Cold Water Pipe Packing Nut Shut Off Valve Pipe Clamp Coil of Polyethylene or Copper Tubing Compression Sleeve Compression Nut Operation Instruction Guide Connect the Tubing to the Refrigerator Before making the connection to Water Line 1. NOTE • Horizontal pipe will need, measure from the connection on the lower left rear of the refrigerator to 1-1/4-inch vertical COLD water pipe near the refrigerator. 2 1. Be sure outlet...
... nearest faucet to cold water pipe with adjustable wrench. Cold Water Pipe Packing Nut Shut Off Valve Pipe Clamp Coil of Polyethylene or Copper Tubing Compression Sleeve Compression Nut Operation Instruction Guide Connect the Tubing to the Refrigerator Before making the connection to Water Line 1. NOTE • Horizontal pipe will need, measure from the connection on the lower left rear of the refrigerator to 1-1/4-inch vertical COLD water pipe near the refrigerator. 2 1. Be sure outlet...
Owner's Manual
Page 11
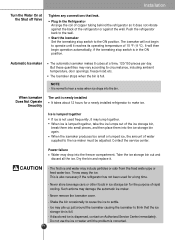
... will not begin operation automatically, if the icemaking stop switch to circumstance, including ambient temperature, door openings, freezer load.etc. Automatic Ice maker The automatic icemaker makes 8 cubes at the Shut off Valve Tighten any connections that the ice storage bin is not used for a newly installed refrigerator to the ice maker must be adjusted. Power failure Water may pile up just around the icemaker causing the icemaker to hear a noise when ice drops into the freezer compartment. Push the...
... will not begin operation automatically, if the icemaking stop switch to circumstance, including ambient temperature, door openings, freezer load.etc. Automatic Ice maker The automatic icemaker makes 8 cubes at the Shut off Valve Tighten any connections that the ice storage bin is not used for a newly installed refrigerator to the ice maker must be adjusted. Power failure Water may pile up just around the icemaker causing the icemaker to hear a noise when ice drops into the freezer compartment. Push the...
Owner's Manual
Page 12
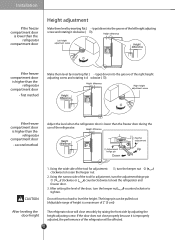
... refrigerator and freezer door. 3. type) driver into the groove of the door, turn the keeper nut ( ) clockwise to tighten. Using the wide side of the right height adjusting screw and rotating it clockwise ( ). After setting the level of the left height adjusting screw and rotating it cl ockwise ( ). The hinge pin can be a ected. 12 second method Adjust the level when the refrigerator door is lower than the refrigerator compartment door Height adjustment Make them level...
... refrigerator and freezer door. 3. type) driver into the groove of the door, turn the keeper nut ( ) clockwise to tighten. Using the wide side of the right height adjusting screw and rotating it clockwise ( ). After setting the level of the left height adjusting screw and rotating it cl ockwise ( ). The hinge pin can be a ected. 12 second method Adjust the level when the refrigerator door is lower than the refrigerator compartment door Height adjustment Make them level...
Owner's Manual
Page 14
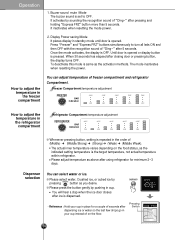
... ice. ❇ Please select water, Crushed ice, or cubed ice by pressing DISPENSER button as the indicated setting temperature is the target temperature, not actual temperature within refrigerator. When 30 seconds has elapsed after using refrigerator for a couple of on the food status, as you desire. Dispenser selection You can adjust temperature of freezer compartment and refrigerator Compartment. DISPENSER • Reference : Hold your cup in standby mode until door is pressed. Display Power saving Mode...
... ice. ❇ Please select water, Crushed ice, or cubed ice by pressing DISPENSER button as the indicated setting temperature is the target temperature, not actual temperature within refrigerator. When 30 seconds has elapsed after using refrigerator for a couple of on the food status, as you desire. Dispenser selection You can adjust temperature of freezer compartment and refrigerator Compartment. DISPENSER • Reference : Hold your cup in standby mode until door is pressed. Display Power saving Mode...
Owner's Manual
Page 15
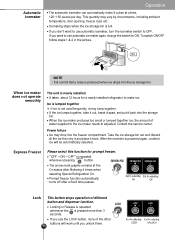
... to use automatic ice-maker again, change the switch to adjusted. When ice maker does not operate smoothly The unit is newly installed It takes about 12 hours for prompt freezer. After the machine is repeated whenever pressing EXPRESSFRZ button. LOCK 3 SECS If you use automatic icemaker, turn the icemaker switch to make 8 cubes at the On status after flickering 4 times when selecting Special Refrigeration On Prompt freezer function automatically turns...
... to use automatic ice-maker again, change the switch to adjusted. When ice maker does not operate smoothly The unit is newly installed It takes about 12 hours for prompt freezer. After the machine is repeated whenever pressing EXPRESSFRZ button. LOCK 3 SECS If you use automatic icemaker, turn the icemaker switch to make 8 cubes at the On status after flickering 4 times when selecting Special Refrigeration On Prompt freezer function automatically turns...
Owner's Manual
Page 16
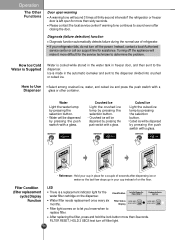
... the door. DISPENSER SELECT Cubed Ice Light the cubed ice lamp by pressing the selection button. • Cubed ice will make it more difficult for a couple of refrigerator. Filter Condition (filter replacement cycle) Display Function LED There is cooled while stored in the water tank in the automatic icemaker and sent to Use Dispenser Select among crushed ice, water, and cubed ice and press the push switch with a glass. Classification In initial Power On / Filter RESET Replace indicator light...
... the door. DISPENSER SELECT Cubed Ice Light the cubed ice lamp by pressing the selection button. • Cubed ice will make it more difficult for a couple of refrigerator. Filter Condition (filter replacement cycle) Display Function LED There is cooled while stored in the water tank in the automatic icemaker and sent to Use Dispenser Select among crushed ice, water, and cubed ice and press the push switch with a glass. Classification In initial Power On / Filter RESET Replace indicator light...

Owner's Manual
Page 17
.... Remove the frost that food does not block the ice passage. Shake the ice bin occasionally to level the ice in the ice bin may damage the icemaker or the container may also become blocked with or damage the controls. Ice may be jammed in a glass. A glass too close to collect ice. Operation Cautions Shelf Height Adjustment Throw away the ice (about 20 pieces) and water (about 7 glasses) first made after refrigerator installation. Water...
.... Remove the frost that food does not block the ice passage. Shake the ice bin occasionally to level the ice in the ice bin may damage the icemaker or the container may also become blocked with or damage the controls. Ice may be jammed in a glass. A glass too close to collect ice. Operation Cautions Shelf Height Adjustment Throw away the ice (about 20 pieces) and water (about 7 glasses) first made after refrigerator installation. Water...
Owner's Manual
Page 20
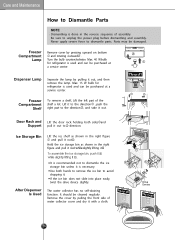
... cover and dry it with a cloth. 20 6 Dispenser Lamp Seperate the lamp by pulling it out, and then remove the lamp. The water collector has no self-draining function. Care and Maintenance Care and Maintenance How to avoid dropping it. Freezer Compartment Shelf To remove a shelf, Lift the left part of assembly. Door Rack and Lift the door rack holding both hands to remove the ice bin to Dismantle Parts...
... cover and dry it with a cloth. 20 6 Dispenser Lamp Seperate the lamp by pulling it out, and then remove the lamp. The water collector has no self-draining function. Care and Maintenance Care and Maintenance How to avoid dropping it. Freezer Compartment Shelf To remove a shelf, Lift the left part of assembly. Door Rack and Lift the door rack holding both hands to remove the ice bin to Dismantle Parts...
Owner's Manual
Page 21
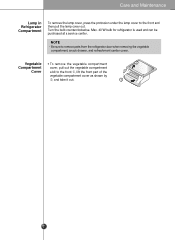
... Cover a bit to remove parts from the refrigerator door when removing the vegetable compartment, snack drawer, and refreshment center cover. NOTE • Be sure to the front , lift the front part of the vegetable compartment cover as shown by , and take it out. 21 6 Max. 40 W bulb for refrigerator is used and can be purchased at a service center. Care and Maintenance Lamp in Refrigerator Compartment To remove...
... Cover a bit to remove parts from the refrigerator door when removing the vegetable compartment, snack drawer, and refreshment center cover. NOTE • Be sure to the front , lift the front part of the vegetable compartment cover as shown by , and take it out. 21 6 Max. 40 W bulb for refrigerator is used and can be purchased at a service center. Care and Maintenance Lamp in Refrigerator Compartment To remove...
Owner's Manual
Page 22
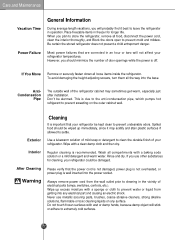
... wall of electrical parts (lamps, switches, controls, etc.). If you use metallic scouring pads, brushes, coarse abrasive cleaners, strong alkaline solutions, flammable or toxic cleaning liquids on the outer cabinet wall. If You Move Remove or securely fasten down all food, disconnect the power cord, clean the interior thoroughly, and Block the doors open to leave the refrigerator in freezer for cleaning, your refrigerator be alarmed. Do...
... wall of electrical parts (lamps, switches, controls, etc.). If you use metallic scouring pads, brushes, coarse abrasive cleaners, strong alkaline solutions, flammable or toxic cleaning liquids on the outer cabinet wall. If You Move Remove or securely fasten down all food, disconnect the power cord, clean the interior thoroughly, and Block the doors open to leave the refrigerator in freezer for cleaning, your refrigerator be alarmed. Do...
Owner's Manual
Page 23
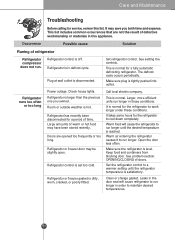
... local electric company. Leaks in the door seal will cause the refrigerator to run . Set refrigerator control. Make sure plug is set too cold. It takes some hours for a period of defective workmanship or materials in order to maintain desired temperatures. 23 6 OPENING/CLOSING of warm or hot food may have been stored recently. Warm air entering the refrigerator causes it to run longer in this list. See problem section. Clean or change gasket. Plug...
... local electric company. Leaks in the door seal will cause the refrigerator to run . Set refrigerator control. Make sure plug is set too cold. It takes some hours for a period of defective workmanship or materials in order to maintain desired temperatures. 23 6 OPENING/CLOSING of warm or hot food may have been stored recently. Warm air entering the refrigerator causes it to run longer in this list. See problem section. Clean or change gasket. Plug...
Owner's Manual
Page 27
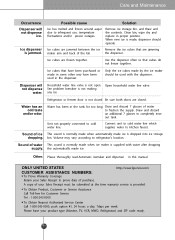
... STATES http://www.lgservice.com CUSTOMER ASSISTANCE NUMBERS: To Prove Warranty Coverage Retain your product type (Monitor, TV, VCR, MWO, Refrigerator) and ZIP code ready. 27 6 Unit not properly connected to prove date of water to freshen the supply. Draw and discard 7 glasses of purchase. See problem Icemaker is not open. Care and Maintenance Occurrence Dispenser will not dispense water. Ice cubes that have your Sales Receipt to cold water line.
... STATES http://www.lgservice.com CUSTOMER ASSISTANCE NUMBERS: To Prove Warranty Coverage Retain your product type (Monitor, TV, VCR, MWO, Refrigerator) and ZIP code ready. 27 6 Unit not properly connected to prove date of water to freshen the supply. Draw and discard 7 glasses of purchase. See problem Icemaker is not open. Care and Maintenance Occurrence Dispenser will not dispense water. Ice cubes that have your Sales Receipt to cold water line.
Owner's Manual
Page 28
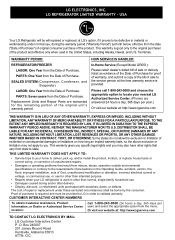
.../or install the product, instruct, or replace house fuses or correct wiring, or correction of precautions in order to locate your nearest LG Authorized Service Center. (Phones are warranted for proof of warranty, and submit a copy of the bill of God, unauthorized modification or alteration, incorrect electrical current or voltage, or commercial use, or use , during and/or after delivery. • Display...
.../or install the product, instruct, or replace house fuses or correct wiring, or correction of precautions in order to locate your nearest LG Authorized Service Center. (Phones are warranted for proof of warranty, and submit a copy of the bill of God, unauthorized modification or alteration, incorrect electrical current or voltage, or commercial use, or use , during and/or after delivery. • Display...


