Owner's Manual
Page 7
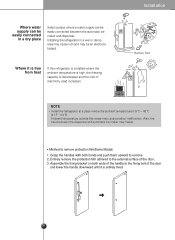
Also, the tube between the automatic ice maker and dispenser. Assemble the fixing bracket on both hands and push them upward to the fixing bolt of electricity used increases. Installing the refrigerator in a dry place Select a place where a water supply can be an electrical hazard. Where it... 5˚C ~ 43˚C (41˚F~110˚F). Entirely remove the protection film adhered to remove protection film(Some Model) 1. Where water supply can be easily connected in a wet or damp area may cause rust and may cause product malfunction. Grasp the handles with both ends...
Also, the tube between the automatic ice maker and dispenser. Assemble the fixing bracket on both hands and push them upward to the fixing bolt of electricity used increases. Installing the refrigerator in a dry place Select a place where a water supply can be an electrical hazard. Where it... 5˚C ~ 43˚C (41˚F~110˚F). Entirely remove the protection film adhered to remove protection film(Some Model) 1. Where water supply can be easily connected in a wet or damp area may cause rust and may cause product malfunction. Grasp the handles with both ends...
Owner's Manual
Page 8
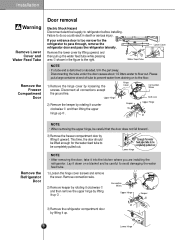
...the kitchen where you are installing the refrigerator. Hinge 1) Remove the hinge cover by rotating it down on to avoid damaging the water feed tube. 1) Loosen the hinge cover screws and remove the cover. Keeper Upper Hinge Remove the Refrigerator Door NOTE • When removing ...be completely pulled out. Lower hinge NOTE • After removing the door, take it upward. Installation Warning Remove Lower Cover and Water Feed Tube Remove the Freezer Compartment Door Door removal Electric Shock Hazard Disconnect electrical supply to flow out. If your entrance door is deformed ...
...the kitchen where you are installing the refrigerator. Hinge 1) Remove the hinge cover by rotating it down on to avoid damaging the water feed tube. 1) Loosen the hinge cover screws and remove the cover. Keeper Upper Hinge Remove the Refrigerator Door NOTE • When removing ...be completely pulled out. Lower hinge NOTE • After removing the door, take it upward. Installation Warning Remove Lower Cover and Water Feed Tube Remove the Freezer Compartment Door Door removal Electric Shock Hazard Disconnect electrical supply to flow out. If your entrance door is deformed ...
Owner's Manual
Page 9
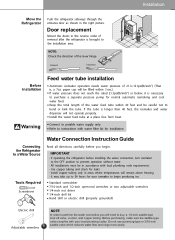
...separate pressure pump for your local plumbing codes. Connect to bend or kink the tube. Do not use a piercing-type or 3/16-inch saddle valve which reduces water flow and clogs more easily. Installation Move the Refrigerator Push the refrigerator sideways through... to the installation area. Correct Incorrect Before Installation Warning Feed water tube installation Automatic icemaker operation needs water pressure of the lever hinge. Refer to instructions with your icemaker to prevent operation without water. • All installations must be in accordance with local plumbing...
...separate pressure pump for your local plumbing codes. Connect to bend or kink the tube. Do not use a piercing-type or 3/16-inch saddle valve which reduces water flow and clogs more easily. Installation Move the Refrigerator Push the refrigerator sideways through... to the installation area. Correct Incorrect Before Installation Warning Feed water tube installation Automatic icemaker operation needs water pressure of the lever hinge. Refer to instructions with your icemaker to prevent operation without water. • All installations must be in accordance with local plumbing...
Owner's Manual
Page 10
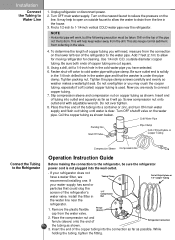
.... Tighten the pipe clamp screws carefully and evenly so washer makes a watertight seal. Do not overtighten or you will go. Now you have a water filter, we recommend installing one. If Tubing Clamp 1 your refrigerator does not have selected. 6. Place the compression nut and ferrule (sleeve) onto the end of Polyethylene or Copper...
.... Tighten the pipe clamp screws carefully and evenly so washer makes a watertight seal. Do not overtighten or you will go. Now you have a water filter, we recommend installing one. If Tubing Clamp 1 your refrigerator does not have selected. 6. Place the compression nut and ferrule (sleeve) onto the end of Polyethylene or Copper...
Owner's Manual
Page 11
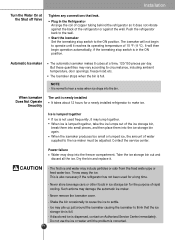
...switch is corrected. 11 The icemaker will then begin to operate until the problem is in ice storage bin for a long time. - Power failure Water may damage the automatic ice maker. - Dry the bin and replace it reaches its operating temperature of rapid cooling. Such actions may drop into the...If ice is full. - When the icemaker produces too small or lumped ice, the amount of copper tubing behind the refrigerator so it may include particles or odor from the feed water pipe or feed water box. Take the ice storage bin out and discard all the ice. The first ice and...
...switch is corrected. 11 The icemaker will then begin to operate until the problem is in ice storage bin for a long time. - Power failure Water may damage the automatic ice maker. - Dry the bin and replace it reaches its operating temperature of rapid cooling. Such actions may drop into the...If ice is full. - When the icemaker produces too small or lumped ice, the amount of copper tubing behind the refrigerator so it may include particles or odor from the feed water pipe or feed water box. Take the ice storage bin out and discard all the ice. The first ice and...


