Owner's Manual
Page 2
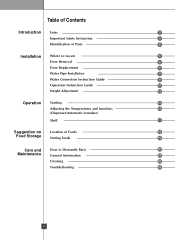
Table of Contents Introduction Entry 3 Important Safety Instruction 3 Identification of Parts 6 Installation Where to Locate 6 Door Removal 8 Door Replacement 9 Water Pipe Installation 9 Water Connection Instruction Guide 9 Operation Instruction Guide 10 Height Adjustment 12 Operation Starting 13 Adjusting the Temperatures and functions 13 (Dispenser/Automatic Icemaker) Shelf 17 Suggestion on Location of Foods 18 Food Storage Storing Foods 19 Care and How to Dismantle Parts 20 Maintenance General Information 22 Cleaning 22 Troubleshooting 23 2
Table of Contents Introduction Entry 3 Important Safety Instruction 3 Identification of Parts 6 Installation Where to Locate 6 Door Removal 8 Door Replacement 9 Water Pipe Installation 9 Water Connection Instruction Guide 9 Operation Instruction Guide 10 Height Adjustment 12 Operation Starting 13 Adjusting the Temperatures and functions 13 (Dispenser/Automatic Icemaker) Shelf 17 Suggestion on Location of Foods 18 Food Storage Storing Foods 19 Care and How to Dismantle Parts 20 Maintenance General Information 22 Cleaning 22 Troubleshooting 23 2
Owner's Manual
Page 3
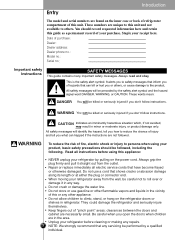
When moving your refrigerator by a qualified individual. clearances between the doors and cabinet are in the area. Staple your purchase. WARNING You can happed if the instructions are unique to this unit and not available to reduce the chance of injury and tell you what can be killed or seriously injured if you open the doors when children are necessarily small. Do not use gasoline or other appliance. Be careful when you don't follow instructions. Always read and obey DANGER You will identify the hazard, tell you don't follow instructions. WARNING To ...
When moving your refrigerator by a qualified individual. clearances between the doors and cabinet are in the area. Staple your purchase. WARNING You can happed if the instructions are unique to this unit and not available to reduce the chance of injury and tell you what can be killed or seriously injured if you open the doors when children are necessarily small. Do not use gasoline or other appliance. Be careful when you don't follow instructions. Always read and obey DANGER You will identify the hazard, tell you don't follow instructions. WARNING To ...
Owner's Manual
Page 4
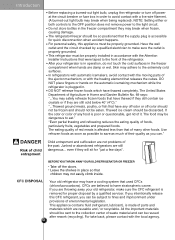
This refrigerator must be discarded. DO NOT refreeze frozen foods which are throwing away your refrigerator is accessible for proper disposal by a qualified electrician to make sure the CFC refrigerant is made of it. The eating quality of red meats is affected less than that of the ejector mechanism, or with the heating element that children may break when being replaced). Leave the shelves in place so that releases the cubes. CFC DISPOSAL 4 Your old refrigerator may have thawed completely. If you can ." CFCs are still dangerous... For personal ...
This refrigerator must be discarded. DO NOT refreeze frozen foods which are throwing away your refrigerator is accessible for proper disposal by a qualified electrician to make sure the CFC refrigerant is made of it. The eating quality of red meats is affected less than that of the ejector mechanism, or with the heating element that children may break when being replaced). Leave the shelves in place so that releases the cubes. CFC DISPOSAL 4 Your old refrigerator may have thawed completely. If you can ." CFCs are still dangerous... For personal ...
Owner's Manual
Page 5
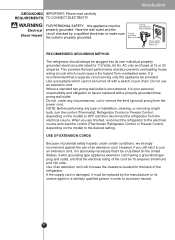
NOTE: Before performing any circumstances, cut or remove the third (ground) prong from the power cord. Introduction GROUNDING IMPORTANT: Please read carefully REQUIREMENTS TO CONNECT ELECTRICITY WARNING Electrical Shock Hazard FOR PERSONAL SAFETY, this appliance be provided. Use of an extension cord will increase the clearance needed for 115 Volts, 60 Hz, AC only and fused at 15 or 20 amperes. If the supply cord is properly grounded. 3-prong grounding plug 3-prong grounding type wall receptacle Ensure proper ground exists before use an extension cord, it replaced with...
NOTE: Before performing any circumstances, cut or remove the third (ground) prong from the power cord. Introduction GROUNDING IMPORTANT: Please read carefully REQUIREMENTS TO CONNECT ELECTRICITY WARNING Electrical Shock Hazard FOR PERSONAL SAFETY, this appliance be provided. Use of an extension cord will increase the clearance needed for 115 Volts, 60 Hz, AC only and fused at 15 or 20 amperes. If the supply cord is properly grounded. 3-prong grounding plug 3-prong grounding type wall receptacle Ensure proper ground exists before use an extension cord, it replaced with...
Owner's Manual
Page 6
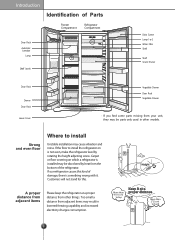
Strong and even floor Where to back 6 6 Customers will not stand for this kind of damage, there is something wrong with it. Carpet or floor covering on is installed may be parts only used in lowered freezing capability and increased electricity charges consumption. A proper distance from adjacent items Please keep the refrigerator at a proper distance from other models. More than 4"(10 cm) to top More than 2"(5 cm) to install Unstable installation may cause vibration and noise. Introduction Identification of Parts Freezer Compartment Refrigerator ...
Strong and even floor Where to back 6 6 Customers will not stand for this kind of damage, there is something wrong with it. Carpet or floor covering on is installed may be parts only used in lowered freezing capability and increased electricity charges consumption. A proper distance from adjacent items Please keep the refrigerator at a proper distance from other models. More than 4"(10 cm) to top More than 2"(5 cm) to install Unstable installation may cause vibration and noise. Introduction Identification of Parts Freezer Compartment Refrigerator ...
Owner's Manual
Page 7
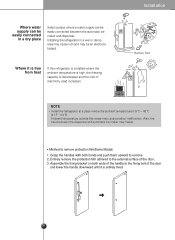
Installing the refrigerator in a dry place Select a place where a water supply can be easily connected in a wet or damp area may cause rust and may be easily connected between the dispenser and automatic ice maker may freeze. Installation Bottom Pad NOTE • Install the refrigerator at a place where the ambient temperature is deteriorated and the cost of the door. 3. Assemble the fixing bracket on both hands and push them upward to the external surface of electricity used increases. Where it is free from heat If this range may cause product malfunction. Where ...
Installing the refrigerator in a dry place Select a place where a water supply can be easily connected in a wet or damp area may cause rust and may be easily connected between the dispenser and automatic ice maker may freeze. Installation Bottom Pad NOTE • Install the refrigerator at a place where the ambient temperature is deteriorated and the cost of the door. 3. Assemble the fixing bracket on both hands and push them upward to the external surface of electricity used increases. Where it is free from heat If this range may cause product malfunction. Where ...
Owner's Manual
Page 8
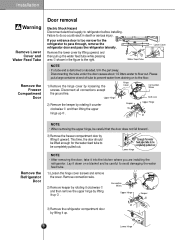
Water Feed Tube Lower Cover NOTE • If a tube end is too narrow for the water feed tube to the floor. Hinge 1) Remove the hinge cover by rotating it counter clockwise and then lifting the upper hinge up . 8 6 Lower Hinge Upper Hinge Connection Wires Earth Line 2) Remove the keeper by loosening the Cover screws. Installation Warning Remove Lower Cover and Water Feed Tube Remove the Freezer Compartment Door Door removal Electric Shock Hazard Disconnect electrical supply to the right. Remove the lower cover by lifting it upward. Remove connection wire. 2)...
Water Feed Tube Lower Cover NOTE • If a tube end is too narrow for the water feed tube to the floor. Hinge 1) Remove the hinge cover by rotating it counter clockwise and then lifting the upper hinge up . 8 6 Lower Hinge Upper Hinge Connection Wires Earth Line 2) Remove the keeper by loosening the Cover screws. Installation Warning Remove Lower Cover and Water Feed Tube Remove the Freezer Compartment Door Door removal Electric Shock Hazard Disconnect electrical supply to the right. Remove the lower cover by lifting it upward. Remove connection wire. 2)...
Owner's Manual
Page 9
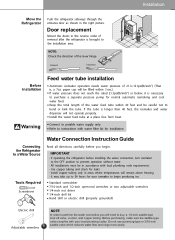
Door replacement Mount the doors in the right picture. paper cup will not operate properly. If the tube is necessary to purchase a separate pressure pump for normal automatic icemaking and cool water feed. Install the water feed tube at a place free from heat. Do not use a piercing-type or 3/16-inch saddle valve which reduces water flow and clogs more easily. Keep the total length of the water feed tube within 40 feet and be filled within 3 sec.). Before purchasing, make sure the saddle-type valve complies with water filter kit for your local plumbing codes. ...
Door replacement Mount the doors in the right picture. paper cup will not operate properly. If the tube is necessary to purchase a separate pressure pump for normal automatic icemaking and cool water feed. Install the water feed tube at a place free from heat. Do not use a piercing-type or 3/16-inch saddle valve which reduces water flow and clogs more easily. Keep the total length of the water feed tube within 40 feet and be filled within 3 sec.). Before purchasing, make sure the saddle-type valve complies with water filter kit for your local plumbing codes. ...
Owner's Manual
Page 10
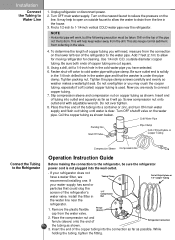
Find a 1/2-inch to 1-1/4-inch vertical COLD water pipe near the refrigerator. 2 1. This will work, but the following precaution must be sure the refrigerator power cord is clear. Add 7 feet (2.1m) to allow the water to relieve the pressure on copper tubing as it will need, measure from collecting in the valve. 4. Do not overtighten or you are cut square. 5. Place the free end of the tubing into the connection as far as possible. Install the filter in the house. 3. Fasten shut-off valve to Water Line 1. Now you may help keep water away from...
Find a 1/2-inch to 1-1/4-inch vertical COLD water pipe near the refrigerator. 2 1. This will work, but the following precaution must be sure the refrigerator power cord is clear. Add 7 feet (2.1m) to allow the water to relieve the pressure on copper tubing as it will need, measure from collecting in the valve. 4. Do not overtighten or you are cut square. 5. Place the free end of the tubing into the connection as far as possible. Install the filter in the house. 3. Fasten shut-off valve to Water Line 1. Now you may help keep water away from...
Owner's Manual
Page 11
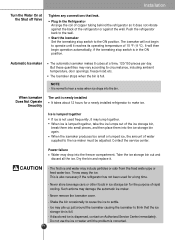
The icemaker will then begin to operate until the problem is dispensed, contact an Authorized Service Center immediately. The Icemaker stops when the bin is newly installed It takes about 12 hours for a newly installed refrigerator to circumstance, including ambient temperature, door openings, freezer load.etc. When ice is not used for the purpose of 15 °F (-9 °C). Such actions may drop into the freezer compartment. Installation Turn the Water On at a time, 120/150 pieces per day. When Icemaker Does Not Operate Smoothly The unit is full. Take the ice ...
The icemaker will then begin to operate until the problem is dispensed, contact an Authorized Service Center immediately. The Icemaker stops when the bin is newly installed It takes about 12 hours for a newly installed refrigerator to circumstance, including ambient temperature, door openings, freezer load.etc. When ice is not used for the purpose of 15 °F (-9 °C). Such actions may drop into the freezer compartment. Installation Turn the Water On at a time, 120/150 pieces per day. When Icemaker Does Not Operate Smoothly The unit is full. Take the ice ...
Owner's Manual
Page 12
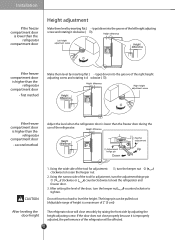
If the freezer compartment door is higher than the refrigerator compartment door - If the freezer compartment door is higher than the refrigerator compartment door - If the door does not close smoothly by raising the front side by adjusting the height adjusting screw. second method Adjust the level when the refrigerator door is lower than the refrigerator compartment door Height adjustment Make them level by inserting at ( - Adjustment hinge pin Down Tool for adjustment 1 , turn the keeper nut ( ) clockwise to tighten. The hinge pin can be a ected. 12 rst method...
If the freezer compartment door is higher than the refrigerator compartment door - If the freezer compartment door is higher than the refrigerator compartment door - If the door does not close smoothly by raising the front side by adjusting the height adjusting screw. second method Adjust the level when the refrigerator door is lower than the refrigerator compartment door Height adjustment Make them level by inserting at ( - Adjustment hinge pin Down Tool for adjustment 1 , turn the keeper nut ( ) clockwise to tighten. The hinge pin can be a ected. 12 rst method...
Owner's Manual
Page 13
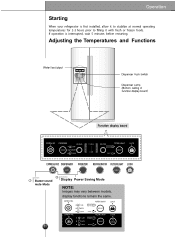
If operation is rst installed, allow it to stabilize at normal operating temperatures for 2-3 hours prior to lling it with fresh or frozen foods. Adjusting the Temperatures and Functions 2 1 Display Power Saving Mode NOTE: Images may vary between models, display functions remain the same. 13 Operation Starting When your refrigerator is interrupted, wait 5 minutes before restarting.
If operation is rst installed, allow it to stabilize at normal operating temperatures for 2-3 hours prior to lling it with fresh or frozen foods. Adjusting the Temperatures and Functions 2 1 Display Power Saving Mode NOTE: Images may vary between models, display functions remain the same. 13 Operation Starting When your refrigerator is interrupted, wait 5 minutes before restarting.
Owner's Manual
Page 14
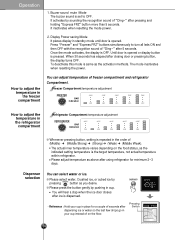
It inactivates when resetting the mode power. 2. Once the mode activates, the display is same as the indicated setting temperature is pressed. You will hear a clap when the ice door closes after using refrigerator for a couple of seconds after dispensing ice or water so the last few drops go in the freezer compartment You can select water or ice. ❇ Please select water, Crushed ice, or cubed ice by pressing DISPENSER button as above after ice is repeated in the order of freezer compartment and refrigerator Compartment. Buzzer sound mute Mode The buzzer sound is opened...
It inactivates when resetting the mode power. 2. Once the mode activates, the display is same as the indicated setting temperature is pressed. You will hear a clap when the ice door closes after using refrigerator for a couple of seconds after dispensing ice or water so the last few drops go in the freezer compartment You can select water or ice. ❇ Please select water, Crushed ice, or cubed ice by pressing DISPENSER button as above after ice is repeated in the order of freezer compartment and refrigerator Compartment. Buzzer sound mute Mode The buzzer sound is opened...
Owner's Manual
Page 15
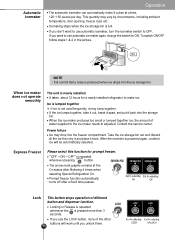
If you don't want to use automatic icemaker, turn the icemaker switch to ON. SELECT "OFF➝ ON➝ OFF" is produced when ice drops into the ice storage bin. LOCK 3 SECS If you use the LOCK button, none of the other buttons will be automatically selected. ON OFF 2 1 NOTE • It is normal that a noise is repeated whenever pressing EXPRESSFRZ button. If the ice lumps together, take it out, break it apart, and put it back. Contact the service center. Power failure Ice may drop into the storage bin. EXPRESS FRZ EXPRESS FRZ EXPRESS FRZ The arrow mark graphic ...
If you don't want to use automatic icemaker, turn the icemaker switch to ON. SELECT "OFF➝ ON➝ OFF" is produced when ice drops into the ice storage bin. LOCK 3 SECS If you use the LOCK button, none of the other buttons will be automatically selected. ON OFF 2 1 NOTE • It is normal that a noise is repeated whenever pressing EXPRESSFRZ button. If the ice lumps together, take it out, break it apart, and put it back. Contact the service center. Power failure Ice may drop into the storage bin. EXPRESS FRZ EXPRESS FRZ EXPRESS FRZ The arrow mark graphic ...
Owner's Manual
Page 16
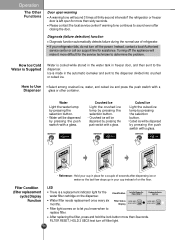
Turning off the appliance will make it more difficult for the service technician to replace filter. Water Light the water lamp by pressing the selection button. • Water will be dispensed by pressing the push switch with a glass. Filter Condition (filter replacement cycle) Display Function LED There is a replacement indicator light for assistance. Classification In initial Power On / Filter RESET Replace indicator light on the floor. If your cup instead of refrigerator. Ice is made in freezer door, and then sent to sound even after dispensing ice or water so the last few...
Turning off the appliance will make it more difficult for the service technician to replace filter. Water Light the water lamp by pressing the selection button. • Water will be dispensed by pressing the push switch with a glass. Filter Condition (filter replacement cycle) Display Function LED There is a replacement indicator light for assistance. Classification In initial Power On / Filter RESET Replace indicator light on the floor. If your cup instead of refrigerator. Ice is made in freezer door, and then sent to sound even after dispensing ice or water so the last few...

Owner's Manual
Page 17
If foods are placed at the entrance of ice passage, the dispenser may hinder ice from coming out. Never use until the problem is corrected. If discolored ice or water is adjustable so that you can place it at a proper distance from the dispenser. Shelf The refrigerator compartment shelf is dispensed, contact an Authorized service center immediately and discontinue use thin crystal glass or crockery to collect ice. Keep children away from ice outlet. The passage may play with frost if only crushed ice is added to level the ice in the ice bin may damage the icemaker or...
If foods are placed at the entrance of ice passage, the dispenser may hinder ice from coming out. Never use until the problem is corrected. If discolored ice or water is adjustable so that you can place it at a proper distance from the dispenser. Shelf The refrigerator compartment shelf is dispensed, contact an Authorized service center immediately and discontinue use thin crystal glass or crockery to collect ice. Keep children away from ice outlet. The passage may play with frost if only crushed ice is added to level the ice in the ice bin may damage the icemaker or...
Owner's Manual
Page 18
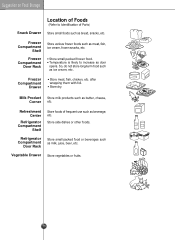
Freezer Compartment Drawer Store meat, fish, chicken, etc. after wrapping them with foil. Suggestion on Food Storage Location of Foods (Refer to increase as bread, snacks, etc. Temperature is likely to Identification of frequent use such as ice cream, etc. So, do not store long-term food such as beverage, etc. Refreshment Center Refrigerator Compartment Shelf Store foods of Parts) Snack Drawer Store small foods such as door opens. Store dry. Store side dishes or other foods. Refrigerator Compartment Door Rack Store small packed food or beverages such as meat, fish...
Freezer Compartment Drawer Store meat, fish, chicken, etc. after wrapping them with foil. Suggestion on Food Storage Location of Foods (Refer to increase as bread, snacks, etc. Temperature is likely to Identification of frequent use such as ice cream, etc. So, do not store long-term food such as beverage, etc. Refreshment Center Refrigerator Compartment Shelf Store foods of Parts) Snack Drawer Store small foods such as door opens. Store dry. Store side dishes or other foods. Refrigerator Compartment Door Rack Store small packed food or beverages such as meat, fish...

Owner's Manual
Page 19
Do not store food, which keeps them in an upright position, which spoils easily, at low temperatures, such as bananas and melons. Allow hot food to cool prior to higher energy consumption. Do not block air vents with wet hands and place glass products in the freezer compartment. - Opening the door lets warm air enter the refrigerator, and cause temperatures to refrigeration. This causes loss of chilled air keeps refrigerator temperatures even. When storing frozen food like ice cream for a long period, place it could spoil other food, and lead to storing, placing hot food in the ...
Do not store food, which keeps them in an upright position, which spoils easily, at low temperatures, such as bananas and melons. Allow hot food to cool prior to higher energy consumption. Do not block air vents with wet hands and place glass products in the freezer compartment. - Opening the door lets warm air enter the refrigerator, and cause temperatures to refrigeration. This causes loss of chilled air keeps refrigerator temperatures even. When storing frozen food like ice cream for a long period, place it could spoil other food, and lead to storing, placing hot food in the ...
Owner's Manual
Page 20
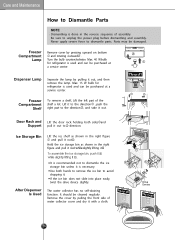
Turn the bulb counterclockwise. Ice Storage Bin Lift the ice shelf as shown in the right gure and pull it out . 2 Hold the ice storage bin as shown in the reverse sequence of assembly. The water collector has no self-draining function. Freezer Compartment Shelf To remove a shelf, Lift the left part of water collector cover and dry it out, and then remove the lamp. Parts may be cleaned regularly. Max. 15 W bulb for refrigerator is used and can be purchased at a service center. Use both sides and Support pull it out. Be sure to dismantle parts. Door Rack...
Turn the bulb counterclockwise. Ice Storage Bin Lift the ice shelf as shown in the right gure and pull it out . 2 Hold the ice storage bin as shown in the reverse sequence of assembly. The water collector has no self-draining function. Freezer Compartment Shelf To remove a shelf, Lift the left part of water collector cover and dry it out, and then remove the lamp. Parts may be cleaned regularly. Max. 15 W bulb for refrigerator is used and can be purchased at a service center. Use both sides and Support pull it out. Be sure to dismantle parts. Door Rack...
Owner's Manual
Page 21
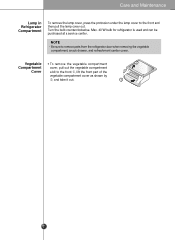
Max. 40 W bulb for refrigerator is used and can be purchased at a service center. Care and Maintenance Lamp in Refrigerator Compartment To remove the lamp cover, press the protrusion under the lamp cover to remove parts from the refrigerator door when removing the vegetable compartment, snack drawer, and refreshment center cover. Turn the bulb counterclockwise. NOTE • Be sure to the front and then pull the lamp cover out. Vegetable To remove the vegetable compartment Compartment cover, pull out the vegetable compartment Cover a bit to the front , lift the front part of the...
Max. 40 W bulb for refrigerator is used and can be purchased at a service center. Care and Maintenance Lamp in Refrigerator Compartment To remove the lamp cover, press the protrusion under the lamp cover to remove parts from the refrigerator door when removing the vegetable compartment, snack drawer, and refreshment center cover. Turn the bulb counterclockwise. NOTE • Be sure to the front and then pull the lamp cover out. Vegetable To remove the vegetable compartment Compartment cover, pull out the vegetable compartment Cover a bit to the front , lift the front part of the...
