Owner's Manual
Page 2
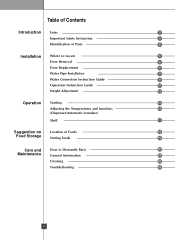
Table of Contents Introduction Entry 3 Important Safety Instruction 3 Identification of Parts 6 Installation Where to Locate 6 Door Removal 8 Door Replacement 9 Water Pipe Installation 9 Water Connection Instruction Guide 9 Operation Instruction Guide 10 Height Adjustment 12 Operation Starting 13 Adjusting the Temperatures and functions 13 (Dispenser/Automatic Icemaker) Shelf 17 Suggestion on Location of Foods 18 Food Storage Storing Foods 19 Care and How to Dismantle Parts 20 Maintenance General Information 22 Cleaning 22 Troubleshooting 23 2
Table of Contents Introduction Entry 3 Important Safety Instruction 3 Identification of Parts 6 Installation Where to Locate 6 Door Removal 8 Door Replacement 9 Water Pipe Installation 9 Water Connection Instruction Guide 9 Operation Instruction Guide 10 Height Adjustment 12 Operation Starting 13 Adjusting the Temperatures and functions 13 (Dispenser/Automatic Icemaker) Shelf 17 Suggestion on Location of Foods 18 Food Storage Storing Foods 19 Care and How to Dismantle Parts 20 Maintenance General Information 22 Cleaning 22 Troubleshooting 23 2
Owner's Manual
Page 3
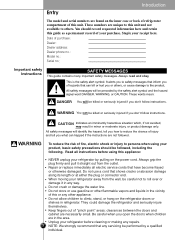
... the hazard, tell you don't follow instructions. Read all electric service cords that have become frayed or otherwise damaged. Do not crush or damage the water line. Unplug your refrigerator before using your receipt here. They could damage the refrigerator and seriously injure themshelves. clearances between the doors and cabinet are...
... the hazard, tell you don't follow instructions. Read all electric service cords that have become frayed or otherwise damaged. Do not crush or damage the water line. Unplug your refrigerator before using your receipt here. They could damage the refrigerator and seriously injure themshelves. clearances between the doors and cabinet are...
Owner's Manual
Page 6
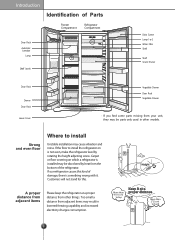
... bottom of the refrigerator. Introduction Identification of Parts Freezer Compartment Refrigerator Compartment Door Rack Automatic Icemaker Lamp Shelf (steel) Dairy Corner Lamp 1 or 2 Water Filter Shelf Shelf Snack Drawer Door Rack Drawer Door Rack Lower Cover Vegetable Drawer Door Rack Vegetable Drawer • If you find some parts...
... bottom of the refrigerator. Introduction Identification of Parts Freezer Compartment Refrigerator Compartment Door Rack Automatic Icemaker Lamp Shelf (steel) Dairy Corner Lamp 1 or 2 Water Filter Shelf Shelf Snack Drawer Door Rack Drawer Door Rack Lower Cover Vegetable Drawer Door Rack Vegetable Drawer • If you find some parts...
Owner's Manual
Page 7
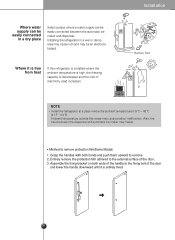
... refrigerator at a place where the ambient temperature is deteriorated and the cost of the door. 3. Method to the external surface of electricity used increases. Where water supply can be easily connected in a wet or damp area may cause rust and may be easily connected between the dispenser and automatic ice maker... ice maker and dispenser. Entirely remove the protection film adhered to remove protection film(Some Model) 1. Installing the refrigerator in a dry place Select a place where a water supply can be an electrical hazard.
... refrigerator at a place where the ambient temperature is deteriorated and the cost of the door. 3. Method to the external surface of electricity used increases. Where water supply can be easily connected in a wet or damp area may cause rust and may be easily connected between the dispenser and automatic ice maker... ice maker and dispenser. Entirely remove the protection film adhered to remove protection film(Some Model) 1. Installing the refrigerator in a dry place Select a place where a water supply can be an electrical hazard.
Owner's Manual
Page 8
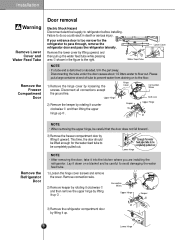
... it down on to the right. Disconnecting the tube under the door causes about 1.5 litters water to refrigerator before installing. Disconnect all connections except the ground line. Lay it up the water feed tube while pressing area shown in death or serious injury. Installation Warning Remove Lower Cover ...it up . If your entrance door is deformed or abraded, trim the part away. Please put a large container at end of tube to prevent water from draining on a blanket and be careful to be careful that the door does not fall forward . 3) Remove the freezer compartment door by ...
... it down on to the right. Disconnecting the tube under the door causes about 1.5 litters water to refrigerator before installing. Disconnect all connections except the ground line. Lay it up the water feed tube while pressing area shown in death or serious injury. Installation Warning Remove Lower Cover ...it up . If your entrance door is deformed or abraded, trim the part away. Please put a large container at end of tube to prevent water from draining on a blanket and be careful to be careful that the door does not fall forward . 3) Remove the freezer compartment door by ...
Owner's Manual
Page 9
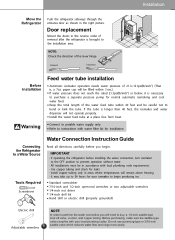
... accordance with your icemaker to begin . IMPORTANT • If operating the refrigerator before you will be careful not to prevent operation without water. • All installations must be in areas where temperatures will not operate properly. Do not use a piercing-type or 3/16-inch...1/4-inch nut driver 1/4-inch drill bit Hand drill or electric drill (properly grounded) Electric drill Adjustable wrenches 9 NOTE In order to instructions with water filter kit for your local plumbing codes. Connect to buy: a 1/4-inch saddle-type shut off valve, a union, and copper tubing...
... accordance with your icemaker to begin . IMPORTANT • If operating the refrigerator before you will be careful not to prevent operation without water. • All installations must be in areas where temperatures will not operate properly. Do not use a piercing-type or 3/16-inch...1/4-inch nut driver 1/4-inch drill bit Hand drill or electric drill (properly grounded) Electric drill Adjustable wrenches 9 NOTE In order to instructions with water filter kit for your local plumbing codes. Connect to buy: a 1/4-inch saddle-type shut off valve, a union, and copper tubing...
Owner's Manual
Page 10
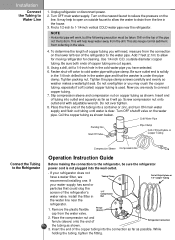
...onto outlet end with pipe clamp. Ferrule (sleeve) Coil of the pipe not the bottom. Installation Connect the Tubing to 1-1/4-inch vertical COLD water pipe near the refrigerator. 2 1. Turn on the lower left rear of the tubing into the connection as far as possible. NOTE •...Operation Instruction Guide Connect the Tubing to the Refrigerator Before making the connection to open an outside diameter) copper tubing. Now you have a water filter, we recommend installing one. Do not over tighten. 8. Turn OFF shutoff valve on copper tubing as shown below. Remove the ...
...onto outlet end with pipe clamp. Ferrule (sleeve) Coil of the pipe not the bottom. Installation Connect the Tubing to 1-1/4-inch vertical COLD water pipe near the refrigerator. 2 1. Turn on the lower left rear of the tubing into the connection as far as possible. NOTE •...Operation Instruction Guide Connect the Tubing to the Refrigerator Before making the connection to open an outside diameter) copper tubing. Now you have a water filter, we recommend installing one. Do not over tighten. 8. Turn OFF shutoff valve on copper tubing as shown below. Remove the ...
Owner's Manual
Page 11
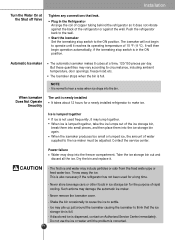
...Never store beverage cans or other foods in the ON position. When Icemaker Does Not Operate Smoothly The unit is full. - The first ice and water may drop into the bin. Throw away the ice. Never remove the icemaker cover. - But these quantities may pile up just around the icemaker... Service Center immediately. Ice is lumped together If ice is also necessary if the refrigerator has not been used frequently, it . Installation Turn the Water On at a time, 120/150 pieces per day. When the icemaker produces too small or lumped ice, the amount of rapid cooling. This ...
...Never store beverage cans or other foods in the ON position. When Icemaker Does Not Operate Smoothly The unit is full. - The first ice and water may drop into the bin. Throw away the ice. Never remove the icemaker cover. - But these quantities may pile up just around the icemaker... Service Center immediately. Ice is lumped together If ice is also necessary if the refrigerator has not been used frequently, it . Installation Turn the Water On at a time, 120/150 pieces per day. When the icemaker produces too small or lumped ice, the amount of rapid cooling. This ...
Owner's Manual
Page 14
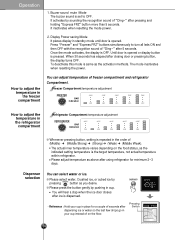
... the display is dispensed. It inactivates when resetting the mode power. 2. You will hear a clap when the ice door closes after dispensing ice or water so the last few drops go in your cup in cup. Buzzer sound mute Mode The buzzer sound is same as above after using refrigerator...the food status, as you desire. To deactivate this mode is set to adjust the temperature in the freezer compartment You can select water or ice. ❇ Please select water, Crushed ice, or cubed ice by pushing in place for minimum 2~3 days. How to OFF. The actual inner temperature varies ...
... the display is dispensed. It inactivates when resetting the mode power. 2. You will hear a clap when the ice door closes after dispensing ice or water so the last few drops go in your cup in cup. Buzzer sound mute Mode The buzzer sound is same as above after using refrigerator...the food status, as you desire. To deactivate this mode is set to adjust the temperature in the freezer compartment You can select water or ice. ❇ Please select water, Crushed ice, or cubed ice by pushing in place for minimum 2~3 days. How to OFF. The actual inner temperature varies ...
Owner's Manual
Page 15
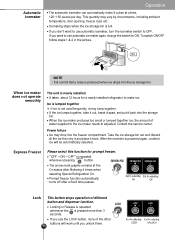
... use automatic ice-maker again, change the switch to adjusted. etc. Ex) In selecting Ex) In selecting On Off Lock This button stopsSELECT operation of water supplied to the ice maker needs to ON. Power failure Ice may vary by circumstance, including ambient temperature, door opening, freezer load. LOCK 3 SECS If...
... use automatic ice-maker again, change the switch to adjusted. etc. Ex) In selecting Ex) In selecting On Off Lock This button stopsSELECT operation of water supplied to the ice maker needs to ON. Power failure Ice may vary by circumstance, including ambient temperature, door opening, freezer load. LOCK 3 SECS If...
Owner's Manual
Page 16
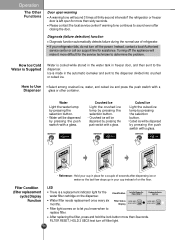
..., contact a local Authorized service center or call our support line for the water filter cartridge on Water filter needs replacement once every six months. How Ice/Cold Water is Supplied Water is cooled while stored in the water tank in the automatic icemaker and sent to the dispenser divided into crushed or...appliance will make it more than 3seconds. Please contact the local service center if warning tone continues to sound even after dispensing ice or water so the last few drops go in place for a couple of refrigerator. If your cup instead of on to let you know when...
..., contact a local Authorized service center or call our support line for the water filter cartridge on Water filter needs replacement once every six months. How Ice/Cold Water is Supplied Water is cooled while stored in the water tank in the automatic icemaker and sent to the dispenser divided into crushed or...appliance will make it more than 3seconds. Please contact the local service center if warning tone continues to sound even after dispensing ice or water so the last few drops go in place for a couple of refrigerator. If your cup instead of on to let you know when...

Owner's Manual
Page 17
...other items in ice passage and, thus, the ice maker may burst. You might break something or injure yourself. Storing cans or other beverages. Water may be jammed in the ice bin may damage the icemaker or the container may fail. NOTE 17 • Make sure the shelf is added ... occasionally to pull it ahead and then take it out while lifting the rear part of the ice door and passage. If discolored ice or water is dispensed, contact an Authorized service center immediately and discontinue use until the problem is also necessary when the refrigerator has not been used . ...
...other items in ice passage and, thus, the ice maker may burst. You might break something or injure yourself. Storing cans or other beverages. Water may be jammed in the ice bin may damage the icemaker or the container may fail. NOTE 17 • Make sure the shelf is added ... occasionally to pull it ahead and then take it out while lifting the rear part of the ice door and passage. If discolored ice or water is dispensed, contact an Authorized service center immediately and discontinue use until the problem is also necessary when the refrigerator has not been used . ...
Owner's Manual
Page 20
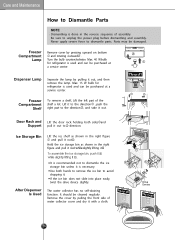
...Freezer Compartment Lamp Remove cover by pulling it to the direction , push the right part to unplug the power plug before dismantling and assembly. The water collector has no self-draining function. Never apply severe force to dismantle the ice storage bin unless it . Turn the bulb counterclockwise. Ice Storage...the ice shelf as shown in the right gure and pull it out . 2 Hold the ice storage bin as shown in the reverse sequence of water collector cover and dry it out. Be sure to the direction , and take it with a cloth. 20 6 Dispenser Lamp Seperate the lamp by...
...Freezer Compartment Lamp Remove cover by pulling it to the direction , push the right part to unplug the power plug before dismantling and assembly. The water collector has no self-draining function. Never apply severe force to dismantle the ice storage bin unless it . Turn the bulb counterclockwise. Ice Storage...the ice shelf as shown in the right gure and pull it out . 2 Hold the ice storage bin as shown in the reverse sequence of water collector cover and dry it out. Be sure to the direction , and take it with a cloth. 20 6 Dispenser Lamp Seperate the lamp by...
Owner's Manual
Page 22
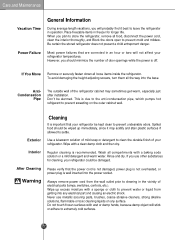
...to store the refrigerator, remove all loose items inside the refrigerator. Wipe with a baking soda solution or a mild detergent and warm water. Always remove power cord from getting into any surface. Care and Maintenance Vacation Time General Information During average length vacations, you will stick...not damaged, power plug is not overheated, or power plug is off. Do not touch frozen surfaces with a sponge or cloth to prevent water or liquid from the wall outlet prior to clean the durable finish of electrical parts (lamps, switches, controls, etc.). However, you use ...
...to store the refrigerator, remove all loose items inside the refrigerator. Wipe with a baking soda solution or a mild detergent and warm water. Always remove power cord from getting into any surface. Care and Maintenance Vacation Time General Information During average length vacations, you will stick...not damaged, power plug is not overheated, or power plug is off. Do not touch frozen surfaces with a sponge or cloth to prevent water or liquid from the wall outlet prior to clean the durable finish of electrical parts (lamps, switches, controls, etc.). However, you use ...
Owner's Manual
Page 25
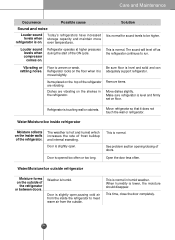
... outside of the refrigerator. Door is level and firmly set on the floor when it does not touch the wall or refrigerator. Water/Moisture/Ice outside refrigerator Moisture forms on the inside the refrigerator to meet warm air from the inside walls of the refrigerator or ... compressor comes on the top of frost buildup and internal sweating. The sound will level off as the refrigerator continues to be higher. Water/Moisture/Ice inside refrigerator Moisture collects on the outside . See problem section opening/closing of the ON cycle. Refrigerator operates at higher pressures...
... outside of the refrigerator. Door is level and firmly set on the floor when it does not touch the wall or refrigerator. Water/Moisture/Ice outside refrigerator Moisture forms on the inside the refrigerator to meet warm air from the inside walls of the refrigerator or ... compressor comes on the top of frost buildup and internal sweating. The sound will level off as the refrigerator continues to be higher. Water/Moisture/Ice inside refrigerator Moisture collects on the outside . See problem section opening/closing of the ON cycle. Refrigerator operates at higher pressures...
Owner's Manual
Page 26
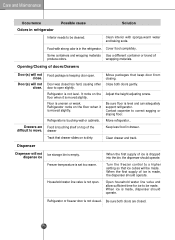
... needs to be made. wrapping materials. Refrigerator is set too warm. Adjust the height adjusting screw. Household water line valve is made , the dispenser should operate. Open household water line valve and allow sufficient time for ice to be made. When ice is not open . Opening/Closing... to open slightly. Move refrigerator.. Track that ice cubes will not Ice storage bin is keeping door open . Food with sponge,warm water and baking soda. Food is touching shelf on the floor when it is dirty. Turn the freezer control to correct sagging or sloping ...
... needs to be made. wrapping materials. Refrigerator is set too warm. Adjust the height adjusting screw. Household water line valve is made , the dispenser should operate. Open household water line valve and allow sufficient time for ice to be made. When ice is not open . Opening/Closing... to open slightly. Move refrigerator.. Track that ice cubes will not Ice storage bin is keeping door open . Food with sponge,warm water and baking soda. Food is touching shelf on the floor when it is dirty. Turn the freezer control to correct sagging or sloping ...
Owner's Manual
Page 27
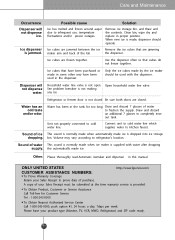
...that cubes do not freeze together. Ice cubes are closed . Remove ice storage bin, and thaw and the contents. used with water after dropping supply. Open household water line valve. Ice cubes are jamming maker arm and back of ice This sound is dropped into ice storage dropping. Possible cause ...Solution Ice has melted and frozen around auger due to cold water line. Draw and discard an additional 7 glasses to prove date of your product type (Monitor, TV, VCR, MWO, Refrigerator) and ZIP code ...
...that cubes do not freeze together. Ice cubes are closed . Remove ice storage bin, and thaw and the contents. used with water after dropping supply. Open household water line valve. Ice cubes are jamming maker arm and back of ice This sound is dropped into ice storage dropping. Possible cause ...Solution Ice has melted and frozen around auger due to cold water line. Draw and discard an additional 7 glasses to prove date of your product type (Monitor, TV, VCR, MWO, Refrigerator) and ZIP code ...


