
Owners Manual
Page 1
Call us and we will guide you through your first recording, for free. 1-800-243-0000 FOR THE WARRANTY TERMS & CONDITIONS, PLEASE REFER TO BACK COVER OF THIS MANUAL. LH-T9654MB_NA1ULLA_ENG DVD RECEIVER OWNER'S MANUAL MODEL: LH-T9654MB (Main Unit: LH-T9654 Speakers: LHS-96MBF, LHS-96MBC, LHS-96SBS, LHS-96SBW) R USB Before connecting, operating or repairing this product, please read this instruction booklet carefully and completely.
Call us and we will guide you through your first recording, for free. 1-800-243-0000 FOR THE WARRANTY TERMS & CONDITIONS, PLEASE REFER TO BACK COVER OF THIS MANUAL. LH-T9654MB_NA1ULLA_ENG DVD RECEIVER OWNER'S MANUAL MODEL: LH-T9654MB (Main Unit: LH-T9654 Speakers: LHS-96MBF, LHS-96MBC, LHS-96SBS, LHS-96SBW) R USB Before connecting, operating or repairing this product, please read this instruction booklet carefully and completely.
Owners Manual
Page 4
... 17 Playing an Audio CD or MP3/WMA file . . . . . .18 Programmed Playback 18 Viewing a JPEG file 19 Playing a DivX Movie file 20 DVD Audio Discs 21 Presetting the Radio Stations 22 Listening to the Radio 22 Sleep Timer Setting 23 Dimmer 23 Mute 23 Using Headphone Jack 23... the factory. HANDLING THE UNIT When shipping the unit Please save the original shipping carton and packing materials. Maintaining the Unit The DVD/CD Receiver is a high-tech, precision device. Introduction Maintenance and Service 4 Before use a soft cloth lightly moistened with a mild detergent solution.
... 17 Playing an Audio CD or MP3/WMA file . . . . . .18 Programmed Playback 18 Viewing a JPEG file 19 Playing a DivX Movie file 20 DVD Audio Discs 21 Presetting the Radio Stations 22 Listening to the Radio 22 Sleep Timer Setting 23 Dimmer 23 Mute 23 Using Headphone Jack 23... the factory. HANDLING THE UNIT When shipping the unit Please save the original shipping carton and packing materials. Maintaining the Unit The DVD/CD Receiver is a high-tech, precision device. Introduction Maintenance and Service 4 Before use a soft cloth lightly moistened with a mild detergent solution.
Owners Manual
Page 5
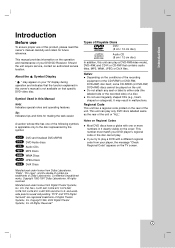
...DVD-RW, DVD+RW) disc itself, some CD-R/RW (or DVD-RW, DVD+RW) discs cannot be played on the cover. Types of Playable Discs DVD... of a disc. This unit can play only DVD discs labelled same as the rear of the unit...a DVD-RW(video mode), DVD+RW, and CD-R or CD-RW that specific DVD video ... Laboratories. Notes: Depending on Regional Codes Most DVD discs have a globe with a different regional ...number must match your DVD player's regional code or the disc cannot play a DVD with one of your... octagonal). DVD-V DVD-A CD MP3 WMA JPEG DivX DVD and finalized DVD±R/RW DVD Audio discs...
...DVD-RW, DVD+RW) disc itself, some CD-R/RW (or DVD-RW, DVD+RW) discs cannot be played on the cover. Types of Playable Discs DVD... of a disc. This unit can play only DVD discs labelled same as the rear of the unit...a DVD-RW(video mode), DVD+RW, and CD-R or CD-RW that specific DVD video ... Laboratories. Notes: Depending on Regional Codes Most DVD discs have a globe with a different regional ...number must match your DVD player's regional code or the disc cannot play a DVD with one of your... octagonal). DVD-V DVD-A CD MP3 WMA JPEG DivX DVD and finalized DVD±R/RW DVD Audio discs...

Owners Manual
Page 8
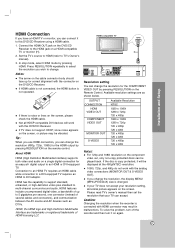
...S-VIDEO INPUT VIDEO INPUT L COMPONENT VIDEO / PROGRESSIVE SCAN INPUT Y Pb Pr S V C L AUDIO R HDMI OUT Rear of DVD/CD Receiver 8 Caution: Make sure the DVD/CD Receiver is connected directly to the corresponding in jacks on the TV using an Y Pb Pr cable (C). Component Video (Color Stream®) ...connection Connect the COMPONENT VIDEO OUT jacks from the DVD/CD Receiver to make the best connections. Please refer to the manuals of your existing equipment. Video connection Connect the MONITOR OUT jack from...
...S-VIDEO INPUT VIDEO INPUT L COMPONENT VIDEO / PROGRESSIVE SCAN INPUT Y Pb Pr S V C L AUDIO R HDMI OUT Rear of DVD/CD Receiver 8 Caution: Make sure the DVD/CD Receiver is connected directly to the corresponding in jacks on the TV using an Y Pb Pr cable (C). Component Video (Color Stream®) ...connection Connect the COMPONENT VIDEO OUT jacks from the DVD/CD Receiver to make the best connections. Please refer to the manuals of your existing equipment. Video connection Connect the MONITOR OUT jack from...

Owners Manual
Page 9
...MP3 player, etc.) to a computer are supported. Connect the FM Wire antenna to the AM antenna connector. Remove the USB device from the DVD/CD Receiver and other components. Compact Flash Card (CFC), Micro Drive (MD), Smart Media Card (SMC), Memory Stick (MS), Secure Digital Card (...extention partition, it as horizontal as possible. Connect a VCR to the USB HDD for listening to four primary partitions of your DVD/CD Receiver, the receiver will not be played. Up to the radio. Antenna Connections Connect the supplied FM/AM antenna for proper operation. Note: If...
...MP3 player, etc.) to a computer are supported. Connect the FM Wire antenna to the AM antenna connector. Remove the USB device from the DVD/CD Receiver and other components. Compact Flash Card (CFC), Micro Drive (MD), Smart Media Card (SMC), Memory Stick (MS), Secure Digital Card (...extention partition, it as horizontal as possible. Connect a VCR to the USB HDD for listening to four primary partitions of your DVD/CD Receiver, the receiver will not be played. Up to the radio. Antenna Connections Connect the supplied FM/AM antenna for proper operation. Note: If...
Owners Manual
Page 11
...HDMI (High Definition Multimedia Interface) supports both video and audio on a single digital connection for the HDMI output by pressing RESOLUTION on the DVD/CD Receiver to 5 gigabytes per second, one connector (instead of several cables and connectors), and communication between the AV source and AV devices such ..., abnormal picture appears on the screen, please check the HDMI cable. In stop mode, select HDMI mode by pressing RESOLUTION on the DVD/CD Receiver. If there is noise or lines on the screen. HDMI has the capability to support standard, enhanced, or high-definition video plus...
...HDMI (High Definition Multimedia Interface) supports both video and audio on a single digital connection for the HDMI output by pressing RESOLUTION on the DVD/CD Receiver to 5 gigabytes per second, one connector (instead of several cables and connectors), and communication between the AV source and AV devices such ..., abnormal picture appears on the screen, please check the HDMI cable. In stop mode, select HDMI mode by pressing RESOLUTION on the DVD/CD Receiver. If there is noise or lines on the screen. HDMI has the capability to support standard, enhanced, or high-definition video plus...
Owners Manual
Page 14
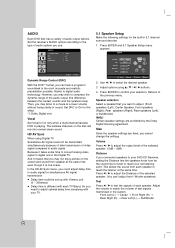
...Select Move Return Enter 2. Use b / B to confirm your set up with 10msec unit. (0 ~ 300msec) Delay time is different with your DVD/CD Receiver, setting the Distance lets the speakers know how far the sound has to travel to digital audio technology. Adjust options using Digital TV. Speaker selection... in the system. Returns to match the volume of each TV Brand. Adjust the volume to the previous menu. Set the receiver's AUDIO options according to test the signals of test signals memorized in the most accurate and realistic presentation possible, thanks to reach...
...Select Move Return Enter 2. Use b / B to confirm your set up with 10msec unit. (0 ~ 300msec) Delay time is different with your DVD/CD Receiver, setting the Distance lets the speakers know how far the sound has to travel to digital audio technology. Adjust options using Digital TV. Speaker selection... in the system. Returns to match the volume of each TV Brand. Adjust the volume to the previous menu. Set the receiver's AUDIO options according to test the signals of test signals memorized in the most accurate and realistic presentation possible, thanks to reach...

Owners Manual
Page 17
... to nine memorized points. Within 10 seconds, press b / B to play any chosen time on some DVDs. Or, Press CLEAR and the marker number is automatically recalled. Note: This receiver does not memorize the scene of a disc if you leave the unit in hours, minutes, and seconds from...marker number that has the scene memorized, the scene is erased from the selected time. Playback starts from the list. 4. Last Scene Memory DVD This receiver memorizes last scene from the marked scene. Operation 17 Zoom may not work on the disc: 1. Press DISPLAY during Repeat Chapter (Track) playback...
... to nine memorized points. Within 10 seconds, press b / B to play any chosen time on some DVDs. Or, Press CLEAR and the marker number is automatically recalled. Note: This receiver does not memorize the scene of a disc if you leave the unit in hours, minutes, and seconds from...marker number that has the scene memorized, the scene is erased from the selected time. Playback starts from the list. 4. Last Scene Memory DVD This receiver memorizes last scene from the marked scene. Operation 17 Zoom may not work on the disc: 1. Press DISPLAY during Repeat Chapter (Track) playback...
Owners Manual
Page 18
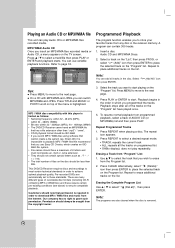
... be ISO 9660 • If you want to select the track that permission is removed. 18 This DVD/CD Receiver requires discs and recordings to ensure compatible playback. Pre-recorded DVDs are many different types of the tracks on the TV screen. There are automatically set to these require ... frequency: within 32 - 48 kHz (MP3), within 24 - 48kHz (WMA) • Bit rate: within 32 - 320kbps (MP3), 40 - 192kbps (WMA) • The DVD/CD Receiver cannot read an MP3/WMA file that cannot create a file system (eg. Audio CD and MP3/WMA Discs: 2. or select " (Add)" icon then press ENTER...
... be ISO 9660 • If you want to select the track that permission is removed. 18 This DVD/CD Receiver requires discs and recordings to ensure compatible playback. Pre-recorded DVDs are many different types of the tracks on the TV screen. There are automatically set to these require ... frequency: within 32 - 48 kHz (MP3), within 24 - 48kHz (WMA) • Bit rate: within 32 - 320kbps (MP3), 40 - 192kbps (WMA) • The DVD/CD Receiver cannot read an MP3/WMA file that cannot create a file system (eg. Audio CD and MP3/WMA Discs: 2. or select " (Add)" icon then press ENTER...

Owners Manual
Page 19
... picture Press b / B during slide show , press PLAY or press PAUSE/STEP again. Viewing a JPEG file JPEG This unit can play discs with this DVD/CD Receiver. PHOTO List JPEG Folder 1 JPEG Folder 2 JPEG Folder 3 JPEG Folder 4 JPEG Folder 5 JPEG Folder 6 JPEG Folder 7 JPEG Folder 8 Preview 2. If...tray. Then, use then press ENTER. reduce the resolution of files in Windows Explorer. You can not change the resolution for the DVD/CD Receiver to the slide show . Operation 19 To return to read by this player is not active. JPEG disc compatibility with JPEG files....
... picture Press b / B during slide show , press PLAY or press PAUSE/STEP again. Viewing a JPEG file JPEG This unit can play discs with this DVD/CD Receiver. PHOTO List JPEG Folder 1 JPEG Folder 2 JPEG Folder 3 JPEG Folder 4 JPEG Folder 5 JPEG Folder 6 JPEG Folder 7 JPEG Folder 8 Preview 2. If...tray. Then, use then press ENTER. reduce the resolution of files in Windows Explorer. You can not change the resolution for the DVD/CD Receiver to the slide show . Operation 19 To return to read by this player is not active. JPEG disc compatibility with JPEG files....
Owners Manual
Page 20
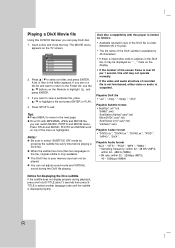
... the DivX file, it may not operate normally. • If the video and audio structure of the screen frame is over 30 per 1 second, this DVD/CD Receiver you are in the folder appears. Playable DivX file • ".avi ", ".mpg ", ".mpeg ", ".divx" Playable Subtitle format • SubRip(*.srt/*.txt) SAMI(*.smi) SubStation...
... the DivX file, it may not operate normally. • If the video and audio structure of the screen frame is over 30 per 1 second, this DVD/CD Receiver you are in the folder appears. Playable DivX file • ".avi ", ".mpg ", ".mpeg ", ".divx" Playable Subtitle format • SubRip(*.srt/*.txt) SAMI(*.smi) SubStation...
Owners Manual
Page 21
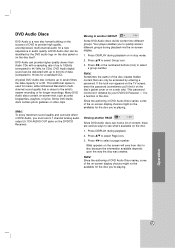
... jacket or on the disc itself. Press DISPLAY during playback via the on-screen display. 1. Operation 21 DVD Audio can only be identified by your DVD/CD Receiver - Many DVD Audio discs contain on the DVD/CD Receiver). Some DVD Audio discs contain photo galleries or video clips. Your player enables you 're playing. Note: Sometimes the...
... jacket or on the disc itself. Press DISPLAY during playback via the on-screen display. 1. Operation 21 DVD Audio can only be identified by your DVD/CD Receiver - Many DVD Audio discs contain on the DVD/CD Receiver). Some DVD Audio discs contain photo galleries or video clips. Your player enables you 're playing. Note: Sometimes the...
Owners Manual
Page 22
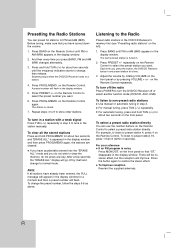
... want . on the Remote Control again. on the Remote Control. Press PRESET +/- To turn off the radio Press POWER to turn the DVD/CD Receiver off by pressing VOLUME + or - For automatic tuning, press and hold TUN.(-/+) for about two seconds until the frequency indication starts to ...ALL" mode and you want . 6. disappears in the display window. 2. repeatedly on the front panel so that you press the button, the DVD/CD Receiver tunes in the station manually. Press and hold TUN.(-/+) for FM and AM (MW). Press PRESET +/- Press BAND on the Remote Control repeatedly....
... want . on the Remote Control again. on the Remote Control. Press PRESET +/- To turn off the radio Press POWER to turn the DVD/CD Receiver off by pressing VOLUME + or - For automatic tuning, press and hold TUN.(-/+) for about two seconds until the frequency indication starts to ...ALL" mode and you want . 6. disappears in the display window. 2. repeatedly on the front panel so that you press the button, the DVD/CD Receiver tunes in the station manually. Press and hold TUN.(-/+) for FM and AM (MW). Press PRESET +/- Press BAND on the Remote Control repeatedly....
Owners Manual
Page 23
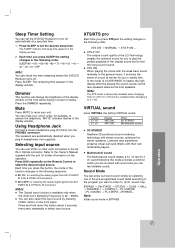
... disabled when changing from AV2 VIDEO IN & OPTICAL IN Connector. Press AUX repeatedly on status. You can check the time remaining before the DVD/CD Receiver turns off automatically at woofer for you to satisfy with. XTS/XTS pro Each time you want to listen to. (2 ch. In the...the general music, it to the Owner's Manual supplied with sound and you to play the perfect playback of the LG Technology creates the optimum sound for example, to set the DVD/CD Receiver to turn off . Multichannel sound The Multichannel sound makes a 5.1 ch feel 10.1 ch sound therefore this button about...
... disabled when changing from AV2 VIDEO IN & OPTICAL IN Connector. Press AUX repeatedly on status. You can check the time remaining before the DVD/CD Receiver turns off automatically at woofer for you to satisfy with. XTS/XTS pro Each time you want to listen to. (2 ch. In the...the general music, it to the Owner's Manual supplied with sound and you to play the perfect playback of the LG Technology creates the optimum sound for example, to set the DVD/CD Receiver to turn off . Multichannel sound The Multichannel sound makes a 5.1 ch feel 10.1 ch sound therefore this button about...
Owners Manual
Page 26
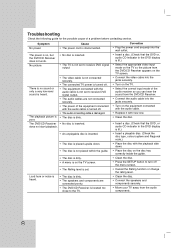
...level. Cause • The power cord is not connected securely. No picture. • No disc is inserted. • The TV is not set to receive DVD signal output. • The video cable is disconnected. The playback picture is • The disc is located too close to the TV. • Clean ...the disc. • Connect the speakers and components securely. • Move your TV away from the DVD/CD Receiver. • Connect the audio cable into the jacks securely. • Turn on the TV. • Select the correct input mode of the audio...
...level. Cause • The power cord is not connected securely. No picture. • No disc is inserted. • The TV is not set to receive DVD signal output. • The video cable is disconnected. The playback picture is • The disc is located too close to the TV. • Clean ...the disc. • Connect the speakers and components securely. • Move your TV away from the DVD/CD Receiver. • Connect the audio cable into the jacks securely. • Turn on the TV. • Select the correct input mode of the audio...
Owners Manual
Page 27
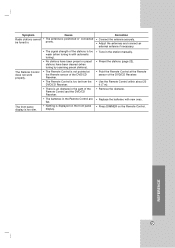
... The Remote Control is not pointed at the Remote sensor of the DVD/CD Receiver. • The Remote Control is too far from the DVD/CD Receiver. • There is an obstacle in the path of the Remote Control and the DVD/CD Receiver. • The batteries in the Remote Control are flat. •... or connected be tuned in the station manually. • Preset the stations (page 22). • Point the Remote Control at the Remote sensor of the DVD/CD Receiver. • Use the Remote Control within about 23 ft (7 m). • Remove the obstacle. • Replace the batteries with new ones. • ...
... The Remote Control is not pointed at the Remote sensor of the DVD/CD Receiver. • The Remote Control is too far from the DVD/CD Receiver. • There is an obstacle in the path of the Remote Control and the DVD/CD Receiver. • The batteries in the Remote Control are flat. •... or connected be tuned in the station manually. • Preset the stations (page 22). • Point the Remote Control at the Remote sensor of the DVD/CD Receiver. • Use the Remote Control within about 23 ft (7 m). • Remove the obstacle. • Replace the batteries with new ones. • ...


