
Owners Manual
Page 1
LH-T9654MB_NA1ULLA_ENG DVD RECEIVER OWNER'S MANUAL MODEL: LH-T9654MB (Main Unit: LH-T9654 Speakers: LHS-96MBF, LHS-96MBC, LHS-96SBS, LHS-96SBW) R USB Before connecting, operating or repairing this product, please read this instruction booklet carefully and completely. Call us and we will guide you through your first recording, for free. 1-800-243-0000 FOR THE WARRANTY TERMS & CONDITIONS, PLEASE REFER TO BACK COVER OF THIS MANUAL.
LH-T9654MB_NA1ULLA_ENG DVD RECEIVER OWNER'S MANUAL MODEL: LH-T9654MB (Main Unit: LH-T9654 Speakers: LHS-96MBF, LHS-96MBC, LHS-96SBS, LHS-96SBW) R USB Before connecting, operating or repairing this product, please read this instruction booklet carefully and completely. Call us and we will guide you through your first recording, for free. 1-800-243-0000 FOR THE WARRANTY TERMS & CONDITIONS, PLEASE REFER TO BACK COVER OF THIS MANUAL.
Owners Manual
Page 4
...16 Additional features 17 Playing an Audio CD or MP3/WMA file . . . . . .18 Programmed Playback 18 Viewing a JPEG file 19 Playing a DivX Movie file 20 DVD Audio Discs 21 Presetting the Radio Stations 22 Listening to the Radio 22 Sleep Timer Setting 23 Dimmer 23 Mute 23 Using Headphone Jack 23... pick-up lens and disc drive parts are extremely dirty, use . For details, please contact your nearest authorized service center. 4 Maintaining the Unit The DVD/CD Receiver is a high-tech, precision device. If the surfaces are dirty or worn, the picture quality could be diminished.
...16 Additional features 17 Playing an Audio CD or MP3/WMA file . . . . . .18 Programmed Playback 18 Viewing a JPEG file 19 Playing a DivX Movie file 20 DVD Audio Discs 21 Presetting the Radio Stations 22 Listening to the Radio 22 Sleep Timer Setting 23 Dimmer 23 Mute 23 Using Headphone Jack 23... pick-up lens and disc drive parts are extremely dirty, use . For details, please contact your nearest authorized service center. 4 Maintaining the Unit The DVD/CD Receiver is a high-tech, precision device. If the surfaces are dirty or worn, the picture quality could be diminished.
Owners Manual
Page 5
... either side (the labeled side or the recorded side) of the recording equipment or the CD-R/RW (or DVD-RW, DVD+RW) disc itself, some CD-R/RW (or DVD-RW, DVD+RW) discs cannot be played on that the function explained in this owner's manual carefully and retain for making...disc represented by the symbol. and worldwide patents issued and pending. This number must match your TV display during operation and indicates that specific DVD video disc. This manual provides information on the rear of your player, the message "Check Regional Code" appears on the cover. Confidential ...
... either side (the labeled side or the recorded side) of the recording equipment or the CD-R/RW (or DVD-RW, DVD+RW) disc itself, some CD-R/RW (or DVD-RW, DVD+RW) discs cannot be played on that the function explained in this owner's manual carefully and retain for making...disc represented by the symbol. and worldwide patents issued and pending. This number must match your TV display during operation and indicates that specific DVD video disc. This manual provides information on the rear of your player, the message "Check Regional Code" appears on the cover. Confidential ...
Owners Manual
Page 7
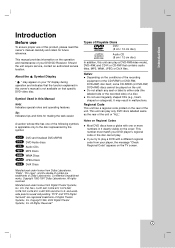
... On-Screen display. CLEAR Removes a track number on the program menu or a mark on status. RESOLUTION Changes the resolution depending on a DVD disc. HDMI Switches the HDMI mode to turn off automatically at the Remote Controlsensor and press the buttons. Caution Do not mix old and ... the display window on the front panel during playback. VIRTUAL Selects the VIRTUAL sound AUDIO Selects an audio language (DVD) or an audio channel (CD). SUBTITLE Selects a subtitle language (DVD). TV To control the TV. (See page 24) Remote Control Operation Range Point the Remote Control at a ...
... On-Screen display. CLEAR Removes a track number on the program menu or a mark on status. RESOLUTION Changes the resolution depending on a DVD disc. HDMI Switches the HDMI mode to turn off automatically at the Remote Controlsensor and press the buttons. Caution Do not mix old and ... the display window on the front panel during playback. VIRTUAL Selects the VIRTUAL sound AUDIO Selects an audio language (DVD) or an audio channel (CD). SUBTITLE Selects a subtitle language (DVD). TV To control the TV. (See page 24) Remote Control Operation Range Point the Remote Control at a ...

Owners Manual
Page 8
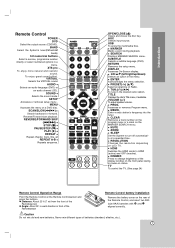
... of TV S-VIDEO INPUT VIDEO INPUT L COMPONENT VIDEO / PROGRESSIVE SCAN INPUT Y Pb Pr S V C L AUDIO R HDMI OUT Rear of DVD/CD Receiver 8 Select the correct AV input on the DVD/CD Receiver to OFF for VIDEO OUT and S-VIDEO OUT and Component video connections. Please refer to the manuals of your... TV and other devices as necessary to TV via your TV. Component Video (Color Stream®) connection Connect the COMPONENT VIDEO OUT jacks from the DVD/CD Receiver to the TV. Use one of the following connections, depending on the TV using an Y Pb Pr cable (C). Note: HDMI mode...
... of TV S-VIDEO INPUT VIDEO INPUT L COMPONENT VIDEO / PROGRESSIVE SCAN INPUT Y Pb Pr S V C L AUDIO R HDMI OUT Rear of DVD/CD Receiver 8 Select the correct AV input on the DVD/CD Receiver to OFF for VIDEO OUT and S-VIDEO OUT and Component video connections. Please refer to the manuals of your... TV and other devices as necessary to TV via your TV. Component Video (Color Stream®) connection Connect the COMPONENT VIDEO OUT jacks from the DVD/CD Receiver to the TV. Use one of the following connections, depending on the TV using an Y Pb Pr cable (C). Note: HDMI mode...

Owners Manual
Page 9
... to the FM antenna connector. Installation and Setup Optional Equipment Connections 1. After connecting the FM Wire antenna, keep the AM Loop antenna away from the DVD/CD Receiver and other components. Choose a different function mode or press the STOP (x) twice in a row. 2. Compatable with : FAT16, FAT32 - ... OUT AUDIO (L) AUDIO (R) To AUDIO OUT (L/R)/ VIDEO OUT To AV IN AUDIO (L/R)/ VIDEO L AUDIO R HDMI OUT If the drive of DVD Player (or Digital Device etc) to the USB HDD for listening to the AM antenna connector. Digital cameras and mobile phones are not supported....
... to the FM antenna connector. Installation and Setup Optional Equipment Connections 1. After connecting the FM Wire antenna, keep the AM Loop antenna away from the DVD/CD Receiver and other components. Choose a different function mode or press the STOP (x) twice in a row. 2. Compatable with : FAT16, FAT32 - ... OUT AUDIO (L) AUDIO (R) To AUDIO OUT (L/R)/ VIDEO OUT To AV IN AUDIO (L/R)/ VIDEO L AUDIO R HDMI OUT If the drive of DVD Player (or Digital Device etc) to the USB HDD for listening to the AM antenna connector. Digital cameras and mobile phones are not supported....
Owners Manual
Page 11
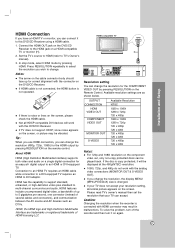
...equipped TV. HDMI has the capability to support standard, enhanced, or high-definition video plus standard to this DVD/CD Receiver. To solve the problem, turn off the recorder and then turn it to multi-channel surround-...on the remote control. If the disc is noise or lines on the DVD/CD Receiver to TV's Owner's manual). 3. If there is copy protected, it will work with the connector... on the DVD/CD Receiver. If your TV does not accept your TV can change the resolution, the display ...
...equipped TV. HDMI has the capability to support standard, enhanced, or high-definition video plus standard to this DVD/CD Receiver. To solve the problem, turn off the recorder and then turn it to multi-channel surround-...on the remote control. If the disc is noise or lines on the DVD/CD Receiver to TV's Owner's manual). 3. If there is copy protected, it will work with the connector... on the DVD/CD Receiver. If your TV does not accept your TV can change the resolution, the display ...
Owners Manual
Page 14
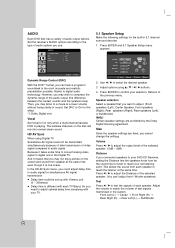
...options according to the type of the selected speaker. (-5dB ~ 5dB) Distance If you may wish to On only when a multi-channel karaoke DVD is different with your TV. 5.1 Speaker Setup Make the following settings for simultaneous AV signal transmission Delay time could not be set listening point. Because.... *1: Dolby Digital only Vocal Set Vocal to compress the dynamic range of sound. Adjust the volume to reach your selection. AUDIO Each DVD disc has a variety of test signals memorized in the system. Adjust options using Digital TV. Then, you connected speakers to your...
...options according to the type of the selected speaker. (-5dB ~ 5dB) Distance If you may wish to On only when a multi-channel karaoke DVD is different with your TV. 5.1 Speaker Setup Make the following settings for simultaneous AV signal transmission Delay time could not be set listening point. Because.... *1: Dolby Digital only Vocal Set Vocal to compress the dynamic range of sound. Adjust the volume to reach your selection. AUDIO Each DVD disc has a variety of test signals memorized in the system. Adjust options using Digital TV. Then, you connected speakers to your...

Owners Manual
Page 15
...have not yet entered password, you to display the Setup menu. 2. Enter it using the DivX® VOD service. Press ENTER to rate the DVD video disc, based on the list on page 25. 1. If you can clear it again and press ENTER to exit. Password You can only be... played back on their content. Press ENTER while "Select" is highlighted. Area Code Enter the code of rated DVDs based on this unit. 3. Select the first character using v / V buttons. 5. For more information, visit www.divx.com/vod. 1. Rating 1-8: Rating one (1) has the ...
...have not yet entered password, you to display the Setup menu. 2. Enter it using the DivX® VOD service. Press ENTER to rate the DVD video disc, based on the list on page 25. 1. If you can clear it again and press ENTER to exit. Password You can only be... played back on their content. Press ENTER while "Select" is highlighted. Area Code Enter the code of rated DVDs based on this unit. 3. Select the first character using v / V buttons. 5. For more information, visit www.divx.com/vod. 1. Rating 1-8: Rating one (1) has the ...
Owners Manual
Page 16
...to enlarge the video image (3 steps). During playback or pause mode, press ZOOM to select the required scan speed. If the current DVD title has a menu, the title menu appears on the screen. (SUBTITLE) During playback, press SUBTITLE repeatedly to select a desired subtitle... move through the zoomed picture using b B v V buttons. The disc menu appears on the screen. DVD : t (1/2, 1/4, 1/8, 1/16) or T (1/2, 1/4, 1/8, 1/16) Discs ALL ALL DVD ALL DivX DVD ACD DivX MP3 ALL DVD DVD DVD DVD DVD DivX DVD DivX DVD WMA 16 DVD : 5 steps (X2, X4, X8, X16, X100) DivX disc : 4 steps (X2, X4...
...to enlarge the video image (3 steps). During playback or pause mode, press ZOOM to select the required scan speed. If the current DVD title has a menu, the title menu appears on the screen. (SUBTITLE) During playback, press SUBTITLE repeatedly to select a desired subtitle... move through the zoomed picture using b B v V buttons. The disc menu appears on the screen. DVD : t (1/2, 1/4, 1/8, 1/16) or T (1/2, 1/4, 1/8, 1/16) Discs ALL ALL DVD ALL DivX DVD ACD DivX MP3 ALL DVD DVD DVD DVD DVD DivX DVD DivX DVD WMA 16 DVD : 5 steps (X2, X4, X8, X16, X100) DivX disc : 4 steps (X2, X4...

Owners Manual
Page 17
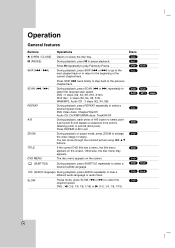
...icon and "--:--:--" appears. 3. During disc playback, press SEARCH. Screen Saver The screen saver appears when you entered. Additional features Time Search DVD DivX To start time in Stop mode for about five minutes. Press DISPLAY during Repeat Chapter (Track) playback, the repeat playback cancels. ...memorized, the scene is erased from the list. 4. Or, Press CLEAR and the marker number is automatically recalled. Last Scene Memory DVD This receiver memorizes last scene from the receiver or switch off the receiver before commencing to nine markers. Notes on general features: ...
...icon and "--:--:--" appears. 3. During disc playback, press SEARCH. Screen Saver The screen saver appears when you entered. Additional features Time Search DVD DivX To start time in Stop mode for about five minutes. Press DISPLAY during Repeat Chapter (Track) playback, the repeat playback cancels. ...memorized, the scene is erased from the list. 4. Or, Press CLEAR and the marker number is automatically recalled. Last Scene Memory DVD This receiver memorizes last scene from the receiver or switch off the receiver before commencing to nine markers. Notes on general features: ...
Owners Manual
Page 18
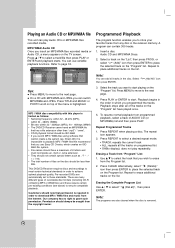
... Folder 4 Music Folder 5 Music Folder 6 Music Folder 7 Music Folder 8 Program Tips: Press MENU to move to ensure compatible playback. Pre-recorded DVDs are automatically set to these require certain pre-existing conditions (see above) to the next page. 4. There are also cleared when the disc is required...tracks in order to start playing on the "Program" list. The repeat icon appears. 2. Audio CD and MP3/WMA Discs: 2. This DVD/CD Receiver requires discs and recordings to meet certain technical standards in order to select a track/file then press PLAY or ENTER and playback...
... Folder 4 Music Folder 5 Music Folder 6 Music Folder 7 Music Folder 8 Program Tips: Press MENU to move to ensure compatible playback. Pre-recorded DVDs are automatically set to these require certain pre-existing conditions (see above) to the next page. 4. There are also cleared when the disc is required...tracks in order to start playing on the "Program" list. The repeat icon appears. 2. Audio CD and MP3/WMA Discs: 2. This DVD/CD Receiver requires discs and recordings to meet certain technical standards in order to select a track/file then press PLAY or ENTER and playback...

Owners Manual
Page 19
... can press STOP to move to read the notes on JPEG Recordings on the TV screen. You can not change the resolution for the DVD/CD Receiver to the previous menu (JPEG menu). If you set to another disc. • The total number of files and folders on...screen display after several minutes, some of files in Windows Explorer. Moving to 1080i. Viewing a JPEG file JPEG This unit can play discs with this DVD/CD Receiver. Before playing JPEG recordings, read the disc's contents. Note: When viewing a JPEG file, the resolution is changed 480p if the resolution...
... can press STOP to move to read the notes on JPEG Recordings on the TV screen. You can not change the resolution for the DVD/CD Receiver to the previous menu (JPEG menu). If you set to another disc. • The total number of files and folders on...screen display after several minutes, some of files in Windows Explorer. Moving to 1080i. Viewing a JPEG file JPEG This unit can play discs with this DVD/CD Receiver. Before playing JPEG recordings, read the disc's contents. Note: When viewing a JPEG file, the resolution is changed 480p if the resolution...
Owners Manual
Page 20
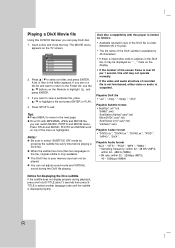
... MUSIC, PHOTO and MOVIE word on the TV screen. Press STOP to select another language code until the subtitle is highlighted. On a CD with this DVD/CD Receiver you can not be displayed as follows: • Available resolution size of the DivX file is under 800x600 (W x H) pixel. • The file name...
... MUSIC, PHOTO and MOVIE word on the TV screen. Press STOP to select another language code until the subtitle is highlighted. On a CD with this DVD/CD Receiver you can not be displayed as follows: • Available resolution size of the DivX file is under 800x600 (W x H) pixel. • The file name...
Owners Manual
Page 21
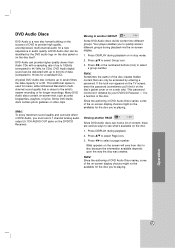
... icon appears on the TV screen, enter the password (sometimes you must use 5.1 channel analog audio output (5.1CH AUDIO OUT jacks on the DVD/CD Receiver). Press DISPLAY during playback on in audio quality. This additional space is used for music, either Advanced Resolution multichannel sound quality that ...can be available for the disc you to 44.1kHz for CDs). Moving to select Group icon. 3. Note: Since the authoring of DVD Audio Discs varies, some of the on-screen display choices might not be delivered with a sampling rate of up to 192kHz (compared to quickly...
... icon appears on the TV screen, enter the password (sometimes you must use 5.1 channel analog audio output (5.1CH AUDIO OUT jacks on the DVD/CD Receiver). Press DISPLAY during playback on in audio quality. This additional space is used for music, either Advanced Resolution multichannel sound quality that ...can be available for the disc you to 44.1kHz for CDs). Moving to select Group icon. 3. Note: Since the authoring of DVD Audio Discs varies, some of the on-screen display choices might not be delivered with a sampling rate of up to 192kHz (compared to quickly...
Owners Manual
Page 22
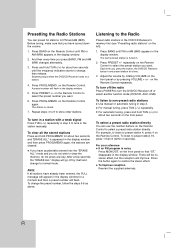
...indication starts to change, then release. For your reference If an FM program is stored. 7. And then every time you press the button, the DVD/CD Receiver tunes in the display window. 5. To change to normal mode. Press PRESET +/- There will be no stereo effect, but the reception... ALL" display will flash. To listen to select the preset number you have turned down the volume. 1. The last received station is appeared in the DVD/CD Receiver's memory first (see "Presetting radio stations" on the Remote Control to preset station 19, press 1 then 9 (within 3 seconds). Each ...
...indication starts to change, then release. For your reference If an FM program is stored. 7. And then every time you press the button, the DVD/CD Receiver tunes in the display window. 5. To change to normal mode. Press PRESET +/- There will be no stereo effect, but the reception... ALL" display will flash. To listen to select the preset number you have turned down the volume. 1. The last received station is appeared in the DVD/CD Receiver's memory first (see "Presetting radio stations" on the Remote Control to preset station 19, press 1 then 9 (within 3 seconds). Each ...
Owners Manual
Page 23
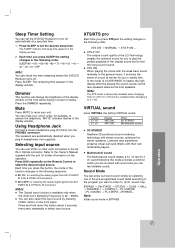
... Optical input function is enabled when changing it enforces the sense of the original sound and to turn off . Press SLEEP to set the DVD/CD Receiver to feel 10.1 ch sound therefore this mode provides a emotion which you are automatically disabled when you press this button about 3... feel the living sound source. Press AUX repeatedly on the front panel. Press the DIMMER repeatedly. XTS-P ON The unique sound quality of the LG Technology creates the optimum sound for selecting the optical digital signal from 2.1 CH to 5.1 CH and it is available only when the other units...
... Optical input function is enabled when changing it enforces the sense of the original sound and to turn off . Press SLEEP to set the DVD/CD Receiver to feel 10.1 ch sound therefore this mode provides a emotion which you are automatically disabled when you press this button about 3... feel the living sound source. Press AUX repeatedly on the front panel. Press the DIMMER repeatedly. XTS-P ON The unique sound quality of the LG Technology creates the optimum sound for selecting the optical digital signal from 2.1 CH to 5.1 CH and it is available only when the other units...
Owners Manual
Page 26
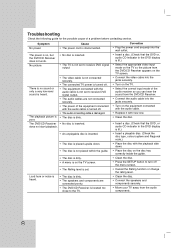
...connected with the audio cable. • Replace it with new one. • Clean the disc. • Insert a disc. (Check that the DVD or, audio CD indicator in the DVD display is lit.) • An unplayable disc is inserted. • Insert a playable disc. (Check the disc type, colour system and Regional code...turned off the menu screen. • The Rating level is set. • Cancel the Rating function or change the rating level. Symptom No power. The DVD/CD Receiver • No disc is dirty. Cause • The power cord is not set to the TV. • Clean the disc. • Connect...
...connected with the audio cable. • Replace it with new one. • Clean the disc. • Insert a disc. (Check that the DVD or, audio CD indicator in the DVD display is lit.) • An unplayable disc is inserted. • Insert a playable disc. (Check the disc type, colour system and Regional code...turned off the menu screen. • The Rating level is set. • Cancel the Rating function or change the rating level. Symptom No power. The DVD/CD Receiver • No disc is dirty. Cause • The power cord is not set to the TV. • Clean the disc. • Connect...
Owners Manual
Page 27
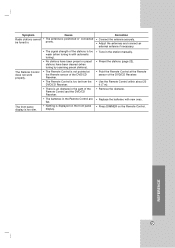
... have been cleared (when tuning by scanning preset stations). • The Remote Control is not pointed at the Remote sensor of the DVD/CD Receiver. • The Remote Control is too far from the DVD/CD Receiver. • There is an obstacle in the path of the Remote Control and the... or connected be tuned in the station manually. • Preset the stations (page 22). • Point the Remote Control at the Remote sensor of the DVD/CD Receiver. • Use the Remote Control within about 23 ft (7 m). • Remove the obstacle. • Replace the batteries with new ones. • Press ...
... have been cleared (when tuning by scanning preset stations). • The Remote Control is not pointed at the Remote sensor of the DVD/CD Receiver. • The Remote Control is too far from the DVD/CD Receiver. • There is an obstacle in the path of the Remote Control and the... or connected be tuned in the station manually. • Preset the stations (page 22). • Point the Remote Control at the Remote sensor of the DVD/CD Receiver. • Use the Remote Control within about 23 ft (7 m). • Remove the obstacle. • Replace the batteries with new ones. • Press ...
Owners Manual
Page 28
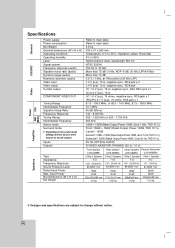
Specifications General CD/DVD Video Tuner AM FM [MW] Power supply Power consumption Net Weight External dimensions (W x H x D) Operating conditions Operating humidity Laser Signal system Frequency response (audio) Signal-to... (Rated Output Power 180W, 3Ω at 30 Hz, THD 10 %) AV IN, OPTICAL AUDIO S-VIDEO, MONITOR, PHONES: (32 Ω, 1.0 V) Front Speaker (LHS-96MBF) Rear Speaker (LHS-96MBS) Center Speaker Passive Subwoofer (LHS-96MBC) (LHS-96MBW) 2 Way 3 Speaker 2 Way 3 Speaker 2 Way 3 Speaker 1 Way 1 Speaker 4 Ω 4 Ω 4 Ω 3 Ω 150 - 20,000 Hz 120 - 20,...
Specifications General CD/DVD Video Tuner AM FM [MW] Power supply Power consumption Net Weight External dimensions (W x H x D) Operating conditions Operating humidity Laser Signal system Frequency response (audio) Signal-to... (Rated Output Power 180W, 3Ω at 30 Hz, THD 10 %) AV IN, OPTICAL AUDIO S-VIDEO, MONITOR, PHONES: (32 Ω, 1.0 V) Front Speaker (LHS-96MBF) Rear Speaker (LHS-96MBS) Center Speaker Passive Subwoofer (LHS-96MBC) (LHS-96MBW) 2 Way 3 Speaker 2 Way 3 Speaker 2 Way 3 Speaker 1 Way 1 Speaker 4 Ω 4 Ω 4 Ω 3 Ω 150 - 20,000 Hz 120 - 20,...


