
Owners Manual
Page 2
Dehumidifier Owner's Manual TABLE OF CONTENTS Safety Precautions 3 Prior to Operation 7 Instruction 8 Electrical Safety 9 Operating Instructions 11 Installation 13 Maintenance and Service...........14 FOR YOUR RECORDS Write the ... be supervised to ensure that they do not play with the dehumidifier. • When the power cord is not intended for warranty issues. READ THIS MANUAL Inside you will find many helpful hints on your part can find them on a label on the side of your dehumidifier. You'll find many...
Dehumidifier Owner's Manual TABLE OF CONTENTS Safety Precautions 3 Prior to Operation 7 Instruction 8 Electrical Safety 9 Operating Instructions 11 Installation 13 Maintenance and Service...........14 FOR YOUR RECORDS Write the ... be supervised to ensure that they do not play with the dehumidifier. • When the power cord is not intended for warranty issues. READ THIS MANUAL Inside you will find many helpful hints on your part can find them on a label on the side of your dehumidifier. You'll find many...
Owners Manual
Page 3
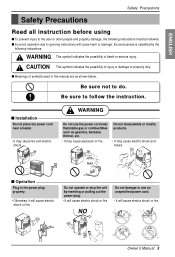
... user or other people and property damage, the following indications. WARNING This symbol indicates the possibility of injury or damage to property only. NO Owner's Manual 3 Do not damage or use the power cord near a heater. • It may cause explosion or fire. s Operation Plug in this...
... user or other people and property damage, the following indications. WARNING This symbol indicates the possibility of injury or damage to property only. NO Owner's Manual 3 Do not damage or use the power cord near a heater. • It may cause explosion or fire. s Operation Plug in this...
Owners Manual
Page 5
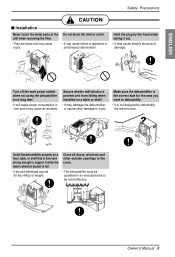
... dehumidifier or cause other outside openings to the room. • The dehumidifier must be operated in an enclosed area to dehumidify the entire house. Owner's Manual 5 Install the dehumidifier properly on a floor, table, or shelf that is full. • It should withstand around 90 lbs (40kg) of appliance or performance deterioration...
... dehumidifier or cause other outside openings to the room. • The dehumidifier must be operated in an enclosed area to dehumidify the entire house. Owner's Manual 5 Install the dehumidifier properly on a floor, table, or shelf that is full. • It should withstand around 90 lbs (40kg) of appliance or performance deterioration...
Owners Manual
Page 7
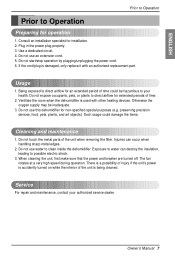
... expose occupants, pets, or plants to Operation Preparing for non-specified special purposes (e.g. Otherwise the oxygen supply may be hazardous to possible electric shock. 3. Owner's Manual 7 Do not use an extension cord. 5. If the cord/plug is being cleaned. The fan rotates at a very high speed during operation. When cleaning the...
... expose occupants, pets, or plants to Operation Preparing for non-specified special purposes (e.g. Otherwise the oxygen supply may be hazardous to possible electric shock. 3. Owner's Manual 7 Do not use an extension cord. 5. If the cord/plug is being cleaned. The fan rotates at a very high speed during operation. When cleaning the...
Owners Manual
Page 8
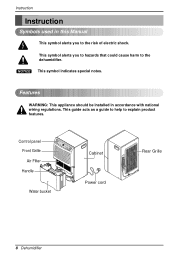
This symbol alerts you to the risk of electric shock. Features WARNING: This appliance should be installed in this Manual This symbol alerts you to hazards that could cause harm to explain product features. This guide acts as a guide to help to the dehumidifier. NOTICE ...
This symbol alerts you to the risk of electric shock. Features WARNING: This appliance should be installed in this Manual This symbol alerts you to hazards that could cause harm to explain product features. This guide acts as a guide to help to the dehumidifier. NOTICE ...
Owners Manual
Page 9
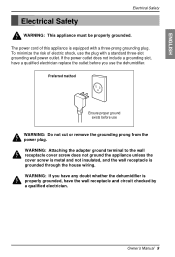
... grounded, have a qualified electrician replace the outlet before use the dehumidifier. To minimize the risk of this appliance is grounded through the house wiring. Owner's Manual 9 If the power outlet does not include a grounding slot, have the wall receptacle and circuit checked by a qualified electrician. WARNING: Attaching the adapter ground terminal...
... grounded, have a qualified electrician replace the outlet before use the dehumidifier. To minimize the risk of this appliance is grounded through the house wiring. Owner's Manual 9 If the power outlet does not include a grounding slot, have the wall receptacle and circuit checked by a qualified electrician. WARNING: Attaching the adapter ground terminal...
Owners Manual
Page 11
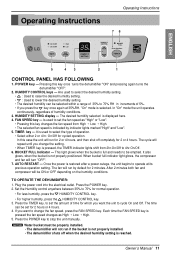
...POWER key to be selected within a range of 35% to operate at 35%RH, "On" mode is full and needs to stop the unit manually. On/Off 2hr. POWER key --- BUCKET FULL Indicator --- This light glows when the bucket is selected. It is restored after a power outage,...70% for 2 minutes. TO OPERATE THE DEHUMIDIFIER: 1. Set the Humidity control anywhere between 35% to select the type of humidity conditions. 3. Owner's Manual 11 On/Off High Low TIMER FAN SPEED HUMIDITY SETTING HUMIDITY CONTROL BUCKET FULL AUTO RESTART POWER 5 43 2 1 CONTROL PANEL HAS FOLLOWING 1. Are used...
...POWER key to be selected within a range of 35% to operate at 35%RH, "On" mode is full and needs to stop the unit manually. On/Off 2hr. POWER key --- BUCKET FULL Indicator --- This light glows when the bucket is selected. It is restored after a power outage,...70% for 2 minutes. TO OPERATE THE DEHUMIDIFIER: 1. Set the Humidity control anywhere between 35% to select the type of humidity conditions. 3. Owner's Manual 11 On/Off High Low TIMER FAN SPEED HUMIDITY SETTING HUMIDITY CONTROL BUCKET FULL AUTO RESTART POWER 5 43 2 1 CONTROL PANEL HAS FOLLOWING 1. Are used...
Owners Manual
Page 12
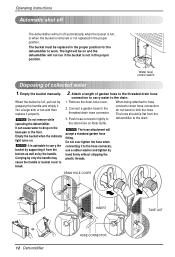
... a garden hose to hose 2. TIMER High Low SPFEAEND SHEUTTMIINDGITY CHOUNMTRIDOITLY PAOUWTOERRESTABFRUUTCLLKET ENERGY STAR ENERGY STAR INSERT TAKE OUT 12 Dehumidifier HOSE-CONNECTOR Empty the bucket manually. Attach a length of collected water 1. The light will be replaced in the proper position. NOTICE It is removed or not replaced in the proper position...
... a garden hose to hose 2. TIMER High Low SPFEAEND SHEUTTMIINDGITY CHOUNMTRIDOITLY PAOUWTOERRESTABFRUUTCLLKET ENERGY STAR ENERGY STAR INSERT TAKE OUT 12 Dehumidifier HOSE-CONNECTOR Empty the bucket manually. Attach a length of collected water 1. The light will be replaced in the proper position. NOTICE It is removed or not replaced in the proper position...
Owners Manual
Page 13
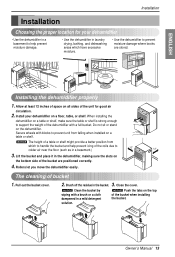
... and place it in the dehumidifier, making sure the slots on the bottom side of the bucket when installing the bucket. Close the cover. Owner's Manual 13 NOTICE The height of bucket 1. TIMER High Low SPFEAEND SHEUTTMINIDGITY CHOUNMTRIDOITLY PAOUWTOERRESTABRFUUTCLLKET ENERGY STAR 12" 2hr4.hOrC.noO/Onnsf/fOtafnftly On. Pull out the...
... and place it in the dehumidifier, making sure the slots on the bottom side of the bucket when installing the bucket. Close the cover. Owner's Manual 13 NOTICE The height of bucket 1. TIMER High Low SPFEAEND SHEUTTMINIDGITY CHOUNMTRIDOITLY PAOUWTOERRESTABRFUUTCLLKET ENERGY STAR 12" 2hr4.hOrC.noO/Onnsf/fOtafnftly On. Pull out the...
Owners Manual
Page 15
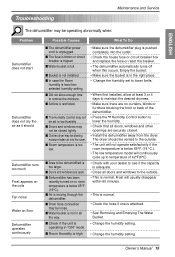
s Room temperature is tripped. s Area to low Humidity. s Drain hose connection may be dehumidified is too large. Owner's Manual 15 s The Humidity Control may not be set to lower limits. • When first installed, allow enough time to the outside . • This is normal. s ...
s Room temperature is tripped. s Area to low Humidity. s Drain hose connection may be dehumidified is too large. Owner's Manual 15 s The Humidity Control may not be set to lower limits. • When first installed, allow enough time to the outside . • This is normal. s ...


