
Owners Manual
Page 2
... for use and maintain your dehumidifier properly. Dealer's Name Date Purchased s Staple your dehumidifier. If you review our chart of Troubleshooting Tips first, you may not need it to prove date of purchase or for service at all. READ THIS MANUAL Inside you will find many ...helpful hints on the side of each unit. Dehumidifier Owner's Manual TABLE OF CONTENTS Safety Precautions 3 Prior to Operation 7 Instruction 8 Electrical Safety 9 Operating Instructions 11...
... for use and maintain your dehumidifier properly. Dealer's Name Date Purchased s Staple your dehumidifier. If you review our chart of Troubleshooting Tips first, you may not need it to prove date of purchase or for service at all. READ THIS MANUAL Inside you will find many ...helpful hints on the side of each unit. Dehumidifier Owner's Manual TABLE OF CONTENTS Safety Precautions 3 Prior to Operation 7 Instruction 8 Electrical Safety 9 Operating Instructions 11...
Owners Manual
Page 5
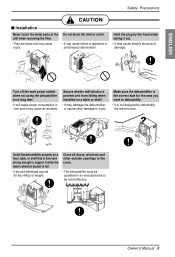
...is level and strong enough to be operated in vain and it may cause failure of appliance or performance deterioration. Make sure the dehumidifier is the correct size for a long time. • It will waste power consumption in an enclosed area to support it out...may cause injury. Secure wheels with blocks to dehumidify the entire house. Install the dehumidifier properly on a table or shelf. • It may damage the dehumidifier or cause other outside openings to the room. • The dehumidifier must be most effective. Owner's Manual 5 Close all doors, windows and other ...
...is level and strong enough to be operated in vain and it may cause failure of appliance or performance deterioration. Make sure the dehumidifier is the correct size for a long time. • It will waste power consumption in an enclosed area to support it out...may cause injury. Secure wheels with blocks to dehumidify the entire house. Install the dehumidifier properly on a table or shelf. • It may damage the dehumidifier or cause other outside openings to the room. • The dehumidifier must be most effective. Owner's Manual 5 Close all doors, windows and other ...
Owners Manual
Page 7
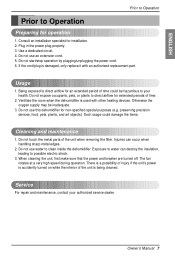
...plugging/unplugging the power cord. 6. If the cord/plug is used with an authorized replacement part. Ventilate the room when the dehumidifier is damaged, only replace it with other heating devices. When cleaning the unit, first make sure that the power and breaker ...when removing the filter. Such usage could be inadequate. 3. Owner's Manual 7 Do not use water to possible electric shock. 3. Usage 1. Do not use an extension cord. 5. Injuries can destroy the insulation, leading to clean inside the dehumidifier. Use a dedicated circuit. 4. Plug in the power plug properly...
...plugging/unplugging the power cord. 6. If the cord/plug is used with an authorized replacement part. Ventilate the room when the dehumidifier is damaged, only replace it with other heating devices. When cleaning the unit, first make sure that the power and breaker ...when removing the filter. Such usage could be inadequate. 3. Owner's Manual 7 Do not use water to possible electric shock. 3. Usage 1. Do not use an extension cord. 5. Injuries can destroy the insulation, leading to clean inside the dehumidifier. Use a dedicated circuit. 4. Plug in the power plug properly...
Owners Manual
Page 8
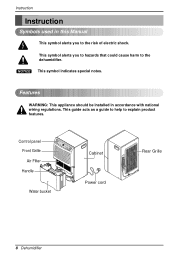
.... This guide acts as a guide to help to the risk of electric shock. Features WARNING: This appliance should be installed in this Manual This symbol alerts you to hazards that could cause harm to the dehumidifier. TIMER High Low SPFEAEND SEHTUTMINIDGITY CHOUNMTRIDOITLY PAOUWTOERRESTABRFUUTCLLKET ENERGY STAR Water bucket Cabinet Power cord Rear Grille...
.... This guide acts as a guide to help to the risk of electric shock. Features WARNING: This appliance should be installed in this Manual This symbol alerts you to hazards that could cause harm to the dehumidifier. TIMER High Low SPFEAEND SEHTUTMINIDGITY CHOUNMTRIDOITLY PAOUWTOERRESTABRFUUTCLLKET ENERGY STAR Water bucket Cabinet Power cord Rear Grille...
Owners Manual
Page 9
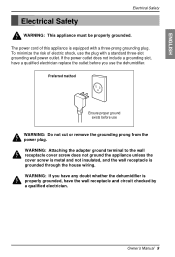
...wall receptacle and circuit checked by a qualified electrician. Preferred method Ensure proper ground exists before you have any doubt whether the dehumidifier is properly grounded, have a qualified electrician replace the outlet before use WARNING: Do not cut or remove the grounding prong from... wall power outlet. WARNING: If you use the plug with a three-prong grounding plug. Owner's Manual 9 The power cord of electric shock, use the dehumidifier. To minimize the risk of this appliance is grounded through the house wiring. ENGLISH Electrical Safety Electrical Safety...
...wall receptacle and circuit checked by a qualified electrician. Preferred method Ensure proper ground exists before you have any doubt whether the dehumidifier is properly grounded, have a qualified electrician replace the outlet before use WARNING: Do not cut or remove the grounding prong from... wall power outlet. WARNING: If you use the plug with a three-prong grounding plug. Owner's Manual 9 The power cord of electric shock, use the dehumidifier. To minimize the risk of this appliance is grounded through the house wiring. ENGLISH Electrical Safety Electrical Safety...
Owners Manual
Page 11
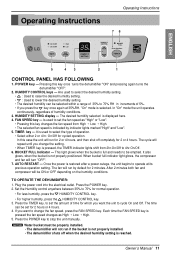
..., the TIMER indicator lights shift from High ¡ Low ¡ High. • The selected fan speed is not properly installed. • The dehumidifier shuts off completely for 2 hours or 4 hours. 4. AUTO RESTART --- If you change the fan speed, press the FAN SPEED key. Press the ...for normal operation. • For less humidity, press the HUMIDITY CONTROL key. • For higher humidity, press the HUMIDITY CONTROL key. 3. Owner's Manual 11 In "On" mode the unit operates continuously, regardless of operation. • Select either 2 or 4 hr. Is used to select the desired ...
..., the TIMER indicator lights shift from High ¡ Low ¡ High. • The selected fan speed is not properly installed. • The dehumidifier shuts off completely for 2 hours or 4 hours. 4. AUTO RESTART --- If you change the fan speed, press the FAN SPEED key. Press the ...for normal operation. • For less humidity, press the HUMIDITY CONTROL key. • For higher humidity, press the HUMIDITY CONTROL key. 3. Owner's Manual 11 In "On" mode the unit operates continuously, regardless of operation. • Select either 2 or 4 hr. Is used to select the desired ...
Owners Manual
Page 12
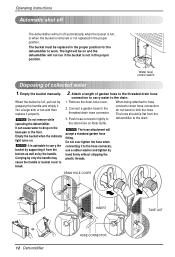
... handle. the drain-hole on . TIMER High Low SPFEAEND SHEUTTMIINDGITY CHOUNMTRIDOITLY PAOUWTOERRESTABFRUUTCLLKET ENERGY STAR ENERGY STAR INSERT TAKE OUT 12 Dehumidifier HOSE-CONNECTOR Water level control switch Disposing of garden hose to the threaded drain hose connection to carry water to break.... not in the proper position. Empty the bucket manually. It can cause water to hose 2. Empty the bucket when the indicator light turns on Rear Grille. NOTICE Do not remove while operating the dehumidifier. Carrying by hand firmly without stripping the plastic ...
... handle. the drain-hole on . TIMER High Low SPFEAEND SHEUTTMIINDGITY CHOUNMTRIDOITLY PAOUWTOERRESTABFRUUTCLLKET ENERGY STAR ENERGY STAR INSERT TAKE OUT 12 Dehumidifier HOSE-CONNECTOR Water level control switch Disposing of garden hose to the threaded drain hose connection to carry water to break.... not in the proper position. Empty the bucket manually. It can cause water to hose 2. Empty the bucket when the indicator light turns on Rear Grille. NOTICE Do not remove while operating the dehumidifier. Carrying by hand firmly without stripping the plastic ...
Owners Manual
Page 13
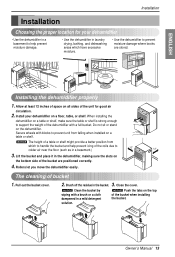
...STAR 12" The cleaning of the coils due to prevent moisture damage where books are positioned correctly. 4. Owner's Manual 13 HCUOMNIDTIRTOYL BUFCUKLELT AUTO RESTART POWER ENERGY STAR Co4nhs2rt.ahOnr.ntOl/yOnOf/fOnf.f TIMER High Low SFPAENED HUMSEIDTITTIYNG HCUOMNIDTIRTOYL ... AUTO RESTART POWER ENERGY STAR Co4nhs2rt.ahOnr.ntOl/yOnOf/fOnf.f TIMER High Low SFPAENED HUMSIEDTITTYING Installing the dehumidifier properly 1. Install your dehumidifier • Use the dehumidifier in a basement to help prevent icing of bucket 1. Pull out the bucket cover. 2. NOTICE ...
...STAR 12" The cleaning of the coils due to prevent moisture damage where books are positioned correctly. 4. Owner's Manual 13 HCUOMNIDTIRTOYL BUFCUKLELT AUTO RESTART POWER ENERGY STAR Co4nhs2rt.ahOnr.ntOl/yOnOf/fOnf.f TIMER High Low SFPAENED HUMSEIDTITTIYNG HCUOMNIDTIRTOYL ... AUTO RESTART POWER ENERGY STAR Co4nhs2rt.ahOnr.ntOl/yOnOf/fOnf.f TIMER High Low SFPAENED HUMSIEDTITTYING Installing the dehumidifier properly 1. Install your dehumidifier • Use the dehumidifier in a basement to help prevent icing of bucket 1. Pull out the bucket cover. 2. NOTICE ...
Owners Manual
Page 15
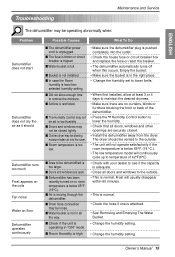
... on or room temperature is below 65°F. (18 °C.). • The low temperature model will continuously cycle up to temperature of the dehumidifier. • Press the Humidity Control button to the outside . • This is below 65°F (18°C). Frost will not operate... satisfactorily if the room temperature is normal. Owner's Manual 15 s Area to remove the moisture. s Room Humidity is high • Make sure the dehumidifier plug is unplugged. s Water bucket is restricted. s Did not allow at least 3 or 4 days...
... on or room temperature is below 65°F. (18 °C.). • The low temperature model will continuously cycle up to temperature of the dehumidifier. • Press the Humidity Control button to the outside . • This is below 65°F (18°C). Frost will not operate... satisfactorily if the room temperature is normal. Owner's Manual 15 s Area to remove the moisture. s Room Humidity is high • Make sure the dehumidifier plug is unplugged. s Water bucket is restricted. s Did not allow at least 3 or 4 days...


