
Owners Manual
Page 2
...by authorized personnel only using only genuine replacement parts. 2 Dehumidifier Dealer's Name Date Purchased s Staple your dehumidifier. READ THIS MANUAL Inside you will find many helpful hints on the side of each unit. PRECAUTION • Contact the authorized service technician ...of this unit. • Contact the installer for installation of this page in the chart of troubleshooting tips. Dehumidifier Owner's Manual TABLE OF CONTENTS Safety Precautions 3 Prior to Operation 7 Instruction 8 Electrical Safety 9 Operating Instructions 11 Installation 13 Maintenance and ...
...by authorized personnel only using only genuine replacement parts. 2 Dehumidifier Dealer's Name Date Purchased s Staple your dehumidifier. READ THIS MANUAL Inside you will find many helpful hints on the side of each unit. PRECAUTION • Contact the authorized service technician ...of this unit. • Contact the installer for installation of this page in the chart of troubleshooting tips. Dehumidifier Owner's Manual TABLE OF CONTENTS Safety Precautions 3 Prior to Operation 7 Instruction 8 Electrical Safety 9 Operating Instructions 11 Installation 13 Maintenance and ...
Owners Manual
Page 3
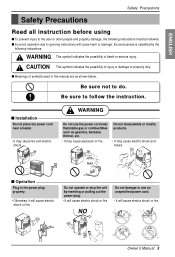
... Read all instruction before using s To prevent injury to the user or other people and property damage, the following indications. NO Owner's Manual 3 s Installation Do not place the power cord near flammable gas or combustibles such as shown below. Do not damage or use the ...fire. Be sure to do. Do not disassemble or modify products. • It may cause fire and electric shock. s Operation Plug in this manual are as gasoline, benzene, thinner, etc. • It may cause explosion or fire. s Incorrect operation due to ignoring instructions will cause electric...
... Read all instruction before using s To prevent injury to the user or other people and property damage, the following indications. NO Owner's Manual 3 s Installation Do not place the power cord near flammable gas or combustibles such as shown below. Do not damage or use the ...fire. Be sure to do. Do not disassemble or modify products. • It may cause fire and electric shock. s Operation Plug in this manual are as gasoline, benzene, thinner, etc. • It may cause explosion or fire. s Incorrect operation due to ignoring instructions will cause electric...
Owners Manual
Page 5
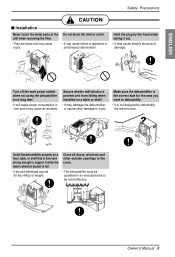
... it when the water collection bucket is not designed to be operated in vain and it out. • It may cause failure of weight. Owner's Manual 5 Turn off the main power switch when not using the dehumidifier for the area you want to dehumidify. • It is full. • It should...
... it when the water collection bucket is not designed to be operated in vain and it out. • It may cause failure of weight. Owner's Manual 5 Turn off the main power switch when not using the dehumidifier for the area you want to dehumidify. • It is full. • It should...
Owners Manual
Page 7
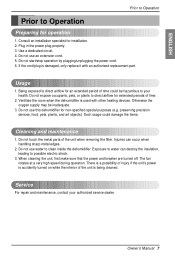
... cord/plug is used with an authorized replacement part. Do not touch the metal parts of time could damage the items. Cleaning and maintenance 1. Owner's Manual 7 ENGLISH Prior to Operation Prior to clean inside the dehumidifier. Do not start/stop operation by plugging/unplugging the power cord. 6. Usage 1. Ventilate the room...
... cord/plug is used with an authorized replacement part. Do not touch the metal parts of time could damage the items. Cleaning and maintenance 1. Owner's Manual 7 ENGLISH Prior to Operation Prior to clean inside the dehumidifier. Do not start/stop operation by plugging/unplugging the power cord. 6. Usage 1. Ventilate the room...
Owners Manual
Page 8
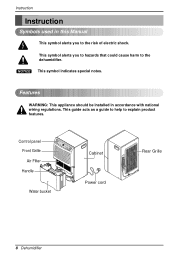
... to the risk of electric shock. This guide acts as a guide to help to the dehumidifier. Features WARNING: This appliance should be installed in this Manual This symbol alerts you to hazards that could cause harm to explain product features. Control panel Front Grille Air Filter Handle 2hr4.hOrC.noO/Onnsf...
... to the risk of electric shock. This guide acts as a guide to help to the dehumidifier. Features WARNING: This appliance should be installed in this Manual This symbol alerts you to hazards that could cause harm to explain product features. Control panel Front Grille Air Filter Handle 2hr4.hOrC.noO/Onnsf...
Owners Manual
Page 9
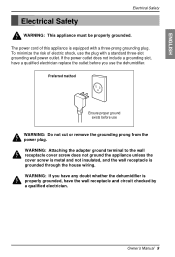
Owner's Manual 9 Preferred method Ensure proper ground exists before you have any doubt whether the dehumidifier is properly grounded, have a qualified electrician replace the outlet before use ...
Owner's Manual 9 Preferred method Ensure proper ground exists before you have any doubt whether the dehumidifier is properly grounded, have a qualified electrician replace the outlet before use ...
Owners Manual
Page 11
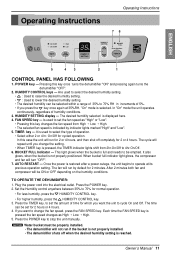
...It is reached. The fan will run if the bucket is not properly installed. • The dehumidifier shuts off completely for 2 minutes. Owner's Manual 11 Once the power is restored after a power outage, the unit begins to select the type of humidity conditions. 3. Plug the power cord into...speed changes as "High" or "Low". • Pressing this key changes the fan speed from 2hr.On/Off to stop the unit manually. ENGLISH Operating Instructions Operating Instructions 76 Constantly On. 4hr. In this key once turns the dehumidifier "ON" and pressing again turns the dehumidifier ...
...It is reached. The fan will run if the bucket is not properly installed. • The dehumidifier shuts off completely for 2 minutes. Owner's Manual 11 Once the power is restored after a power outage, the unit begins to select the type of humidity conditions. 3. Plug the power cord into...speed changes as "High" or "Low". • Pressing this key changes the fan speed from 2hr.On/Off to stop the unit manually. ENGLISH Operating Instructions Operating Instructions 76 Constantly On. 4hr. In this key once turns the dehumidifier "ON" and pressing again turns the dehumidifier ...
Owners Manual
Page 12
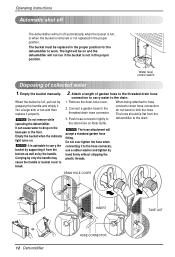
... the proper position for the dehumidifier to the drain. 1. Attach a length of collected water 1. Push hose connector tightly to dehumidifier to hose 2. Empty the bucket manually. connector drain hose connection, do not bend or kink the hose. Connect a garden hose to break. 2. DRAIN HOLE COVER 2hr4.hOrC.noO/Onnsf/fOtafnftly On...
... the proper position for the dehumidifier to the drain. 1. Attach a length of collected water 1. Push hose connector tightly to dehumidifier to hose 2. Empty the bucket manually. connector drain hose connection, do not bend or kink the hose. Connect a garden hose to break. 2. DRAIN HOLE COVER 2hr4.hOrC.noO/Onnsf/fOtafnftly On...
Owners Manual
Page 13
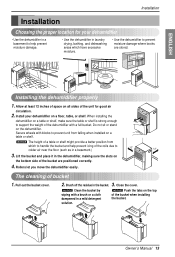
... on the dehumidifier. NOTICE The height of bucket 1. TIMER High Low SPFEAEND SHEUTTMINIDGITY CHOUNMTRIDOITLY PAOUWTOERRESTABRFUUTCLLKET ENERGY STAR 12" 2hr4.hOrC.noO/Onnsf/fOtafnftly On. Owner's Manual 13
... on the dehumidifier. NOTICE The height of bucket 1. TIMER High Low SPFEAEND SHEUTTMINIDGITY CHOUNMTRIDOITLY PAOUWTOERRESTABRFUUTCLLKET ENERGY STAR 12" 2hr4.hOrC.noO/Onnsf/fOtafnftly On. Owner's Manual 13
Owners Manual
Page 15
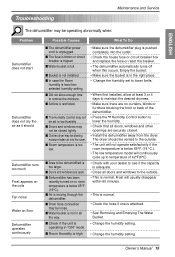
... when this occurs. Empty the bucket. • Make sure the bucket is in the right place. • Change the humidity set to low Humidity. Owner's Manual 15 s Water bucket is attached. • See Removing and Emptying The Water Bucket. • Change the humidity setting. • Change the humidity setting. s Did not...
... when this occurs. Empty the bucket. • Make sure the bucket is in the right place. • Change the humidity set to low Humidity. Owner's Manual 15 s Water bucket is attached. • See Removing and Emptying The Water Bucket. • Change the humidity setting. • Change the humidity setting. s Did not...


