User Guide
Page 1
Retain it for future reference. Color Monitor http://www.lge.com P/NO. : 3828TUL227D(0404-REV00) Printed in Korea L4200A User's Guide Manuel d'utilisation Guía del usuario Guia do usuário Please read this information to your set . See the label attached on the back cover and quote this manual carefully before operating your dealer when you require service. Record model number and serial number of the set .
Retain it for future reference. Color Monitor http://www.lge.com P/NO. : 3828TUL227D(0404-REV00) Printed in Korea L4200A User's Guide Manuel d'utilisation Guía del usuario Guia do usuário Please read this information to your set . See the label attached on the back cover and quote this manual carefully before operating your dealer when you require service. Record model number and serial number of the set .

User Guide
Page 2
...A5 Connection Connecting the Speakers - ENGLISH Table of SRS Labs,Inc. i Optional A8 Name and Function of the Parts A9 Connecting the Monitor A10 Connecting the VCR/DVD A13 Connecting the DVD/HDTV A15 Connecting AV Outputs A16 Input Selection and Tracking Selecting and Adjustment the Screen... Name of the Buttons in the Screen Adjustment Unit OSD Menu How to adjust the OSD (On Screen Display) screen When Connected to your PC Adjusting Screen Color Adjusting Screen CLOCK/PHASE and Position Adjusting the audio function Selecting the Options ...
...A5 Connection Connecting the Speakers - ENGLISH Table of SRS Labs,Inc. i Optional A8 Name and Function of the Parts A9 Connecting the Monitor A10 Connecting the VCR/DVD A13 Connecting the DVD/HDTV A15 Connecting AV Outputs A16 Input Selection and Tracking Selecting and Adjustment the Screen... Name of the Buttons in the Screen Adjustment Unit OSD Menu How to adjust the OSD (On Screen Display) screen When Connected to your PC Adjusting Screen Color Adjusting Screen CLOCK/PHASE and Position Adjusting the audio function Selecting the Options ...

User Guide
Page 3
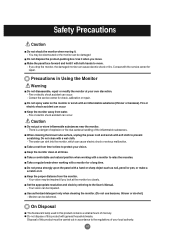
...must pay particular attention. - Install the monitor in a neat and dry place. - If you may occur. Do not block the ventilation hole of the monitor by mistake, force the patient to the wall, it out of the reach of children. - Install the monitor on a flat and stable place that has no EMI ...occurs. If the monitor is dropped, you install the monitor too close to vomit and visit the nearest...
...must pay particular attention. - Install the monitor in a neat and dry place. - If you may occur. Do not block the ventilation hole of the monitor by mistake, force the patient to the wall, it out of the reach of children. - Install the monitor on a flat and stable place that has no EMI ...occurs. If the monitor is dropped, you install the monitor too close to vomit and visit the nearest...

User Guide
Page 4
.... If you may be damaged. You may be electrocuted. Electrical shock can cause electric leakage, electric shock or fire. The monitor can break out due to use the monitor for exclusive use . - You may be electrocuted. Fix the power cable completely. - If the power cable is in Moving...shock or fire. Use a power bar with dust, dry the power plug completely or wipe dust off the monitor. - You may be damaged, which may be electrocuted or the monitor can be electrocuted or a fire can break out. You may be damaged. Additionally, do not touch the power...
.... If you may be damaged. You may be electrocuted. Electrical shock can cause electric leakage, electric shock or fire. The monitor can break out due to use the monitor for exclusive use . - You may be electrocuted. Fix the power cable completely. - If the power cable is in Moving...shock or fire. Use a power bar with dust, dry the power plug completely or wipe dust off the monitor. - You may be damaged, which may be electrocuted or the monitor can be electrocuted or a fire can break out. You may be damaged. Additionally, do not touch the power...
User Guide
Page 5
... for repair. Do not press strongly upon the panel with a hand or sharp object such as nail, pencil or pen, or make a scratch on the monitor or scrub with a wet cloth. - Your vision may be electrocuted or the monitor can be deformed. Set the appropriate resolution and ...Use it with general household waste. Contact the service center for a long time. Take a rest from the monitor. - Make the panel face forward and hold it when you drop the monitor, the damaged monitor can be impaired. Precautions in this product with both hands to the User's Manual. - Keep the...
... for repair. Do not press strongly upon the panel with a hand or sharp object such as nail, pencil or pen, or make a scratch on the monitor or scrub with a wet cloth. - Your vision may be electrocuted or the monitor can be deformed. Set the appropriate resolution and ...Use it with general household waste. Contact the service center for a long time. Take a rest from the monitor. - Make the panel face forward and hold it when you drop the monitor, the damaged monitor can be impaired. Precautions in this product with both hands to the User's Manual. - Keep the...
User Guide
Page 6
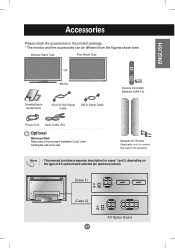
... 2] A4 Video AV Option Board ENGLISH Accessories Please check the accessories in the product package. * The monitor and the accessories can be different from the figures shown here. Desktop Stand Type Free Mount Type OR Monitor Diskette/User's Guide/Cards 15-pin D-Sub Signal Cable DVI-D Signal Cable Remote Controller/ Batteries (AAA...
... 2] A4 Video AV Option Board ENGLISH Accessories Please check the accessories in the product package. * The monitor and the accessories can be different from the figures shown here. Desktop Stand Type Free Mount Type OR Monitor Diskette/User's Guide/Cards 15-pin D-Sub Signal Cable DVI-D Signal Cable Remote Controller/ Batteries (AAA...
User Guide
Page 7
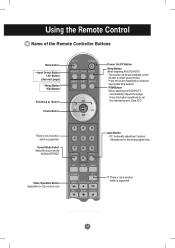
...See A27) There is not a function which is supported Sound Mode Select Select the sound mode : MONO/STEREO Video Operation Button Applicable for LG products only Auto Button PC: Automatic adjustment function (Operational for the analog signal only) * * There is not a function which is supported... A5 Press this button repetitively to select an appropriate time duration PSM Button When watching AV/DVD/HDTV - The monitor will be automatically turned off after a certain period of the Remote Controller Buttons Mute button • Input Select Button • AV ...
...See A27) There is not a function which is supported Sound Mode Select Select the sound mode : MONO/STEREO Video Operation Button Applicable for LG products only Auto Button PC: Automatic adjustment function (Operational for the analog signal only) * * There is not a function which is supported... A5 Press this button repetitively to select an appropriate time duration PSM Button When watching AV/DVD/HDTV - The monitor will be automatically turned off after a certain period of the Remote Controller Buttons Mute button • Input Select Button • AV ...
User Guide
Page 10
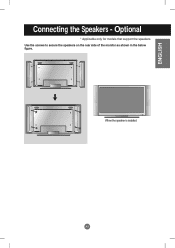
When the speaker is installed. ENGLISH Connecting the Speakers - Optional * Applicable only for models that support the speakers Use the screws to secure the speakers on the rear side of the monitor as shown in the below figure. A8
When the speaker is installed. ENGLISH Connecting the Speakers - Optional * Applicable only for models that support the speakers Use the screws to secure the speakers on the rear side of the monitor as shown in the below figure. A8

User Guide
Page 11
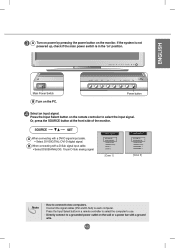
... to the *LINE OUT jack of the PC sound card. If the Audio Out of the PC sound card is checked before you install the monitor. OUT IN Video [Case 1] Video [Case 2] RS-232C Serial ports PC signal inputs Connect the audio cable to the speaker including a built-in amplifier (Amp...
... to the *LINE OUT jack of the PC sound card. If the Audio Out of the PC sound card is checked before you install the monitor. OUT IN Video [Case 1] Video [Case 2] RS-232C Serial ports PC signal inputs Connect the audio cable to the speaker including a built-in amplifier (Amp...

User Guide
Page 12
A10 Disassemble the stand cover. Stand cover 2. After connecting the cables, correctly position the stand cover into place. ENGLISH Connecting the Monitor To arrange cables in the figure. The cover may be easily disassembled by pressing down on the stand. If securely connected, you will hear the latch click into the holes on the base as shown in order 1.
A10 Disassemble the stand cover. Stand cover 2. After connecting the cables, correctly position the stand cover into place. ENGLISH Connecting the Monitor To arrange cables in the figure. The cover may be easily disassembled by pressing down on the stand. If securely connected, you will hear the latch click into the holes on the base as shown in order 1.

User Guide
Page 13
... to a wall outlet. OUT IN OUT IN PC PC MAC Connect the power cord. Then, connect the signal input cable. Connecting the Monitor First of the monitor. A B C Macintosh Adapter (not included) Use the standard Macintosh adapter since an incompatible adaptor is available in the market. (Different signaling... system) Rear side of all, see if the computer, monitor and the peripherals are turned off. A When connecting with the DSub signal input cable. (Macintosh) Rear side of the monitor. B When connecting with the DSub signal input cable. (IBM compatible PC) C When...
... to a wall outlet. OUT IN OUT IN PC PC MAC Connect the power cord. Then, connect the signal input cable. Connecting the Monitor First of the monitor. A B C Macintosh Adapter (not included) Use the standard Macintosh adapter since an incompatible adaptor is available in the market. (Different signaling... system) Rear side of all, see if the computer, monitor and the peripherals are turned off. A When connecting with the DSub signal input cable. (Macintosh) Rear side of the monitor. B When connecting with the DSub signal input cable. (IBM compatible PC) C When...
User Guide
Page 14
... wall or a power bar with a ground wire. Power button Select an input signal. Or, press the SOURCE button at the front side of the monitor. Press the Input Select button in the 'on' position. Connect the signal cables (DVI and D-Sub) to two computers. A When connecting with a...When connecting with a DVI-D signal input cable. • Select DVI DIGITAL: DVI-D digital signal. A12 Directly connect to a grounded power outlet on the monitor. Press the Input Select button on the PC. Main Power Switch B Turn on the remote controller to use. If the system is not powered up...
... wall or a power bar with a ground wire. Power button Select an input signal. Or, press the SOURCE button at the front side of the monitor. Press the Input Select button in the 'on' position. Connect the signal cables (DVI and D-Sub) to two computers. A When connecting with a...When connecting with a DVI-D signal input cable. • Select DVI DIGITAL: DVI-D digital signal. A12 Directly connect to a grounded power outlet on the monitor. Press the Input Select button on the PC. Main Power Switch B Turn on the remote controller to use. If the system is not powered up...

User Guide
Page 15
... cable. • Connect to the S-Video input terminal to watch high image quality movies. Red) OUT IN Monitor Video Yellow White Red (not included) RCA Cable R W Y VCR/DVD B When connecting with a proper color match. (Video - Monitor Video White Red W R RCA Cable (not included) S-Video Cable (not included) VCR/DVD A13 White, Sound...
... cable. • Connect to the S-Video input terminal to watch high image quality movies. Red) OUT IN Monitor Video Yellow White Red (not included) RCA Cable R W Y VCR/DVD B When connecting with a proper color match. (Video - Monitor Video White Red W R RCA Cable (not included) S-Video Cable (not included) VCR/DVD A13 White, Sound...

User Guide
Page 16
... connecting with an S-Video cable. • Select VIDEO 2 (S-Video) C When connecting with a SCART cable. Or, press the SOURCE button at the front side of the monitor. SCART Cable (not included) ENGLISH C When connecting with a SCART cable. • Select SCART 1 / SCART 2 DVI DIGITAL DSUB ANALOG VIDEO1(CVBS) VIDEO2(S-Video) SCART 1 SCART 2 [Case...
... connecting with an S-Video cable. • Select VIDEO 2 (S-Video) C When connecting with a SCART cable. Or, press the SOURCE button at the front side of the monitor. SCART Cable (not included) ENGLISH C When connecting with a SCART cable. • Select SCART 1 / SCART 2 DVI DIGITAL DSUB ANALOG VIDEO1(CVBS) VIDEO2(S-Video) SCART 1 SCART 2 [Case...
User Guide
Page 17
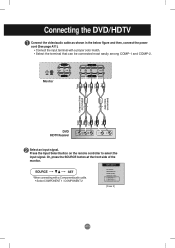
... 1 / COMPONENT 2 DVI DIGITAL DSUB ANALOG VIDEO1(CVBS) VIDEO2(S-Video) COMPONENT 1 COMPONENT 2 [Case 2] A15 Or, press the SOURCE button at the front side of the monitor. Video Monitor Green Blue Red White Red Component Cable (not included) Audio Cable (not included) Green Blue Red White Red DVD HDTV Receiver Select an input signal...
... 1 / COMPONENT 2 DVI DIGITAL DSUB ANALOG VIDEO1(CVBS) VIDEO2(S-Video) COMPONENT 1 COMPONENT 2 [Case 2] A15 Or, press the SOURCE button at the front side of the monitor. Video Monitor Green Blue Red White Red Component Cable (not included) Audio Cable (not included) Green Blue Red White Red DVD HDTV Receiver Select an input signal...

User Guide
Page 18
Monitor Video Red White Yellow (not included) RCA Cable R W Y VCR/DVD A16 ENGLISH Connecting AV Outputs Connect to the AV output terminal. When you set the input signal of the main screen as 'VIDEO1 (CVBS)', you can transmit the signal that you're watching to the external device if you record the broadcasting.
Monitor Video Red White Yellow (not included) RCA Cable R W Y VCR/DVD A16 ENGLISH Connecting AV Outputs Connect to the AV output terminal. When you set the input signal of the main screen as 'VIDEO1 (CVBS)', you can transmit the signal that you're watching to the external device if you record the broadcasting.
User Guide
Page 20
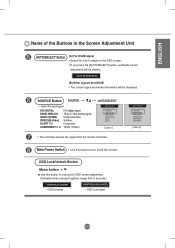
...Name of the Buttons in the Screen Adjustment Unit AUTO/SELECT Button [A] For DSUB signal • Select the icon to adjust on /off the monitor. OSD Lock/Unlock Button Menu button + Use this button to lock/unlock OSD screen adjustment. (Activated when pressed together longer than 5 seconds.)... VIDEO1(CVBS) VIDEO2(S-Video) SCART 1 SCART 2 [Case 1] • The unit that DSUB • The current signal and mode information will be displayed. Main Power Switch • Use this button to turn on the OSD screen. • If you press the [AUTO/SELECT] button, automatic screen adjustment...
...Name of the Buttons in the Screen Adjustment Unit AUTO/SELECT Button [A] For DSUB signal • Select the icon to adjust on /off the monitor. OSD Lock/Unlock Button Menu button + Use this button to lock/unlock OSD screen adjustment. (Activated when pressed together longer than 5 seconds.)... VIDEO1(CVBS) VIDEO2(S-Video) SCART 1 SCART 2 [Case 1] • The unit that DSUB • The current signal and mode information will be displayed. Main Power Switch • Use this button to turn on the OSD screen. • If you press the [AUTO/SELECT] button, automatic screen adjustment...
User Guide
Page 22
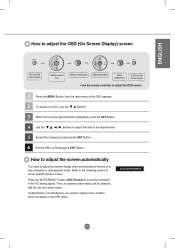
... PC analog signal. Then, an optimal screen status will be selected that fits into the current mode. ENGLISH How to adjust the OSD (On Screen Display) screen Pops up the menu screen Select a menu icon Select a menu icon Adjust the status Save adjustment Exit from the menu screen. • Use ...MENU Button, then the main menu of the OSD appears. 2 To access a control, use the Buttons. 3 When the icon you need to adjust the screen display when connecting the monitor to set an optimal monitor screen. Press the AUTO/SELECT button (AUTO button in a remote controller) in the OSD menu.
... PC analog signal. Then, an optimal screen status will be selected that fits into the current mode. ENGLISH How to adjust the OSD (On Screen Display) screen Pops up the menu screen Select a menu icon Select a menu icon Adjust the status Save adjustment Exit from the menu screen. • Use ...MENU Button, then the main menu of the OSD appears. 2 To access a control, use the Buttons. 3 When the icon you need to adjust the screen display when connecting the monitor to set an optimal monitor screen. Press the AUTO/SELECT button (AUTO button in a remote controller) in the OSD menu.

User Guide
Page 25
...for OSD POSITION. * If the zooming value is in which the control names are displayed. Up Down Moving the OSD screen position vertically. Note When connected to the factory default. ZOOM Use this function to reset the monitor to your computer, the Zoom menu will not be adjusted. When you turn the... monitor off and on the screen. TRANSPARENCY To adjust the transparency of the OSD window on again, the default screen size will be disabled if the screen size is 1:1 or PIP/POP/PBP is set to display the submenu for OSD POSITION.
...for OSD POSITION. * If the zooming value is in which the control names are displayed. Up Down Moving the OSD screen position vertically. Note When connected to the factory default. ZOOM Use this function to reset the monitor to your computer, the Zoom menu will not be adjusted. When you turn the... monitor off and on the screen. TRANSPARENCY To adjust the transparency of the OSD window on again, the default screen size will be disabled if the screen size is 1:1 or PIP/POP/PBP is set to display the submenu for OSD POSITION.

User Guide
Page 31
... disabled when the screen size is 4:3, spectacle or 1:1, or PIP/POP/PBP is set to individually control each monitor when several monitors are displayed. However, language selection will not be restored. Press the button to display the submenu for OSD POSITION. * If the zooming value is activated. Selecting and Adjusting the Screen Selecting the...
... disabled when the screen size is 4:3, spectacle or 1:1, or PIP/POP/PBP is set to individually control each monitor when several monitors are displayed. However, language selection will not be restored. Press the button to display the submenu for OSD POSITION. * If the zooming value is activated. Selecting and Adjusting the Screen Selecting the...


