User Manual
Page 3
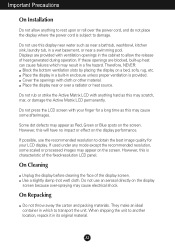
...Some dot defects may cause electrical shock. If possible, use this display near a swimming pool. If used under any mode except the recommended resolution, some afterimages. However, this may appear on the screen. On Cleaning Unplug the display before cleaning the face of the fixed...-resolution LCD panel. Do not use the recommended resolution to allow anything hard as this will have no impact or effect on the display performance. Therefore, NEVER: Block the ...
...Some dot defects may cause electrical shock. If possible, use this display near a swimming pool. If used under any mode except the recommended resolution, some afterimages. However, this may appear on the screen. On Cleaning Unplug the display before cleaning the face of the fixed...-resolution LCD panel. Do not use the recommended resolution to allow anything hard as this will have no impact or effect on the display performance. Therefore, NEVER: Block the ...
User Manual
Page 7
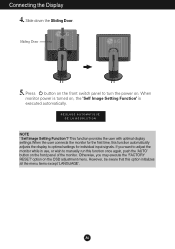
... function automatically adjusts the display to manually run this function once again, push the 'AUTO' button on the OSD adjustment menu. REGLAGE AUTOMATIQUE DE LA RESOLUTION NOTE ' Self Image Setting Function'? Otherwise, you want to adjust the monitor while in use, or wish to optimal settings for the first time, this...
... function automatically adjusts the display to manually run this function once again, push the 'AUTO' button on the OSD adjustment menu. REGLAGE AUTOMATIQUE DE LA RESOLUTION NOTE ' Self Image Setting Function'? Otherwise, you want to adjust the monitor while in use, or wish to optimal settings for the first time, this...
User Manual
Page 9
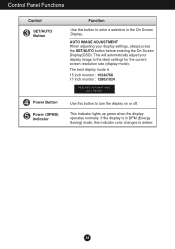
AUTO IMAGE ADJUSTMENT When adjusting your display image to the ideal settings for the current screen resolution size (display mode). This will automatically adjust your display settings, always press the SET/AUTO button before entering the On Screen Display(OSD). The best ...
AUTO IMAGE ADJUSTMENT When adjusting your display image to the ideal settings for the current screen resolution size (display mode). This will automatically adjust your display settings, always press the SET/AUTO button before entering the On Screen Display(OSD). The best ...
User Manual
Page 17
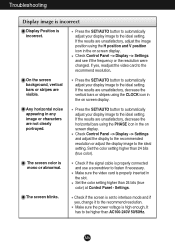
... Panel --> Display --> Settings and adjust the display to the recommended resolution or adjust the display image to the recommend resolution. The screen blinks. Check Control Panel --> Display --> Settings and see if the frequency or the resolution were changed. If the results are not clearly portrayed. Set the color...setting higher than 24 bits (true color) at Control Panel - Check if the screen is high enough, It has to the recommend resolution. Press the SET/AUTO button to automatically adjust your display image to the ideal setting. Make sure the video card is mono or abnormal...
... Panel --> Display --> Settings and adjust the display to the recommended resolution or adjust the display image to the recommend resolution. The screen blinks. Check Control Panel --> Display --> Settings and see if the frequency or the resolution were changed. If the results are not clearly portrayed. Set the color...setting higher than 24 bits (true color) at Control Panel - Check if the screen is high enough, It has to the recommend resolution. Press the SET/AUTO button to automatically adjust your display image to the ideal setting. Make sure the video card is mono or abnormal...

User Manual
Page 19
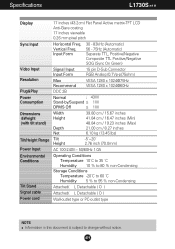
A18 Specifications L1530S H Display Sync Input Video Input Resolution Plug&Play Power Consumption Dimensions &Weight (with tilt stand) Tilt/Height Range Power Input Environmental Conditions Tilt Stand Signal cable Power cord 15 inches (38....
A18 Specifications L1530S H Display Sync Input Video Input Resolution Plug&Play Power Consumption Dimensions &Weight (with tilt stand) Tilt/Height Range Power Input Environmental Conditions Tilt Stand Signal cable Power cord 15 inches (38....
User Manual
Page 20
Vertical Freq. Input Form 30 - 83kHz (Automatic) 56 - 75Hz (Automatic) Separate TTL, Positive/Negative Composite TTL Positive/Negative SOG (Sync On Green) Video Input Resolution Signal Input Input Form Max Recommend 15 pin D-Sub Connector RGB Analog (0.7Vp-p/75ohm) VESA 1280 x 1024@75Hz VESA 1280 x 1024@60Hz Plug&Play DDC ...
Vertical Freq. Input Form 30 - 83kHz (Automatic) 56 - 75Hz (Automatic) Separate TTL, Positive/Negative Composite TTL Positive/Negative SOG (Sync On Green) Video Input Resolution Signal Input Input Form Max Recommend 15 pin D-Sub Connector RGB Analog (0.7Vp-p/75ohm) VESA 1280 x 1024@75Hz VESA 1280 x 1024@60Hz Plug&Play DDC ...
User Manual
Page 21
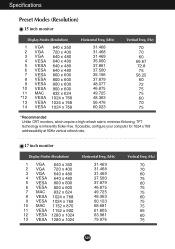
If possible, configure your computer for 1024 x 768 addressability at 60Hz vertical refresh rate. 17 inch monitor Display Modes (Resolution) 1 VGA 640 x 350 2 VGA 720 x 400 3 VGA 640 x 480 4 VESA 640 x 480 5 VESA 800 x 600 6 VESA 800 x 600 7 MAC 832 x 624 8 VESA 1024 x 768 9 VESA ....981 79.976 Vertical Freq. (Hz) 70 70 60 75 60 75 75 60 75 75 65 60 75 A20 Specifications Preset Modes (Resolution) 15 inch monitor Display Modes (Resolution) 1 VGA 640 x 350 2 VGA 720 x 400 3 VGA 640 x 480 4 VESA 640 x 480 5 VESA 640 x 480 6 VESA 640 x 480 7 VESA 800 x 600 8 VESA...
If possible, configure your computer for 1024 x 768 addressability at 60Hz vertical refresh rate. 17 inch monitor Display Modes (Resolution) 1 VGA 640 x 350 2 VGA 720 x 400 3 VGA 640 x 480 4 VESA 640 x 480 5 VESA 800 x 600 6 VESA 800 x 600 7 MAC 832 x 624 8 VESA 1024 x 768 9 VESA ....981 79.976 Vertical Freq. (Hz) 70 70 60 75 60 75 75 60 75 75 65 60 75 A20 Specifications Preset Modes (Resolution) 15 inch monitor Display Modes (Resolution) 1 VGA 640 x 350 2 VGA 720 x 400 3 VGA 640 x 480 4 VESA 640 x 480 5 VESA 640 x 480 6 VESA 640 x 480 7 VESA 800 x 600 8 VESA...


