Owner's Manual (English)
Page 2
... Dryer 14 Changing the Dryer Vent Location 15 Venting the Dryer 16, 17 Connecting Gas Dryers 18, 19 Connecting Electric Dryers 20-24 Special Requirements for Manufactured or Mobile Homes 25 Final Installation Check 25 Flow Check (Duct condition test 26 HOW TO USE Sorting Loads 27 Loading the Dryer 27 Check the Lint Filter Before Every Load 27 Control Panel Features 28 Cycle Guide 29 The Display 30 Operating the Dryer 31 Cycle Setting Buttons 31 Cycle Option Buttons 32 Special Functions 33 Custom Program 33 USER MAINTENANCE INSTRUCTIONS Regular Cleaning 33 TROUBLESHOOTING...
... Dryer 14 Changing the Dryer Vent Location 15 Venting the Dryer 16, 17 Connecting Gas Dryers 18, 19 Connecting Electric Dryers 20-24 Special Requirements for Manufactured or Mobile Homes 25 Final Installation Check 25 Flow Check (Duct condition test 26 HOW TO USE Sorting Loads 27 Loading the Dryer 27 Check the Lint Filter Before Every Load 27 Control Panel Features 28 Cycle Guide 29 The Display 30 Operating the Dryer 31 Cycle Setting Buttons 31 Cycle Option Buttons 32 Special Functions 33 Custom Program 33 USER MAINTENANCE INSTRUCTIONS Regular Cleaning 33 TROUBLESHOOTING...
Owner's Manual (English)
Page 3
... check the inside of the dryer or attempt any servicing unless specifically recommended in this Use and Care Guide or in published user-repair instructions that you understand and have provided many important safety messages in this manual and on or in the dryer....exhaust opening and adjacent surrounding areas free from the accumulation of lint, dust, and dirt. • Do not reach into the dryer if the drum or any other part is moving. • Do not repair or replace any part of the dryer for foreign objects. • Clean lint screen before using this appliance, follow instructions...
... check the inside of the dryer or attempt any servicing unless specifically recommended in this Use and Care Guide or in published user-repair instructions that you understand and have provided many important safety messages in this manual and on or in the dryer....exhaust opening and adjacent surrounding areas free from the accumulation of lint, dust, and dirt. • Do not reach into the dryer if the drum or any other part is moving. • Do not repair or replace any part of the dryer for foreign objects. • Clean lint screen before using this appliance, follow instructions...
Owner's Manual (English)
Page 4
... in this manual must be minimized further by properly venting the dryer to light a match or cigarette, or turn on any electrical switches. Immediately call the fire department. Do not try to the outdoors. 4 If you cannot reach your gas supplier, call your building. 3. Clear the room, building, or area of natural gas or LP fuels. Follow the gas supplier's instructions carefully. 5. Do...
... in this manual must be minimized further by properly venting the dryer to light a match or cigarette, or turn on any electrical switches. Immediately call the fire department. Do not try to the outdoors. 4 If you cannot reach your gas supplier, call your building. 3. Clear the room, building, or area of natural gas or LP fuels. Follow the gas supplier's instructions carefully. 5. Do...
Owner's Manual (English)
Page 5
... children. READ ALL INSTRUCTIONS BEFORE USE wWARNING For your safety, the information in this Owner's Guide. Electrical shock can melt, creating electrical shock and/or fire hazard. • Remove all shipping materials properly. This appliance must be properly installed as described in a risk of electric shock by a qualified electrician. wWARNING - Improper power circuit can result if the dryer is properly grounded. There...
... children. READ ALL INSTRUCTIONS BEFORE USE wWARNING For your safety, the information in this Owner's Guide. Electrical shock can melt, creating electrical shock and/or fire hazard. • Remove all shipping materials properly. This appliance must be properly installed as described in a risk of electric shock by a qualified electrician. wWARNING - Improper power circuit can result if the dryer is properly grounded. There...
Owner's Manual (English)
Page 7
... installation instructions in this manual for specific electrical requirements for your model. Do not use a cord that matches the rating plate. The power cord can be properly grounded. READ ALL INSTRUCTIONS BEFORE USE wWARNING For your safety, the information in this manual must be careful not to pinch, crush, or damage the power cord. The power cord can melt, creating electrical shock and/or fire hazard. • When installing or moving the dryer...
... installation instructions in this manual for specific electrical requirements for your model. Do not use a cord that matches the rating plate. The power cord can be properly grounded. READ ALL INSTRUCTIONS BEFORE USE wWARNING For your safety, the information in this manual must be careful not to pinch, crush, or damage the power cord. The power cord can melt, creating electrical shock and/or fire hazard. • When installing or moving the dryer...
Owner's Manual (English)
Page 15
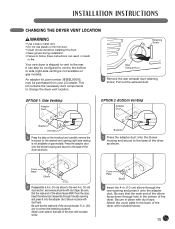
... the knockout and carefully remove the knockout for the desired vent opening (right-side venting is not available on gas models). Be sure that the male end of the dryer as shown. An adapter kit, part number 383EEL9001B, may be configured to vent to the bottom or side (right-side venting is shipped to vent to the rear. This kit contains the necessary duct components to change the dryer vent location. Bracket 2 Press...
... the knockout and carefully remove the knockout for the desired vent opening (right-side venting is not available on gas models). Be sure that the male end of the dryer as shown. An adapter kit, part number 383EEL9001B, may be configured to vent to the bottom or side (right-side venting is shipped to vent to the rear. This kit contains the necessary duct components to change the dryer vent location. Bracket 2 Press...

Owner's Manual (English)
Page 16
... when using this appliance, follow these instructions can result in use of this ducting will affect drying time. Failure to follow these instructions can result in fire or death. • If connecting to local building codes. Failure to follow these instructions can result in fire or death. • Venting must be 4 in. (10 cm) in fire or death. • Gas dryers MUST exhaust to...
... when using this appliance, follow these instructions can result in use of this ducting will affect drying time. Failure to follow these instructions can result in fire or death. • If connecting to local building codes. Failure to follow these instructions can result in fire or death. • Venting must be 4 in. (10 cm) in fire or death. • Gas dryers MUST exhaust to...
Owner's Manual (English)
Page 18
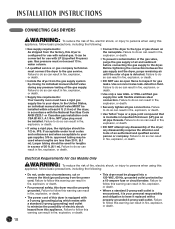
... of air and sediment before connecting the gas supply to inspect for Gas Models Only wWARNING: To reduce the risk of gas shown on all gas connections. In the United States, an individual manual shutoff valve MUST be converted for use an open flame to the dryer. A 1/8-in fire, explosion, or death. • Isolate the dryer from the power cord. If acceptable under any pressure testing of the dryer...
... of air and sediment before connecting the gas supply to inspect for Gas Models Only wWARNING: To reduce the risk of gas shown on all gas connections. In the United States, an individual manual shutoff valve MUST be converted for use an open flame to the dryer. A 1/8-in fire, explosion, or death. • Isolate the dryer from the power cord. If acceptable under any pressure testing of the dryer...

Owner's Manual (English)
Page 19
... kit order part number 4948EL4002B) should be installed by a qualified technician or gas supplier. 19 Failure to do so can result in fire, explosion, or death. • If necessary, the correct nozzle (for the dryer. ConnecTING GAS DRYERS (cont.) wWARNING: To reduce the risk of fire, electric shock, or injury to persons when using a new flexible stainless steel connector with a 3/8-in. NPT gas connection. 2 Remove...
... kit order part number 4948EL4002B) should be installed by a qualified technician or gas supplier. 19 Failure to do so can result in fire, explosion, or death. • If necessary, the correct nozzle (for the dryer. ConnecTING GAS DRYERS (cont.) wWARNING: To reduce the risk of fire, electric shock, or injury to persons when using a new flexible stainless steel connector with a 3/8-in. NPT gas connection. 2 Remove...
Owner's Manual (English)
Page 20
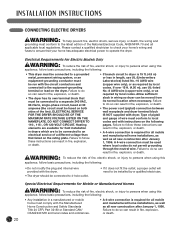
... result in fire, explosion, or death. 20 Electrical Requirements for all mobile and manufactured home installations, as well as required by local codes. Heating elements are to be moved from its own terminal block that your home has adequate electrical power to operate the dryer. Failure to do so can result in fire, explosion, or death. • A 4-wire connection is 15 ft. (4.5 m) or less in...
... result in fire, explosion, or death. 20 Electrical Requirements for all mobile and manufactured home installations, as well as required by local codes. Heating elements are to be moved from its own terminal block that your home has adequate electrical power to operate the dryer. Failure to do so can result in fire, explosion, or death. • A 4-wire connection is 15 ft. (4.5 m) or less in...
Owner's Manual (English)
Page 25
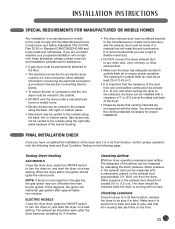
Testing Dryer Heating GAS MODELS Close the dryer door, press the ON/OFF switch to turn the dryer on, and start the dryer on a heat setting. The dryer should be checked while the dryer is important that the clearance of the duct from any other duct, vent, chimney, or other exhaust duct. • Make sure the dryer has adequate access to the outside using the back, left , or bottom panel. The opening for proper installation. You should ignite the...
Testing Dryer Heating GAS MODELS Close the dryer door, press the ON/OFF switch to turn the dryer on, and start the dryer on a heat setting. The dryer should be checked while the dryer is important that the clearance of the duct from any other duct, vent, chimney, or other exhaust duct. • Make sure the dryer has adequate access to the outside using the back, left , or bottom panel. The opening for proper installation. You should ignite the...
Owner's Manual (English)
Page 26
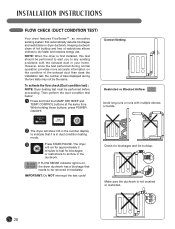
... reduces energy use. Correct Venting Restricted or Blocked Airflow Avoid long runs or runs with the exhaust duct in the ductwork. Check for blockages or restrictions to indicate that automatically detects blockages and restrictions in duct condition testing mode. 3 Press START/PAUSE. Keeping ductwork clean of lint buildup and free of bars displayed during the two tests may not be removed immediately. If FLOW SENSE indicator light is in dryer ductwork...
... reduces energy use. Correct Venting Restricted or Blocked Airflow Avoid long runs or runs with the exhaust duct in the ductwork. Check for blockages or restrictions to indicate that automatically detects blockages and restrictions in duct condition testing mode. 3 Press START/PAUSE. Keeping ductwork clean of lint buildup and free of bars displayed during the two tests may not be removed immediately. If FLOW SENSE indicator light is in dryer ductwork...
Owner's Manual (English)
Page 27
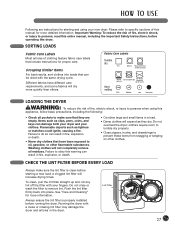
... LOADS Fabric Care Labels Most articles of fire, electric shock, or injury to persons, read this entire manual, including the Important Safety Instructions, before operating this appliance, follow basic precautions, including the following: • Check all pockets to make sure the lint filter is properly installed before starting and using this dryer. clothes require room to tumble dry properly. • Close zippers, hooks, and drawstrings to remove lint. a clogged lint filter...
... LOADS Fabric Care Labels Most articles of fire, electric shock, or injury to persons, read this entire manual, including the Important Safety Instructions, before operating this appliance, follow basic precautions, including the following: • Check all pockets to make sure the lint filter is properly installed before starting and using this dryer. clothes require room to tumble dry properly. • Close zippers, hooks, and drawstrings to remove lint. a clogged lint filter...
Owner's Manual (English)
Page 28
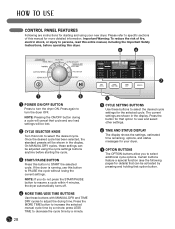
... the cycle time by a minute; The current settings are instructions for starting the cycle. 3 START/PAUSE BUTTON Press this button to PAUSE the cycle without losing the current settings. Important Warning: To reduce the risk of this button to START the selected cycle. press LESS TIME to select the desired cycle. On MANUAL DRY cycles, these buttons with MANUAL DRY and TIME DRY cycles to resume a cycle within 4 minutes, the dryer automatically turns off. 4 MORE TIME/LESS TIME BUTTONS Use these settings can...
... the cycle time by a minute; The current settings are instructions for starting the cycle. 3 START/PAUSE BUTTON Press this button to PAUSE the cycle without losing the current settings. Important Warning: To reduce the risk of this button to START the selected cycle. press LESS TIME to select the desired cycle. On MANUAL DRY cycles, these buttons with MANUAL DRY and TIME DRY cycles to resume a cycle within 4 minutes, the dryer automatically turns off. 4 MORE TIME/LESS TIME BUTTONS Use these settings can...
Owner's Manual (English)
Page 34
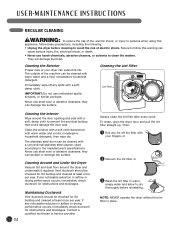
... the lint filter in airflow or drying performance occurs, immediately check ductwork for obstructions and blockages. Clean the window with a soft cloth dampened with a conventional stainless steel cleaner, used according to the manufacturer's specifications. Cleaning Around and Under the Dryer Vacuum lint and dust from around the door opening and seal with your dryer can be cleaned with warm water and a mild, nonabrasive household detergent; Vent ductwork...
... the lint filter in airflow or drying performance occurs, immediately check ductwork for obstructions and blockages. Clean the window with a soft cloth dampened with a conventional stainless steel cleaner, used according to the manufacturer's specifications. Cleaning Around and Under the Dryer Vacuum lint and dust from around the door opening and seal with your dryer can be cleaned with warm water and a mild, nonabrasive household detergent; Vent ductwork...
Owner's Manual (English)
Page 35
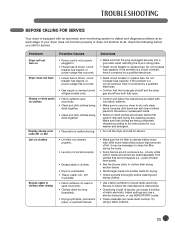
... dryer's rating plate. • Reset circuit breaker or replace fuse. If the problem is blown, circuit breaker has tripped, or power outage has occurred. Be sure to follow the instructions provided with an automatic error-monitoring system to detect and diagnose problems at all, check the following before you call for service. • Make sure the lint filter is cleaned before every load. Adjust settings and use a shorter drying time, or use your dryer to dry only clean...
... dryer's rating plate. • Reset circuit breaker or replace fuse. If the problem is blown, circuit breaker has tripped, or power outage has occurred. Be sure to follow the instructions provided with an automatic error-monitoring system to detect and diagnose problems at all, check the following before you call for service. • Make sure the lint filter is cleaned before every load. Adjust settings and use a shorter drying time, or use your dryer to dry only clean...
Owner's Manual (English)
Page 36
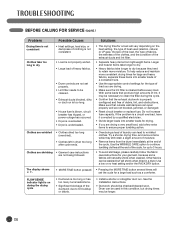
... TIME button several times will shrink when dried in dryer too long after cycle ends. Dryer can be used (electric, natural, or LP gas), the size of the load, the type of fabrics, the wetness of the clothes, and the condition of the exhaust ducts and lint filter. • Separate heavy items from the dryer immediately at the end of laundry can be cleaned. • Exhaust ducts blocked, dirty, or duct run . FLOW SENSE indicator light is on the heat setting...
... TIME button several times will shrink when dried in dryer too long after cycle ends. Dryer can be used (electric, natural, or LP gas), the size of the load, the type of fabrics, the wetness of the clothes, and the condition of the exhaust ducts and lint filter. • Separate heavy items from the dryer immediately at the end of laundry can be cleaned. • Exhaust ducts blocked, dirty, or duct run . FLOW SENSE indicator light is on the heat setting...

Owner's Manual (English)
Page 40
.... STACKING KIT INSTALLATION This stacking kit includes: • Two (2) side rails • One (1) front rail • Four (4) screws Tools Needed for one of the stacking kit side brackets. 40 2 Fit the side bracket to the side of the washer top as a mobile home. Remove paper backing from draining or venting connections. Two or more people are already installed, disconnect them from all power, water, or gas lines...
.... STACKING KIT INSTALLATION This stacking kit includes: • Two (2) side rails • One (1) front rail • Four (4) screws Tools Needed for one of the stacking kit side brackets. 40 2 Fit the side bracket to the side of the washer top as a mobile home. Remove paper backing from draining or venting connections. Two or more people are already installed, disconnect them from all power, water, or gas lines...
Owner's Manual (English)
Page 42
... NATURE, INCLUDING WITHOUT LIMITATION, LOST REVENUES OR PROFITS, OR ANY OTHER DAMAGE WHETHER BASED IN CONTRACT, TORT, OR OTHERWISE. This warranty gives you specific legal rights and you . O. Box 240007 201 James Record Road Huntsville, Alabama 35824 ATTN: CIC Product Registration Information Model: Serial Number: Date of the product. LG DRYER LIMITED WARRANTY - Territories. Replacement Units and Repair Parts may be located on how long...
... NATURE, INCLUDING WITHOUT LIMITATION, LOST REVENUES OR PROFITS, OR ANY OTHER DAMAGE WHETHER BASED IN CONTRACT, TORT, OR OTHERWISE. This warranty gives you specific legal rights and you . O. Box 240007 201 James Record Road Huntsville, Alabama 35824 ATTN: CIC Product Registration Information Model: Serial Number: Date of the product. LG DRYER LIMITED WARRANTY - Territories. Replacement Units and Repair Parts may be located on how long...
Specification (English)
Page 2
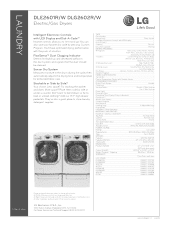
..., Speed Dry, Air Dry, Freshen Up 7 Options Custom Program, Damp Dry Beep, Wrinkle Care, Rack Dry, Anti Bacterial, More Time, Less Time 5 Temperature Levels High, Medium High, Medium, Low, Ultra Low 5 Drying Levels Very Dry, More Dry, Normal Dry, Less Dry, Damp Dry Dry Times 60 min., 50 min., 40 min., 30 min., 20 min. LG Design and Life's Good are the property of Cycle Beeper Variable Child Lock • Venting Option Electric: 4 Way Venting Gas: 3 Way Venting Drum Light • Reversible Door...
..., Speed Dry, Air Dry, Freshen Up 7 Options Custom Program, Damp Dry Beep, Wrinkle Care, Rack Dry, Anti Bacterial, More Time, Less Time 5 Temperature Levels High, Medium High, Medium, Low, Ultra Low 5 Drying Levels Very Dry, More Dry, Normal Dry, Less Dry, Damp Dry Dry Times 60 min., 50 min., 40 min., 30 min., 20 min. LG Design and Life's Good are the property of Cycle Beeper Variable Child Lock • Venting Option Electric: 4 Way Venting Gas: 3 Way Venting Drum Light • Reversible Door...


