
Owners Manual
Page 2
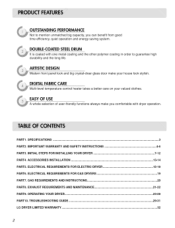
... coated with dryer operation. SPECIFICATIONS ... 3 PART2. EXHAUST REQUIREMENTS AND MAINTENANCE 21-22 PART9. TROUBLESHOOTING GUIDE ... 29-31 LG DRYER LIMITED WARRANTY ... 32 2 ARTISTIC DESIGN Modern front panel look stylish. INITIAL STEPS FOR INSTALLING YOUR DRYER 7-12 PART4. ELECTRICAL REQUIREMENTS FOR ELECTRIC DRYER 15-18 PART6. OUTSTANDING PERFORMANCE Not to guarantee high durability and the long life. EASY OF USE A whole selection of user-friendly functions always make your valued clothes. ELECTRICAL REQUIREMENTS FOR GAS DRYERS 19...
... coated with dryer operation. SPECIFICATIONS ... 3 PART2. EXHAUST REQUIREMENTS AND MAINTENANCE 21-22 PART9. TROUBLESHOOTING GUIDE ... 29-31 LG DRYER LIMITED WARRANTY ... 32 2 ARTISTIC DESIGN Modern front panel look stylish. INITIAL STEPS FOR INSTALLING YOUR DRYER 7-12 PART4. ELECTRICAL REQUIREMENTS FOR ELECTRIC DRYER 15-18 PART6. OUTSTANDING PERFORMANCE Not to guarantee high durability and the long life. EASY OF USE A whole selection of user-friendly functions always make your valued clothes. ELECTRICAL REQUIREMENTS FOR GAS DRYERS 19...
Owners Manual
Page 3
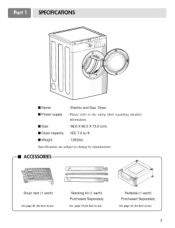
Stacking kit (1 each ) Purchased Separately See page 14 for how to use. Pedestal (1 each ) Purchased Separately See page 13for how to use. • Name : Electric and Gas Dryer • Power supply : Please refer to the rating label regarding detailed information. • Size • Dryer capacity : 68.6 X 96.5 X 73.0 (cm) : IEC 7.0 cu.ft. • Weight : 126(Ibs) Specifications are subject to change by manufacturer. --II ACCESSORIES Dryer rack (1 each) See page 26 for how to use. 3
Stacking kit (1 each ) Purchased Separately See page 14 for how to use. Pedestal (1 each ) Purchased Separately See page 13for how to use. • Name : Electric and Gas Dryer • Power supply : Please refer to the rating label regarding detailed information. • Size • Dryer capacity : 68.6 X 96.5 X 73.0 (cm) : IEC 7.0 cu.ft. • Weight : 126(Ibs) Specifications are subject to change by manufacturer. --II ACCESSORIES Dryer rack (1 each) See page 26 for how to use. 3
Owners Manual
Page 4
... when using your receipt hear. Warranty service is available by contacting your safety, the recommendations in this manual. Warranty Restriction: If the dryer is needed to the instructions in this dryer is installed and operated according to obtain warranty service. You will repair or replace any of the dryer behind the door. Serial No. Your dryer's model and serial numbers are located on the Model and Serial Number Plate located on the front of its mechanical or electrical parts...
... when using your receipt hear. Warranty service is available by contacting your safety, the recommendations in this manual. Warranty Restriction: If the dryer is needed to the instructions in this dryer is installed and operated according to obtain warranty service. You will repair or replace any of the dryer behind the door. Serial No. Your dryer's model and serial numbers are located on the Model and Serial Number Plate located on the front of its mechanical or electrical parts...
Owners Manual
Page 5
... the outlet, have come into an appropriate outlet that is moving. 6) Do not install or store this appliance where it will reduce the risk of least resistance t_r electric current. Do not modify the plug provided with all instructions before or after each load. 11) Keep area around the exhaust opening and adjacent surrounding areas fiee fiom the accumulation of lint...
... the outlet, have come into an appropriate outlet that is moving. 6) Do not install or store this appliance where it will reduce the risk of least resistance t_r electric current. Do not modify the plug provided with all instructions before or after each load. 11) Keep area around the exhaust opening and adjacent surrounding areas fiee fiom the accumulation of lint...

Owners Manual
Page 8
.... Once in which your door opens: ! The door on the floor and the dryer should not exceed 2.5 cm (1 inch). Please review this manual also provide important information concerning the placement of and clearances for your dryer can be installed to open either to reverse the direction in position, adjust the leveling legs of the dryer from left to right or from front to...
.... Once in which your door opens: ! The door on the floor and the dryer should not exceed 2.5 cm (1 inch). Please review this manual also provide important information concerning the placement of and clearances for your dryer can be installed to open either to reverse the direction in position, adjust the leveling legs of the dryer from left to right or from front to...
Owners Manual
Page 9
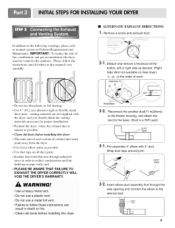
... fire. • Clean old ducts before installing this manual) very carefully. • ALTERNATE EXHAUST DIRECTIONS ] • Remove a screw and exhaust duct. 2- ]. DUCT TAPE 3-2. IMPORTANT." To reduce the risk of fire, combustion, and gas accumulation, the dryer must point away from the dryer • Use fewer elbow joints as desired. (Right Side Vent not available on Gas dryer) (1-3, ('_), (5) the order of exhaust duct must be vented to follow the instructions (and all duct joints •...
... fire. • Clean old ducts before installing this manual) very carefully. • ALTERNATE EXHAUST DIRECTIONS ] • Remove a screw and exhaust duct. 2- ]. DUCT TAPE 3-2. IMPORTANT." To reduce the risk of fire, combustion, and gas accumulation, the dryer must point away from the dryer • Use fewer elbow joints as desired. (Right Side Vent not available on Gas dryer) (1-3, ('_), (5) the order of exhaust duct must be vented to follow the instructions (and all duct joints •...

Owners Manual
Page 10
... Connector. 2. 1/8" NPT Pipe Plug (for electric dryers. The dryer is providcd insidc thc drycr control hood. For LP (Liquefied Petroleum) gas connection, refer to this manual's section on connecting the dryer to an electrical power source, please refer to install or use in your dryer. 4. listed No. 10 (copper wire only) three conductor power supply cord kit rated 240 Volts (minimum) 30 Amperes and labeled as noted below, only use and where local codes...
... Connector. 2. 1/8" NPT Pipe Plug (for electric dryers. The dryer is providcd insidc thc drycr control hood. For LP (Liquefied Petroleum) gas connection, refer to this manual's section on connecting the dryer to an electrical power source, please refer to install or use in your dryer. 4. listed No. 10 (copper wire only) three conductor power supply cord kit rated 240 Volts (minimum) 30 Amperes and labeled as noted below, only use and where local codes...
Owners Manual
Page 11
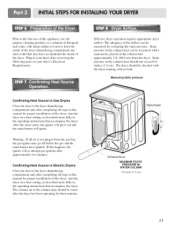
... the gas and the main burner have accumulated the inside of the dryer drum/drying compartment any dust or dirt that accompany the dryer. The exhaust air or the exhaust pipe should not exceed 0.6 inches (1.5 cm). Plug-in your dryer after reviewing the following parts on a heat setting, as described more fully in this manual for proper installation of this dryer, start the dryer on your dryer's Electrical Requirements. Confirming Heat Source in Electric Dryers...
... the gas and the main burner have accumulated the inside of the dryer drum/drying compartment any dust or dirt that accompany the dryer. The exhaust air or the exhaust pipe should not exceed 0.6 inches (1.5 cm). Plug-in your dryer after reviewing the following parts on a heat setting, as described more fully in this manual for proper installation of this dryer, start the dryer on your dryer's Electrical Requirements. Confirming Heat Source in Electric Dryers...

Owners Manual
Page 12
... outside. 4) Electric dryers may be vented to ensure proper operation. DO NOT connect exhaust ducts with metal screws or fasteners that venting materials are not supplied with the dryer. NOT vent the exhaust duct under the manufactured or mobile home. 12 WARNING! Gas dryer may not be vented to the outside using the back, left , or bottom panel. WARNING! The following instructions are uncertain whether your proposed installation will...
... outside. 4) Electric dryers may be vented to ensure proper operation. DO NOT connect exhaust ducts with metal screws or fasteners that venting materials are not supplied with the dryer. NOT vent the exhaust duct under the manufactured or mobile home. 12 WARNING! Gas dryer may not be vented to the outside using the back, left , or bottom panel. WARNING! The following instructions are uncertain whether your proposed installation will...
Owners Manual
Page 13
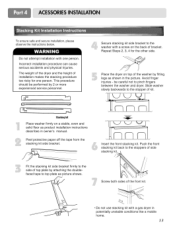
... doublefaced tape to top plate as product installation instructions describes in owner's manual. Peel protective paper off the tape from the iiii!ii!ii!iiiiiiiiiiiiisiiitiiaiiiciiikiiiiiniiigiiiiiiiiiiikiii_t!i!isl ide bracket. Slide washer slowly backwards to the side of installation makes the stacking procedure too risky for the other side. Push the front stacking kit back to the stoppers of side Fit...
... doublefaced tape to top plate as product installation instructions describes in owner's manual. Peel protective paper off the tape from the iiii!ii!ii!iiiiiiiiiiiiisiiitiiaiiiciiikiiiiiniiigiiiiiiiiiiikiii_t!i!isl ide bracket. Slide washer slowly backwards to the side of installation makes the stacking procedure too risky for the other side. Push the front stacking kit back to the stoppers of side Fit...
Owners Manual
Page 14
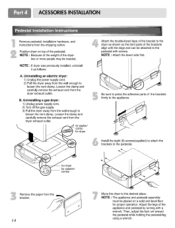
... instructions from the bracket. /4 Move the dryer to the desired place. Loosen the clamp and carefully remove the exhaust vent from the dryer exhaust outlet. Loosen the clamp and carefully remove the exhaust vent from the dryer exhaust outlet. for washer/ combo for proper operation. NOTE • The appliance and pedestal assembly must be attached to the pedestal with a wrench. NOTE : If dryer was previously installed, uninstall it as shown so the bent parts...
... instructions from the bracket. /4 Move the dryer to the desired place. Loosen the clamp and carefully remove the exhaust vent from the dryer exhaust outlet. Loosen the clamp and carefully remove the exhaust vent from the dryer exhaust outlet. for washer/ combo for proper operation. NOTE • The appliance and pedestal assembly must be attached to the pedestal with a wrench. NOTE : If dryer was previously installed, uninstall it as shown so the bent parts...

Owners Manual
Page 15
... local regulations. d) If branch circuit to dryer is optional and subject to wire your dryer. DO NOT CONNECT DRYER TO 110, 115, OR 120 VOLT CIRCUIT. Please contact a qualified electrician to check your home's wiring and fuses to ensure that your home has adequate electrical power to operate the dryer. 120V/240M 60 Hertz, 3-Wire Installation Instructions for field installation in dryers which to local code requirements. A_, Important Warning: To...
... local regulations. d) If branch circuit to dryer is optional and subject to wire your dryer. DO NOT CONNECT DRYER TO 110, 115, OR 120 VOLT CIRCUIT. Please contact a qualified electrician to check your home's wiring and fuses to ensure that your home has adequate electrical power to operate the dryer. 120V/240M 60 Hertz, 3-Wire Installation Instructions for field installation in dryers which to local code requirements. A_, Important Warning: To...
Owners Manual
Page 19
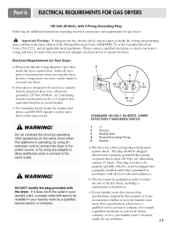
... codes and ordinances. c) Use separately fused circuits for washers and dryers, and DO NOT operate a washer and a dryer on the same circuit when this manual, or if you and your laundry room a proper outlet will need to be nstalled in order to ensure that is operating, by using an extension cor d to connect the dryer to you are additional instructions regarding electrical connections and requirements for any adapter to allow additional cords...
... codes and ordinances. c) Use separately fused circuits for washers and dryers, and DO NOT operate a washer and a dryer on the same circuit when this manual, or if you and your laundry room a proper outlet will need to be nstalled in order to ensure that is operating, by using an extension cor d to connect the dryer to you are additional instructions regarding electrical connections and requirements for any adapter to allow additional cords...
Owners Manual
Page 20
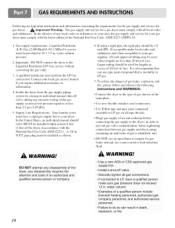
... an authorized and qualified service person or company . in I.P gas on the nameplate; Important: DO NOT connect the dryer to the dryer; WARNING! • Use a new AGA or CSA approved gas supply line. • Instal a shut-off valve, during any disassembly require s th e attention and tools of gas leaks, explosion, and fire, please follow and observe the following instructions and WARNINGS: Connect the dryer to or less...
... an authorized and qualified service person or company . in I.P gas on the nameplate; Important: DO NOT connect the dryer to the dryer; WARNING! • Use a new AGA or CSA approved gas supply line. • Instal a shut-off valve, during any disassembly require s th e attention and tools of gas leaks, explosion, and fire, please follow and observe the following instructions and WARNINGS: Connect the dryer to or less...

Owners Manual
Page 21
..., gas vent, or concealed space of exhaust pipe must have a weather hood with plastic or thin foil ducting. It is recommended. Rigid metal duct is not recommended to clean any old ducts before installing your dryer. ,_t Important Warning: To reduce the risk of fire, combustion, or accumulation of combustible gases, DO NOT exhaust dryer air into the duct that could catch lint and...
..., gas vent, or concealed space of exhaust pipe must have a weather hood with plastic or thin foil ducting. It is recommended. Rigid metal duct is not recommended to clean any old ducts before installing your dryer. ,_t Important Warning: To reduce the risk of fire, combustion, or accumulation of combustible gases, DO NOT exhaust dryer air into the duct that could catch lint and...
Owners Manual
Page 22
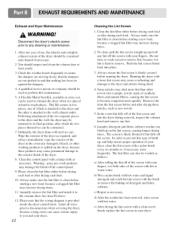
... scrub the lint screen with hot or warm water. Ordinarily, the dryer drum will need no care. Clean the lint filter either before and after drying each load or after which is attached to the dryer and the other is attached to the wall exhaust outlet. This Kit comes in your fingers, wet both sides of your fingers. Label all wires prior to disconnection when servicing the dryer, because wiring errors can build...
... scrub the lint screen with hot or warm water. Ordinarily, the dryer drum will need no care. Clean the lint filter either before and after drying each load or after which is attached to the dryer and the other is attached to the wall exhaust outlet. This Kit comes in your fingers, wet both sides of your fingers. Label all wires prior to disconnection when servicing the dryer, because wiring errors can build...
Owners Manual
Page 29
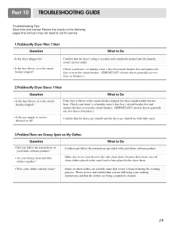
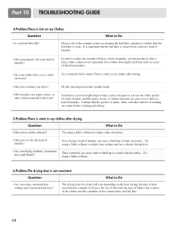
... and follow the instructions provided with your home's or laundry room s A se box/circuit breaker box and replace the fuse or reset the circuit breaker. (IMPORTANT: electric dryers generally use your dryer to call for service. 1.Problem:My Dryer Won't Start • Is the dry..e..r plugged lug. • Is the fuse blown, or is the circuit breaker tripped? i If the fuse, is securely and completely pushed into the laundry Check your fabric softener product...
... and follow the instructions provided with your home's or laundry room s A se box/circuit breaker box and replace the fuse or reset the circuit breaker. (IMPORTANT: electric dryers generally use your dryer to call for service. 1.Problem:My Dryer Won't Start • Is the dry..e..r plugged lug. • Is the fuse blown, or is the circuit breaker tripped? i If the fuse, is securely and completely pushed into the laundry Check your fabric softener product...
Owners Manual
Page 30
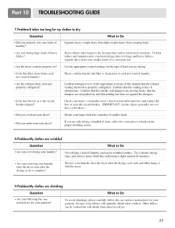
... excess lint in my clothes after drying. The drying time for a load will w_ry depending on the heat setting, the type of heat used (electric, natural or LP gas), the size of the load, the type of fabrics, the wetness of the clothes and the condition of laundry, sort lint producers (like a fuzzy white cotton towel) separately from clothes that might forget to the mtmual section on cletming the lint filter, and...
... excess lint in my clothes after drying. The drying time for a load will w_ry depending on the heat setting, the type of heat used (electric, natural or LP gas), the size of the load, the type of fabrics, the wetness of the clothes and the condition of laundry, sort lint producers (like a fuzzy white cotton towel) separately from clothes that might forget to the mtmual section on cletming the lint filter, and...
Owners Manual
Page 31
... more consistent drying times for large and heavy fabrics, separate these items into a number of moisture • Are you are not pushed in a dryer. 31 Check you Overload your dryer? To avoid shrinkage, please careff_lly t_>llow the care and use two fuses or breakers.) , Did you r home s or la_ adry room's fuse box/circuit breaker box _md replace the fuse or reset the circuit breaker. (IMPORTANT: electric dryers generally use instructions for...
... more consistent drying times for large and heavy fabrics, separate these items into a number of moisture • Are you are not pushed in a dryer. 31 Check you Overload your dryer? To avoid shrinkage, please careff_lly t_>llow the care and use two fuses or breakers.) , Did you r home s or la_ adry room's fuse box/circuit breaker box _md replace the fuse or reset the circuit breaker. (IMPORTANT: electric dryers generally use instructions for...
Owners Manual
Page 32
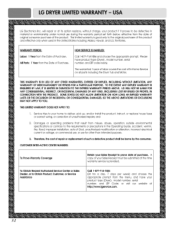
... of repair or replacement of such a defective product shall be submiHed at the time warranty service is good only to the requirements or precautions in the Operating Guide, accident, vermin, fire, flood, improper installation, acts of God, unauthorized modification or alteration, incorrect electrical current or voltage, or commercial use, or use during the warranty period set forth below, effective from misuse, abuse, operation outside environmental specifications...
... of repair or replacement of such a defective product shall be submiHed at the time warranty service is good only to the requirements or precautions in the Operating Guide, accident, vermin, fire, flood, improper installation, acts of God, unauthorized modification or alteration, incorrect electrical current or voltage, or commercial use, or use during the warranty period set forth below, effective from misuse, abuse, operation outside environmental specifications...


