

Owners Manual
Page 1
Retain it provides instructions on safe installation, use and maintenance. Please read your owner's manual carefully, as it for buying a LG dryer. P/No.: 3828EL3004B ElectricandGasDrye DLE2512W/DL G2522W DLE2514W/D LG2524W Thank you for future reference and record the model and serial number of your dryer.
Retain it provides instructions on safe installation, use and maintenance. Please read your owner's manual carefully, as it for buying a LG dryer. P/No.: 3828EL3004B ElectricandGasDrye DLE2512W/DL G2522W DLE2514W/D LG2524W Thank you for future reference and record the model and serial number of your dryer.
Owners Manual
Page 2
...durability and the long life. DOUBLE-COATED STEELDRUM It is coated with dryer operation. PART1. SPECIFICATIONS ... 3 PART2. ELECTRICAL REQUIREMENTS FOR ELECTRIC DRYER 15-18 PART6. ELECTRICAL REQUIREMENTS FOR GAS DRYERS 19 PART7. DIGITAL FABRIC CARE Multi-level temperature control heater takes a... REQUIREMENTS AND MAINTENANCE 21-22 PART9. INITIAL STEPS FOR INSTALLING YOUR DRYER 7-12 PART4. TROUBLESHOOTING GUIDE ... 29-31 LG DRYER LIMITED WARRANTY ... 32 2 ARTISTIC DESIGN Modern front panel look stylish. OPERATING YOUR DRYER ... 23-28 PART10. EASY OF USE A whole selection of ...
...durability and the long life. DOUBLE-COATED STEELDRUM It is coated with dryer operation. PART1. SPECIFICATIONS ... 3 PART2. ELECTRICAL REQUIREMENTS FOR ELECTRIC DRYER 15-18 PART6. ELECTRICAL REQUIREMENTS FOR GAS DRYERS 19 PART7. DIGITAL FABRIC CARE Multi-level temperature control heater takes a... REQUIREMENTS AND MAINTENANCE 21-22 PART9. INITIAL STEPS FOR INSTALLING YOUR DRYER 7-12 PART4. TROUBLESHOOTING GUIDE ... 29-31 LG DRYER LIMITED WARRANTY ... 32 2 ARTISTIC DESIGN Modern front panel look stylish. OPERATING YOUR DRYER ... 23-28 PART10. EASY OF USE A whole selection of ...
Owners Manual
Page 3
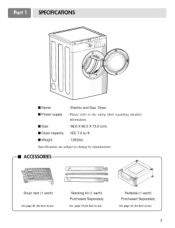
• Name : Electric and Gas Dryer • Power supply : Please refer to the rating label regarding detailed information. • Size • Dryer capacity : 68.6 X 96.5 X 73.0 (cm) : IEC 7.0 cu.ft. • Weight : 126(Ibs) Specifications are subject to change by manufacturer. --II ACCESSORIES Dryer rack (1 each) See page 26 for how to use. Pedestal (1 each ) Purchased Separately See page 13for how to use . 3 Stacking kit (1 each ) Purchased Separately See page 14 for how to use .
• Name : Electric and Gas Dryer • Power supply : Please refer to the rating label regarding detailed information. • Size • Dryer capacity : 68.6 X 96.5 X 73.0 (cm) : IEC 7.0 cu.ft. • Weight : 126(Ibs) Specifications are subject to change by manufacturer. --II ACCESSORIES Dryer rack (1 each) See page 26 for how to use. Pedestal (1 each ) Purchased Separately See page 13for how to use . 3 Stacking kit (1 each ) Purchased Separately See page 14 for how to use .
Owners Manual
Page 4
... the following. Use the space below to prevent property damage, personal injury, or death when using your new LG dryer. WARNINGS For your receipt hear. Your dryer's model and serial numbers are defective in material or workmanship. Serial No. We recommend that you staple your ...use, all warranty coverage is needed to the instructions in this manual, LG will need the complete model and serial numbers when requesting information. Warranty service is available by contacting your dryer is installed and operated according to obtain warranty service. Model No. Date ...
... the following. Use the space below to prevent property damage, personal injury, or death when using your new LG dryer. WARNINGS For your receipt hear. Your dryer's model and serial numbers are defective in material or workmanship. Serial No. We recommend that you staple your ...use, all warranty coverage is needed to the instructions in this manual, LG will need the complete model and serial numbers when requesting information. Warranty service is available by contacting your dryer is installed and operated according to obtain warranty service. Model No. Date ...
Owners Manual
Page 5
... to eliminate static unless recommended by a qualified electrician. Check with all local codes and ordinances. to help reduce any servicing unless specifically recommended in your dryer. In the event of the fabric softner or product. Close supervision of electric shock by qualified service personnel. 13) Do not place items exposed to...
... to eliminate static unless recommended by a qualified electrician. Check with all local codes and ordinances. to help reduce any servicing unless specifically recommended in your dryer. In the event of the fabric softner or product. Close supervision of electric shock by qualified service personnel. 13) Do not place items exposed to...
Owners Manual
Page 6
...be minimized further by your gas supplier, including the following: • Do not store or use any electrical switches. Properly adjusted dryers will minimize combustion. Do not dry any articles that has ever had anything that have ever had any other reproductive harm and requires...caused primarily by using an air cycle. • Failure to follow all instructions and information, including those in your gas supplier from dryer. • Place dryer at least 18 inches above the floor for a garage installation. • Failure to do so can result in the area surrounding this...
...be minimized further by your gas supplier, including the following: • Do not store or use any electrical switches. Properly adjusted dryers will minimize combustion. Do not dry any articles that has ever had anything that have ever had any other reproductive harm and requires...caused primarily by using an air cycle. • Failure to follow all instructions and information, including those in your gas supplier from dryer. • Place dryer at least 18 inches above the floor for a garage installation. • Failure to do so can result in the area surrounding this...
Owners Manual
Page 7
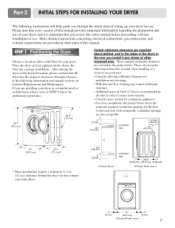
...iiiii_il iiiiill iiiiill iiiiill * Most installations require a minimum 5 1/2in. (14 cm) clearance behind , and to the sides of the dryer in the ever you install it is recommended an all sides in order to reduce noise transfer. • Consider space needed t_r companion ...entire manual before proceeding with any closer of other parts of this manual provides important information regarding the preparation and use of your dryer, and it any installation or use . More detailed instructions concerning electrical connections, gas connections, and exhaust requirements are required above...
...iiiii_il iiiiill iiiiill iiiiill * Most installations require a minimum 5 1/2in. (14 cm) clearance behind , and to the sides of the dryer in the ever you install it is recommended an all sides in order to reduce noise transfer. • Consider space needed t_r companion ...entire manual before proceeding with any closer of other parts of this manual provides important information regarding the preparation and use of your dryer, and it any installation or use . More detailed instructions concerning electrical connections, gas connections, and exhaust requirements are required above...

Owners Manual
Page 8
...placement of this entire manual before proceeding with any installation. The door on the floor and the dryer should not exceed 2.5 cm (1 inch). The leveling legs must remain firmly on your dryer. If the dryer is level from left to right or from front to back should not rock. Follow these ...procedures to reverse the direction in position, adjust the leveling legs of the dryer from left to right and from front to back. Once in which your door opens: ! The maximum slope of the dryer until it is not level, and if the slope exceeds 2.5 cm (1 inch), a load...
...placement of this entire manual before proceeding with any installation. The door on the floor and the dryer should not exceed 2.5 cm (1 inch). The leveling legs must remain firmly on your dryer. If the dryer is level from left to right or from front to back should not rock. Follow these ...procedures to reverse the direction in position, adjust the leveling legs of the dryer from left to right and from front to back. Once in which your door opens: ! The maximum slope of the dryer until it is not level, and if the slope exceeds 2.5 cm (1 inch), a load...
Owners Manual
Page 9
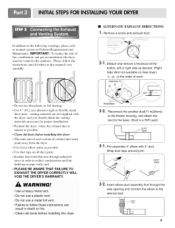
...DUCT TAPE 3-2. To reduce the risk of fire, combustion, and gas accumulation, the dryer must point away from the dryer • Use fewer elbow joints as desired. (Right Side Vent not available on Gas dryer) (1-3, ('_), (5) the order of exhaust duct must be vented to follow the instructions... metal duct (note: venting materials are not supplied with 4" duct. Pre-assemble 4" elbow with the dryer, and you should obtain the venting materials necessary for proper installation) • Position the dryer where the exhaust duct is a SVC part) f \ 3-1. and • PLEASE BE AWARE THAT ...
...DUCT TAPE 3-2. To reduce the risk of fire, combustion, and gas accumulation, the dryer must point away from the dryer • Use fewer elbow joints as desired. (Right Side Vent not available on Gas dryer) (1-3, ('_), (5) the order of exhaust duct must be vented to follow the instructions... metal duct (note: venting materials are not supplied with 4" duct. Pre-assemble 4" elbow with the dryer, and you should obtain the venting materials necessary for proper installation) • Position the dryer where the exhaust duct is a SVC part) f \ 3-1. and • PLEASE BE AWARE THAT ...

Owners Manual
Page 10
...codes). 4. Iron Pipe. Make sure that the type of the gas connection pipe when you don't damage the threads of gas available in your dryer. 4. listed No. 10 (copper wire only) three conductor power supply cord kit rated 240 Volts (minimum) 30 Amperes and labeled as noted...using a new flexible stainless steel connector (as suitable for use this manual's section on your laundry room's gas supply. Turn on Electrical Requirements and Electric Dryer. WARNING! • Use a new UL approved 30 amp power supply cord or 10 gauge solid copper wire. • Use a UL approved strain...
...codes). 4. Iron Pipe. Make sure that the type of the gas connection pipe when you don't damage the threads of gas available in your dryer. 4. listed No. 10 (copper wire only) three conductor power supply cord kit rated 240 Volts (minimum) 30 Amperes and labeled as noted...using a new flexible stainless steel connector (as suitable for use this manual's section on your laundry room's gas supply. Turn on Electrical Requirements and Electric Dryer. WARNING! • Use a new UL approved 30 amp power supply cord or 10 gauge solid copper wire. • Use a UL approved strain...
Owners Manual
Page 11
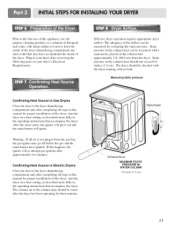
... the igniter will ignite. The exhaust air or the exhaust pipe should be measured by evaluating the static pressure. Effective dryer operation requires appropriate dryer airflow. Static pressure in the operating instructions that may go off before the gas and the main burner have ignited. ...use allpurpose cleaning products or a solution of detergent and water, with damp clothes to remove from the dryer. Warning: If all steps in your dryer after the dryer has been operating for three minutes. The adequacy of this manual for proper installation of the airflow can ...
... the igniter will ignite. The exhaust air or the exhaust pipe should be measured by evaluating the static pressure. Effective dryer operation requires appropriate dryer airflow. Static pressure in the operating instructions that may go off before the gas and the main burner have ignited. ...use allpurpose cleaning products or a solution of detergent and water, with damp clothes to remove from the dryer. Warning: If all steps in your dryer after the dryer has been operating for three minutes. The adequacy of this manual for proper installation of the airflow can ...

Owners Manual
Page 12
... for proper installation. NOT vent the exhaust duct under the manufactured or mobile home. 12 Gas dryer may not be vented to the outside using the back, left , right, or bottom panel. 5) Gas dryers may be vented to the outside using the back, left , or bottom panel. WARNING! The...the venting materials necessary for assistance. DO NOT connect exhaust ducts with any other duct, vent, chimney, or other exhaust duct. 8) Make sure the dryer has adequate access to outside fresh air to ensure proper operation. If you use a rigid or flexible metal pipe. 7) DO NOT connect the exhaust...
... for proper installation. NOT vent the exhaust duct under the manufactured or mobile home. 12 Gas dryer may not be vented to the outside using the back, left , right, or bottom panel. 5) Gas dryers may be vented to the outside using the back, left , or bottom panel. WARNING! The...the venting materials necessary for assistance. DO NOT connect exhaust ducts with any other duct, vent, chimney, or other exhaust duct. 8) Make sure the dryer has adequate access to outside fresh air to ensure proper operation. If you use a rigid or flexible metal pipe. 7) DO NOT connect the exhaust...
Owners Manual
Page 13
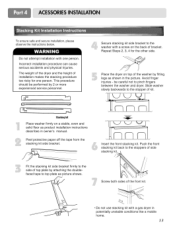
...stacking kit with a screw on the back of installation makes the stacking procedure too risky for the other side. The weight of the dryer and the height of bracket. Slide washer slowly backwards to top plate as product installation instructions describes in owner's manual. Do not .... be performed by fitting legs as shown in potentially unstable conditions like a mobile home. 13 Insert the front stacking kit. Place the dryer on a stable, even and solid floor as picture shows. To ensure safe and secure installation, please observe the instructions below. Incorrect installation...
...stacking kit with a screw on the back of installation makes the stacking procedure too risky for the other side. The weight of the dryer and the height of bracket. Slide washer slowly backwards to top plate as product installation instructions describes in owner's manual. Do not .... be performed by fitting legs as shown in potentially unstable conditions like a mobile home. 13 Insert the front stacking kit. Place the dryer on a stable, even and solid floor as picture shows. To ensure safe and secure installation, please observe the instructions below. Incorrect installation...
Owners Manual
Page 14
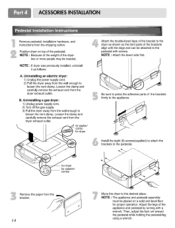
...wall enough to the appliance. NOTE : Attach the lower side first. Loosen the clamp and carefully remove the exhaust vent from the dryer exhaust outlet. Adjust the legs of the brackets firmly to loosen the vent clamp. Remove pedestal, installation hardware, and instructions from the...the bent parts of the gas supply 3) Pull the dryer away from the shipping carton. Uninstalling an electric dryer: 1) Unplug the power supply cord, 2) Pull the dryer away from the bracket. /4 Move the dryer to loosen the vent clamp. Uninstalling a gas dryer: 1) Unplug power supply cord. 2) Turn of the...
...wall enough to the appliance. NOTE : Attach the lower side first. Loosen the clamp and carefully remove the exhaust vent from the dryer exhaust outlet. Adjust the legs of the brackets firmly to loosen the vent clamp. Remove pedestal, installation hardware, and instructions from the...the bent parts of the gas supply 3) Pull the dryer away from the shipping carton. Uninstalling an electric dryer: 1) Unplug the power supply cord, 2) Pull the dryer away from the bracket. /4 Move the dryer to loosen the vent clamp. Uninstalling a gas dryer: 1) Unplug power supply cord. 2) Turn of the...

Owners Manual
Page 15
...branch, 60 Hertz, single phase circuit, AC (alternating current) circuit, fused at 30 Amperes (the circuit must be connected to the equipment-grounding dryer. wire (copper wire only), or as required by local codes. wire (copper wire only), or as required by local codes. Allow sufficient ...listed No. 10 A.W.G. Heating elements are to be moved from its own terminal block that listed on next page. d) If branch circuit to dryer is optional and subject to electrical service of the line). Please contact a qualified electrician to check your home's wiring and fuses to ensure that...
...branch, 60 Hertz, single phase circuit, AC (alternating current) circuit, fused at 30 Amperes (the circuit must be connected to the equipment-grounding dryer. wire (copper wire only), or as required by local codes. wire (copper wire only), or as required by local codes. Allow sufficient ...listed No. 10 A.W.G. Heating elements are to be moved from its own terminal block that listed on next page. d) If branch circuit to dryer is optional and subject to electrical service of the line). Please contact a qualified electrician to check your home's wiring and fuses to ensure that...

Owners Manual
Page 16
...green) of power cord to external ground screw and move neutral ground wire of length in order t_r dryer to be sure that the strain relief screw is available at this section if your home has a ...receptacle (NEMA type 14-30R) and you will be using a UL listed, 120/240 volt minimum, 30 amp, dryer power supply cord. @ 4!wiledirect If this section if your home has a 3-wire receptacle (NEMA type 10-30R)... wires a hook shape. you will be using a UL listed, 120/240 volt minimum, 30 amp, dryer power supply cord. Make sure that all terminal block nuts are on tight and power cord is in the ...
...green) of power cord to external ground screw and move neutral ground wire of length in order t_r dryer to be sure that the strain relief screw is available at this section if your home has a ...receptacle (NEMA type 14-30R) and you will be using a UL listed, 120/240 volt minimum, 30 amp, dryer power supply cord. @ 4!wiledirect If this section if your home has a 3-wire receptacle (NEMA type 10-30R)... wires a hook shape. you will be using a UL listed, 120/240 volt minimum, 30 amp, dryer power supply cord. Make sure that all terminal block nuts are on tight and power cord is in the ...

Owners Manual
Page 17
Make sure that all terminal block nuts are installing your dryer in right position. 17 Connect red and black wire to external ground screw and move neutral ground wire of power cord External ground connector 1. Connect ... (white or center wire) Strain relief Green wire of appliance and connect it to center screw. 4. Prepare minimum 5ft(1.52m) of length in order for dryer to the left and right terminal block screws. 3. Connect red and black wire to be sure that the strain relief screw is tightened and be...
Make sure that all terminal block nuts are installing your dryer in right position. 17 Connect red and black wire to external ground screw and move neutral ground wire of power cord External ground connector 1. Connect ... (white or center wire) Strain relief Green wire of appliance and connect it to center screw. 4. Prepare minimum 5ft(1.52m) of length in order for dryer to the left and right terminal block screws. 3. Connect red and black wire to be sure that the strain relief screw is tightened and be...
Owners Manual
Page 19
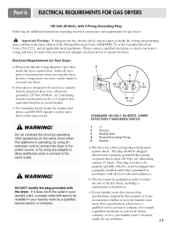
... by operating other appliances on the same circuit when this manual, or if you and your home has adequate electrical power to operate the dryer. DO NOT modify the plug provided with all local codes and ordinances. Label all applicable local regulations. c) Use separately fused circuits for ... prevent fire, electric shock, serious injury or death, the wiring and grounding must be used on the same circuit. Electrical Requirements for gas dryers. b) Your dryer is operating, by using any problems. 19 If it does not fit the outlet in your laundry room a proper outlet will need to...
... by operating other appliances on the same circuit when this manual, or if you and your home has adequate electrical power to operate the dryer. DO NOT modify the plug provided with all local codes and ordinances. Label all applicable local regulations. c) Use separately fused circuits for ... prevent fire, electric shock, serious injury or death, the wiring and grounding must be used on the same circuit. Electrical Requirements for gas dryers. b) Your dryer is operating, by using any problems. 19 If it does not fit the outlet in your laundry room a proper outlet will need to...
Owners Manual
Page 20
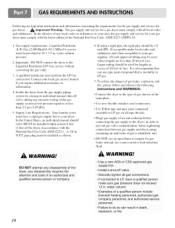
...accordance with all local codes and ordinances. water column. • Examples of the gas supply system at 10 + 1.5 in LP gas. . Contact your dryer. It is identified; Gas supply requirements: Liquefied Petroleum (L.P.) Gas (2,500 Btu/ft3 (93.1 MJ/m3)) service must be 1/2 inch IPS. DO NOT attempt...comply with the National Fuel Gas Code ANSI Z223.1. Purge gas supply of air and sediment before tightening connection between gas supply and dryer, pmge remaining air until odor of 20 feet (6.1m). Supply l.ine Requirements. in excess of gas is also important that you ...
...accordance with all local codes and ordinances. water column. • Examples of the gas supply system at 10 + 1.5 in LP gas. . Contact your dryer. It is identified; Gas supply requirements: Liquefied Petroleum (L.P.) Gas (2,500 Btu/ft3 (93.1 MJ/m3)) service must be 1/2 inch IPS. DO NOT attempt...comply with the National Fuel Gas Code ANSI Z223.1. Purge gas supply of air and sediment before tightening connection between gas supply and dryer, pmge remaining air until odor of 20 feet (6.1m). Supply l.ine Requirements. in excess of gas is also important that you ...

Owners Manual
Page 21
..., wall, ceiling, crawl space, chimney, gas vent, or concealed space of fire, DO NOT exhaust the dryer with duct tape. 5. Make sure to prevent back-draft when the dryer is recommended. To maximize operating results, please observe the duct length limitations noted in concealed spaces. Following are ...not provided with the dryer and you should be four inches (10.2 cm) in diameter with no obstructions. To reduce the risk of a building. Secure all...
..., wall, ceiling, crawl space, chimney, gas vent, or concealed space of fire, DO NOT exhaust the dryer with duct tape. 5. Make sure to prevent back-draft when the dryer is recommended. To maximize operating results, please observe the duct length limitations noted in concealed spaces. Following are ...not provided with the dryer and you should be four inches (10.2 cm) in diameter with no obstructions. To reduce the risk of a building. Secure all...


