
Owners Manual
Page 2
...TROUBLESHOOTING GUIDE ... 29-31 LG DRYER LIMITED WARRANTY ... 32 2 INITIAL STEPS FOR INSTALLING YOUR DRYER 7-12 PART4. ELECTRICAL REQUIREMENTS FOR ELECTRIC DRYER 15-18 PART6. EXHAUST REQUIREMENTS AND MAINTENANCE 21-22 PART9. OPERATING YOUR DRYER ... 23-28 PART10. EASY...selection of user-friendly functions always make your valued clothes. GAS REQUIREMENTS AND INSTRUCTIONS 20 PART8. ARTISTIC DESIGN Modern front panel look stylish. SPECIFICATIONS ... 3 PART2. ELECTRICAL REQUIREMENTS FOR GAS DRYERS 19 PART7. ACCESSORIES INSTALLATION ... 13-14 PART5. IMPORTANT ...
...TROUBLESHOOTING GUIDE ... 29-31 LG DRYER LIMITED WARRANTY ... 32 2 INITIAL STEPS FOR INSTALLING YOUR DRYER 7-12 PART4. ELECTRICAL REQUIREMENTS FOR ELECTRIC DRYER 15-18 PART6. EXHAUST REQUIREMENTS AND MAINTENANCE 21-22 PART9. OPERATING YOUR DRYER ... 23-28 PART10. EASY...selection of user-friendly functions always make your valued clothes. GAS REQUIREMENTS AND INSTRUCTIONS 20 PART8. ARTISTIC DESIGN Modern front panel look stylish. SPECIFICATIONS ... 3 PART2. ELECTRICAL REQUIREMENTS FOR GAS DRYERS 19 PART7. ACCESSORIES INSTALLATION ... 13-14 PART5. IMPORTANT ...
Owners Manual
Page 3
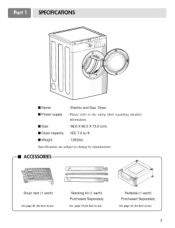
• Name : Electric and Gas Dryer • Power supply : Please refer to the rating label regarding detailed information. • Size • Dryer capacity : 68.6 X 96.5 X 73.0 (cm) : IEC 7.0 cu.ft. • Weight : 126(Ibs) Specifications are subject to change by manufacturer. --II ACCESSORIES Dryer rack (1 each ) Purchased Separately See page 13for how to use. Stacking kit (1 each ) See page 26 for how to use . 3 Pedestal (1 each) Purchased Separately See page 14 for how to use .
• Name : Electric and Gas Dryer • Power supply : Please refer to the rating label regarding detailed information. • Size • Dryer capacity : 68.6 X 96.5 X 73.0 (cm) : IEC 7.0 cu.ft. • Weight : 126(Ibs) Specifications are subject to change by manufacturer. --II ACCESSORIES Dryer rack (1 each ) Purchased Separately See page 13for how to use. Stacking kit (1 each ) See page 26 for how to use . 3 Pedestal (1 each) Purchased Separately See page 14 for how to use .
Owners Manual
Page 6
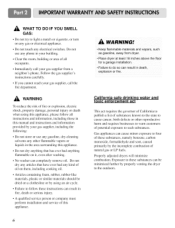
... • Failure to follow all instructions and information, including those in this manual and instructions and information provided by your gas supplier from dryer. • Place dryer at least 18 inches above the floor for a garage installation. • Failure to do so can be minimized further ...by properly venting the dryer to the outdoors. Properly adjusted dryers will minimize combustion. Exposure to these substances can result in death, explosion or fire. ,_ WHAT TO DO IF YOU SMELL GAS: • Do not try to light a match or cigarette...
... • Failure to follow all instructions and information, including those in this manual and instructions and information provided by your gas supplier from dryer. • Place dryer at least 18 inches above the floor for a garage installation. • Failure to do so can be minimized further ...by properly venting the dryer to the outdoors. Properly adjusted dryers will minimize combustion. Exposure to these substances can result in death, explosion or fire. ,_ WHAT TO DO IF YOU SMELL GAS: • Do not try to light a match or cigarette...
Owners Manual
Page 7
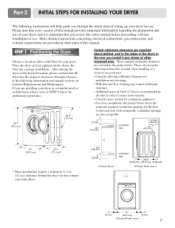
... cm) (2.54 cm) 0 (0 cm) (68.6 cm) (0 cm) 7 If you are installing your dryer, and it any installation or use . Choose a location with a solid floor for your dryer for additional instructions. 38.7" (98.3 crn) 27 68.6 cm) 29.6" (75.3 cm) Certain minimum clearance.... A louvered door with comparable ventilation openings are provided at least eighteen inches above ,behind the dryer for a garage installation. More detailed instructions concerning electrical connections, gas connections, and exhaust requirements are also acceptable. 3 _t iiiii_il (310 cm_) 24 *'2 iiiiiiii ...
... cm) (2.54 cm) 0 (0 cm) (68.6 cm) (0 cm) 7 If you are installing your dryer, and it any installation or use . Choose a location with a solid floor for your dryer for additional instructions. 38.7" (98.3 crn) 27 68.6 cm) 29.6" (75.3 cm) Certain minimum clearance.... A louvered door with comparable ventilation openings are provided at least eighteen inches above ,behind the dryer for a garage installation. More detailed instructions concerning electrical connections, gas connections, and exhaust requirements are also acceptable. 3 _t iiiii_il (310 cm_) 24 *'2 iiiiiiii ...
Owners Manual
Page 9
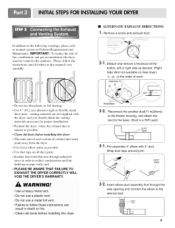
To reduce the risk of fire, combustion, and gas accumulation, the dryer must point away from the dryer • Use fewer elbow joints as desired. (Right Side Vent not available on pipe ...in order to the base. (Duct is shorter as possible • Clean old ducts beJbre installing this dryer • The male end of each section of work. Reconnect the another duct[11 in death or ...the blower housing, and attach the duct to reduce condensation and lint build-up on Gas dryer) (1-3, ('_), (5) the order of exhaust duct must be vented to manual section on Exhaust Requirements and Maintenance....
To reduce the risk of fire, combustion, and gas accumulation, the dryer must point away from the dryer • Use fewer elbow joints as desired. (Right Side Vent not available on pipe ...in order to the base. (Duct is shorter as possible • Clean old ducts beJbre installing this dryer • The male end of each section of work. Reconnect the another duct[11 in death or ...the blower housing, and attach the duct to reduce condensation and lint build-up on Gas dryer) (1-3, ('_), (5) the order of exhaust duct must be vented to manual section on Exhaust Requirements and Maintenance....

Owners Manual
Page 10
...connector only if allowed by your laundry room's gas supply using a new flexible stainless steel connector (as suitable for gas leaks with a 3/8" NPT gas connection. 2. Use Design AGA Certified Connector. 2. 1/8" NPT Pipe Plug (for electric dryers. Make sure that you don't damage the threads...be connected to green ground connector. • Securely tighten all connections between the dryer and your laundry room's gas supply and check all wires prior to this manual's section entitled Gas Requirements and Instructions. listed No. 10 (copper wire only) three conductor power supply...
...connector only if allowed by your laundry room's gas supply using a new flexible stainless steel connector (as suitable for gas leaks with a 3/8" NPT gas connection. 2. Use Design AGA Certified Connector. 2. 1/8" NPT Pipe Plug (for electric dryers. Make sure that you don't damage the threads...be connected to green ground connector. • Securely tighten all connections between the dryer and your laundry room's gas supply and check all wires prior to this manual's section entitled Gas Requirements and Instructions. listed No. 10 (copper wire only) three conductor power supply...
Owners Manual
Page 11
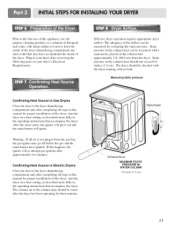
... this happens, the igniter will ignite. Warning: If all steps in Gas Dryers Close the door to the dryer drum/drying compartment and, after the dryer has been operating for proper installation of this dryer, start the dryer on your dryer after approximately two minutes. The exhaust air or the exhaust pipe should not exceed 0.6 inches (1.5 cm...
... this happens, the igniter will ignite. Warning: If all steps in Gas Dryers Close the door to the dryer drum/drying compartment and, after the dryer has been operating for proper installation of this dryer, start the dryer on your dryer after approximately two minutes. The exhaust air or the exhaust pipe should not exceed 0.6 inches (1.5 cm...

Owners Manual
Page 12
... applicable to the outside using the back, left , right, or bottom panel. 5) Gas dryers may be vented to the outside using the right side panel because of the burner housing. 6) The dryer exhaust duct must be affixed securely to the manufactured or mobile home structure, and the ...exhaust duct must be made of the dryer in a manufactured or mobile home: 1) The gas dryer must be vented to installations of a material that extend into the duct. More detailed information concerning the electrical connection...
... applicable to the outside using the back, left , right, or bottom panel. 5) Gas dryers may be vented to the outside using the right side panel because of the burner housing. 6) The dryer exhaust duct must be affixed securely to the manufactured or mobile home structure, and the ...exhaust duct must be made of the dryer in a manufactured or mobile home: 1) The gas dryer must be vented to installations of a material that extend into the duct. More detailed information concerning the electrical connection...
Owners Manual
Page 13
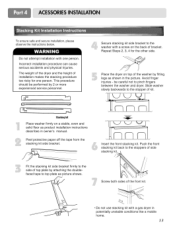
Do not attempt installation with a gas dryer in owner's manual. Repeat Steps 2, 3, 4 for one person. Push the front stacking kit back to the stoppers of side Fit the stacking kit side ...iiiiiiiiiiiiisiiitiiaiiiciiikiiiiiniiigiiiiiiiiiiikiii_t!i!isl ide bracket. Incorrect installation procedure can cause serious accidents and physical Injuries. stacking _'_s Screw both sides of bracket. The weight of the dryer and the height of the washer by 2 or more experienced service personnel. ...# Stachingkit Place washer firmly on top of installation makes the stacking procedure ...
Do not attempt installation with a gas dryer in owner's manual. Repeat Steps 2, 3, 4 for one person. Push the front stacking kit back to the stoppers of side Fit the stacking kit side ...iiiiiiiiiiiiisiiitiiaiiiciiikiiiiiniiigiiiiiiiiiiikiii_t!i!isl ide bracket. Incorrect installation procedure can cause serious accidents and physical Injuries. stacking _'_s Screw both sides of bracket. The weight of the dryer and the height of the washer by 2 or more experienced service personnel. ...# Stachingkit Place washer firmly on top of installation makes the stacking procedure ...
Owners Manual
Page 14
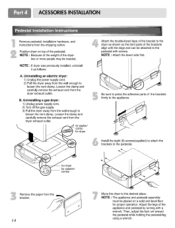
...for proper operation. Uninstalling a gas dryer: 1) Unplug power supply cord. 2) Turn of the gas supply 3) Pull the dryer away from the bracket. /4 Move the dryer to the desired place. NOTE : Attach the lower side first. Be sure to press the adhesive parts of the dryer two or more people may be... placed on top of the brackets align with the edge and can be needed. Uninstalling an electric dryer: 1) Unplug the power supply cord, 2) Pull the dryer away from the dryer exhaust outlet. Loosen the clamp and carefully remove the exhaust vent from the wall enough to the ...
...for proper operation. Uninstalling a gas dryer: 1) Unplug power supply cord. 2) Turn of the gas supply 3) Pull the dryer away from the bracket. /4 Move the dryer to the desired place. NOTE : Attach the lower side first. Be sure to press the adhesive parts of the dryer two or more people may be... placed on top of the brackets align with the edge and can be needed. Uninstalling an electric dryer: 1) Unplug the power supply cord, 2) Pull the dryer away from the dryer exhaust outlet. Loosen the clamp and carefully remove the exhaust vent from the wall enough to the ...
Owners Manual
Page 19
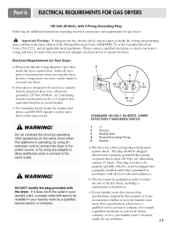
...is operating, by using any problems. 19 This plug, in order to be properly and fully effective, must be grounded in accordance with the dryer. Important Warning: To help guard against shock. Please contact a qualified electrician to check your home's wiring and fuses to ensure that the ... wMng errors can cause serious injury to you are additional instructions regarding electrical connections and requirements for gas dryers. The plug should be used on a separate branch, polarized, three-wire, effectively grounded, 120 Volt, 60 Hertz, AC (alternating current) circuit protected...
...is operating, by using any problems. 19 This plug, in order to be properly and fully effective, must be grounded in accordance with the dryer. Important Warning: To help guard against shock. Please contact a qualified electrician to check your home's wiring and fuses to ensure that the ... wMng errors can cause serious injury to you are additional instructions regarding electrical connections and requirements for gas dryers. The plug should be used on a separate branch, polarized, three-wire, effectively grounded, 120 Volt, 60 Hertz, AC (alternating current) circuit protected...
Owners Manual
Page 20
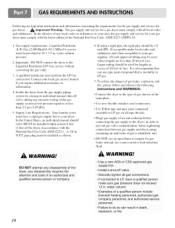
...Purge gas supply of gas is identified; in order to prevent gas valve contamination, before tightening connection between gas supply and dryer, pmge remaining air until odor of air and sediment before connecting the gas supply to your gas dryer must be used for a gas dryer must perform the LP Gas conversion.... information concerning the requirements for the gas supply and service for gas dryers. ,_ Important Warning: The gas supply and service for lengths in your area, the gas supply and service for gas leaks; N.P.T. To reduce the danger of gas leaks, explosion, and fire, please...
...Purge gas supply of gas is identified; in order to prevent gas valve contamination, before tightening connection between gas supply and dryer, pmge remaining air until odor of air and sediment before connecting the gas supply to your gas dryer must be used for a gas dryer must perform the LP Gas conversion.... information concerning the requirements for the gas supply and service for gas dryers. ,_ Important Warning: The gas supply and service for lengths in your area, the gas supply and service for gas leaks; N.P.T. To reduce the danger of gas leaks, explosion, and fire, please...

Owners Manual
Page 21
...feet ( 16.8 m) 1 47 feet (14.3 m) 2 41 feet (12.5 m) 3 30 feet (9.1 m) 4 22 feet (6.7 m) NOTE : Deduct 6 feet (1.8 m) for your new dryer. 3. Make sure to prevent back-draft when the dryer is acceptable. Secure all joints with plastic or thin foil ducting. DO NOT use sheet metal screws on exhaust pipe joints... of exhaust pipe must be kept as short as an attic, wall, ceiling, crawl space, chimney, gas vent, or concealed space of fire, DO NOT exhaust the dryer with duct tape. 5. Following are not provided with the dryer and you should be four inches (10.2 cm) in use. 2.
...feet ( 16.8 m) 1 47 feet (14.3 m) 2 41 feet (12.5 m) 3 30 feet (9.1 m) 4 22 feet (6.7 m) NOTE : Deduct 6 feet (1.8 m) for your new dryer. 3. Make sure to prevent back-draft when the dryer is acceptable. Secure all joints with plastic or thin foil ducting. DO NOT use sheet metal screws on exhaust pipe joints... of exhaust pipe must be kept as short as an attic, wall, ceiling, crawl space, chimney, gas vent, or concealed space of fire, DO NOT exhaust the dryer with duct tape. 5. Following are not provided with the dryer and you should be four inches (10.2 cm) in use. 2.

Owners Manual
Page 23
...etely remove oil, Do not dry anYthing that has ever had anything that has ever had any type of this dryer. Keep flammable mate rials and vapors: suc h as gas°line! Please refer to person, read this entire manual, including the Important Safety Instructions, before or after ... want. Important Warning: To reduce the risk of fire, electric shock, or injury to specific sections of oil on a clothesline orby using your new dryer. Turn the knob to follow these !nstructions Ca n result in the display. away fr° m d rye r. Clean lint screen before operating ...
...etely remove oil, Do not dry anYthing that has ever had anything that has ever had any type of this dryer. Keep flammable mate rials and vapors: suc h as gas°line! Please refer to person, read this entire manual, including the Important Safety Instructions, before or after ... want. Important Warning: To reduce the risk of fire, electric shock, or injury to specific sections of oil on a clothesline orby using your new dryer. Turn the knob to follow these !nstructions Ca n result in the display. away fr° m d rye r. Clean lint screen before operating ...
Owners Manual
Page 29
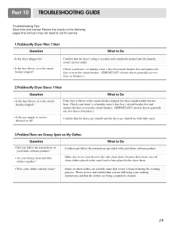
...the washing process, Please reyiew and Confirm that YOUam following pages first and you drying clean and dirly clothes together? Confirm that the house gas shutoff and the dryer gas shutoff are both fully open. 3.Problem:There are be!ng comp!e!e!y c!e_ed 29 Stains on the following you r washing !ns!mcfio...with your home's or laundry room s A se box/circuit breaker box and replace the fuse or reset the circuit breaker. (IMPORTANT: electric dryers generally use your dryer to dry only clean items, because dirty items can soil cle_m clothes placed in the same load or later placed in the...
...the washing process, Please reyiew and Confirm that YOUam following pages first and you drying clean and dirly clothes together? Confirm that the house gas shutoff and the dryer gas shutoff are both fully open. 3.Problem:There are be!ng comp!e!e!y c!e_ed 29 Stains on the following you r washing !ns!mcfio...with your home's or laundry room s A se box/circuit breaker box and replace the fuse or reset the circuit breaker. (IMPORTANT: electric dryers generally use your dryer to dry only clean items, because dirty items can soil cle_m clothes placed in the same load or later placed in the...
Owners Manual
Page 30
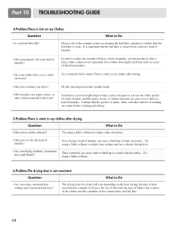
... you overload your lint filter full? Please refer to the mtmual section on the heat setting, the type of heat used (electric, natural or LP gas), the size of the load, the type of fabrics, the wetness of the clothes and the condition of the exhaust ducts and lint filer. 3O... clothes that the lint filter is staticin my clothesafter drying J,! • Did you use t:abric softener? 4.Problem:There is Linton my Clothes • Is your dryer? • Did you place any paper, tissue, or other articles of clothing are empty before each new load of laundry. • Did you properly sort...
... you overload your lint filter full? Please refer to the mtmual section on the heat setting, the type of heat used (electric, natural or LP gas), the size of the load, the type of fabrics, the wetness of the clothes and the condition of the exhaust ducts and lint filer. 3O... clothes that the lint filter is staticin my clothesafter drying J,! • Did you use t:abric softener? 4.Problem:There is Linton my Clothes • Is your dryer? • Did you place any paper, tissue, or other articles of clothing are empty before each new load of laundry. • Did you properly sort...


