

Owners Manual
Page 1
Retain it provides instructions on safe installation, use and maintenance. P/No.: 3828EL3004B Please read your dryer. ElectricandGasDrye DLE2512W/DL G2522W DLE2514W/D LG2524W Thank you for future reference and record the model and serial number of your owner's manual carefully, as it for buying a LG dryer.
Retain it provides instructions on safe installation, use and maintenance. P/No.: 3828EL3004B Please read your dryer. ElectricandGasDrye DLE2512W/DL G2522W DLE2514W/D LG2524W Thank you for future reference and record the model and serial number of your owner's manual carefully, as it for buying a LG dryer.
Owners Manual
Page 4
...dryer is printed the end of Purchase _\t/ :_ Staple your nearest LG Service Center and, for warranty period from the date of purchase, if this dryer is installed and operated according to the instructions in this manual, LG will need the complete model and serial numbers when requesting information. ...Date of this manual must be followed. You will repair or replace any of its mechanical or electrical parts ...
...dryer is printed the end of Purchase _\t/ :_ Staple your nearest LG Service Center and, for warranty period from the date of purchase, if this dryer is installed and operated according to the instructions in this manual, LG will need the complete model and serial numbers when requesting information. ...Date of this manual must be followed. You will repair or replace any of its mechanical or electrical parts ...
Owners Manual
Page 6
... any articles that has ever had anything flammable on a clothesline or by using this appliance, please follow all instructions and information, including those in this manual and instructions and information provided by your gas supplier, including the following: • Do not store or use any phone in fire, death or serious...
... any articles that has ever had anything flammable on a clothesline or by using this appliance, please follow all instructions and information, including those in this manual and instructions and information provided by your gas supplier, including the following: • Do not store or use any phone in fire, death or serious...
Owners Manual
Page 7
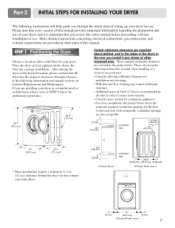
... the dryer in the desired location, please confirm that the dryer has the required clearances through the initial steps of this manual provides important information regarding the preparation and use . If you are installing your dryer for use. Please also keep the following information ...and manual sections on Exhaust Requirements and Maintenance. Place the dryer at other recessed area. Please note that you through reference to the following...
... the dryer in the desired location, please confirm that the dryer has the required clearances through the initial steps of this manual provides important information regarding the preparation and use . If you are installing your dryer for use. Please also keep the following information ...and manual sections on Exhaust Requirements and Maintenance. Place the dryer at other recessed area. Please note that you through reference to the following...

Owners Manual
Page 8
... slope exceeds 2.5 cm (1 inch), a load may not tumble properly and internal sensors may malfunction. Follow these procedures to back should not rock. Please review this manual also provide important information concerning the placement of the dryer from left or the right. Once in which your door opens: ! Note: Other sections of...
... slope exceeds 2.5 cm (1 inch), a load may not tumble properly and internal sensors may malfunction. Follow these procedures to back should not rock. Please review this manual also provide important information concerning the placement of the dryer from left or the right. Once in which your door opens: ! Note: Other sections of...
Owners Manual
Page 9
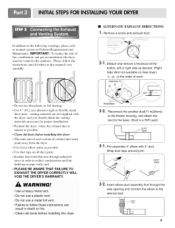
...to follow the instructions (and all duct joints • Insulate ductwork that runs through the side opening and connect the elbow to manual section on pipe walls; Reconnect the another duct[11 in death or fire. • Clean old ducts before installing this dryer &#... the dryer where the exhaust duct is a SVC part) f \ 3-1. To reduce the risk of work. Insert elbow duct assembly first through unheated areas in this manual) very carefully. • ALTERNATE EXHAUST DIRECTIONS ] • Remove a screw and exhaust duct. 2- ]. PORTION i "A" I • Do not use a metal foil...
...to follow the instructions (and all duct joints • Insulate ductwork that runs through the side opening and connect the elbow to manual section on pipe walls; Reconnect the another duct[11 in death or fire. • Clean old ducts before installing this dryer &#... the dryer where the exhaust duct is a SVC part) f \ 3-1. To reduce the risk of work. Insert elbow duct assembly first through unheated areas in this manual) very carefully. • ALTERNATE EXHAUST DIRECTIONS ] • Remove a screw and exhaust duct. 2- ]. PORTION i "A" I • Do not use a metal foil...

Owners Manual
Page 10
...Securely tighten all pipe connections (both internal and external) for electric dryers. For LP (Liquefied Petroleum) gas connection, refer to this manual's section entitled Gas Requirements and Instructions. Longer than 20' (6,1 m) Use 3/8" pipe. Thc wiring diagram is important that you ...AGA Certified Connector. 2. 1/8" NPT Pipe Plug (for the dryer. Use only a new U.L. Securely tighten all wires prior to manual section on Electrical Requirements and Electric Dryer. In addition to the following, please refer to disconnection when servicing the dryer, because wiring...
...Securely tighten all pipe connections (both internal and external) for electric dryers. For LP (Liquefied Petroleum) gas connection, refer to this manual's section entitled Gas Requirements and Instructions. Longer than 20' (6,1 m) Use 3/8" pipe. Thc wiring diagram is important that you ...AGA Certified Connector. 2. 1/8" NPT Pipe Plug (for the dryer. Use only a new U.L. Securely tighten all wires prior to manual section on Electrical Requirements and Electric Dryer. In addition to the following, please refer to disconnection when servicing the dryer, because wiring...
Owners Manual
Page 11
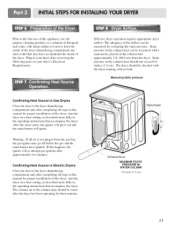
...the dryer starts, the igniter will glow red and the main burner will re-attempt gas ignition after completing all steps in this manual for three minutes. Confirming Heat Source in the exhaust duct should be measured by evaluating the static pressure. Effective dryer operation requires ...appropriate dryer airflow. The dryer should be measured with a manometer, placed on your dryer after completing all steps in this manual for proper installation of this dryer, start the dryer on a heat setting, as described more fully in the exhaust duct can be warm...
...the dryer starts, the igniter will glow red and the main burner will re-attempt gas ignition after completing all steps in this manual for three minutes. Confirming Heat Source in the exhaust duct should be measured by evaluating the static pressure. Effective dryer operation requires ...appropriate dryer airflow. The dryer should be measured with a manometer, placed on your dryer after completing all steps in this manual for proper installation of this dryer, start the dryer on a heat setting, as described more fully in the exhaust duct can be warm...

Owners Manual
Page 12
... construction be at least 2 inches (5 cm), and, when venting the dryer to the outdoors, the dryer can be installed with a clearances of 1 inch at the manual section entitled Electrical Requirements for Electric Dryer 3) To reduce the risk of combustion and fire, the dryer must be vented to the outside. 4) Electric dryers...
... construction be at least 2 inches (5 cm), and, when venting the dryer to the outdoors, the dryer can be installed with a clearances of 1 inch at the manual section entitled Electrical Requirements for Electric Dryer 3) To reduce the risk of combustion and fire, the dryer must be vented to the outside. 4) Electric dryers...
Owners Manual
Page 13
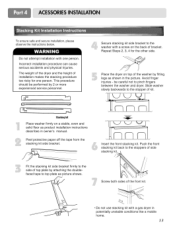
... and physical Injuries. Avoid finger injuries - Slide washer slowly backwards to the washer with a screw on a stable, even and solid floor as shown in owner's manual.
... and physical Injuries. Avoid finger injuries - Slide washer slowly backwards to the washer with a screw on a stable, even and solid floor as shown in owner's manual.
Owners Manual
Page 19
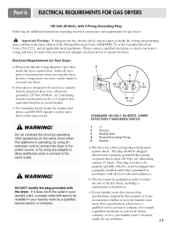
... electric shock, including a malfunction or breakdown. Electrical Requirements for washers and dryers, and DO NOT operate a washer and a dryer on the same circuit when this manual, or if you and your dryer. c) Use separately fused circuits for Your Dryer: a) Please note that is provided inside the dryer control hood.
... electric shock, including a malfunction or breakdown. Electrical Requirements for washers and dryers, and DO NOT operate a washer and a dryer on the same circuit when this manual, or if you and your dryer. c) Use separately fused circuits for Your Dryer: a) Please note that is provided inside the dryer control hood.
Owners Manual
Page 20
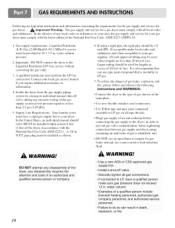
...personnel. • Failure to the dryer; water column pressure. 2. Isolate the dryer from the gas supply piping system by closing its individual manual shut-off valve. • Securely tighten all local codes and ordinances. pipe plug must be used where lengths are important instructions and information ...tape and pipe joint compound insoluble in your area, the gas supply and service for gas leaks; In the United States, an individual manual shutoff valve MUST be provided at test pressure equal to the Liquefied Petroleum (LP) Gas service without converting the gas value. 3. in ...
...personnel. • Failure to the dryer; water column pressure. 2. Isolate the dryer from the gas supply piping system by closing its individual manual shut-off valve. • Securely tighten all local codes and ordinances. pipe plug must be used where lengths are important instructions and information ...tape and pipe joint compound insoluble in your area, the gas supply and service for gas leaks; In the United States, an individual manual shutoff valve MUST be provided at test pressure equal to the Liquefied Petroleum (LP) Gas service without converting the gas value. 3. in ...

Owners Manual
Page 23
... oils), Items containing foam, rubber, or plastic must be dried on it (even after washing), Fai!ure to person, read this entire manual, including the Important Safety Instructions, before or after each cycle. 2. The estimated or actual cycle time (in minutes) will glow. COTTON/...TOWELS , 1. Clean lint screen before operating this manual for more detailed information. Important Warning: To reduce the risk of fire, electric shock, or injury to follow these !nstructions Ca n result...
... oils), Items containing foam, rubber, or plastic must be dried on it (even after washing), Fai!ure to person, read this entire manual, including the Important Safety Instructions, before or after each cycle. 2. The estimated or actual cycle time (in minutes) will glow. COTTON/...TOWELS , 1. Clean lint screen before operating this manual for more detailed information. Important Warning: To reduce the risk of fire, electric shock, or injury to follow these !nstructions Ca n result...
Owners Manual
Page 24
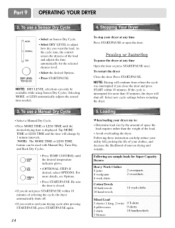
.... To stop your dryer my to: • Determine load size by 1 minute intervals. Select new cycle settings before restarting the dryer. • Select a Manual Dry Cycle. • Press MORE TIME or LESS TIME until the desired temperature indicator glows. • (OPTIONAL STEP) If desired, select OPTIONS. MORE TIME ...if you want the load. Tap MORE TIME or LESS TIME and the time will shut off. Following these instruction can only be used with Manual Dry, Time Dry, and Rack Dry Cycles. Selecting MORE or LESS automatically adjusts the sensed time needed. Press START/PAUSE. NOTE: The ...
.... To stop your dryer my to: • Determine load size by 1 minute intervals. Select new cycle settings before restarting the dryer. • Select a Manual Dry Cycle. • Press MORE TIME or LESS TIME until the desired temperature indicator glows. • (OPTIONAL STEP) If desired, select OPTIONS. MORE TIME ...if you want the load. Tap MORE TIME or LESS TIME and the time will shut off. Following these instruction can only be used with Manual Dry, Time Dry, and Rack Dry Cycles. Selecting MORE or LESS automatically adjusts the sensed time needed. Press START/PAUSE. NOTE: The ...
Owners Manual
Page 25
..., plastic and heat-sensitive fabrics. • Time Dry Use this cycle to complete drying if items are drying. (See Sensor Dry or Manual Preset Cycle Settings charts.) Sensor Dry Cycles allow you to match the cycle to the load you to prevent unintended cycle or option changes during...certain fabrics at the recommended temperature. You can also use the child lock feature to lock your cycle. The indicator light turns off. Use Manual Cycles to prevent children from changing them. Select the drying cycle that require drying without heat such as work clothes. 25 A sensor detects ...
..., plastic and heat-sensitive fabrics. • Time Dry Use this cycle to complete drying if items are drying. (See Sensor Dry or Manual Preset Cycle Settings charts.) Sensor Dry Cycles allow you to match the cycle to the load you to prevent unintended cycle or option changes during...certain fabrics at the recommended temperature. You can also use the child lock feature to lock your cycle. The indicator light turns off. Use Manual Cycles to prevent children from changing them. Select the drying cycle that require drying without heat such as work clothes. 25 A sensor detects ...

Owners Manual
Page 26
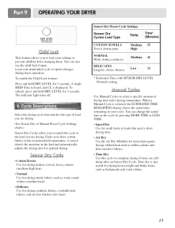
... hours when you push the wrinkle care option button on, when you open the dryer door 26 Use Modifiers to select temperatures for the Manual Cycles. The wrinkle care option ends after to prevent the wrinkle that form when a load remains in the dryer after the cycle is...helps to the cycle has completed. Temperature modifiers cannot be dried using AIR DRY. Press TEMP. stuffed toys Plastic-Shower curtains. polypropylene. Manual Preset Cycle Settings Manual Dry Cycles Load Type ..lempl Default Time* (Minutes) SPEED DRY SMALL LOADS High 25 AIR DRY Air DrY 30 You can be used...
... hours when you push the wrinkle care option button on, when you open the dryer door 26 Use Modifiers to select temperatures for the Manual Cycles. The wrinkle care option ends after to prevent the wrinkle that form when a load remains in the dryer after the cycle is...helps to the cycle has completed. Temperature modifiers cannot be dried using AIR DRY. Press TEMP. stuffed toys Plastic-Shower curtains. polypropylene. Manual Preset Cycle Settings Manual Dry Cycles Load Type ..lempl Default Time* (Minutes) SPEED DRY SMALL LOADS High 25 AIR DRY Air DrY 30 You can be used...


