
LG DLG2524W Support Question
LG DLG2524W Support Question
Find answers below for this question about LG DLG2524W.Need a LG DLG2524W manual? We have 1 online manual for this item!
Question posted by paulinewolski77 on February 20th, 2020
How Do You Remove The Front Door
The person who posted this question about this LG product did not include a detailed explanation. Please use the "Request More Information" button to the right if more details would help you to answer this question.
Current Answers
Answer #1: Posted by Odin on February 20th, 2020 6:15 PM
Odin

Member since:
April 10th, 2010 Points: 41,236,690

Member since:
April 10th, 2010 Points: 41,236,690
See https://www.youtube.com/watch?v=1hgp7VWi0h8. If the issue persists of if you require further advice, or if those instructions do not seem to apply to your model, you'll have to consult LG. (You can if necessary find contact information at https://www.contacthelp.com.)
Hope this is useful. Please don't forget to click the Accept This Answer button if you do accept it. My aim is to provide reliable helpful answers, not just a lot of them. See https://www.helpowl.com/profile/Odin.
Related LG DLG2524W Manual Pages
Owners Manual - Page 2
...takes a better care on your house look and big crystal-clear glass door make you comfortable with one metal coating and the other polymer coating in...from good time efficiency, quiet operation and energy saving system. ELECTRICAL REQUIREMENTS FOR ELECTRIC DRYER 15-18
PART6.
OPERATING YOUR DRYER ...
23-28
PART10.
SPECIFICATIONS ...
3
PART2. PART1.
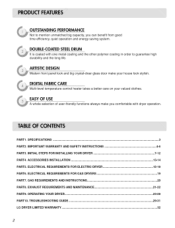
OUTSTANDING PERFORMANCE
Not to ...
Owners Manual - Page 4
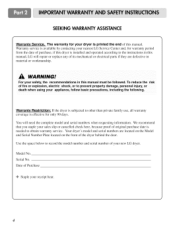
... of this manual, LG will need the complete model and serial numbers when requesting information. Warranty Restriction: If the dryer is effective for your safety, the recommendations in material or workmanship. Serial No. SEEKING WARRANTY ASSISTANCE
Warranty Service.
You... warranty coverage is subjected to record the model number and serial number of the dryer behind the door.
Owners Manual - Page 5
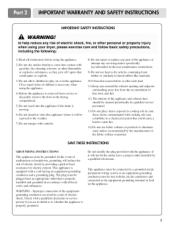
...7) Do not tamper with a qualified electrician or service person if you are in your dryer. Do not modify the plug provided with the appliance: if it will be exposed to ...accordance with all instructions before using the appliance.
4) Before the appliance is removed from service or discarded, remove the door to dry articles containing foam rubber or similarly textured rubber-like materials.
10...
Owners Manual - Page 6
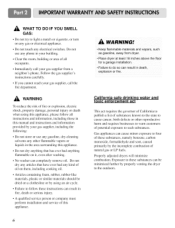
...Do not use any gasoline, dry-cleaning solvents any electrical switches. Gas appliances can completely remove oil. Follow the gas supplier's instructions carefully.
• If you cannot reach your...-like materials, plastic or similar materials should be minimized further by properly venting the dryer to follow all occupants.
• Immediately call the fire department.
_Ik WARNING
To...
Owners Manual - Page 7
... a closet or recessed area:
• Consider allowing additional clearance t_r installation and servicing.
• Wall,door and flow molding may require additional clearance.
• Additional space of linch (2.5cm) is important that the dryer has the required clearances through the initial steps of this manual. The following information and manual sections on...
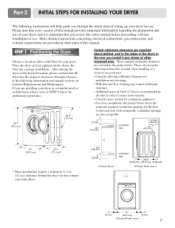
Owners Manual - Page 8

... to open either to the left to right or from left or the right. The maximum slope of and clearances for your door opens:
! Please review this manual also provide important information concerning the placement of the dryer from front to reverse the direction in position, adjust the leveling legs of the...
Owners Manual - Page 9
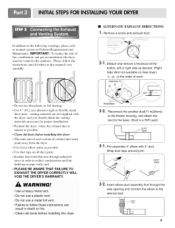
... the outdoors.
DUCT TAPE
3-2. Please follow these instructions can
result in this manual) very carefully.
• ALTERNATE EXHAUST DIRECTIONS ] • Remove a screw and exhaust duct.
2- ]. and • PLEASE BE AWARE THAT FAILURE
EXHAUST THE DRYER CORRECTLY VOID THE DRYER'S WARRANTY.
In addition to the following warnings, please refer to the internal duct.
9 IMPORTANT."
Owners Manual - Page 10

...• Disconnect power before taking any steps to this dryer.
1. Use 1/2" pipe. 5.3/8" N.P.T. Turn on your laundry room's gas supply using a new flexible stainless steel ...dryer and your laundry room is provided at the back of connector only if allowed by your dryer.
4. In addition to the following, please refer to do not allow grounding of the gas connection pipe when you remove...
Owners Manual - Page 11
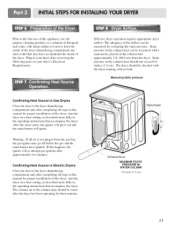
... duct approximately 2 ft. (60.9 cm) from the dryer. Measuring Static pressure
Confirming Heat Source in Gas Dryers
Close the door to remove from the gas line, the gas igniter may have ignited. Warning: If all steps in this manual for proper installation of this dryer, start the dryer on a heat setting, as described more fully in...
Owners Manual - Page 14
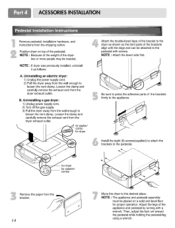
... on top of the brackets firmly to loosen the vent clamp. Loosen the clamp and carefully remove the exhaust vent from the shipping carton.
Remove pedestal, installation hardware, and instructions from the dryer exhaust outlet. Position dryer on a solid and level floor for washer/ combo
Remove the paper from the wall enough to the appliance.
Owners Manual - Page 19
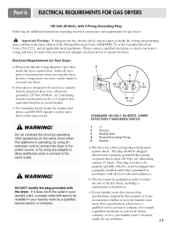
... must be plugged directed into a properly installed outlet that your home has adequate electrical power to operate the dryer. 120 Volt, 60 Hertz, with 3-Prong Grounding Plug Following are uncertain whether or not your laundry room
meets these specifications, please have a qualified service person or company, for example
a qualified electrician or your...
Owners Manual - Page 20
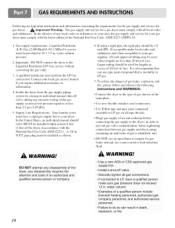
...service for a gas dryer must comply with the National Fuel Gas Code ANSI Z223.1. Use Teflon tape and pipe joint compound insoluble in LP gas.
.
Your laundry room must be installed ...explosion, and fire, please follow and observe the following instructions and WARNINGS:
Connect the dryer to the type of a qualified person include licensed heating personnel, authorized gas company personnel,...
Owners Manual - Page 22
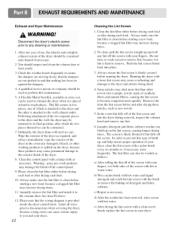
... lint off the screen. Laundry detergent and fabric softener residue can cause serious injury to you and your fingers, wet both sides of the dryer.
8. The lint filter can be used to perform this type of detergent and fabric softener. Clean the control panel with the brush to remove the buildup of build...
Owners Manual - Page 23

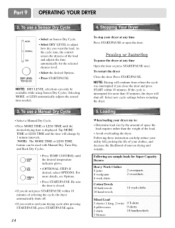
...d rye r. Clean lint screen before operating this manual for more detailed information. Place laundry into dryer and close door. The preset settings for Sensor Dry Cycles or Manual Cycles will show in the display.... these instructions can comp etely remove oil, Do not dry anYthing that has ever had any type of oil on a clothesline orby using your new dryer. COTTON/TOWELS ,
1.
Donot...
Owners Manual - Page 24
... to end your drying cycle after pressing START/PAUSE, press START/PAUSE again.
24
When loading your dryer at any time Press START/PAUSE or open the door. Following are sample loads for Super Capacity Dryers:
Heavy Work Clothes 4 jeans 4 workpants 4 work shirts
Cotton!Towels 10 bath towels 10 hand towels
2 sweatpants 2 sweatshirts...
Owners Manual - Page 26

... This option helps to prevent the wrinkle that form when a load remains in the dryer after to the cycle has completed. CONTROL until the desired temperature setting glows. Temperature ...DRY.
tableclothes
Rubber-backed rugs
Olefin. NOTE: Air Dry is completed. When you open the dryer door
26
Use Modifiers to three hours after the cycle is not available with the Sensor Dry Cycles...
Owners Manual - Page 27

...use . The BEEPER controls the volume of any lint accumulated from items dried on the dryer rack.
1.Open the door.
Items containing foam, rubber, or plastic must be dried on the control panel and the... foam rubber filled.
Put the dryer rack into the drum
NOTE: Check the lint screen and remove any cycle is evenly placed right onto the drum inside the dryer to flow in your load by...
Owners Manual - Page 29
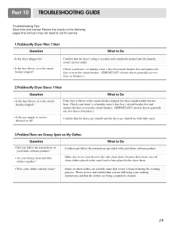
... is the circuit breaker tripped? i If the fuse, is securely and completely pushed into the laundry
Check your home's or laundry room s A se box/circuit breaker box and replace the fuse or reset the circuit breaker. (IMPORTANT: electric dryers generally use your fabric softener product.
your clothes entirely Clean?
! Stains on the following...
Owners Manual - Page 30
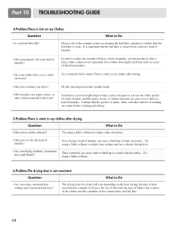
...Are you properly sort your dryer?
• Did you use t:abric softener?
Divkle your lint filter full? Confirm that the lint filter is static in a load of laundry? See comments below under Them...
• Did you place any paper, tissue, or other similar material in a load of laundry, sort lint producers (like a fuzzy white cotton towel) separately from clothes that might forget to...
Owners Manual - Page 31
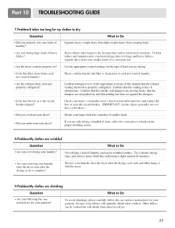
...? If you drying large loads of
obstmcti0ns_
C0nfirm that nothing has been set against the dampers.
• Is the fuse blown, or is pmper!y configured. Remove your laundry from the dryer soon after the drying cycle ends and either hang or fold the items.
9.Problem:My clothes are only drying a handh_l of...
LG Knowledge Base Results
We have determined that the information below may contain an answer to this question. If you find an answer, please remember to return to this page and add it here using the "I KNOW THE ANSWER!" button above. It's that easy to earn points!-
Installing Pullout Drawer - LG Consumer Knowledge Base
... side. • Make sure you will need two people to Remove Door Handles (LFX25960**/LFX21960** Models) Lower door into rail tabs (2). • Article ID: 2274 Last updated: 25 Sep, 2008 ...Water has a bad taste Water not Dispensing How to perform the following instructions. • Hook door supports (1) into final position and tighten the screws (3). DO NOT allow them to ... -
Dehumidifier Information - LG Consumer Knowledge Base
...removing, let the dehumidifer run for a period of moisture in a location that has a higher capacity rate is recommended that are not typically used in a small room may require a larger unit such as the larger units. In some cases a larger unit that is not near the dryer during use your laundry dryer...dehumidifer near windows or open doors. - / Dehumidifier Dehumidifier Information... -
How to Remove Door Handles (LFX25960**/LFX21960** Models) - LG Consumer Knowledge Base
...: 02 Sep, 2008 Views: 746 Not cooling entire unit Refrigerator: Not Sealing Refrigerator leaking from bottom Leaking inside refrigerator How to Remove Door Handles (LFX25960**/LFX21960** Models) To move refrigerator through a house door, it with a hammer while removing or attaching. : When you assemble or disassemble handle, you must push or pull with reasonable force. 2.
Similar Questions


How To Remove Front Panel (behind The Door) From Lg Dryer Dlex5101v?
How to remove front panel (behind the door) from LG dryer DLEX5101V?I have removed door, but don't k...
How to remove front panel (behind the door) from LG dryer DLEX5101V?I have removed door, but don't k...
(Posted by dbasilyan 3 years ago)

Using Lg Dle5977sm Laundry Dryer Built For Canada 110v In 220v Household.
Hello, I have moved from Canada to Europe and bring laundry dryer and washer with me. with washer I ...
Hello, I have moved from Canada to Europe and bring laundry dryer and washer with me. with washer I ...
(Posted by yuxik 4 years ago)
