Owners Manual
Page 2
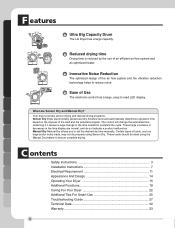
... time display are Sensor Dry and Manual Dry? These large increases or decreases in the time needed to complete the cycle. C ontents F Safety Instructions 3 Installation Instructions 7 Electrical Requirement 11 Appearance And Design 14 Operating Your Dryer 15 Additional Functions 18 Caring For Your Dryer 22 Additional Tips For Smart Use 25 Troubleshooting Guide 27 Technical Data 32 Warranty 33 2 Manual Dry Manual Dry allows you to reduce noise. Ease of an efficient air flow system and an optimized heater. Reduced drying time Drying time...
... time display are Sensor Dry and Manual Dry? These large increases or decreases in the time needed to complete the cycle. C ontents F Safety Instructions 3 Installation Instructions 7 Electrical Requirement 11 Appearance And Design 14 Operating Your Dryer 15 Additional Functions 18 Caring For Your Dryer 22 Additional Tips For Smart Use 25 Troubleshooting Guide 27 Technical Data 32 Warranty 33 2 Manual Dry Manual Dry allows you to reduce noise. Ease of an efficient air flow system and an optimized heater. Reduced drying time Drying time...
Owners Manual
Page 3
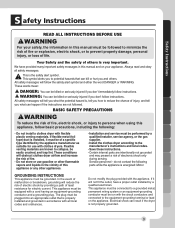
... install a clothes dryer with clothes dryers. Your Safety and the safety of least resistance for use gasoline or other flammable vapors and liquids in this appliance or any other appliances. • Installation and service must be of a specific type identified by a qualified installer, service agency, or the gas supplier. • Install the clothes dryer according to the manufacturer's instructions and local codes. • Save these instructions. • Certain internal parts...
... install a clothes dryer with clothes dryers. Your Safety and the safety of least resistance for use gasoline or other flammable vapors and liquids in this appliance or any other appliances. • Installation and service must be of a specific type identified by a qualified installer, service agency, or the gas supplier. • Install the clothes dryer according to the manufacturer's instructions and local codes. • Save these instructions. • Certain internal parts...
Owners Manual
Page 4
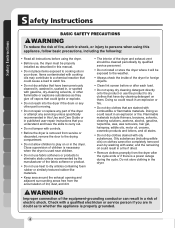
...; Always check the inside of the dryer for foreign objects. • Clean lint screen before using the dryer. • Before use, the dryer must be properly installed as described in this Use and Care Guide or in published user-repair instructions that you are in a fire if dried. • Remove clothes promptly from the dryer after each load. • Do not spray dry cleaning detergent directly onto the product or use the product to dry clothes that...
...; Always check the inside of the dryer for foreign objects. • Clean lint screen before using the dryer. • Before use, the dryer must be properly installed as described in this Use and Care Guide or in published user-repair instructions that you are in a fire if dried. • Remove clothes promptly from the dryer after each load. • Do not spray dry cleaning detergent directly onto the product or use the product to dry clothes that...
Owners Manual
Page 5
... ALL INSTRUCTIONS BEFORE USE 5 Failure to follow this Owner's Guide. Failure to avoid electrical overload. Electrical shock can cause serious injury, fire, electrical shock, or death. • Connect to a properly rated, protected, and sized power circuit to do not install the dryer in this warning can result if the dryer is not properly grounded. • Install and store the dryer where it will not be exposed to temperatures...
... ALL INSTRUCTIONS BEFORE USE 5 Failure to follow this Owner's Guide. Failure to avoid electrical overload. Electrical shock can cause serious injury, fire, electrical shock, or death. • Connect to a properly rated, protected, and sized power circuit to do not install the dryer in this warning can result if the dryer is not properly grounded. • Install and store the dryer where it will not be exposed to temperatures...
Owners Manual
Page 6
... power cord. Failure to do so can be careful not to make sure the outlet is not properly grounded. To prevent personal injury or damage to the installation instructions in electrical shock or injury. • Refer to the dryer, the electrical power cord must be plugged into a properly grounded outlet. • For personal safety, this manual for specific electrical requirements for your dryer by the incomplete combustion of natural gas...
... power cord. Failure to do so can be careful not to make sure the outlet is not properly grounded. To prevent personal injury or damage to the installation instructions in electrical shock or injury. • Refer to the dryer, the electrical power cord must be plugged into a properly grounded outlet. • For personal safety, this manual for specific electrical requirements for your dryer by the incomplete combustion of natural gas...
Owners Manual
Page 8
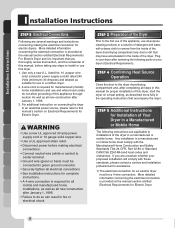
... the manual section entitled Electrical Requirements for Installation of Your Dryer in a manufactured or mobile home. For additional instruction on connecting the dryer to an electrical power source, please refer to this dryer, start the dryer on Electrical Requirements for manufactured (mobile) home installations and use in the inside of the dryer drum/drying compartment any steps to install or use this appliance, use of this dryer. 1. listed No. 10 (copper wire only) conductor power supply cord kit rated 240...
... the manual section entitled Electrical Requirements for Installation of Your Dryer in a manufactured or mobile home. For additional instruction on connecting the dryer to an electrical power source, please refer to this dryer, start the dryer on Electrical Requirements for manufactured (mobile) home installations and use in the inside of the dryer drum/drying compartment any steps to install or use this appliance, use of this dryer. 1. listed No. 10 (copper wire only) conductor power supply cord kit rated 240...
Owners Manual
Page 9
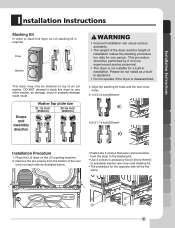
... Instructions Stacking Kit In order to stack this dryer on any other washer, as damage, injury or property damage could result. 3. DO NOT attempt to assemble washer rear cover and stacking kit. • The procedure for a built-in accessory box [0.6inch(16mm)] to stack this dryer an LG stacking kit is disassembled. Remove the two screws from the dryer to the stacking kit. • Use 4 screws in installation. Place the LG dryer on top of an LG washer. Dryer Washer...
... Instructions Stacking Kit In order to stack this dryer on any other washer, as damage, injury or property damage could result. 3. DO NOT attempt to assemble washer rear cover and stacking kit. • The procedure for a built-in accessory box [0.6inch(16mm)] to stack this dryer an LG stacking kit is disassembled. Remove the two screws from the dryer to the stacking kit. • Use 4 screws in installation. Place the LG dryer on top of an LG washer. Dryer Washer...
Owners Manual
Page 11
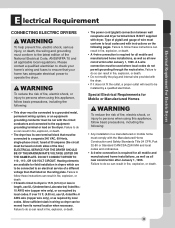
... installations, as well as required by local codes. Electrical Requirement For Electric Dryers E lectrical Requirement CONNECTING ELECTRIC DRYERS WARNING To help prevent fire, electric shock, serious injury, or death, the wiring and grounding must be fused on both sides of the line.) ELECTRICAL SERVICE FOR THE DRYER SHOULD BE OF THE MAXIMUM RATE VOLTAGE LISTED ON THE NAMEPLATE. WARNING F • The power cord (pigtail) connection between wall receptacle and dryer terminal block IS NOT supplied with instructions...
... installations, as well as required by local codes. Electrical Requirement For Electric Dryers E lectrical Requirement CONNECTING ELECTRIC DRYERS WARNING To help prevent fire, electric shock, serious injury, or death, the wiring and grounding must be fused on both sides of the line.) ELECTRICAL SERVICE FOR THE DRYER SHOULD BE OF THE MAXIMUM RATE VOLTAGE LISTED ON THE NAMEPLATE. WARNING F • The power cord (pigtail) connection between wall receptacle and dryer terminal block IS NOT supplied with instructions...

Owners Manual
Page 12
... most locations. Connect neutral wire (white) of power cord to the left and right terminal block screws. 3. It is the customer's responsibility to ensure that all terminal block nuts are on tight and power cord is tightened and be sure that the installation meets all local codes. 4-Prong plug 1. Electrical Requirement For Electric Dryers E lectrical Requirement Review the following options to determine the appropriate electrical F connection for your home: 4-wire receptacle (NEMA type14-30R) Use the instructions...
... most locations. Connect neutral wire (white) of power cord to the left and right terminal block screws. 3. It is the customer's responsibility to ensure that all terminal block nuts are on tight and power cord is tightened and be sure that the installation meets all local codes. 4-Prong plug 1. Electrical Requirement For Electric Dryers E lectrical Requirement Review the following options to determine the appropriate electrical F connection for your home: 4-wire receptacle (NEMA type14-30R) Use the instructions...
Owners Manual
Page 16
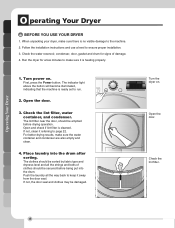
.... Turn power on . Check the lint filter, water container, and condenser. Open and check if lint filter is ready set to keep it referring to ensure proper installation. 3. Check the water reservoir, condenser, door, gasket and drum for a few minutes to make sure there is heating properly. 1. Run the dryer for signs of clothes should be damaged. First, press the Power button. Open the door. 3. The clothes should be secured before drying operation. F Turn the dryer on . Open the door. The lint filter...
.... Turn power on . Check the lint filter, water container, and condenser. Open and check if lint filter is ready set to keep it referring to ensure proper installation. 3. Check the water reservoir, condenser, door, gasket and drum for a few minutes to make sure there is heating properly. 1. Run the dryer for signs of clothes should be damaged. First, press the Power button. Open the door. 3. The clothes should be secured before drying operation. F Turn the dryer on . Open the door. The lint filter...
Owners Manual
Page 17
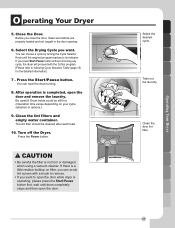
... using a vacuum cleaner. Press the Power button. Take out the laundry. Clean the door lint filter. 17 Operating Your Dryer You can choose a cycle by turning the Cycle Selector Knob until drum completely stops and then open the door. Drum inside could be cleaned after each load. 10. Close the Door. Before you want . Be careful! If there is operating, please press the Start/Pause button first, wait until the required program reaches to remove...
... using a vacuum cleaner. Press the Power button. Take out the laundry. Clean the door lint filter. 17 Operating Your Dryer You can choose a cycle by turning the Cycle Selector Knob until drum completely stops and then open the door. Drum inside could be cleaned after each load. 10. Close the Door. Before you want . Be careful! If there is operating, please press the Start/Pause button first, wait until the required program reaches to remove...
Owners Manual
Page 19
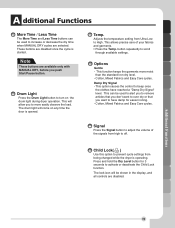
... Care cycles. Damp Dry Signal - Cotton, Mixed Fabircs and Easy Care cycles. Adjusts the temperature setting from being changed while the dryer is operating. Options Gentle - This function keeps the garments more easily observe the load. Press and hold the Dry Level button for easier ironing. - The lock icon will come on the drum light during dryer operation. This will allow you to turn on any time the door is started. Drum Light Press the Drum Light button...
... Care cycles. Damp Dry Signal - Cotton, Mixed Fabircs and Easy Care cycles. Adjusts the temperature setting from being changed while the dryer is operating. Options Gentle - This function keeps the garments more easily observe the load. Press and hold the Dry Level button for easier ironing. - The lock icon will come on the drum light during dryer operation. This will allow you to turn on any time the door is started. Drum Light Press the Drum Light button...
Owners Manual
Page 22
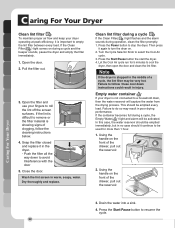
... these cool down to turn the dryer on during a cycle and the beeper sounds, pause the dryer and empty the filter immediately. 1. Close the door. Dry thoroughly and replace. Empty water container If your dryer is not connected to a household drain, then the water reservoir will be used for 5 minutes to cool the dryer, then open the door and clean the lint filter. Press the Start/Pause button to remove or the filter material is...
... these cool down to turn the dryer on during a cycle and the beeper sounds, pause the dryer and empty the filter immediately. 1. Close the door. Dry thoroughly and replace. Empty water container If your dryer is not connected to a household drain, then the water reservoir will be used for 5 minutes to cool the dryer, then open the door and clean the lint filter. Press the Start/Pause button to remove or the filter material is...
Owners Manual
Page 24
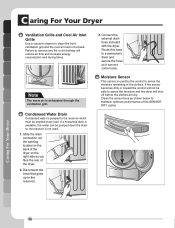
... air flow and increase energy consumption and drying times. 3. Clean the sensor bars as you face the rear of the SENSOR DRY cycles. If a household drain is available, this hose to maintain optimum performance of the dryer. 2. Route this water can not come loose. Condensed Water Drain Condensed water is not used by the control to the reservoir. C aring For Your Dryer F Ventilation Grille and Cool Air Inlet Grille Use a vacuum cleaner to remove...
... air flow and increase energy consumption and drying times. 3. Clean the sensor bars as you face the rear of the SENSOR DRY cycles. If a household drain is available, this hose to maintain optimum performance of the dryer. 2. Route this water can not come loose. Condensed Water Drain Condensed water is not used by the control to the reservoir. C aring For Your Dryer F Ventilation Grille and Cool Air Inlet Grille Use a vacuum cleaner to remove...
Owners Manual
Page 26
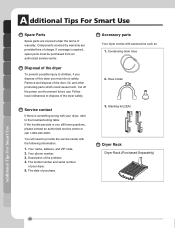
... the power cord to dispose of the dryer safely. 2. Hose holder Service contact If there is expired, spare parts must do so safely. A dditional Tips For Smart Use Spare Parts F Accessory parts Spare parts are provided free of charge. Components covered by warranty are covered under the terms of warranty. If coverage is something wrong with the following information: 1. Your dryer comes with accessories such as 1. Remove and...
... the power cord to dispose of the dryer safely. 2. Hose holder Service contact If there is expired, spare parts must do so safely. A dditional Tips For Smart Use Spare Parts F Accessory parts Spare parts are provided free of charge. Components covered by warranty are covered under the terms of warranty. If coverage is something wrong with the following information: 1. Your dryer comes with accessories such as 1. Remove and...
Owners Manual
Page 27
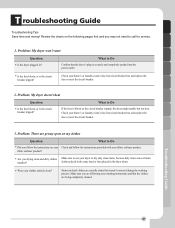
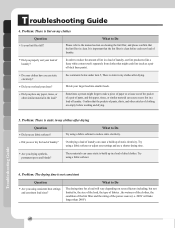
...'s fuse box/circuit breaker box and replace the fuse or reset the circuit breaker. 2. What to Do Confirm that the clothes are greasy spots on the following your fabric softener product. Problem: My dryer doesn't heat Question Is the fuse blown, or is the circuit breaker tripped? clothes placed in the same load or later placed in ? Troubleshooting Guide 27 Problem: My dryer won't start Question Is the dryer plugged in the dryer drum. What to dry...
...'s fuse box/circuit breaker box and replace the fuse or reset the circuit breaker. 2. What to Do Confirm that the clothes are greasy spots on the following your fabric softener product. Problem: My dryer doesn't heat Question Is the fuse blown, or is the circuit breaker tripped? clothes placed in the same load or later placed in ? Troubleshooting Guide 27 Problem: My dryer won't start Question Is the dryer plugged in the dryer drum. What to dry...
Owners Manual
Page 28
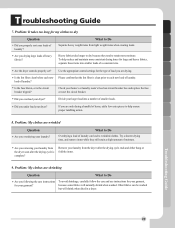
... to , the size of the load, the type of fabrics , the wetness of the clothes, the condition of the lint filter and the rating of the power source (i.e. 208V will take a piece of paper or a tissue out of the pocket of a pair of laundry? Do your settings and use fabric softener? Did you using a fabric softener. 6. Problem: The drying time is clean. T roubleshooting Guide 4. See comments...
... to , the size of the load, the type of fabrics , the wetness of the clothes, the condition of the lint filter and the rating of the power source (i.e. 208V will take a piece of paper or a tissue out of the pocket of a pair of laundry? Do your settings and use fabric softener? Did you using a fabric softener. 6. Problem: The drying time is clean. T roubleshooting Guide 4. See comments...
Owners Manual
Page 29
... drying. Troubleshooting Guide 29 Use the appropriate control settings for your laundry? Try a shorter drying time, and remove items while they tend to retain more consistent drying times for my clothes to dry F Question Did you under load your dryer? Other fabrics can lead to help reduce and maintain more moisture. Did you properly sort your home's or laundry room's fuse box/circuit breaker box and replace the fuse or reset...
... drying. Troubleshooting Guide 29 Use the appropriate control settings for your laundry? Try a shorter drying time, and remove items while they tend to retain more consistent drying times for my clothes to dry F Question Did you under load your dryer? Other fabrics can lead to help reduce and maintain more moisture. Did you properly sort your home's or laundry room's fuse box/circuit breaker box and replace the fuse or reset...

Owners Manual
Page 33
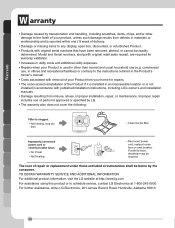
.... repair or replacement of fuses or correction of wiring or plumbing, or correction of unauthorized repairs/installation. • Failure of the product to perform during the warranty period set forth below, LG will at its option repair or replace the product. Proof of original retail purchase is required to obtain warranty service under normal home use of accessories, components, or consumable cleaning products that vary from operating...
.... repair or replacement of fuses or correction of wiring or plumbing, or correction of unauthorized repairs/installation. • Failure of the product to perform during the warranty period set forth below, LG will at its option repair or replace the product. Proof of original retail purchase is required to obtain warranty service under normal home use of accessories, components, or consumable cleaning products that vary from operating...
Owners Manual
Page 34
Improper repair includes use of parts not approved or specified by LG. • The warranty also does not cover the following: The cost of delivery. • Damage or missing items to any display, open box, discounted, or refurbished Product. • Products with published installation instructions, including LG's owner's and installation manuals. • Damage resulting from defects in other damage to schedule service, contact LG Electronics at...
Improper repair includes use of parts not approved or specified by LG. • The warranty also does not cover the following: The cost of delivery. • Damage or missing items to any display, open box, discounted, or refurbished Product. • Products with published installation instructions, including LG's owner's and installation manuals. • Damage resulting from defects in other damage to schedule service, contact LG Electronics at...


