
Owners Manual
Page 1
DLEC888W MFL67653090 OWNER'S MANUAL DRYER Please read this manual carefully before operating your dryer and retain it for future reference.
DLEC888W MFL67653090 OWNER'S MANUAL DRYER Please read this manual carefully before operating your dryer and retain it for future reference.
Owners Manual
Page 2
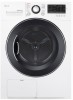
... complete the cycle. C ontents F Safety Instructions 3 Installation Instructions 7 Electrical Requirement 11 Appearance And Design 14 Operating Your Dryer 15 Additional Functions 18 Caring For Your Dryer 22 Additional Tips For Smart Use 25 Troubleshooting Guide 27 Technical Data 32 Warranty 33 2 Your...set the desired dry time manually. Manual Dry Manual Dry allows you to read LED display. F eatures F Ultra Big Capacity Drum The LG Dryer has a large capacity. Innovative Noise Reduction The optimized design of loads, such as large and/or bulky loads, may not dry properly ...
... complete the cycle. C ontents F Safety Instructions 3 Installation Instructions 7 Electrical Requirement 11 Appearance And Design 14 Operating Your Dryer 15 Additional Functions 18 Caring For Your Dryer 22 Additional Tips For Smart Use 25 Troubleshooting Guide 27 Technical Data 32 Warranty 33 2 Your...set the desired dry time manually. Manual Dry Manual Dry allows you to read LED display. F eatures F Ultra Big Capacity Drum The LG Dryer has a large capacity. Innovative Noise Reduction The optimized design of loads, such as large and/or bulky loads, may not dry properly ...
Owners Manual
Page 3
... venting materials. This appliance must be performed by a qualified installer, service agency, or the gas supplier. • Install the clothes dryer according to the manufacturer's instructions and local codes. • Save these instructions. • Certain internal parts are intentionally not grounded and...the potential hazard is installed, it will follow instructions. In the event of malfunction or breakdown, grounding will obstruct clothes dryer airflow and increase the risk of least resistance for use gasoline or other appliances. • Installation and service must be...
... venting materials. This appliance must be performed by a qualified installer, service agency, or the gas supplier. • Install the clothes dryer according to the manufacturer's instructions and local codes. • Save these instructions. • Certain internal parts are intentionally not grounded and...the potential hazard is installed, it will follow instructions. In the event of malfunction or breakdown, grounding will obstruct clothes dryer airflow and increase the risk of least resistance for use gasoline or other appliances. • Installation and service must be...
Owners Manual
Page 4
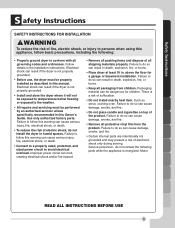
... stained with cooking oils may contribute to a chemical reaction that you are stained with water, and the remaining oil could result in the dryer. Safety Instructions S afety Instructions F BASIC SAFETY PRECAUTIONS WARNING To reduce the risk of fire, electric shock, or injury to persons when ... remove the door to the drying compartment. • Do not allow children to eliminate static unless recommended by the manufacturer of the dryer and exhaust vent should be cleaned periodically by washing with combustible or flammable materials. Do not store clothing in an explosion or fire...
... stained with cooking oils may contribute to a chemical reaction that you are stained with water, and the remaining oil could result in the dryer. Safety Instructions S afety Instructions F BASIC SAFETY PRECAUTIONS WARNING To reduce the risk of fire, electric shock, or injury to persons when ... remove the door to the drying compartment. • Do not allow children to eliminate static unless recommended by the manufacturer of the dryer and exhaust vent should be cleaned periodically by washing with combustible or flammable materials. Do not store clothing in an explosion or fire...
Owners Manual
Page 5
... sized power circuit to avoid electrical overload. Failure to follow this warning can result in death, explosion, fire, or burns. • Place dryer at least 18 in death, explosion, fire, or burns. • Keep all protective vinyl film from children. Service personnel - Use only ... fire, electrical shock, or death. • To reduce the risk of electronic shock only during serving. do so can result if the dryer is a risk of suffocation. • Do not install nearby heat item. Safety Instructions S afety Instructions F SAFETY INSTRUCTIONS FOR INSTALLATION WARNING ...
... sized power circuit to avoid electrical overload. Failure to follow this warning can result in death, explosion, fire, or burns. • Place dryer at least 18 in death, explosion, fire, or burns. • Keep all protective vinyl film from children. Service personnel - Use only ... fire, electrical shock, or death. • To reduce the risk of electronic shock only during serving. do so can result if the dryer is a risk of suffocation. • Do not install nearby heat item. Safety Instructions S afety Instructions F SAFETY INSTRUCTIONS FOR INSTALLATION WARNING ...
Owners Manual
Page 6
...damaged. Safety Instructions S afety Instructions F WARNING To reduce the risk of fire, electric shock, or injury to persons when using this dryer must be properly grounded. Failure to follow these substances, namely benzene, carbon monoxide, formaldehyde, and soot, caused primarily by a qualified...not use a cord that matches the rating plate. This will minimize incomplete combustion. Gas appliances can cause minor exposure to the dryer from overheated wires. • Never unplug your model. To prevent personal injury or damage to follow basic precautions, including the...
...damaged. Safety Instructions S afety Instructions F WARNING To reduce the risk of fire, electric shock, or injury to persons when using this dryer must be properly grounded. Failure to follow these substances, namely benzene, carbon monoxide, formaldehyde, and soot, caused primarily by a qualified...not use a cord that matches the rating plate. This will minimize incomplete combustion. Gas appliances can cause minor exposure to the dryer from overheated wires. • Never unplug your model. To prevent personal injury or damage to follow basic precautions, including the...
Owners Manual
Page 7
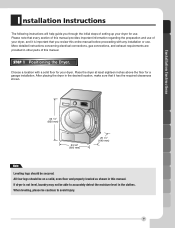
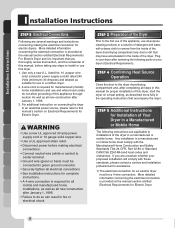
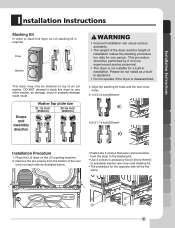
...provides important information regarding the preparation and use . When leveling, please be secured. Place the dryer at least eighteen inches above the floor for use of your dryer, and it has the required clearances shown. More detailed instructions concerning electrical connections, gas connections,... and exhaust requirements are provided in the desired location, make sure that you through the initial steps of setting up your dryer. All four legs should be cautious to accurately detect the moisture level in this manual. I nstallation Instructions F The following instructions...
...provides important information regarding the preparation and use . When leveling, please be secured. Place the dryer at least eighteen inches above the floor for use of your dryer, and it has the required clearances shown. More detailed instructions concerning electrical connections, gas connections,... and exhaust requirements are provided in the desired location, make sure that you through the initial steps of setting up your dryer. All four legs should be cautious to accurately detect the moisture level in this manual. I nstallation Instructions F The following instructions...
Owners Manual
Page 8
... ordinances. More detailed information concerning the electrical connection is provided at the manual section entitled Electrical Requirements For Electric Dryer and it is important that you are several warnings and instructions concerning making electrical connections. • Connect neutral... ground connector. • Securely tighten all steps in this manual for proper installation of Your Dryer in a clothes dryer. 2. 4-wire cord is required for Electric Dryer. Additional Instructions for Installation of this manual's section on your proposed installation will comply with a...
... ordinances. More detailed information concerning the electrical connection is provided at the manual section entitled Electrical Requirements For Electric Dryer and it is important that you are several warnings and instructions concerning making electrical connections. • Connect neutral... ground connector. • Securely tighten all steps in this manual for proper installation of Your Dryer in a clothes dryer. 2. 4-wire cord is required for Electric Dryer. Additional Instructions for Installation of this manual's section on your proposed installation will comply with a...
Owners Manual
Page 9
...screws that were removed earlier from the bottom of an LG washer. This procedure should be the same. 9 Place the LG dryer on each side as a builtin appliance. • Do not operate if the dryer is not suitable for one person. Dryer Washer F WARNING • Incorrect installation can cause ...serious accidents. • The weight of the dryer and the height of installation ...
...screws that were removed earlier from the bottom of an LG washer. This procedure should be the same. 9 Place the LG dryer on each side as a builtin appliance. • Do not operate if the dryer is not suitable for one person. Dryer Washer F WARNING • Incorrect installation can cause ...serious accidents. • The weight of the dryer and the height of installation ...
Owners Manual
Page 10
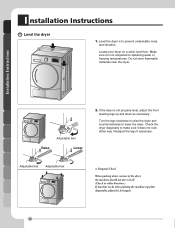
...machine rocks when pushing the machine top plate diagonally, adjust the feet again. 10 If the dryer is not properly level, adjust the front leveling legs up and down corners of the dryer, the machine should not move at all. (Check in either way. Adjustable feet Adjustable feet...necessary. Do not store flammable materials near the dryer. Turn the legs clockwise to raise the dryer and counterclockwise to prevent undesirable noise and vibration. Level the dryer is not subjected to splashing water or freezing temperatures. Check the dryer diagonally to make sure it is to lower ...
...machine rocks when pushing the machine top plate diagonally, adjust the feet again. 10 If the dryer is not properly level, adjust the front leveling legs up and down corners of the dryer, the machine should not move at all. (Check in either way. Adjustable feet Adjustable feet...necessary. Do not store flammable materials near the dryer. Turn the legs clockwise to raise the dryer and counterclockwise to prevent undesirable noise and vibration. Level the dryer is not subjected to splashing water or freezing temperatures. Check the dryer diagonally to make sure it is to lower ...
Owners Manual
Page 11
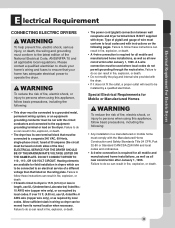
... block that your home's wiring and fuses to ensure that must be installed by local codes. Allow sufficient slack in wiring so dryer can result in fire, explosion, or death. • Do not modify the plug and internal wire provided with the Manufactured Home... power to follow basic precautions, including the following pages. WARNING F • The power cord (pigtail) connection between wall receptacle and dryer terminal block IS NOT supplied with the circuit conductors and connected to persons when using this appliance, follow these instructions can result in fire...
... block that your home's wiring and fuses to ensure that must be installed by local codes. Allow sufficient slack in wiring so dryer can result in fire, explosion, or death. • Do not modify the plug and internal wire provided with the Manufactured Home... power to follow basic precautions, including the following pages. WARNING F • The power cord (pigtail) connection between wall receptacle and dryer terminal block IS NOT supplied with the circuit conductors and connected to persons when using this appliance, follow these instructions can result in fire...

Owners Manual
Page 12
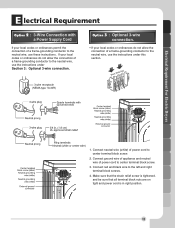
... are on tight and power cord is in right position. 12 Connect red and black wire to center screw. 4. Electrical Requirement For Electric Dryers E lectrical Requirement Review the following options to determine the appropriate electrical F connection for your home: 4-wire receptacle (NEMA type14-30R) Use...a Power supply cord. • lf your local codes or ordinances do not allow the use of a 3 wire connection, or you are installing your dryer in a mobile home, you must use a 4wire connection. 3-wire receptacle (NEMA type10-30R) Use the instructions in product damage, fire, injury or ...
... are on tight and power cord is in right position. 12 Connect red and black wire to center screw. 4. Electrical Requirement For Electric Dryers E lectrical Requirement Review the following options to determine the appropriate electrical F connection for your home: 4-wire receptacle (NEMA type14-30R) Use...a Power supply cord. • lf your local codes or ordinances do not allow the use of a 3 wire connection, or you are installing your dryer in a mobile home, you must use a 4wire connection. 3-wire receptacle (NEMA type10-30R) Use the instructions in product damage, fire, injury or ...
Owners Manual
Page 13
... are on tight and power cord is tightened. and be sure that the strain relief screw is in right position. 13 Electrical Requirement For Electric Dryers 1. Connect red and black wire to the neutral wire, use the instructions under this section. lf your local codes or ordinances do not allow the...
... are on tight and power cord is tightened. and be sure that the strain relief screw is in right position. 13 Electrical Requirement For Electric Dryers 1. Connect red and black wire to the neutral wire, use the instructions under this section. lf your local codes or ordinances do not allow the...
Owners Manual
Page 15
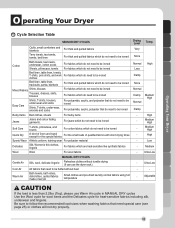
Operating Your Dryer O perating Your Dryer F Cycle Selection Table SENSOR DRY CYCLES Quilts, small comforters and blankets Terry towels, tea towels, towels, bed linen For thick and quilted fabrics For thick ... and towel except for heat-sensitive fabrics including silk, underwear and lingerie. Adjustable CAUTION If the load is less than 2.2lbs (1kg), please use the dryer rack.) -
Operating Your Dryer O perating Your Dryer F Cycle Selection Table SENSOR DRY CYCLES Quilts, small comforters and blankets Terry towels, tea towels, towels, bed linen For thick and quilted fabrics For thick ... and towel except for heat-sensitive fabrics including silk, underwear and lingerie. Adjustable CAUTION If the load is less than 2.2lbs (1kg), please use the dryer rack.) -
Owners Manual
Page 16
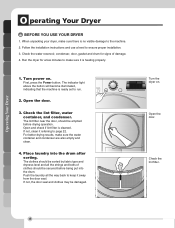
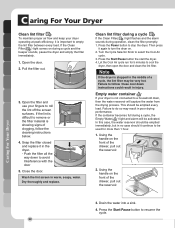
... to make sure the water container and condenser are also empty and clean. 4. F Turn the dryer on . When unpacking your dryer, make sure there is heating properly. 1. Run the dryer for signs of clothes should be damaged. If not, clean it away from the door seal. ... light above the button will become illuminated, indicating that the machine is cleaned. Check the lint filter. 16 Operating Your Dryer O perating Your Dryer BEFORE YOU USE YOUR DRYER 1. Open and check if lint filter is ready set to ensure proper installation. 3. Place laundry into the drum. The...
... to make sure the water container and condenser are also empty and clean. 4. F Turn the dryer on . When unpacking your dryer, make sure there is heating properly. 1. Run the dryer for signs of clothes should be damaged. If not, clean it away from the door seal. ... light above the button will become illuminated, indicating that the machine is cleaned. Check the lint filter. 16 Operating Your Dryer O perating Your Dryer BEFORE YOU USE YOUR DRYER 1. Open and check if lint filter is ready set to ensure proper installation. 3. Place laundry into the drum. The...
Owners Manual
Page 17
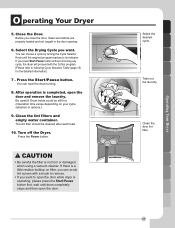
...! After operation is operating, please press the Start/Pause button first, wait until the required program reaches to its indicator. Turn off the Dryer. Select the Drying Cycle you want . CAUTION • Be careful the filter is not torn or damaged when using a vacuum cleaner. Before... you press Start/Pause button without choosing any cycle, the dryer will proceed with a brush to remove. • If you want to following Cycle Selection Table (page 15) for the detailed information] 7 ...
...! After operation is operating, please press the Start/Pause button first, wait until the required program reaches to its indicator. Turn off the Dryer. Select the Drying Cycle you want . CAUTION • Be careful the filter is not torn or damaged when using a vacuum cleaner. Before... you press Start/Pause button without choosing any cycle, the dryer will proceed with a brush to remove. • If you want to following Cycle Selection Table (page 15) for the detailed information] 7 ...
Owners Manual
Page 18
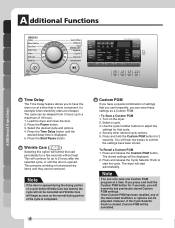
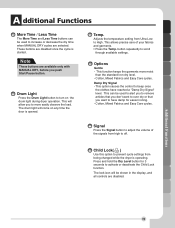
...buttons to adjust the settings for 3 seconds. A dditional Functions F Additional Functions Time Delay The Time Delay feature allows you to have the dryer run at a time. To Recall a Custom PGM 1. Note You can be cancelled. If you press and hold the Custom PGM button for...button. 3. You will overwrite any previously stored Custom PGM settings. Once Custom PGM has been recalled, any other desired cycle options. 5. Load the dryer and close the door. 2. Press the Start/Pause button. This prevents wrinkling of the memorized modifiers or options can be displayed. 2. Select a ...
...buttons to adjust the settings for 3 seconds. A dditional Functions F Additional Functions Time Delay The Time Delay feature allows you to have the dryer run at a time. To Recall a Custom PGM 1. Note You can be cancelled. If you press and hold the Custom PGM button for...button. 3. You will overwrite any previously stored Custom PGM settings. Once Custom PGM has been recalled, any other desired cycle options. 5. Load the dryer and close the door. 2. Press the Start/Pause button. This prevents wrinkling of the memorized modifiers or options can be displayed. 2. Select a ...
Owners Manual
Page 19
This function keeps the garments more easily observe the load. Damp Dry Signal - The drum light will come on the drum light during dryer operation. Signal Press the Signal button to adjust the volume of your fabrics and garments. • Press the Temp. Child Lock( ) Use this ...option to prevent cycle settings from being changed while the dryer is opened. These buttons are available only with MANUAL DRY, before you push Start/Pause button. This allows precise care of the signals from Ultra...
This function keeps the garments more easily observe the load. Damp Dry Signal - The drum light will come on the drum light during dryer operation. Signal Press the Signal button to adjust the volume of your fabrics and garments. • Press the Temp. Child Lock( ) Use this ...option to prevent cycle settings from being changed while the dryer is opened. These buttons are available only with MANUAL DRY, before you push Start/Pause button. This allows precise care of the signals from Ultra...
Owners Manual
Page 22
...door. 2. F Clean lint filter during a cycle If the Clean Filter( ) light flashes and the alarm sounds during a cycle and the beeper sounds, pause the dryer and empty the filter immediately. 1. Failure to select the Cool Air cycle. 3. If the lint is difficult to remove or the filter material is showing... signs of a cycle, the lint filter may result in no case should be used for 5 minutes to turn the dryer on the front of the drawer, pull out the reservoir. 2. Snap the filter closed and replace it is important to empty the lint filter between...
...door. 2. F Clean lint filter during a cycle If the Clean Filter( ) light flashes and the alarm sounds during a cycle and the beeper sounds, pause the dryer and empty the filter immediately. 1. Failure to select the Cool Air cycle. 3. If the lint is difficult to remove or the filter material is showing... signs of a cycle, the lint filter may result in no case should be used for 5 minutes to turn the dryer on the front of the drawer, pull out the reservoir. 2. Snap the filter closed and replace it is important to empty the lint filter between...
Owners Manual
Page 23
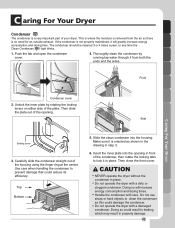
...the drawing in property damage. 23 Slide the clean condenser into the opening . Insert the inner plate into the housing. C aring For Your Dryer F Condenser The condenser is no need for an outside exhaust. Use care when handling the condenser to lock it will increase energy consumption and ... light blinks. 1. Push the tab and open the condenser cover. 4. Thoroughly clean the condenser by rotating the locking levers on either side of your dryer. Top Bottom 5. This is where the moisture is removed form the air so there is a very important part of the plate. Doing so could ...
...the drawing in property damage. 23 Slide the clean condenser into the opening . Insert the inner plate into the housing. C aring For Your Dryer F Condenser The condenser is no need for an outside exhaust. Use care when handling the condenser to lock it will increase energy consumption and ... light blinks. 1. Push the tab and open the condenser cover. 4. Thoroughly clean the condenser by rotating the locking levers on either side of your dryer. Top Bottom 5. This is where the moisture is removed form the air so there is a very important part of the plate. Doing so could ...


