
Owner's Manual
Page 1
Record the model and serial numbers of your machine requires service. Commercial Dryer Operating Instructions CDE3379WD/CDG3389WD CDE3379WN/CDG3389WN Please read this information to your dealer if your machine and report this manual carefully. Not for future reference. DESIGN ERTIFIE D C Retain it for residential use , and maintenance. It provides instructions on safe installation, use .
Record the model and serial numbers of your machine requires service. Commercial Dryer Operating Instructions CDE3379WD/CDG3389WD CDE3379WN/CDG3389WN Please read this information to your dealer if your machine and report this manual carefully. Not for future reference. DESIGN ERTIFIE D C Retain it for residential use , and maintenance. It provides instructions on safe installation, use .

Owner's Manual
Page 2
... largest capacity, quick drying times, quiet operation, and an energy-saving system. IDENTIFICATION ...9 PART 4. ARTISTIC DESIGN Modern front panel look and big clear glass door make your dryer look stylish EASY OF USE An entire selection of the laundry. ULTRA CAPACITY The larger drum enables better tumbling and less tangling and wrinkling of user-friendly functions makes operating the dryer easy. PROGRAMMING MODE ...12 PART 6. IMPORTANT SAFETY INSTRUCTIONS 3 PART 2. WARRANTY...
... largest capacity, quick drying times, quiet operation, and an energy-saving system. IDENTIFICATION ...9 PART 4. ARTISTIC DESIGN Modern front panel look and big clear glass door make your dryer look stylish EASY OF USE An entire selection of the laundry. ULTRA CAPACITY The larger drum enables better tumbling and less tangling and wrinkling of user-friendly functions makes operating the dryer easy. PROGRAMMING MODE ...12 PART 6. IMPORTANT SAFETY INSTRUCTIONS 3 PART 2. WARRANTY...
Owner's Manual
Page 3
...this manual must be properly installed as they give off vapors that could ignite or explode. • Do not reach into the dryer if the drum or any other part is moving. • Do not repair or replace any part of children is necessary when the dryer is...risk of fire, electric shock, or injury to persons when using the dryer. • Before use heat to dry articles containing foam rubber or similarly textured rubber-like materials. • Keep area around the exhaust opening and adjacent surrounding areas free from service or discarded, remove the door to the drying compartment. •...
...this manual must be properly installed as they give off vapors that could ignite or explode. • Do not reach into the dryer if the drum or any other part is moving. • Do not repair or replace any part of children is necessary when the dryer is...risk of fire, electric shock, or injury to persons when using the dryer. • Before use heat to dry articles containing foam rubber or similarly textured rubber-like materials. • Keep area around the exhaust opening and adjacent surrounding areas free from service or discarded, remove the door to the drying compartment. •...
Owner's Manual
Page 4
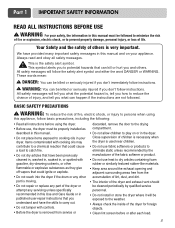
...'s phone. Follow the gas supplier's instructions carefully. 5. Properly adjusted dryers will minimize incomplete combustion. supplier. Clear the room, building, or area of potential exposure to light a match or cigarette, or turn on any electrical switches. Part 1 IMPORTANT SAFETY INFORMATION READ ALL INSTRUCTIONS BEFORE USE WARNING For your safety, the information in this appliance or qualified installer, service agency, or the gas any other appliances...
...'s phone. Follow the gas supplier's instructions carefully. 5. Properly adjusted dryers will minimize incomplete combustion. supplier. Clear the room, building, or area of potential exposure to light a match or cigarette, or turn on any electrical switches. Part 1 IMPORTANT SAFETY INFORMATION READ ALL INSTRUCTIONS BEFORE USE WARNING For your safety, the information in this appliance or qualified installer, service agency, or the gas any other appliances...
Owner's Manual
Page 5
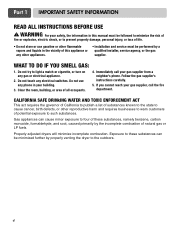
... not fit the outlet, have a proper outlet installed by a qualified electrician. The plug must be performed by providing a path of suffocation. 5 Do not modify the plug provided with all packaging from children. Electrical shock can result in the installation instructions. Failure to follow basic precautions, including the following: • Properly ground dryer to persons when using this Owner's Guide. Improper power circuit can result...
... not fit the outlet, have a proper outlet installed by a qualified electrician. The plug must be performed by providing a path of suffocation. 5 Do not modify the plug provided with all packaging from children. Electrical shock can result in the installation instructions. Failure to follow basic precautions, including the following: • Properly ground dryer to persons when using this Owner's Guide. Improper power circuit can result...

Owner's Manual
Page 6
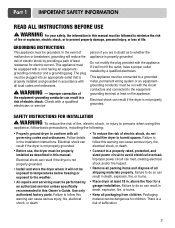
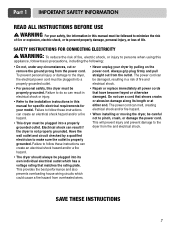
... for use sheet metal screws or other combustible ductwork can result in a burn hazard. 6 For complete details, follow basic precautions, including the following: • Do not open the dryer door during or after the steam cycle. Make sure to the outside . Part 1 IMPORTANT SAFETY INFORMATION READ ALL INSTRUCTIONS BEFORE USE WARNING For your new dryer. SAFETY INSTRUCTIONS FOR INSTALLATION Exhaust/Ducting: • Gas dryers MUST be exhausted to clean...
... for use sheet metal screws or other combustible ductwork can result in a burn hazard. 6 For complete details, follow basic precautions, including the following: • Do not open the dryer door during or after the steam cycle. Make sure to the outside . Part 1 IMPORTANT SAFETY INFORMATION READ ALL INSTRUCTIONS BEFORE USE WARNING For your new dryer. SAFETY INSTRUCTIONS FOR INSTALLATION Exhaust/Ducting: • Gas dryers MUST be exhausted to clean...
Owner's Manual
Page 7
... pinch, crush, or damage the power cord. Have the wall outlet and circuit checked by pulling on the power cord. Do not use a cord that shows cracks or abrasion damage along its own individual electrical outlet which could cause a fire hazard from the outlet. SAFETY INSTRUCTIONS FOR CONNECTING ELECTRICITY WARNING: To reduce the risk of fire and electrical shock. • Repair or replace immediately all power cords that matches the...
... pinch, crush, or damage the power cord. Have the wall outlet and circuit checked by pulling on the power cord. Do not use a cord that shows cracks or abrasion damage along its own individual electrical outlet which could cause a fire hazard from the outlet. SAFETY INSTRUCTIONS FOR CONNECTING ELECTRICITY WARNING: To reduce the risk of fire and electrical shock. • Repair or replace immediately all power cords that matches the...

Owner's Manual
Page 8
Part 2 SPECIFICATIONS Type: Rating: Size: Capacity: Weight: Electric or Gas Dryer Please refer to change by manufacturer. 8 ft. (22.5 lbs.) 126 Ibs (57.2 kg) Note Specifications subject to the rating label regarding detailed information. 27 x 29.9 x 38.7 (inch) IEC 7.3 cu.
Part 2 SPECIFICATIONS Type: Rating: Size: Capacity: Weight: Electric or Gas Dryer Please refer to change by manufacturer. 8 ft. (22.5 lbs.) 126 Ibs (57.2 kg) Note Specifications subject to the rating label regarding detailed information. 27 x 29.9 x 38.7 (inch) IEC 7.3 cu.

Owner's Manual
Page 11
.... 5 Change cycle You cannot change that has a sufficient balance. Time can control the additional time and money setting (top off (To add more time) After a debit card is running. When the COOL DOWN has been working, if time is not enough, the machine will show the remaining time and the selected cycle starts. The card balance should have enough balance to satisfy increasing time.) The operating time can...
.... 5 Change cycle You cannot change that has a sufficient balance. Time can control the additional time and money setting (top off (To add more time) After a debit card is running. When the COOL DOWN has been working, if time is not enough, the machine will show the remaining time and the selected cycle starts. The card balance should have enough balance to satisfy increasing time.) The operating time can...
Owner's Manual
Page 12
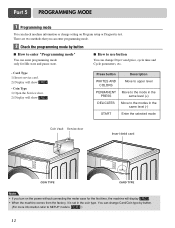
... (+) DELICATES Move to use button You can change Dryer vend price, cycle time and Cycle parameters, etc. - Part 5 PROGRAMMING MODE 1 Programming mode You can check machine information or change Card/Coin type by button How to SETUP mode's .) 12 You can change setting on the power without connecting the meter case for Idle state and pause state. There are two methods that you turn on Program setup or Diagnostic test.
... (+) DELICATES Move to use button You can change Dryer vend price, cycle time and Cycle parameters, etc. - Part 5 PROGRAMMING MODE 1 Programming mode You can check machine information or change Card/Coin type by button How to SETUP mode's .) 12 You can change setting on the power without connecting the meter case for Idle state and pause state. There are two methods that you turn on Program setup or Diagnostic test.
Owner's Manual
Page 14
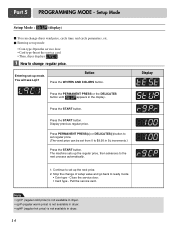
... PRESS or the DELICATES button until appears in dryer. 14 Display Press the START button. Pull the service card. Part 5 PROGRAMMING MODE - You will see LqC1 Button Press the WHITES AND COLORS button. Press PERMANENT PRESS(+) or DELICATES(-) button to set regular price. (The vend price can change dryer vend price, cycle time, and cycle parameters, etc. Close the service door. • Card type - Note • rgCP (regular...
... PRESS or the DELICATES button until appears in dryer. 14 Display Press the START button. Pull the service card. Part 5 PROGRAMMING MODE - You will see LqC1 Button Press the WHITES AND COLORS button. Press PERMANENT PRESS(+) or DELICATES(-) button to set regular price. (The vend price can change dryer vend price, cycle time, and cycle parameters, etc. Close the service door. • Card type - Note • rgCP (regular...
Owner's Manual
Page 15
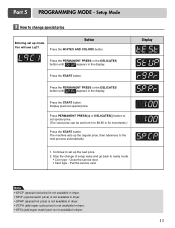
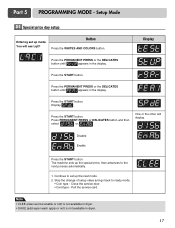
.... (The vend price can be set from 0 to change of setup value and go back to ready mode. • Coin type - Setup Mode 2 How to $9.95 in dryer. 15 Stop the change special price Entering set up mode. Press the PERMANENT PRESS or the DELICATES button until appears in the display. Press the START button. Press the START button. Display Note • SPCP...
.... (The vend price can be set from 0 to change of setup value and go back to ready mode. • Coin type - Setup Mode 2 How to $9.95 in dryer. 15 Stop the change special price Entering set up mode. Press the PERMANENT PRESS or the DELICATES button until appears in the display. Press the START button. Press the START button. Display Note • SPCP...
Owner's Manual
Page 17
...or the DELICATES button until appears in the display. Press the START button. Close the service door. • Card type - You will display. Press the START button. Note • CLEE (clear escrow enable or not) is not available in dryer. • SUUE...START button. Pull the service card. Stop the change of setup value and go back to the next process automatically. 1. One or the other will see LqC1 Button Press the WHITES AND COLORS button. Part 5 PROGRAMMING MODE - Display Press the PERMANENT PRESS or the DELICATES button until appears in dryer. 17 The machine sets...
...or the DELICATES button until appears in the display. Press the START button. Close the service door. • Card type - You will display. Press the START button. Note • CLEE (clear escrow enable or not) is not available in dryer. • SUUE...START button. Pull the service card. Stop the change of setup value and go back to the next process automatically. 1. One or the other will see LqC1 Button Press the WHITES AND COLORS button. Part 5 PROGRAMMING MODE - Display Press the PERMANENT PRESS or the DELICATES button until appears in dryer. 17 The machine sets...
Owner's Manual
Page 24
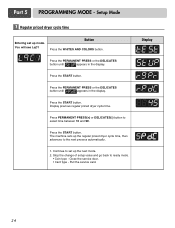
... appears in the display. Press PERMANENT PRESS(+) or DELICATES(-) button to ready mode. • Coin type - Pull the service card. Display 24 Display previous regular priced dryer cycle time. Continue to the next process automatically. 1. Press the START button. The machine sets up the regular priced dryer cycle time, then advances to set up the next mode. 2. Press the START button. Part 5 PROGRAMMING MODE - Press the...
... appears in the display. Press PERMANENT PRESS(+) or DELICATES(-) button to ready mode. • Coin type - Pull the service card. Display 24 Display previous regular priced dryer cycle time. Continue to the next process automatically. 1. Press the START button. The machine sets up the regular priced dryer cycle time, then advances to set up the next mode. 2. Press the START button. Part 5 PROGRAMMING MODE - Press the...
Owner's Manual
Page 25
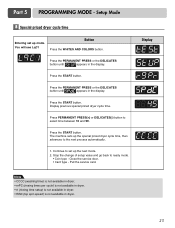
... START button. Press the START button. Display previous special priced dryer cycle time. Continue to ready mode. • Coin type - Press PERMANENT PRESS(+) or DELICATES(-) button to the next process automatically. 1. Part 5 PROGRAMMING MODE - Close the service door. • Card type - The machine sets up the special priced dryer cycle time, then advances to select time between 10 and 99. Stop the change of setup value and go back to set...
... START button. Press the START button. Display previous special priced dryer cycle time. Continue to ready mode. • Coin type - Press PERMANENT PRESS(+) or DELICATES(-) button to the next process automatically. 1. Part 5 PROGRAMMING MODE - Close the service door. • Card type - The machine sets up the special priced dryer cycle time, then advances to select time between 10 and 99. Stop the change of setup value and go back to set...

Owner's Manual
Page 30
.... Motor+Valve LED & KEY CHECK Press WHITES AND COLORS button. Press DELICATES button. Door switch (Motor & Heater Off, Buzzer beeps seven times) Test goes back at step 2. (Motor on ) Display US:OE or US:Og and EU:XX alternately. Please close the door completely) Measured moisture value (70~239) Note During LqC1 test, if no buttons are pressed for testing the dryer and detecting errors. START Insert service card (card type), open . Motor + Valve ■ ELECTRIC TYPE: Heater runs.
.... Motor+Valve LED & KEY CHECK Press WHITES AND COLORS button. Press DELICATES button. Door switch (Motor & Heater Off, Buzzer beeps seven times) Test goes back at step 2. (Motor on ) Display US:OE or US:Og and EU:XX alternately. Please close the door completely) Measured moisture value (70~239) Note During LqC1 test, if no buttons are pressed for testing the dryer and detecting errors. START Insert service card (card type), open . Motor + Valve ■ ELECTRIC TYPE: Heater runs.
Owner's Manual
Page 31
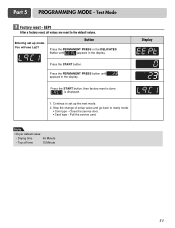
... in the display. Press the START button. Continue to set up the next mode. 2. Stop the change of setup value and go back to the default values. Close the service door. • Card type - Top off time 15 Minute 31 Drying time 45 Minute - EEPt After a factory reset, all values are reset to ready mode. • Coin type - Entering set up mode. Press the PERMANENT...
... in the display. Press the START button. Continue to set up the next mode. 2. Stop the change of setup value and go back to the default values. Close the service door. • Card type - Top off time 15 Minute 31 Drying time 45 Minute - EEPt After a factory reset, all values are reset to ready mode. • Coin type - Entering set up mode. Press the PERMANENT...

Owner's Manual
Page 35
START 5. START Insert service card(card type), open the service door(coin type). The Lists are displayed by pressing with PERMANENT PRESS or DELICATES button. Abbreviation Meaning 1 rgPr Regular Price 2 rgCP Regular Cold Price 3 rgrP Regular Warm Price 4 rgHP Regular Hot Price 5 dELC Dryer Moisture Sense 6 ItrC Interval Regular Cycles 7 ItCC Interval Regular Cold Cycles 8 ItAC Interval Regular Warm Cycles 9 ItHC Interval Regular Hot Cycles 10 ItSC Interval...
START 5. START Insert service card(card type), open the service door(coin type). The Lists are displayed by pressing with PERMANENT PRESS or DELICATES button. Abbreviation Meaning 1 rgPr Regular Price 2 rgCP Regular Cold Price 3 rgrP Regular Warm Price 4 rgHP Regular Hot Price 5 dELC Dryer Moisture Sense 6 ItrC Interval Regular Cycles 7 ItCC Interval Regular Cold Cycles 8 ItAC Interval Regular Warm Cycles 9 ItHC Interval Regular Hot Cycles 10 ItSC Interval...

Owner's Manual
Page 37
... Thermistor should be replaced. Check the card reader wire. Disconnection of power failure the machine stops running but the time display remains on, showing the time just before power failure. Thermistor should be replaced. Part 7 POWER FAIL RECOVERY In case of card reader wire. Part 6 ERROR MODE Meaning of Error Codes that LED displays during occurrence or problem. It is displayed when thermistor is open. Part 8 DEFAULT DRYER SETTINGS Default Settings Cycle Time (Minutes) Cool Down Time Cycle High Temperature Medium Temperature...
... Thermistor should be replaced. Check the card reader wire. Disconnection of power failure the machine stops running but the time display remains on, showing the time just before power failure. Thermistor should be replaced. Part 7 POWER FAIL RECOVERY In case of card reader wire. Part 6 ERROR MODE Meaning of Error Codes that LED displays during occurrence or problem. It is displayed when thermistor is open. Part 8 DEFAULT DRYER SETTINGS Default Settings Cycle Time (Minutes) Cool Down Time Cycle High Temperature Medium Temperature...
Owner's Manual
Page 38
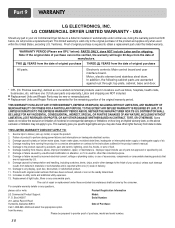
.... LG COMMERCIAL DRYER LIMITED WARRANTY - TWO (2) YEARS from the date of original purchase All parts. Electronic controls: Main control board and user interface board. NEITHER THE MANUFACTURER NOR ITS U.S. Damage resulting from the date of original purchase THREE (3) YEARS from misuse, abuse, improper installation, repair, or maintenance. The cost of purchase, model and serial number. 38 Please be verified, the warranty will provide a replacement part. Service trips...
.... LG COMMERCIAL DRYER LIMITED WARRANTY - TWO (2) YEARS from the date of original purchase All parts. Electronic controls: Main control board and user interface board. NEITHER THE MANUFACTURER NOR ITS U.S. Damage resulting from the date of original purchase THREE (3) YEARS from misuse, abuse, improper installation, repair, or maintenance. The cost of purchase, model and serial number. 38 Please be verified, the warranty will provide a replacement part. Service trips...


