Owner's Manual
Page 6
User Mode 76 Picture Improvement Technology 77 Expert Picture Control 78 Picture Reset 80 Demo Mode 80 Image Sticking Minimization (ISM) Method 81 6 Channel Editing 42 Channel List 43 Favorite Channel Setup 44 ... Modes 52 Photo List 53 Music List 59 Movie List 62 DivX Registration Code 68 Deactivation 69 PICTURE CONTROL Picture Size (Aspect Ratio) Control 70 Picture Wizard 72 Energy Saving 74 Preset Picture Settings (Picture Mode 75 Manual Picture Adjustment - CONTENTS WARNING 2 SAFETY INSTRUCTIONS 3 FEATURE OF THIS TV 8 PREPARATION Accessories 9 Front Panel ...
User Mode 76 Picture Improvement Technology 77 Expert Picture Control 78 Picture Reset 80 Demo Mode 80 Image Sticking Minimization (ISM) Method 81 6 Channel Editing 42 Channel List 43 Favorite Channel Setup 44 ... Modes 52 Photo List 53 Music List 59 Movie List 62 DivX Registration Code 68 Deactivation 69 PICTURE CONTROL Picture Size (Aspect Ratio) Control 70 Picture Wizard 72 Energy Saving 74 Preset Picture Settings (Picture Mode 75 Manual Picture Adjustment - CONTENTS WARNING 2 SAFETY INSTRUCTIONS 3 FEATURE OF THIS TV 8 PREPARATION Accessories 9 Front Panel ...
Owner's Manual
Page 8
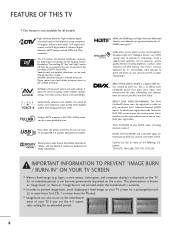
AV Mode is an official DivX Certified® device that plays DivX video. Using a sophisticated algorithm, the LG processes picture quality elements including brightness, contrast, color, sharpness and white balance. ABOUT DIVX VIDEO: DivX® is a digital video format created by one... and Game Modes. ABOUT DIVX VIDEO-ON-DEMAND: This DivX Certified® device must be registered in full 1920 x 1080p resolution for more detailed picture. logos, screen menus, video game, and computer display) is displayed on the TV for Plasma). I In order to play DivX® video, ...
AV Mode is an official DivX Certified® device that plays DivX video. Using a sophisticated algorithm, the LG processes picture quality elements including brightness, contrast, color, sharpness and white balance. ABOUT DIVX VIDEO: DivX® is a digital video format created by one... and Game Modes. ABOUT DIVX VIDEO-ON-DEMAND: This DivX Certified® device must be registered in full 1920 x 1080p resolution for more detailed picture. logos, screen menus, video game, and computer display) is displayed on the TV for Plasma). I In order to play DivX® video, ...
Owner's Manual
Page 10
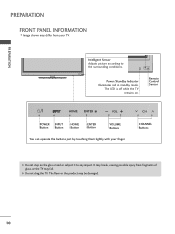
... finger. PREPARATION PREPARATION FRONT PANEL INFORMATION I Image shown may differ from fragments of glass, or the TV may fall. ENTER VOL CH Intelligent Sensor Adjusts picture according to any impact. The LED is off while the TV remains on the glass stand or subject it to the surrounding conditions. The floor...
... finger. PREPARATION PREPARATION FRONT PANEL INFORMATION I Image shown may differ from fragments of glass, or the TV may fall. ENTER VOL CH Intelligent Sensor Adjusts picture according to any impact. The LED is off while the TV remains on the glass stand or subject it to the surrounding conditions. The floor...
Owner's Manual
Page 18
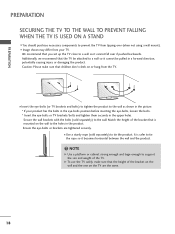
... eye-bolts position before inserting the eye-bolts, loosen the bolts. * Insert the eye-bolts or TV brackets/bolts and tighten them securely in the picture. * If your TV. I Insert the eye-bolts (or TV brackets and bolts) to tighten the product to the wall as shown in the upper holes...
... eye-bolts position before inserting the eye-bolts, loosen the bolts. * Insert the eye-bolts or TV brackets/bolts and tighten them securely in the picture. * If your TV. I Insert the eye-bolts (or TV brackets and bolts) to tighten the product to the wall as shown in the upper holes...
Owner's Manual
Page 19
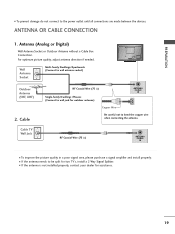
... antenna is not installed properly, contact your dealer for two TV's, install a 2-Way Signal Splitter. For optimum picture quality, adjust antenna direction if needed. RF Coaxial Wire (75 Ω) ANTENNA /CABLE IN I To improve the picture quality in a poor signal area, please purchase a signal amplifier and install properly. Antenna (Analog or Digital...
... antenna is not installed properly, contact your dealer for two TV's, install a 2-Way Signal Splitter. For optimum picture quality, adjust antenna direction if needed. RF Coaxial Wire (75 Ω) ANTENNA /CABLE IN I To improve the picture quality in a poor signal area, please purchase a signal amplifier and install properly. Antenna (Analog or Digital...
Owner's Manual
Page 23
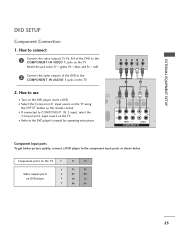
... 1 jacks on the TV. DIO IN B/DVI) REMOTE CONTROL IN AV IN 1 VIDEO /MONO AUDIO 2 L R 1 VIDEO AUDIO A COMPONENT IN Component Input ports To get better picture quality, connect a DVD player to COMPONENT IN 2 input, select the Component2 input source on the TV. I Select the Component1 input source on the TV using...
... 1 jacks on the TV. DIO IN B/DVI) REMOTE CONTROL IN AV IN 1 VIDEO /MONO AUDIO 2 L R 1 VIDEO AUDIO A COMPONENT IN Component Input ports To get better picture quality, connect a DVD player to COMPONENT IN 2 input, select the Component2 input source on the TV. I Select the Component1 input source on the TV using...
Owner's Manual
Page 29
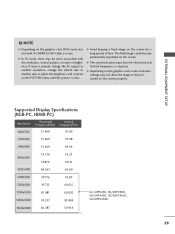
... 47.776 59.87 1360x768 47.712 60.015 1280x1024 63.981 60.020 1600x1200 74.537 59.869 1920x1080 66.587 59.934 For 60PV250, 50/60PV400, 50/60PV450, 50/60PV450C, 50/60PV550U 29 G In PC mode, there may be positioned on the graphics card, DOS mode may not allow... the image to another rate or adjust the brightness and contrast on the PICTURE menu until the picture is present, change the PC output to another resolution, change the refresh rate to be noise associated with the resolution, vertical pattern, contrast...
... 47.776 59.87 1360x768 47.712 60.015 1280x1024 63.981 60.020 1600x1200 74.537 59.869 1920x1080 66.587 59.934 For 60PV250, 50/60PV400, 50/60PV450, 50/60PV450C, 50/60PV550U 29 G In PC mode, there may be positioned on the graphics card, DOS mode may not allow... the image to another rate or adjust the brightness and contrast on the PICTURE menu until the picture is present, change the PC output to another resolution, change the refresh rate to be noise associated with the resolution, vertical pattern, contrast...
Owner's Manual
Page 30
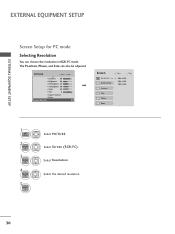
... resolution in RGB-PC mode. Position Size Phase Reset Move Prev. 1024 x 768 1280 x 768 1360 x 768 1 Home 2 ENTER 3 ENTER 4 ENTER 5 ENTER Select PICTURE. Select the desired resolution. 30 PICTURE Move E • Contrast 90 • Brightness 50 • H Sharpness 60 • V Sharpness 60 • Color 60 • Tint 0R • Expert Control...
... resolution in RGB-PC mode. Position Size Phase Reset Move Prev. 1024 x 768 1280 x 768 1360 x 768 1 Home 2 ENTER 3 ENTER 4 ENTER 5 ENTER Select PICTURE. Select the desired resolution. 30 PICTURE Move E • Contrast 90 • Brightness 50 • H Sharpness 60 • V Sharpness 60 • Color 60 • Tint 0R • Expert Control...
Owner's Manual
Page 31
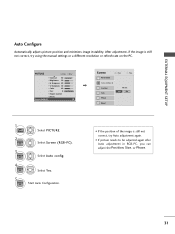
...try using the manual settings or a different resolution or refresh rate on the PC. To Set Yes No 1 Home 2 ENTER Select PICTURE. EXTERNAL EQUIPMENT SETUP Auto Configure Automatically adjusts picture position and minimizes image instability. Select Screen (RGB-PC). 3 ENTER Select Auto config. 4 ENTER Select Y e s. 5 ENTER ...Start Auto Configuration. • If the position of the image is still not correct, try Auto adjustment again. • If picture needs to be adjusted again after Auto adjustment in RGB-PC, you can adjust the Position, Si ze, or Phase. 31...
...try using the manual settings or a different resolution or refresh rate on the PC. To Set Yes No 1 Home 2 ENTER Select PICTURE. EXTERNAL EQUIPMENT SETUP Auto Configure Automatically adjusts picture position and minimizes image instability. Select Screen (RGB-PC). 3 ENTER Select Auto config. 4 ENTER Select Y e s. 5 ENTER ...Start Auto Configuration. • If the position of the image is still not correct, try Auto adjustment again. • If picture needs to be adjusted again after Auto adjustment in RGB-PC, you can adjust the Position, Si ze, or Phase. 31...
Owner's Manual
Page 32
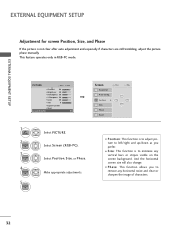
.... I S i z e: This function is not clear after auto adjustment and especially if characters are still trembling, adjust the picture phase manually. Select Screen (RGB-PC). And the horizontal screen size will also change. EXTERNAL EQUIPMENT SETUP EXTERNAL EQUIPMENT SETUP Adjustment ...for screen Position, Size, and Phase If the picture is to remove any vertical bars or stripes visible on the screen background. G 1 Home 2 ENTER 3 ENTER 4 ENTER 5 ENTER Select PICTURE. I P h a s e: This function allows you prefer. Move D Position ...
.... I S i z e: This function is not clear after auto adjustment and especially if characters are still trembling, adjust the picture phase manually. Select Screen (RGB-PC). And the horizontal screen size will also change. EXTERNAL EQUIPMENT SETUP EXTERNAL EQUIPMENT SETUP Adjustment ...for screen Position, Size, and Phase If the picture is to remove any vertical bars or stripes visible on the screen background. G 1 Home 2 ENTER 3 ENTER 4 ENTER 5 ENTER Select PICTURE. I P h a s e: This function allows you prefer. Move D Position ...
Owner's Manual
Page 33
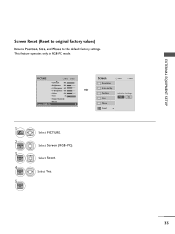
... original factory values) Returns Position, S i z e, and Phase to the default factory settings. This feature operates only in RGB-PC mode. Select Screen (RGB-PC). Select Y e s. PICTURE Move E • Contrast 90 • Brightness 50 • H Sharpness 60 • V Sharpness 60 • Color 60 • Tint 0R • Expert Control • Reset Screen...
... original factory values) Returns Position, S i z e, and Phase to the default factory settings. This feature operates only in RGB-PC mode. Select Screen (RGB-PC). Select Y e s. PICTURE Move E • Contrast 90 • Brightness 50 • H Sharpness 60 • V Sharpness 60 • Color 60 • Tint 0R • Expert Control • Reset Screen...
Owner's Manual
Page 35
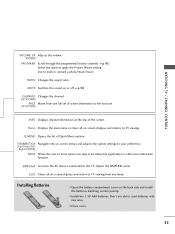
Use to apply the Picture Wizard setting. Q.MENU Opens the list of the screen. I Install two 1.5V AAA batteries. G p.45 Select the input to mark or unmark a photo/music/movie. I ...
Use to apply the Picture Wizard setting. Q.MENU Opens the list of the screen. I Install two 1.5V AAA batteries. G p.45 Select the input to mark or unmark a photo/music/movie. I ...
Owner's Manual
Page 37
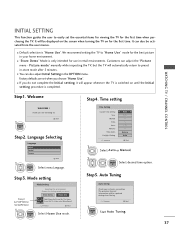
Factory defaults are set the essential items for viewing the TV for choosing LG Next Step2. Thank you do not complete the Initial setting, it will be updated during Auto Tuning. 1 ENTER Previous Next Start Auto Tuning. 37... 1 Select A ut o or Manual. 2 ENTER Select desired time option. Welcome 1 ENTER WELCOME ! We recommend setting the TV to "Home Use" mode for the best picture in -store mode after 5 minutes. I Default selection is completed. WATCHING TV / CHANNEL CONTROL Step1. I If you for the first time when purchasing the TV. Step4...
Factory defaults are set the essential items for viewing the TV for choosing LG Next Step2. Thank you do not complete the Initial setting, it will be updated during Auto Tuning. 1 ENTER Previous Next Start Auto Tuning. 37... 1 Select A ut o or Manual. 2 ENTER Select desired time option. Welcome 1 ENTER WELCOME ! We recommend setting the TV to "Home Use" mode for the best picture in -store mode after 5 minutes. I Default selection is completed. WATCHING TV / CHANNEL CONTROL Step1. I If you for the first time when purchasing the TV. Step4...
Owner's Manual
Page 38
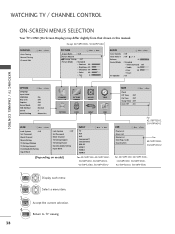
...current selection. Return to TV viewing. Except 42/50PT250U, 50/60PV550U CHANNEL Auto Tuning Manual Tuning Channel Edit Move Enter PICTURE Move Aspect Ratio : 16:9 Picture Wizard Energy Saving : Off Picture Mode : Standard • Contrast 90 • Brightness 50 • Sharpness 60 • Color 60 •...Mode ISM Method Set ID Initial Setting Move Enter : On : Off : Off : Off : Normal : 1 : Home Use CHANNEL PICTURE AUDIO TIME OPTION LOCK INPUT USB LOCK Move Enter Lock System : Off Set Password Block Channel Movie Rating TV Rating-Children TV Rating-General...
...current selection. Return to TV viewing. Except 42/50PT250U, 50/60PV550U CHANNEL Auto Tuning Manual Tuning Channel Edit Move Enter PICTURE Move Aspect Ratio : 16:9 Picture Wizard Energy Saving : Off Picture Mode : Standard • Contrast 90 • Brightness 50 • Sharpness 60 • Color 60 •...Mode ISM Method Set ID Initial Setting Move Enter : On : Off : Off : Off : Normal : 1 : Home Use CHANNEL PICTURE AUDIO TIME OPTION LOCK INPUT USB LOCK Move Enter Lock System : Off Set Password Block Channel Movie Rating TV Rating-Children TV Rating-General...
Owner's Manual
Page 39
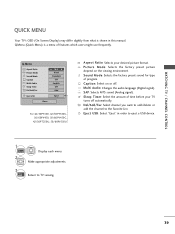
... automatically. Multi Audio: Changes the audio language (Digital signal). Sound Mode: Selects the factory preset sound for type of time before your desired picture format. Make appropriate adjustments. 3 EXIT Return to the Favorite List. WATCHING TV / CHANNEL CONTROL QUICK MENU Your TV's OSD (On Screen ... to TV viewing. 39 Eject USB: Select "Eject" in this manual. Sleep Timer: Select the amount of program. Q.Menu Aspect Ratio Picture Mode Sound Mode Caption Multi Audio Sleep Timer CH Del/Add/Fav F 16:9 G Vivid Standard Off English Off Add Eject USB Eject Close...
... automatically. Multi Audio: Changes the audio language (Digital signal). Sound Mode: Selects the factory preset sound for type of time before your desired picture format. Make appropriate adjustments. 3 EXIT Return to the Favorite List. WATCHING TV / CHANNEL CONTROL QUICK MENU Your TV's OSD (On Screen ... to TV viewing. 39 Eject USB: Select "Eject" in this manual. Sleep Timer: Select the amount of program. Q.Menu Aspect Ratio Picture Mode Sound Mode Caption Multi Audio Sleep Timer CH Del/Add/Fav F 16:9 G Vivid Standard Off English Off Add Eject USB Eject Close...
Owner's Manual
Page 44
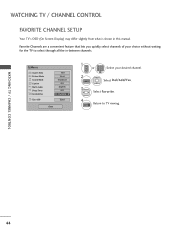
Q.Menu Aspect Ratio Picture Mode Sound Mode Caption Multi Audio Sleep Timer CH Del/Add/Fav Eject USB 16:9 Vivid Standard Off English Off F Favorite G Eject Close 1 or P CH A G E 2 Q....
Q.Menu Aspect Ratio Picture Mode Sound Mode Caption Multi Audio Sleep Timer CH Del/Add/Fav Eject USB 16:9 Vivid Standard Off English Off F Favorite G Eject Close 1 or P CH A G E 2 Q....
Owner's Manual
Page 49
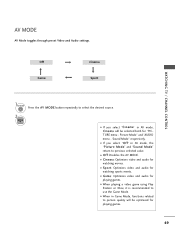
..." and "AUDIO menu - Sound Mode" respectively. I When in Game Mode, functions related to picture quality will be optimized for playing games. I If you select "Cinema" in AV mode, the "Picture Mode" and "Sound Mode" return to use the Game Mode. I Cinema: Optimizes video and audio for watching sports events. I When playing a video... MODE button repeatedly to select the desired source. 2 ENTER I O f f: Disables the AV MODE. I If you select "O f f" in AV mode, Cinema will be selected both for "PICTURE menu -
..." and "AUDIO menu - Sound Mode" respectively. I When in Game Mode, functions related to picture quality will be optimized for playing games. I If you select "Cinema" in AV mode, the "Picture Mode" and "Sound Mode" return to use the Game Mode. I Cinema: Optimizes video and audio for watching sports events. I When playing a video... MODE button repeatedly to select the desired source. 2 ENTER I O f f: Disables the AV MODE. I If you select "O f f" in AV mode, Cinema will be selected both for "PICTURE menu -

Owner's Manual
Page 58
Make appropriate adjustments. USB USB G When you select the Set Audio. Picture Mode Contrast Brightness Sharpness Color Tint Color Temperature Noise Reduction Reset Vivid 100 50 70 80 0 W C 0 W C Medium Prev. 1 ENTER 2 ENTER Show the Picture Mode. G When you select the Set Video. Set audio. Make appropriate adjustments. 58 Sound Mode Auto Volume Clear Voice ll Balance Cinema Off Off 0 L R Prev. 1 ENTER 2 ENTER Show the Sound Mode, Auto Volume, Clear Voice II and Balance. I APS mode is not supported in Set Video function. Set video.
Make appropriate adjustments. USB USB G When you select the Set Audio. Picture Mode Contrast Brightness Sharpness Color Tint Color Temperature Noise Reduction Reset Vivid 100 50 70 80 0 W C 0 W C Medium Prev. 1 ENTER 2 ENTER Show the Picture Mode. G When you select the Set Video. Set audio. Make appropriate adjustments. 58 Sound Mode Auto Volume Clear Voice ll Balance Cinema Off Off 0 L R Prev. 1 ENTER 2 ENTER Show the Sound Mode, Auto Volume, Clear Voice II and Balance. I APS mode is not supported in Set Video function. Set video.

Owner's Manual
Page 66
... Select Set Video Play, Set Video, or Set Audio. Size . G Picture size: Selects your desired picture format for video files. Files with the captions, it can be adjusted by 0.5 second. Sync . Exit ! Picture Size Audio Language F Full G 1 Subtitle Language . Set video. G ...Position: Move the location of the audio for videos. G Audio Language: Changes the Language Group of the subtitles. 1 Show the Picture size, audio Language, or Subtitle Language. 2 Make appropriate adjustments. Set audio. G Subtitle Language: The subtitles can be turned on or off....
... Select Set Video Play, Set Video, or Set Audio. Size . G Picture size: Selects your desired picture format for video files. Files with the captions, it can be adjusted by 0.5 second. Sync . Exit ! Picture Size Audio Language F Full G 1 Subtitle Language . Set video. G ...Position: Move the location of the audio for videos. G Audio Language: Changes the Language Group of the subtitles. 1 Show the Picture size, audio Language, or Subtitle Language. 2 Make appropriate adjustments. Set audio. G Subtitle Language: The subtitles can be turned on or off....

Owner's Manual
Page 67
Make appropriate adjustments. Sound Mode Auto Volume Clear Voice ll Balance Cinema Off Off 0 L R Prev. 1 ENTER Show the Sound Mode, Auto Volume, Clear Voice II and Balance. 2 ENTER Make appropriate adjustments. 67 USB G When you select the Set Video. Set video. Picture Mode Contrast Brightness Sharpness Color Tint Color Temperature Noise Reduction Reset Standard 100 50 70 80 0 W C 0 W C Low Prev. 1 ENTER 2 ENTER Show the Picture Mode. G When you select the Set Audio. Set audio.
Make appropriate adjustments. Sound Mode Auto Volume Clear Voice ll Balance Cinema Off Off 0 L R Prev. 1 ENTER Show the Sound Mode, Auto Volume, Clear Voice II and Balance. 2 ENTER Make appropriate adjustments. 67 USB G When you select the Set Video. Set video. Picture Mode Contrast Brightness Sharpness Color Tint Color Temperature Noise Reduction Reset Standard 100 50 70 80 0 W C 0 W C Low Prev. 1 ENTER 2 ENTER Show the Picture Mode. G When you select the Set Audio. Set audio.


