
Owner's Manual (English)
Page 1
... Information Center P/NO : SAC33575902(0904-REV00) www.lgusa.com / www.lg.cwaw/ww.lgwuws.alg.comm/ ewrwciwa.l.lgco.cma The model and serial number of the TV is located on the back and one side of the TV. PLASMA TV OWNER'S MANUAL 42PQ10 50PQ10 50PS11 60PS11 42PQ12 50PQ12 Please read this manual carefully before operating your set and retain it below should you ever...
... Information Center P/NO : SAC33575902(0904-REV00) www.lgusa.com / www.lg.cwaw/ww.lgwuws.alg.comm/ ewrwciwa.l.lgco.cma The model and serial number of the TV is located on the back and one side of the TV. PLASMA TV OWNER'S MANUAL 42PQ10 50PQ10 50PS11 60PS11 42PQ12 50PQ12 Please read this manual carefully before operating your set and retain it below should you ever...
Owner's Manual (English)
Page 4
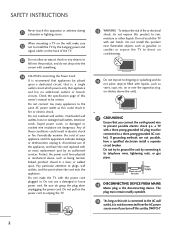
... twisted, kinked, pinched, closed in a door, or walked upon a dedicated circuit; Do not install this owner's manual to dripping or splashing and do not drop onto the screen with an exact replacement part by the hanging power and signal cables on the back of fire or electrical shock, do grasp the plug when unplugging the power cord. Check the specification page of this product...
... twisted, kinked, pinched, closed in a door, or walked upon a dedicated circuit; Do not install this owner's manual to dripping or splashing and do not drop onto the screen with an exact replacement part by the hanging power and signal cables on the back of fire or electrical shock, do grasp the plug when unplugging the power cord. Check the specification page of this product...
Owner's Manual (English)
Page 6
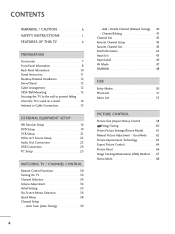
... Picture Settings(Picture Mode 61 Manual Picture Adjustment - FEATURES OF THIS TV 6 PREPARATION Accessories 7 Front Panel Information 8 Back Panel Information 10 Stand Instruction 11 Desktop Pedestal Installation 12 Swivel Stand 12 Cable Arrangement 12 VESA Wall Mounting 13 Securing the TV to the wall to prevent falling when the TV is used on a stand 14 Antenna or Cable Connection 15 EXTERNAL EQUIPMENT SETUP HD Receiver Setup 16 DVD Setup 19 VCR Setup 21 Other A/V Source Setup 23 Audio Out Connection 23 USB Connection 24 PC Setup 25 WATCHING TV / CHANNEL CONTROL Remote...
... Picture Settings(Picture Mode 61 Manual Picture Adjustment - FEATURES OF THIS TV 6 PREPARATION Accessories 7 Front Panel Information 8 Back Panel Information 10 Stand Instruction 11 Desktop Pedestal Installation 12 Swivel Stand 12 Cable Arrangement 12 VESA Wall Mounting 13 Securing the TV to the wall to prevent falling when the TV is used on a stand 14 Antenna or Cable Connection 15 EXTERNAL EQUIPMENT SETUP HD Receiver Setup 16 DVD Setup 19 VCR Setup 21 Other A/V Source Setup 23 Audio Out Connection 23 USB Connection 24 PC Setup 25 WATCHING TV / CHANNEL CONTROL Remote...
Owner's Manual (English)
Page 12
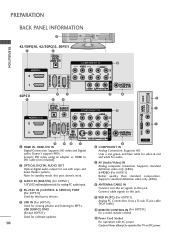
...1 REMOTE ANTENNA/ CABLE IN CONTROL IN S-VIDEO VIDEO (MONO) AUDIO AV IN 2 4 1 HDMI IN, HDMI/DVI IN 9 10 7 8 6 COMPONENT IN Digital Connection. Supports HD video and Digital audio. Uses a red, green, and blue cable for video & red and white for analog PC audio input. 4 RS-232C IN (CONTROL & SERVICE) PORT (For 60PS11) Analog Connection. S-VIDEO (For 60PS11) Better quality than standard composition. Used for software updates. 10 11 Power Cord Socket For operation with amps and home theater systems. Note: In standby mode, this port doesn't work. 3 AUDIO IN (RGB/DVI) (For 60PS11...
...1 REMOTE ANTENNA/ CABLE IN CONTROL IN S-VIDEO VIDEO (MONO) AUDIO AV IN 2 4 1 HDMI IN, HDMI/DVI IN 9 10 7 8 6 COMPONENT IN Digital Connection. Supports HD video and Digital audio. Uses a red, green, and blue cable for video & red and white for analog PC audio input. 4 RS-232C IN (CONTROL & SERVICE) PORT (For 60PS11) Analog Connection. S-VIDEO (For 60PS11) Better quality than standard composition. Used for software updates. 10 11 Power Cord Socket For operation with amps and home theater systems. Note: In standby mode, this port doesn't work. 3 AUDIO IN (RGB/DVI) (For 60PS11...
Owner's Manual (English)
Page 15
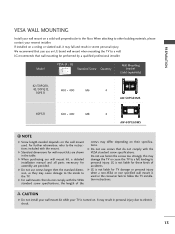
... with the mount. G Standard dimensions for wall mount kits are provided. G When purchasing our wall mount kit, a detailed installation manual and all parts necessary for these kinds of the screws may result in the table. G For wall mounts that you use fasten the screws too strongly, this may damage the TV or cause the TV to the instructions included with the VESA standard screw specifications, the length of accidents. LG is used . G LG is...
... with the mount. G Standard dimensions for wall mount kits are provided. G When purchasing our wall mount kit, a detailed installation manual and all parts necessary for these kinds of the screws may result in the table. G For wall mounts that you use fasten the screws too strongly, this may damage the TV or cause the TV to the instructions included with the VESA standard screw specifications, the length of accidents. LG is used . G LG is...
Owner's Manual (English)
Page 18
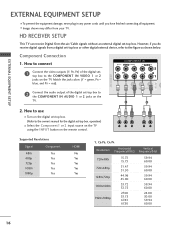
... 2 input source on the TV using the INPUT button on the TV. COMPONENT IN VIDEO AUDIO 2 L R 1 VIDEO (MONO) AUDIO 1 2 2. HD RECEIVER SETUP This TV can receive Digital Over-the-air/Cable signals without an external digital set -top box. Match the jack colors (Y = green, PB = blue, and PR = red). 2 Connect the audio output of the digital settop box to the COMPONENT IN AUDIO 1 or 2 jacks on the remote control. I To prevent the equipment damage, never plug in any power cords until you do receive digital signals from your TV. AV IN USB SERVICE...
... 2 input source on the TV using the INPUT button on the TV. COMPONENT IN VIDEO AUDIO 2 L R 1 VIDEO (MONO) AUDIO 1 2 2. HD RECEIVER SETUP This TV can receive Digital Over-the-air/Cable signals without an external digital set -top box. Match the jack colors (Y = green, PB = blue, and PR = red). 2 Connect the audio output of the digital settop box to the COMPONENT IN AUDIO 1 or 2 jacks on the remote control. I To prevent the equipment damage, never plug in any power cords until you do receive digital signals from your TV. AV IN USB SERVICE...
Owner's Manual (English)
Page 19
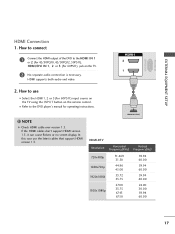
... no screen display. In this case use 1 I Refer to the DVD player's manual for operating instructions. ! How to connect 1 Connect the HDMI output of the DVD to use the latest cables that support HDMI version 1.3. How to the HDMI IN 1 or 2 (For 42/50PQ10, 42/50PQ12, 50PS11), HDMI/DVI IN 1, 2 or 3 (For 60PS11) jack on the remote control. NOTE G Check HDMI cable over version 1.3. EXTERNAL EQUIPMENT SETUP RS-232C IN (SERVICE ONLY) HDMI Connection 1. HDMI supports both audio and video. HDMI-DVD OUTPUT HDMI-DTV Resolution Horizontal Vertical Frequency...
... no screen display. In this case use 1 I Refer to the DVD player's manual for operating instructions. ! How to connect 1 Connect the HDMI output of the DVD to use the latest cables that support HDMI version 1.3. How to the HDMI IN 1 or 2 (For 42/50PQ10, 42/50PQ12, 50PS11), HDMI/DVI IN 1, 2 or 3 (For 60PS11) jack on the remote control. NOTE G Check HDMI cable over version 1.3. EXTERNAL EQUIPMENT SETUP RS-232C IN (SERVICE ONLY) HDMI Connection 1. HDMI supports both audio and video. HDMI-DVD OUTPUT HDMI-DTV Resolution Horizontal Vertical Frequency...
Owner's Manual (English)
Page 20
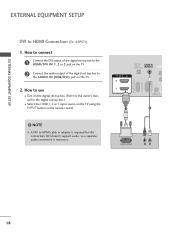
... the HDMI/DVI IN 1, 2 or 3 jack on the TV. 2 Connect the audio output of the digital set-top box to the owner's manual for this connection. DVI doesn't support audio, so a separate audio connection is required for the digital set -top box to HDMI Connection (For 60PS11) 1. How to connect 1 Connect the DVI output of the digital set -top box.) I Select the HDMI1, 2 or 3 input source on the TV using the INPUT button on the TV. 2. NOTE G A DVI to HDMI cable or adapter is necessary. OPTICAL DIGITAL AUDIO OUT AUDIO IN (RGB/DVI) HDMI/DVI IN 2 1 REMOTE CONTROL IN 1 2 DVI-DTV...
... the HDMI/DVI IN 1, 2 or 3 jack on the TV. 2 Connect the audio output of the digital set-top box to the owner's manual for this connection. DVI doesn't support audio, so a separate audio connection is required for the digital set -top box to HDMI Connection (For 60PS11) 1. How to connect 1 Connect the DVI output of the digital set -top box.) I Select the HDMI1, 2 or 3 input source on the TV using the INPUT button on the TV. 2. NOTE G A DVI to HDMI cable or adapter is necessary. OPTICAL DIGITAL AUDIO OUT AUDIO IN (RGB/DVI) HDMI/DVI IN 2 1 REMOTE CONTROL IN 1 2 DVI-DTV...

Owner's Manual (English)
Page 22
How to use I Refer to the HDMI IN 1 or 2 (For 42/50PQ10, 42/50PQ12, 50PS11), HDMI/DVI IN 1, 2 or 3 (For 60PS11) jack on the remote control. IN 2 1 1 HDMI-DVD OUTPUT 20 RS-232C IN (SERVICE ONLY) EXTERNAL EQUIPMENT SETUP EXTERNAL EQUIPMENT SETUP HDMI Connection 1. How to connect 1 Connect the HDMI output of the DVD to the DVD player's manual for operating instructions. HDMI supports both audio and video. 2. I Select the HDMI1, 2 or 3(For 60PS11) input source on the TV using the INPUT button on the TV. 2 No separate audio connection is necessary.
How to use I Refer to the HDMI IN 1 or 2 (For 42/50PQ10, 42/50PQ12, 50PS11), HDMI/DVI IN 1, 2 or 3 (For 60PS11) jack on the remote control. IN 2 1 1 HDMI-DVD OUTPUT 20 RS-232C IN (SERVICE ONLY) EXTERNAL EQUIPMENT SETUP EXTERNAL EQUIPMENT SETUP HDMI Connection 1. How to connect 1 Connect the HDMI output of the DVD to the DVD player's manual for operating instructions. HDMI supports both audio and video. 2. I Select the HDMI1, 2 or 3(For 60PS11) input source on the TV using the INPUT button on the TV. 2 No separate audio connection is necessary.
Owner's Manual (English)
Page 24
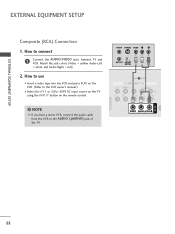
... VCR, connect the audio cable from the VCR to connect 1 Connect the AUDIO/VIDEO jacks between TV and VCR. AV IN USB SERVICE ONLY EXTERNAL EQUIPMENT SETUP EXTERNAL EQUIPMENT SETUP Composite (RCA) Connection 1. How to the AUDIO L(MONO) jack of the TV. How to use I Insert a video tape into the VCR and press PLAY on the VCR. (Refer to the VCR owner's manual.) I Select the A V 1 or 2(For 60PS11) input source on the TV using the INPUT button on the remote control. !
... VCR, connect the audio cable from the VCR to connect 1 Connect the AUDIO/VIDEO jacks between TV and VCR. AV IN USB SERVICE ONLY EXTERNAL EQUIPMENT SETUP EXTERNAL EQUIPMENT SETUP Composite (RCA) Connection 1. How to the AUDIO L(MONO) jack of the TV. How to use I Insert a video tape into the VCR and press PLAY on the VCR. (Refer to the VCR owner's manual.) I Select the A V 1 or 2(For 60PS11) input source on the TV using the INPUT button on the remote control. !
Owner's Manual (English)
Page 25
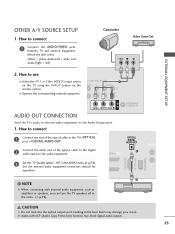
... 2(For 60PS11) input source on the TV using the INPUT button on the audio equipment. OPTICAL DIGITAL AUDIO OUT 2 Connect the other end of DIGITAL AUDIO OUT. OTHER A/V SOURCE SETUP 1. How to external audio equipment via the Audio Output port. 1. Match the jack colors. (Video = yellow, Audio Left = white, and Audio Right = red) Camcorder Video Game Set VIDEO L R EXTERNAL EQUIPMENT SETUP AV IN 2. How to the digital audio input on the remote control. G Audio with external audio equipment, such as amplifiers or speakers, you can turn the TV speakers off in the AUDIO menu...
... 2(For 60PS11) input source on the TV using the INPUT button on the audio equipment. OPTICAL DIGITAL AUDIO OUT 2 Connect the other end of DIGITAL AUDIO OUT. OTHER A/V SOURCE SETUP 1. How to external audio equipment via the Audio Output port. 1. Match the jack colors. (Video = yellow, Audio Left = white, and Audio Right = red) Camcorder Video Game Set VIDEO L R EXTERNAL EQUIPMENT SETUP AV IN 2. How to the digital audio input on the remote control. G Audio with external audio equipment, such as amplifiers or speakers, you can turn the TV speakers off in the AUDIO menu...
Owner's Manual (English)
Page 28
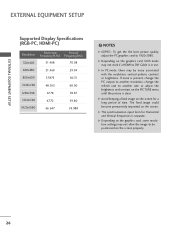
... G 60PS11: To get the the best picture quality, adjust the PC graphics card to be positioned on the graphics card, DOS mode may be noise associated with the resolution, vertical pattern, contrast or brightness. If noise is present, change the PC output to another resolution, change the refresh rate to DVI Cable is in use. G The synchronization input form for a long period of time. EXTERNAL EQUIPMENT SETUP EXTERNAL EQUIPMENT SETUP Supported Display Specifications (RGB-PC, HDMI-PC) Resolution...
... G 60PS11: To get the the best picture quality, adjust the PC graphics card to be positioned on the graphics card, DOS mode may be noise associated with the resolution, vertical pattern, contrast or brightness. If noise is present, change the PC output to another resolution, change the refresh rate to DVI Cable is in use. G The synchronization input form for a long period of time. EXTERNAL EQUIPMENT SETUP EXTERNAL EQUIPMENT SETUP Supported Display Specifications (RGB-PC, HDMI-PC) Resolution...
Owner's Manual (English)
Page 37
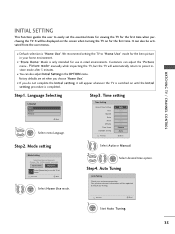
... Use" mode for the first time. Mode setting Step3. Store Demo Home Use Select [Home Use] to use in the OPTION menu. Picture mode" manually while inspecting the TV, but the TV will be activated from the user menus. I Default selection is only intended for the first time when purchasing the TV. Step2. Step4. WATCHING TV / CHANNEL CONTROL INITIAL SETTING This Function guides the user to easily set when you choose "Home Use". Factory defaults are set the essential items for viewing...
... Use" mode for the first time. Mode setting Step3. Store Demo Home Use Select [Home Use] to use in the OPTION menu. Picture mode" manually while inspecting the TV, but the TV will be activated from the user menus. I Default selection is only intended for the first time when purchasing the TV. Step2. Step4. WATCHING TV / CHANNEL CONTROL INITIAL SETTING This Function guides the user to easily set when you choose "Home Use". Factory defaults are set the essential items for viewing...
Owner's Manual (English)
Page 45
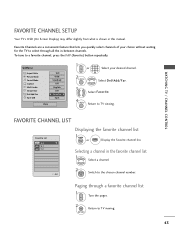
... Display the Favorite channel list. Exit Paging through all the in this manual. MENU Return to the chosen channel number. FAVORITE CHANNEL SETUP Your TV's OSD (On Screen Display) may differ slightly from what is shown in -between channels. Selecting a channel in the favorite channel list 1 Select a channel. 2 ENTER Switch to TV viewing. Q.Menu Aspect Ratio Picture Mode Sound Mode Caption Multi Audio Sleep Timer CH Del/Add/Fav Eject USB 16:9 Vivid Standard Off English Off F Favorite G Eject Close...
... Display the Favorite channel list. Exit Paging through all the in this manual. MENU Return to the chosen channel number. FAVORITE CHANNEL SETUP Your TV's OSD (On Screen Display) may differ slightly from what is shown in -between channels. Selecting a channel in the favorite channel list 1 Select a channel. 2 ENTER Switch to TV viewing. Q.Menu Aspect Ratio Picture Mode Sound Mode Caption Multi Audio Sleep Timer CH Del/Add/Fav Eject USB 16:9 Vivid Standard Off English Off F Favorite G Eject Close...

Owner's Manual (English)
Page 50
... theater speakers and the TV speakers are fully supported. Select SIMPLINK. 3 ENTER Select O n or O f f. 4 Return to TV viewing. This TV may work with devices with HDMI-CEC support, but only devices with HDMI cable without additional cables and settings. RETURN Return to the previous menu. MENU ! SIMPLINK can be turned on the back of the SIMPLINK device with an OPTICAL cable. 48 WATCHING TV / CHANNEL CONTROL OPTION Menu Language Audio Language Input Label SIMPLINK Key Lock Caption Demo Mode...
... theater speakers and the TV speakers are fully supported. Select SIMPLINK. 3 ENTER Select O n or O f f. 4 Return to TV viewing. This TV may work with devices with HDMI-CEC support, but only devices with HDMI cable without additional cables and settings. RETURN Return to the previous menu. MENU ! SIMPLINK can be turned on the back of the SIMPLINK device with an OPTICAL cable. 48 WATCHING TV / CHANNEL CONTROL OPTION Menu Language Audio Language Input Label SIMPLINK Key Lock Caption Demo Mode...
Owner's Manual (English)
Page 52
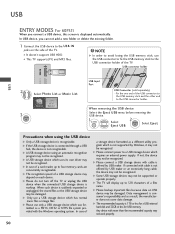
... USB memory. I This TV supports JPG and MP3 files. ! Precautions when using an automatic recognition program may not be recognized. G Please use a USB storage device which requires an external power supply. In case of the TV. In USB device, you connect a USB device, this screen is not supported by Windows, it may not work properly. 50 Fix the one end of the TV. G In case of a files name. G Please connect a USB...
... USB memory. I This TV supports JPG and MP3 files. ! Precautions when using an automatic recognition program may not be recognized. G Please use a USB storage device which requires an external power supply. In case of the TV. In USB device, you connect a USB device, this screen is not supported by Windows, it may not work properly. 50 Fix the one end of the TV. G In case of a files name. G Please connect a USB...
Owner's Manual (English)
Page 63
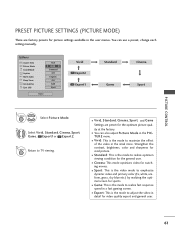
... the video mode to maximize the effect of the video in detail for sports. I Game: This is the mode to emphasize dynamic video and primary color (Ex, white, uniform, grass, sky blue etc.) by realizing the optimal screen for video quality expert and general user. 61 I Sport: This is the mode to TV viewing. TURE menu. MENU Return to adjust the video in the retail store. I You can use a preset, change each setting manually...
... the video mode to maximize the effect of the video in detail for sports. I Game: This is the mode to emphasize dynamic video and primary color (Ex, white, uniform, grass, sky blue etc.) by realizing the optimal screen for video quality expert and general user. 61 I Sport: This is the mode to TV viewing. TURE menu. MENU Return to adjust the video in the retail store. I You can use a preset, change each setting manually...
Owner's Manual (English)
Page 88
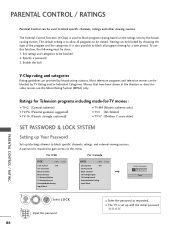
... TV Rating-French Downloadable Rating Input Block Enter Password **** Close 1 MENU ENTER Select L O C K. 21 2 3 456 789 0 Input the password. 86 I TV-Y7 (Children 7 years older) PARENTAL CONTROL / RATING SET PASSWORD & LOCK SYSTEM Setting up Your Password Set up with the initial password "0-0-0-0". Enable the lock V-Chip rating and categories Rating guidelines are provided by the broadcasting station. Ratings for Television programs including made-for a time period. A password is used to block specific channels, ratings, and external viewing sources...
... TV Rating-French Downloadable Rating Input Block Enter Password **** Close 1 MENU ENTER Select L O C K. 21 2 3 456 789 0 Input the password. 86 I TV-Y7 (Children 7 years older) PARENTAL CONTROL / RATING SET PASSWORD & LOCK SYSTEM Setting up Your Password Set up with the initial password "0-0-0-0". Enable the lock V-Chip rating and categories Rating guidelines are provided by the broadcasting station. Ratings for Television programs including made-for a time period. A password is used to block specific channels, ratings, and external viewing sources...

Owner's Manual (English)
Page 100
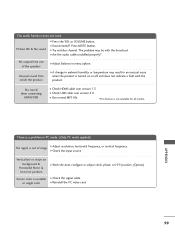
... to +, - I Check the power control settings. Poor reception on . No picture when connecting HDMI I Test the wall power outlet, plug another channel. APPENDIX 98 The remote control doesn't work I Check to see if there is turned on some channels I Try another product's power cord into wall power outlet? I Station or cable product experiencing problems, tune to another channel. I Activate any object between the product and the VCR. The HDMI cables don't support HDMI version 1.3, it cause...
... to +, - I Check the power control settings. Poor reception on . No picture when connecting HDMI I Test the wall power outlet, plug another channel. APPENDIX 98 The remote control doesn't work I Check to see if there is turned on some channels I Try another product's power cord into wall power outlet? I Station or cable product experiencing problems, tune to another channel. I Activate any object between the product and the VCR. The HDMI cables don't support HDMI version 1.3, it cause...
Owner's Manual (English)
Page 101
... signal cable. I Reinstall the PC video card. I Adjust resolution, horizontal frequency, or vertical frequency. There is a problem in an unusual noise when the product is turned on background & Horizontal Noise & Incorrect position I Work the Auto configure or adjust clock, phase, or H/V position. (Option) Screen color is out of the speakers Unusual sound from inside the product I Try another channel. No sound when connecting HDMI/USB I Press the VOL or VOLUME button. Picture OK & No sound...
... signal cable. I Reinstall the PC video card. I Adjust resolution, horizontal frequency, or vertical frequency. There is a problem in an unusual noise when the product is turned on background & Horizontal Noise & Incorrect position I Work the Auto configure or adjust clock, phase, or H/V position. (Option) Screen color is out of the speakers Unusual sound from inside the product I Try another channel. No sound when connecting HDMI/USB I Press the VOL or VOLUME button. Picture OK & No sound...


