Owners Manual
Page 4
... Location Marking : Apparatus shall not be exposed to dripping or splashing and no additional outlets or branch circuits. tric shock, do not drop onto the screen with liquids, such as vases, shall be placed on or over . Do not overload wall outlets. If grounding methods are dangerous. Do not try to...
... Location Marking : Apparatus shall not be exposed to dripping or splashing and no additional outlets or branch circuits. tric shock, do not drop onto the screen with liquids, such as vases, shall be placed on or over . Do not overload wall outlets. If grounding methods are dangerous. Do not try to...
Owners Manual
Page 5
...(Manual Tuning) ...... 39 - Color Tone - Preset 55 Manual Picture Adjustment - User Mode 67 Balance 68 TV Speakers On/Off Setup 69 Stereo/SAP Broadcasts Setup 70 Audio Language 71 On-Screen Menus Language Selection 72 Caption Mode 73 - Picture Mode - Preset 54 - User Mode 56 - User Mode... Source Setup 26 PC Setup 27 USB In Setup 32 Audio Out Setup 33 Remote Control Functions 34 Turning On TV 36 Channel Selection 36 Volume Adjustment 36 On-Screen Menus Selection 37 Channel Setup - Color Tone - Caption Option 76 Picture Mode - Cinema 3:2 Pulldown Mode 59 ...
...(Manual Tuning) ...... 39 - Color Tone - Preset 55 Manual Picture Adjustment - User Mode 67 Balance 68 TV Speakers On/Off Setup 69 Stereo/SAP Broadcasts Setup 70 Audio Language 71 On-Screen Menus Language Selection 72 Caption Mode 73 - Picture Mode - Preset 54 - User Mode 56 - User Mode... Source Setup 26 PC Setup 27 USB In Setup 32 Audio Out Setup 33 Remote Control Functions 34 Turning On TV 36 Channel Selection 36 Volume Adjustment 36 On-Screen Menus Selection 37 Channel Setup - Color Tone - Caption Option 76 Picture Mode - Cinema 3:2 Pulldown Mode 59 ...
Owners Manual
Page 7
.... aa DI G I T AL Manufactured under FULLHD 3 IOBOP LG TV with this logo has ambient light sensor that connect audio and video digital images and sound. ""_Some minute dot defects may be visible on the screen. Doing so may be carried out in this product with general ...HD 1080p signal. On Disposal a. FOR LCD TV If the TV feels cold to the regulations of LG's audio/video device connected to fit room atmosphere. b. The fluorescent lamp used in accordance to the touch, there may produce some temporary distortion effects on the screen, appearing as iPOD, and JPEG images...
.... aa DI G I T AL Manufactured under FULLHD 3 IOBOP LG TV with this logo has ambient light sensor that connect audio and video digital images and sound. ""_Some minute dot defects may be visible on the screen. Doing so may be carried out in this product with general ...HD 1080p signal. On Disposal a. FOR LCD TV If the TV feels cold to the regulations of LG's audio/video device connected to fit room atmosphere. b. The fluorescent lamp used in accordance to the touch, there may produce some temporary distortion effects on the screen, appearing as iPOD, and JPEG images...

Owners Manual
Page 13
PREPARATION STAND INSTALLATION (Onl3y7LBSD) ""_Here shown may be somewhat different from your TV. 0 Carefully place the product screen side down on m a cushioned surface that will protect product and screen from damage. 0 z Assemble the product stand with the product as shown. 0 Securely install the 4 bolts provided. 12
PREPARATION STAND INSTALLATION (Onl3y7LBSD) ""_Here shown may be somewhat different from your TV. 0 Carefully place the product screen side down on m a cushioned surface that will protect product and screen from damage. 0 z Assemble the product stand with the product as shown. 0 Securely install the 4 bolts provided. 12
Owners Manual
Page 25
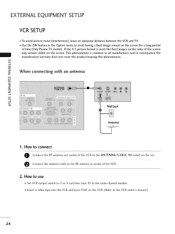
... consequence the manufactures warranty does not cover the product bearing this phenomenon. the fixed images on the sides of the screen may remain visible on the screen for a long period of the VCR. EXTERNALEQUIPMENT SETUP VCR SETUP To avoid picture noise (interference), leave an adequate ...distance between the VCR and TV. Use the ISM feature in socket of time (Only Plasma TV model). If the 4:3 picture format is common ...
... consequence the manufactures warranty does not cover the product bearing this phenomenon. the fixed images on the sides of the screen may remain visible on the screen for a long period of the VCR. EXTERNALEQUIPMENT SETUP VCR SETUP To avoid picture noise (interference), leave an adequate ...distance between the VCR and TV. Use the ISM feature in socket of time (Only Plasma TV model). If the 4:3 picture format is common ...

Owners Manual
Page 31
button and then use A or • button c "O Pserelescst thSecreIe_n. the I_ button to a PC Output, Select RGB-PC with using the INPUT button on the remote control. m x When you change the resolution, select the proper resolution in present input to see the best picture appearance. _o z X:) c z tPoresseslethcet thMeENPUICTUbRutEton maenndu.then use A or • button to Pmreensus. EXTERNALEQUIPMENT SETUP Screen Setup for PC mode Overview When the RGB input, of the set is connected to enter the screen adjustment @@ 3O
button and then use A or • button c "O Pserelescst thSecreIe_n. the I_ button to a PC Output, Select RGB-PC with using the INPUT button on the remote control. m x When you change the resolution, select the proper resolution in present input to see the best picture appearance. _o z X:) c z tPoresseslethcet thMeENPUICTUbRutEton maenndu.then use A or • button to Pmreensus. EXTERNALEQUIPMENT SETUP Screen Setup for PC mode Overview When the RGB input, of the set is connected to enter the screen adjustment @@ 3O

Owners Manual
Page 32
... the same H/V Sync Time. The Size adjustment range is to adjust picture to left/right and up/down as you prefer. Adjustment for screen Resolution, Position, Size, and Phase Use • or • button to select Resolution, Position, Size, or Phase. 0 Press the ...; button to original factory values) To initialize the adjusted values. Phase This function allows you to remove any vertical bars or stripes visible on the screen background. c Position This function is -30 ~ +30. 0 Press the ENTER button. x m _D z m XD c @@@ Resolution XGA (1024, 1280, 1360) isn't...
... the same H/V Sync Time. The Size adjustment range is to adjust picture to left/right and up/down as you prefer. Adjustment for screen Resolution, Position, Size, and Phase Use • or • button to select Resolution, Position, Size, or Phase. 0 Press the ...; button to original factory values) To initialize the adjusted values. Phase This function allows you to remove any vertical bars or stripes visible on the screen background. c Position This function is -30 ~ +30. 0 Press the ENTER button. x m _D z m XD c @@@ Resolution XGA (1024, 1280, 1360) isn't...

Owners Manual
Page 35
...viewed. -- (DASH) Used to enter a program number for multiple program channels such as 2-1,2-2, etc. 34 WATCHING TV / CHANNEL CONTROL REMOTE CONTROL FUNCTIONS When using the remote control, aim it at the screen. _ p.43 VOLUME UP Increase/decrease the sound level. /DOWN MUTE Switch the sound on... screen. VCR/DVD Control video cassette recorders or DVD players. I > z EXIT Clear all on the TV. Adjust brightness on or off auto- © matically...
...viewed. -- (DASH) Used to enter a program number for multiple program channels such as 2-1,2-2, etc. 34 WATCHING TV / CHANNEL CONTROL REMOTE CONTROL FUNCTIONS When using the remote control, aim it at the screen. _ p.43 VOLUME UP Increase/decrease the sound level. /DOWN MUTE Switch the sound on... screen. VCR/DVD Control video cassette recorders or DVD players. I > z EXIT Clear all on the TV. Adjust brightness on or off auto- © matically...

Owners Manual
Page 36
... are linked automatically, only if these are connected). USB EJECT Remove the USB device. _ p.46 35 MODE Select the remote operating mode: TV, DVD, VCR, AUDIO, or STB. * If the mode of another product is not used for fT1 type of sound for the selected product... can control the TV. N MEDIAHosT Enter to the last TV channel. POWER Turns your TV or any other programmed equipment on or off, depending on the mode. TV INPUT In AV 1-2, Component 1-2, RGB-PC,HDMI1, HDMI2 and HDMI3 input sources, screen returns to the MEDIAHOSTmode. -r" z Inside...
... are linked automatically, only if these are connected). USB EJECT Remove the USB device. _ p.46 35 MODE Select the remote operating mode: TV, DVD, VCR, AUDIO, or STB. * If the mode of another product is not used for fT1 type of sound for the selected product... can control the TV. N MEDIAHosT Enter to the last TV channel. POWER Turns your TV or any other programmed equipment on or off, depending on the mode. TV INPUT In AV 1-2, Component 1-2, RGB-PC,HDMI1, HDMI2 and HDMI3 input sources, screen returns to the MEDIAHOSTmode. -r" z Inside...
Owners Manual
Page 38
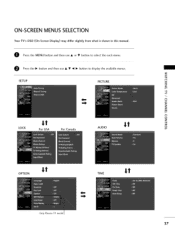
ON-SCREENMENUS SELECTION Your TV's OSD (On Screen Display) may differ slightly from what is shown in this manual. @ Press the MENU button and then use A or • button to select the each menu. @ Press the I_ button and then use A • _1 I_ button to display the available menus. z < N I > z z r_l N 0 It Z It _m LOCK For USA For Canada AUDIO 0 OPTION It It TIME Only Plasma TV model 37 SETUP PICTURE "1-
ON-SCREENMENUS SELECTION Your TV's OSD (On Screen Display) may differ slightly from what is shown in this manual. @ Press the MENU button and then use A or • button to select the each menu. @ Press the I_ button and then use A • _1 I_ button to display the available menus. z < N I > z z r_l N 0 It Z It _m LOCK For USA For Canada AUDIO 0 OPTION It It TIME Only Plasma TV model 37 SETUP PICTURE "1-
Owners Manual
Page 40
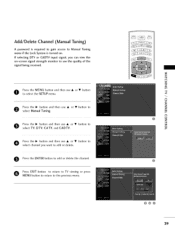
... menu. Ptoresseslethcet thMeENSUETUbPutmtoennua. Add/Delete Channel (Manual Tuning) A password is required to gain access to Manual Tuning menu if the Lock System is turned on -screen signal strength monitor to see the quality of the signal being received. nd then use • or • button Pserelescst thMeanI_ualbTututonninga_nd then use • or...; Z © @@@ 39 If selecting DTV or CADTV input signal, you want to select channel you can view the on . Press EXIT button to return to TV viewing or press MENU button to return to add or delete the channel.
... menu. Ptoresseslethcet thMeENSUETUbPutmtoennua. Add/Delete Channel (Manual Tuning) A password is required to gain access to Manual Tuning menu if the Lock System is turned on -screen signal strength monitor to see the quality of the signal being received. nd then use • or • button Pserelescst thMeanI_ualbTututonninga_nd then use • or...; Z © @@@ 39 If selecting DTV or CADTV input signal, you want to select channel you can view the on . Press EXIT button to return to TV viewing or press MENU button to return to add or delete the channel.

Owners Manual
Page 41
...TV / CHANNEL CONTROL Channel Editing From the default channel list created from the Auto Tuning channel search, you can be created by referring to the N -r" small window at the top-left corner of that channel number. lighted you can create two different types of channel lists in front of the screen.... N I > z z fT1 N © Z Pserelescst ththee MSEENTUUPbumtteonnu. z You can create your Favorite List. The surfing icon will now see a screen filled with ENTER button. and then use A or •...
...TV / CHANNEL CONTROL Channel Editing From the default channel list created from the Auto Tuning channel search, you can be created by referring to the N -r" small window at the top-left corner of that channel number. lighted you can create two different types of channel lists in front of the screen.... N I > z z fT1 N © Z Pserelescst ththee MSEENTUUPbumtteonnu. z You can create your Favorite List. The surfing icon will now see a screen filled with ENTER button. and then use A or •...

Owners Manual
Page 42
...: (ex: When connected only to select the input source. I Av1I -- AV 1-2: Select it when using the DVD or the Digital set -top box depend on screen. Press the ENTER button to change the input to the unit, on connector. 41 I Av2I t J Antenna: Select it when watching the CADTV/CATV. Component 1-2: Select... fT1 N 0 Z @ If no external input sources are connected: < IAoteoI-oIa Cab,Ie--I Av2I -- It°raoPoeoItl N -r" ! ! > Z Z I _o"ooIa -- Cable: Select it when watching the DTV/TV. ii i_ N "l-
...: (ex: When connected only to select the input source. I Av1I -- AV 1-2: Select it when using the DVD or the Digital set -top box depend on screen. Press the ENTER button to change the input to the unit, on connector. 41 I Av2I t J Antenna: Select it when watching the CADTV/CATV. Component 1-2: Select... fT1 N 0 Z @ If no external input sources are connected: < IAoteoI-oIa Cab,Ie--I Av2I -- It°raoPoeoItl N -r" ! ! > Z Z I _o"ooIa -- Cable: Select it when watching the DTV/TV. ii i_ N "l-

Owners Manual
Page 44
... A • _ I_ button to the previous TV channel regardless of the current mode. @ DISC playback: Select and play discs. When multiple discs are available, the titles of discs are conveniently displayed at the bottom of the screen. @ VCR playback: Play and control the connected ...VCR. @ HDD Recordings playback: Play and control recordings stored in bright color) 43 SimpLink Menu N -r" z < N -r" > Z Z fT1 N 0 Z _m 0 @@ @ TV viewing: Switch to select the desired device and...
... A • _ I_ button to the previous TV channel regardless of the current mode. @ DISC playback: Select and play discs. When multiple discs are available, the titles of discs are conveniently displayed at the bottom of the screen. @ VCR playback: Play and control the connected ...VCR. @ HDD Recordings playback: Play and control recordings stored in bright color) 43 SimpLink Menu N -r" z < N -r" > Z Z fT1 N 0 Z _m 0 @@ @ TV viewing: Switch to select the desired device and...

Owners Manual
Page 47
... The recognition speed of remote control before removing -H the USB device. In USB device, you connect a USB device or press the :+_,_s>button, this screen is not supported by Windows, it may not be recognized. Please do not connect the USB storage device which requires an external power supply. When... such device is working. Please do not turn off the TV or unplug the USB device when the connected USB storage device is suddenly separated or unplugged, the stored files or the USB storage device may...
... The recognition speed of remote control before removing -H the USB device. In USB device, you connect a USB device or press the :+_,_s>button, this screen is not supported by Windows, it may not be recognized. Please do not connect the USB storage device which requires an external power supply. When... such device is working. Please do not turn off the TV or unplug the USB device when the connected USB storage device is suddenly separated or unplugged, the stored files or the USB storage device may...

Owners Manual
Page 48
The On Screen Display may be different from your set. Screen Components m Usable USB memory -1- 0 -.q @ Current page/Total pages @ Total number of marked thumbnail photos @ Corresponding buttons on the remote control 47 PHOTO LIST It's available to assist with the TV operation. Images are an example to playback the photo file(*.jpg) in the USB device.
The On Screen Display may be different from your set. Screen Components m Usable USB memory -1- 0 -.q @ Current page/Total pages @ Total number of marked thumbnail photos @ Corresponding buttons on the remote control 47 PHOTO LIST It's available to assist with the TV operation. Images are an example to playback the photo file(*.jpg) in the USB device.

Owners Manual
Page 49
... Photo Selection and PopUp Menu As shown, up to show the PopUp menu. _ View : Display the selected item. _, Mark All: Mark all photos on the screen. _ Delete : Delete the selected photo item. _/_Cancel: Close the pop-up menu. If no photos are marked, you can view individual photos or a slide ...show . O Repeatedly, press EXIT button to return to the Media Host 48 @@ button to return to TV viewing or press the menu. r11 _D O Use the CH A or • button to mark or unmark a photo. vidually or all photos indi- When...
... Photo Selection and PopUp Menu As shown, up to show the PopUp menu. _ View : Display the selected item. _, Mark All: Mark all photos on the screen. _ Delete : Delete the selected photo item. _/_Cancel: Close the pop-up menu. If no photos are marked, you can view individual photos or a slide ...show . O Repeatedly, press EXIT button to return to the Media Host 48 @@ button to return to TV viewing or press the menu. r11 _D O Use the CH A or • button to mark or unmark a photo. vidually or all photos indi- When...

Owners Manual
Page 50
...ENTER button to show . After 4 hours, the slide show . Use _ or I_ button to the View menu, then press the ENTER button. Detailed operations screen. When selected, the selected photos are displayed during slide show the PopUp menu. Rotates the photo 90 °, 180 °, 270 °, 360 °...ENTER button on Set the BGM device and album in Option. _ _ (Rotate): Rotate photos. are displayed during slide show will end and go to TV mode or external input mode. _/_BGM: Listen to music while viewing photos in full size. O The selected photo is displayed in full size. _/...
...ENTER button to show . After 4 hours, the slide show . Use _ or I_ button to the View menu, then press the ENTER button. Detailed operations screen. When selected, the selected photos are displayed during slide show the PopUp menu. Rotates the photo 90 °, 180 °, 270 °, 360 °...ENTER button on Set the BGM device and album in Option. _ _ (Rotate): Rotate photos. are displayed during slide show will end and go to TV mode or external input mode. _/_BGM: Listen to music while viewing photos in full size. O The selected photo is displayed in full size. _/...

Owners Manual
Page 51
ues. Use _ or I_ button to the Media Host 5O Use A • _1 I_ button to select and control the menu on the full-sized screen. 0 Use EXIT button to go to _ and press ENTER to save the settings. ing or press menu, button to return to select Option and press ... to select the previous or next photo. To see the menu again on the full-sized screen, Use c_ or I1_ button to TV view- Then go back to the photo list from the full-sized screen. 0 Repeatedly, press EXIT button to return to select Hide and press ENTER button, "1- _/_Option: Set values...
ues. Use _ or I_ button to the Media Host 5O Use A • _1 I_ button to select and control the menu on the full-sized screen. 0 Use EXIT button to go to _ and press ENTER to save the settings. ing or press menu, button to return to select Option and press ... to select the previous or next photo. To see the menu again on the full-sized screen, Use c_ or I1_ button to TV view- Then go back to the photo list from the full-sized screen. 0 Repeatedly, press EXIT button to return to select Hide and press ENTER button, "1- _/_Option: Set values...
Owners Manual
Page 52
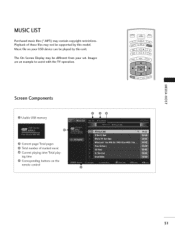
Music file on the remote control 51 m Screen Components 0 @ Usable USB memory 0 Current page/Total pages Total number of these files may contain copyright restrictions. The On Screen Display may be played by this unit. MUSIC LIST Purchased music files (*.MP3) may not be supported by this model. Images are an example to assist with the TV operation. Playback of marked music Current playing time/Total playing time 0 Corresponding buttons on your USB device can be different from your set.
Music file on the remote control 51 m Screen Components 0 @ Usable USB memory 0 Current page/Total pages Total number of these files may contain copyright restrictions. The On Screen Display may be played by this unit. MUSIC LIST Purchased music files (*.MP3) may not be supported by this model. Images are an example to assist with the TV operation. Playback of marked music Current playing time/Total playing time 0 Corresponding buttons on your USB device can be different from your set.

