
Owner's Manual (English)
Page 6
... Mode 69 Sound Setting Adjustment - Add / Delete Channel ( Manual Tuning) . . 43 - Picture Mode - Preset 58 Manual Picture Adjustment - User Mode 60 XD - Analog Broadcasting System Captions . . . . 77 - Color Tone - User Mode 70 Balance 72 Stereo / SAP Broadcast Setup 73 TV Speakers On/ Off Setup 74 Audio Language 75 On-Screen Menus Language Selection 76 Caption Mode - Preset 57 - User Mode 59 - Cinema 3:2 Pulldown Mode 62 Advanced - Auto Scan ( Auto Tuning 42 - Digital Broadcasting System Captions . . .79 - Picture Mode - Channel Editing 44 Input List...
... Mode 69 Sound Setting Adjustment - Add / Delete Channel ( Manual Tuning) . . 43 - Picture Mode - Preset 58 Manual Picture Adjustment - User Mode 60 XD - Analog Broadcasting System Captions . . . . 77 - Color Tone - User Mode 70 Balance 72 Stereo / SAP Broadcast Setup 73 TV Speakers On/ Off Setup 74 Audio Language 75 On-Screen Menus Language Selection 76 Caption Mode - Preset 57 - User Mode 59 - Cinema 3:2 Pulldown Mode 62 Advanced - Auto Scan ( Auto Tuning 42 - Digital Broadcasting System Captions . . .79 - Picture Mode - Channel Editing 44 Input List...
Owner's Manual (English)
Page 9
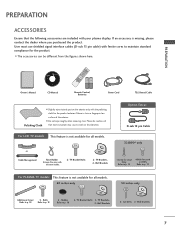
User must use shielded signal interface cables (D-sub 15 pin cable) with the twist holder. 2- CD Manual TV INPUT STB BRIGHT - MENU BACK CC AUTO DEMO APM M/C EJECT RATIO SIMPLINK 1.5V 1.5V Remote Control, Batteries Power Cord 75Ω Round Cable Polishing Cloth I Slightly wipe stained spot on the exterior only with your plasma display. For LCD TV models This feature is stain or fingerprint on surface of that the following...
User must use shielded signal interface cables (D-sub 15 pin cable) with the twist holder. 2- CD Manual TV INPUT STB BRIGHT - MENU BACK CC AUTO DEMO APM M/C EJECT RATIO SIMPLINK 1.5V 1.5V Remote Control, Batteries Power Cord 75Ω Round Cable Polishing Cloth I Slightly wipe stained spot on the exterior only with your plasma display. For LCD TV models This feature is stain or fingerprint on surface of that the following...
Owner's Manual (English)
Page 22
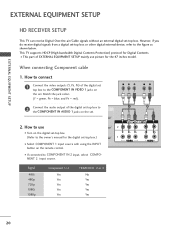
... COMPONENT IN AUDIO 1 jacks on the set . How to use picture for the 47 inches model. This TV supports HDCP (High-bandwidth Digital Contents Protection) protocol for the digital set -top box. (Refer to the owner's manual for Digital Contents. When connecting Component cable 1. I This part of the digital set top box to the COMPONENT IN VIDEO 1 jacks on the remote control. How to connect 1 Connect the video outputs (Y, PB, PR) of EXTERNAL EQUIPMENT SETUP mainly use I Turn on the digital set -top bo(xDV.)I) I If connected to COMPONENT IN 2 input, select COMPONENT 2 input...
... COMPONENT IN AUDIO 1 jacks on the set . How to use picture for the 47 inches model. This TV supports HDCP (High-bandwidth Digital Contents Protection) protocol for the digital set -top box. (Refer to the owner's manual for Digital Contents. When connecting Component cable 1. I This part of the digital set top box to the COMPONENT IN VIDEO 1 jacks on the remote control. How to connect 1 Connect the video outputs (Y, PB, PR) of EXTERNAL EQUIPMENT SETUP mainly use I Turn on the digital set -top bo(xDV.)I) I If connected to COMPONENT IN 2 input, select COMPONENT 2 input...
Owner's Manual (English)
Page 23
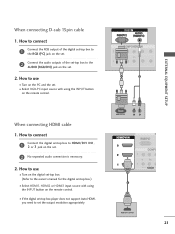
... use I Turn on the digital set-top box. (Refer to use I Select HDMI1, HDMI2 or HDMI3 input source with using the INPUT button on the remote control. How to the owner's manual for the digital set . 2. I Select RGB-PC input source with using the INPUT button on the set. 2 No separated audio connection is necessary. 2. I If the digital set-top box player does not support Auto HDMI, you need to HDMI/DVI IN1, 2 or 3 jack on the remote control. RGB OUTPUT L R (DVI) 1 HDMI-DTV OUTPUT 21 RGB 1 2 When connecting HDMI cable 1. How to connect 1 Connect the digital...
... use I Turn on the digital set-top box. (Refer to use I Select HDMI1, HDMI2 or HDMI3 input source with using the INPUT button on the remote control. How to the owner's manual for the digital set . 2. I Select RGB-PC input source with using the INPUT button on the set. 2 No separated audio connection is necessary. 2. I If the digital set-top box player does not support Auto HDMI, you need to HDMI/DVI IN1, 2 or 3 jack on the remote control. RGB OUTPUT L R (DVI) 1 HDMI-DTV OUTPUT 21 RGB 1 2 When connecting HDMI cable 1. How to connect 1 Connect the digital...
Owner's Manual (English)
Page 24
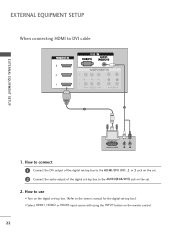
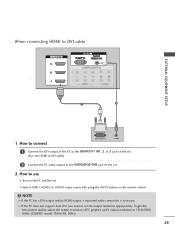
EXTERNAL EQUIPMENT SETUP When connecting HDMI to the AUDIO(RGB/DVI) jack on the set -top box.) I Turn on the remote control. 22 How to use I Select HDMI1, HDMI2 or HDMI3 input source with using the INPUT button on the digital set-top box. (Refer to the owner's manual for the digital set . 2. How to connect 1 Connect the DVI output of the digital set-top box to the HDMI/DVI IN1, 2 or 3 jack on the set. 2 Connect the audio output of the digital set-top box to DVI cable RGB 3 EXTERNAL EQUIPMENT SETUP 2 1 DVI-DTV OUTPUT L R 1.
EXTERNAL EQUIPMENT SETUP When connecting HDMI to the AUDIO(RGB/DVI) jack on the set -top box.) I Turn on the remote control. 22 How to use I Select HDMI1, HDMI2 or HDMI3 input source with using the INPUT button on the digital set-top box. (Refer to the owner's manual for the digital set . 2. How to connect 1 Connect the DVI output of the digital set-top box to the HDMI/DVI IN1, 2 or 3 jack on the set. 2 Connect the audio output of the digital set-top box to DVI cable RGB 3 EXTERNAL EQUIPMENT SETUP 2 1 DVI-DTV OUTPUT L R 1.
Owner's Manual (English)
Page 25
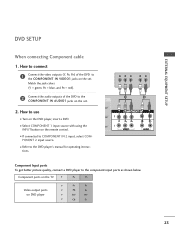
... DVD player's manual for operating instruc- tions. Component ports on the TV Y PB PR Video output ports on the remote control. Match the jack colors (Y = green, PB = blue, and PR = red). 2 Connect the audio outputs of the DVD to the COMPONENT IN AUDIO1 jacks on the set . 2. PONENT 2 input source. Y PB PR L R 1 2 Component Input ports To get better picture quality, connect a DVD player to COMPONENT IN 2 input, select COM- How to connect 1 Connect the video outputs (Y, PB, PR) of the DVD to the COMPONENT IN VIDEO1 jacks on the set...
... DVD player's manual for operating instruc- tions. Component ports on the TV Y PB PR Video output ports on the remote control. Match the jack colors (Y = green, PB = blue, and PR = red). 2 Connect the audio outputs of the DVD to the COMPONENT IN AUDIO1 jacks on the set . 2. PONENT 2 input source. Y PB PR L R 1 2 Component Input ports To get better picture quality, connect a DVD player to COMPONENT IN 2 input, select COM- How to connect 1 Connect the video outputs (Y, PB, PR) of the DVD to the COMPONENT IN VIDEO1 jacks on the set...
Owner's Manual (English)
Page 26
...Auto HDMI, you need to the DVD player's manual for operating instructions. I Select A V 1 input source with using the INPUT button on the remote control. I If connected to the DVD player's manual for operating instructions. I Refer to AV IN 2, select A V 2 input source. How to connect 1 Connect the HDMI output of the DVD to use I Select HDMI1, HDMI2 or HDMI3 input source with using the INPUT button on the set . 2. How to the HDMI/DVI IN1, 2 or 3 jack on the remote control. How to the AUDIO input jacks on the DVD player, insert a DVD. EXTERNAL EQUIPMENT SETUP...
...Auto HDMI, you need to the DVD player's manual for operating instructions. I Select A V 1 input source with using the INPUT button on the remote control. I If connected to the DVD player's manual for operating instructions. I Refer to AV IN 2, select A V 2 input source. How to connect 1 Connect the HDMI output of the DVD to use I Select HDMI1, HDMI2 or HDMI3 input source with using the INPUT button on the set . 2. How to the HDMI/DVI IN1, 2 or 3 jack on the remote control. How to the AUDIO input jacks on the DVD player, insert a DVD. EXTERNAL EQUIPMENT SETUP...
Owner's Manual (English)
Page 27
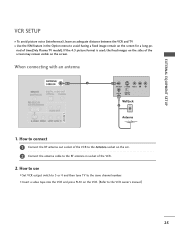
... the VCR owner's manual.) 25 When connecting with an antenna ANTENNA/ CABLE IN 1 ANT OUT S-VIDEO VIDEO L R ANT IN OUTPUT SWITCH Wall Jack 2 Antenna 1. How to use I Insert a video tape into the VCR and press PLAY on the screen for a long pe- I Set VCR output switch to 3 or 4 and then tune TV to the same channel number. How to connect 1 Connect the RF antenna out socket of time(Only Plasma TV model). riod of the VCR to the Antenna socket on the screen. EXTERNAL EQUIPMENT SETUP VCR SETUP...
... the VCR owner's manual.) 25 When connecting with an antenna ANTENNA/ CABLE IN 1 ANT OUT S-VIDEO VIDEO L R ANT IN OUTPUT SWITCH Wall Jack 2 Antenna 1. How to use I Insert a video tape into the VCR and press PLAY on the screen for a long pe- I Set VCR output switch to 3 or 4 and then tune TV to the same channel number. How to connect 1 Connect the RF antenna out socket of time(Only Plasma TV model). riod of the VCR to the Antenna socket on the screen. EXTERNAL EQUIPMENT SETUP VCR SETUP...
Owner's Manual (English)
Page 31
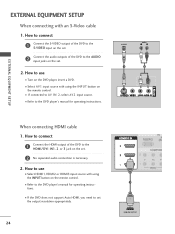
... INPUT button on the remote control. G If the PC does not support Auto DVI, you need to DVI cable RGB EXTERNAL EQUIPMENT SETUP 1 2 1. How to connect DVI-PC OUTPUT AUDIO 1 Connect the DVI output of PC graphics card's output resolution to the AUDIO(RGB/DVI) jack on the set. 2. To get the best picture quality, adjust the output resolution of the PC to the HDMI/DVI IN1, 2 or 3 jack on the set. (Use the HDMI to DVI cable) 2 Connect the PC audio output to 1920x1080, 60Hz. (32LB9D* model: 1360x768, 60Hz) 29 When connecting HDMI...
... INPUT button on the remote control. G If the PC does not support Auto DVI, you need to DVI cable RGB EXTERNAL EQUIPMENT SETUP 1 2 1. How to connect DVI-PC OUTPUT AUDIO 1 Connect the DVI output of PC graphics card's output resolution to the AUDIO(RGB/DVI) jack on the set. 2. To get the best picture quality, adjust the output resolution of the PC to the HDMI/DVI IN1, 2 or 3 jack on the set. (Use the HDMI to DVI cable) 2 Connect the PC audio output to 1920x1080, 60Hz. (32LB9D* model: 1360x768, 60Hz) 29 When connecting HDMI...
Owner's Manual (English)
Page 32
... or brightness in use. EXTERNAL EQUIPMENT SETUP NOTES G Depending on the graphics card, DOS mode may become permanently imprinted on the screen. G Avoid keeping a fixed image on the screen for Horizontal and Vertical frequencies is clear. G The synchronization input form for a long period of the PC graphic card. If noise is present, change the PC output to another resolution, change the PC graphic...
... or brightness in use. EXTERNAL EQUIPMENT SETUP NOTES G Depending on the graphics card, DOS mode may become permanently imprinted on the screen. G Avoid keeping a fixed image on the screen for Horizontal and Vertical frequencies is clear. G The synchronization input form for a long period of the PC graphic card. If noise is present, change the PC output to another resolution, change the PC graphic...
Owner's Manual (English)
Page 39
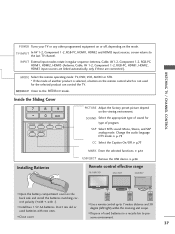
... the selected product can control the TV. I Install two 1.5V AA batteries. I Close cover. SAP Select MTS sound: Mono, Stereo, and SAP analog mode. MEDIAHOST Inside the Sliding Cover BACK PICTURE SOUND SAP CC MARK USB EJECT PICTURE Adjust the factory preset picture depend on the mode. DAY + LIVE TV INPUT MODE DAY - STB MEDIA HOST WATCHING TV / CHANNEL CONTROL POWER Turns your TV or any other programmed equipment on or off, depending on the viewing environment. INPUT External input modes...
... the selected product can control the TV. I Install two 1.5V AA batteries. I Close cover. SAP Select MTS sound: Mono, Stereo, and SAP analog mode. MEDIAHOST Inside the Sliding Cover BACK PICTURE SOUND SAP CC MARK USB EJECT PICTURE Adjust the factory preset picture depend on the mode. DAY + LIVE TV INPUT MODE DAY - STB MEDIA HOST WATCHING TV / CHANNEL CONTROL POWER Turns your TV or any other programmed equipment on or off, depending on the viewing environment. INPUT External input modes...

Owner's Manual (English)
Page 40
WATCHING TV / CHANNEL CONTROL WATCHING TV /CHANNEL CONTROL TURNING ON TV 1 First, connect power cord correctly. MENU BRIGHT + TIMER RATIO SIMPLINK BACK PICTURE SOUND SAP CC MARK USB EJECT 38 I This TV is programmed to remember which mode it was last set to standby mode. TV INPUT INPUT STB MEDIA HOST BRIGHT - At this moment, the TV switches to be away on vacation, disconnect the power plug from the wall power outlet. NOTE G If you turn the TV...
WATCHING TV / CHANNEL CONTROL WATCHING TV /CHANNEL CONTROL TURNING ON TV 1 First, connect power cord correctly. MENU BRIGHT + TIMER RATIO SIMPLINK BACK PICTURE SOUND SAP CC MARK USB EJECT 38 I This TV is programmed to remember which mode it was last set to standby mode. TV INPUT INPUT STB MEDIA HOST BRIGHT - At this moment, the TV switches to be away on vacation, disconnect the power plug from the wall power outlet. NOTE G If you turn the TV...
Owner's Manual (English)
Page 43
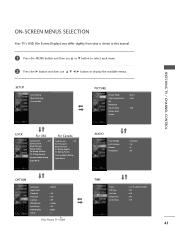
SETUP Auto Tuning Manual Tuning Channel Edit PICTURE Picture Mode Color Temperature XD Advanced Aspect Ratio Picture Reset Screen : User1 : Cool : 16:9 LOCK For USA Lock System : Off Set Password Block Channel Movie Rating TV Rating-Children TV Rating-General Downloadable Rating Input Block For Canada Lock System Set Password Block Channel TV Rating-English TV Rating-French : Off Downloadable Rating Input Block AUDIO Sound Mode Auto Volume Balance TV Speaker : Standard : On : 0 : On OPTION Language Input Label SimpLink Key Lock Caption ISM Method Low Power Front Display...
SETUP Auto Tuning Manual Tuning Channel Edit PICTURE Picture Mode Color Temperature XD Advanced Aspect Ratio Picture Reset Screen : User1 : Cool : 16:9 LOCK For USA Lock System : Off Set Password Block Channel Movie Rating TV Rating-Children TV Rating-General Downloadable Rating Input Block For Canada Lock System Set Password Block Channel TV Rating-English TV Rating-French : Off Downloadable Rating Input Block AUDIO Sound Mode Auto Volume Balance TV Speaker : Standard : On : 0 : On OPTION Language Input Label SimpLink Key Lock Caption ISM Method Low Power Front Display...
Owner's Manual (English)
Page 45
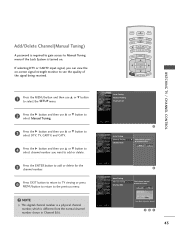
... in Channel Edit. TV INPUT STB MEDIA HOST BRIGHT - BACK BACK PICTURE SOUND SAP CC PICTURE SAP CC 2 Press the MARK USB EJECT G button and then use D or button to E MARK USB EJECT select Manual Tuning. 3 Press the G button and then use D or E button to select DTV, TV, CADTV, and CATV. 4 Press the G button and then use D or E button to delete the channel. 43 NOTE G This digital channel number is a physical channel number, which is turned on -screen signal strength monitor...
... in Channel Edit. TV INPUT STB MEDIA HOST BRIGHT - BACK BACK PICTURE SOUND SAP CC PICTURE SAP CC 2 Press the MARK USB EJECT G button and then use D or button to E MARK USB EJECT select Manual Tuning. 3 Press the G button and then use D or E button to select DTV, TV, CADTV, and CATV. 4 Press the G button and then use D or E button to delete the channel. 43 NOTE G This digital channel number is a physical channel number, which is turned on -screen signal strength monitor...
Owner's Manual (English)
Page 50
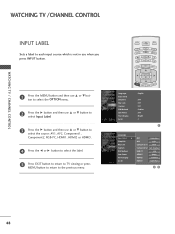
... use STB when youMEDIA HOST press INPUT button. Language Input label SimpLink Key Lock Caption ISM Method Low Power Front Display Set ID TIMER RATIO SIMPLINK : English : Off : Off : Off : Orbiter : Off : Bright : 1 PICTURE SOUND MARK USB EJECT BACK CC Language Input label G SimpLink Key Lock Caption ISM Method Low Power Front Display Set ID AV1 Cable Box AV2 VCR Component1 DVD Component2 Set Top Box RGB-PC VCR HDMI1 Game HDMI2 Satellite HDMI3 Cable Box 48 WATCHING TV / CHANNEL CONTROL WATCHING TV /CHANNEL CONTROL...
... use STB when youMEDIA HOST press INPUT button. Language Input label SimpLink Key Lock Caption ISM Method Low Power Front Display Set ID TIMER RATIO SIMPLINK : English : Off : Off : Off : Orbiter : Off : Bright : 1 PICTURE SOUND MARK USB EJECT BACK CC Language Input label G SimpLink Key Lock Caption ISM Method Low Power Front Display Set ID AV1 Cable Box AV2 VCR Component1 DVD Component2 Set Top Box RGB-PC VCR HDMI1 Game HDMI2 Satellite HDMI3 Cable Box 48 WATCHING TV / CHANNEL CONTROL WATCHING TV /CHANNEL CONTROL...

Owner's Manual (English)
Page 59
... Eye (Only LCD TV models), Dynamic, Standard, Mild, User1, and User2 (your own settings). 2 Press the EXIT button to save and return to adjust Picture Mode. Picture Mode Color Temperature XD Advanced Aspect Ratio Picture Reset Screen : User1 : Cool : 16:9 Picture Mode G Color Temperature XD Advanced Aspect Ratio Picture Reset Screen Intelligent Eye Dynamic Standard Mild User 1 User 2 PICTURE CONTROL PICTURE SO MARK USB 57 In the User 1, and User 2 modes only, user can also use the PICTURE menu to TV viewing. I You can directly adjust the contrast, brightness...
... Eye (Only LCD TV models), Dynamic, Standard, Mild, User1, and User2 (your own settings). 2 Press the EXIT button to save and return to adjust Picture Mode. Picture Mode Color Temperature XD Advanced Aspect Ratio Picture Reset Screen : User1 : Cool : 16:9 Picture Mode G Color Temperature XD Advanced Aspect Ratio Picture Reset Screen Intelligent Eye Dynamic Standard Mild User 1 User 2 PICTURE CONTROL PICTURE SO MARK USB 57 In the User 1, and User 2 modes only, user can also use the PICTURE menu to TV viewing. I You can directly adjust the contrast, brightness...
Owner's Manual (English)
Page 62
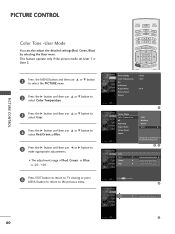
...E button to select Red, Green, or Blue. 5 Press the G button and then use D or E button to make appropriate adjustments. User Red 0 G Green 0 Blue 0 Press MENU to the detailed setting screen. MENU BRIGHT + TIMER RATIO SIMPLINK Picture Mode : User1 Color Temperature : Cool XD Advanced Aspect Ratio : 16:9 Picture Reset Screen BACK PICTURE SOUND CC MARK USB EJECT Picture Mode Color Temperature XD Advanced Aspect Ratio Picture Reset Screen Cool Medium Warm User G Selection ( G or ) leads you to confirm. PICTURE CONTROL PICTURE CONTROL TV INPUT...
...E button to select Red, Green, or Blue. 5 Press the G button and then use D or E button to make appropriate adjustments. User Red 0 G Green 0 Blue 0 Press MENU to the detailed setting screen. MENU BRIGHT + TIMER RATIO SIMPLINK Picture Mode : User1 Color Temperature : Cool XD Advanced Aspect Ratio : 16:9 Picture Reset Screen BACK PICTURE SOUND CC MARK USB EJECT Picture Mode Color Temperature XD Advanced Aspect Ratio Picture Reset Screen Cool Medium Warm User G Selection ( G or ) leads you to confirm. PICTURE CONTROL PICTURE CONTROL TV INPUT...
Owner's Manual (English)
Page 79
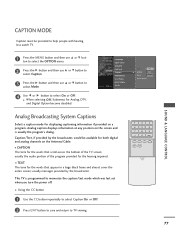
... turn the power off. CAPTION MODE Caption must be available for the hearing impaired. PICTURE SOUND CC PICTURE SOUND SAP CC MAR MARK USB EJECT I TEXT The term for displaying captioning information if provided on the screen and is programmed to select O n or O f f. Language ton to select Caption. Input Label TV INPUT TV INP TV INPUT TV INPUT SimpLink IA HOST 2 Press the G button and then use D or E button to select the OPTION menu. SOUND & LANGUAGE CONTROL Analog Broadcasting System Captions Select a caption mode...
... turn the power off. CAPTION MODE Caption must be available for the hearing impaired. PICTURE SOUND CC PICTURE SOUND SAP CC MAR MARK USB EJECT I TEXT The term for displaying captioning information if provided on the screen and is programmed to select O n or O f f. Language ton to select Caption. Input Label TV INPUT TV INP TV INPUT TV INPUT SimpLink IA HOST 2 Press the G button and then use D or E button to select the OPTION menu. SOUND & LANGUAGE CONTROL Analog Broadcasting System Captions Select a caption mode...
Owner's Manual (English)
Page 88
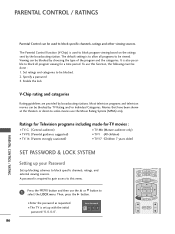
... Password 86 BACK PICTURE SOUND SAP CC BACK TV INPUT STB MEDIA HOST BRIGHT - Most television programs and television movies can be viewed. MENU BRIGHT + TIMER RATIO SIMPLINK BACK Movies that have been shown at the theaters or direct-to block specific channels, ratings, and external viewing sources. To use this menu. 1 Press the MENU button and then use the Movie Rating System (MPAA) only. Then, press the G button. Viewing can be done : 1. PARENTAL CONTROL / RATINGS Parental Control...
... Password 86 BACK PICTURE SOUND SAP CC BACK TV INPUT STB MEDIA HOST BRIGHT - Most television programs and television movies can be viewed. MENU BRIGHT + TIMER RATIO SIMPLINK BACK Movies that have been shown at the theaters or direct-to block specific channels, ratings, and external viewing sources. To use this menu. 1 Press the MENU button and then use the Movie Rating System (MPAA) only. Then, press the G button. Viewing can be done : 1. PARENTAL CONTROL / RATINGS Parental Control...
Owner's Manual (English)
Page 95
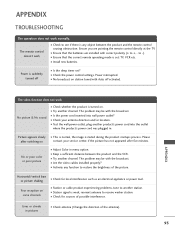
...'s power cord into wall power outlet? I Is the sleep timer set : TV, VCR etc. I Install new batteries. I Station or cable product experiencing problems, tune to +, - I Try another channel. The problem may be with the broadcast. Ensure you are installed with Auto off I Ensure that the batteries are pointing the remote control directly at the TV. Power interrupted. No picture & No sound I Are the video cables installed properly? I Check whether the product is set ? I Check antenna (Change the direction...
...'s power cord into wall power outlet? I Is the sleep timer set : TV, VCR etc. I Install new batteries. I Station or cable product experiencing problems, tune to +, - I Try another channel. The problem may be with the broadcast. Ensure you are installed with Auto off I Ensure that the batteries are pointing the remote control directly at the TV. Power interrupted. No picture & No sound I Are the video cables installed properly? I Check whether the product is set ? I Check antenna (Change the direction...


