Owners Manual
Page 6
... Channel Setup 43 Favorite Channel List 43 Brief Information 44 Input List 45 Input Label 46 AV Mode 47 SIMPLINK 48 USB Entry Modes 50 Photo List 51 Music List 55 Movie List 58 DivX Registration Code 62 Deactivation 63 PICTURE CONTROL Picture Size (Aspect Ratio) Control 64 ... 11 Cable Management 12 Desktop Pedestal Installation 13 VESA Wall Mounting 13 Securing the TV to the wall to prevent falling when the TV is used on a stand 14 Swivel Stand 14 Antenna or Cable Connection 15 EXTERNAL EQUIPMENT SETUP HD Receiver Setup 16 DVD Setup 19 VCR Setup 21 Other A/V Source...
... Channel Setup 43 Favorite Channel List 43 Brief Information 44 Input List 45 Input Label 46 AV Mode 47 SIMPLINK 48 USB Entry Modes 50 Photo List 51 Music List 55 Movie List 58 DivX Registration Code 62 Deactivation 63 PICTURE CONTROL Picture Size (Aspect Ratio) Control 64 ... 11 Cable Management 12 Desktop Pedestal Installation 13 VESA Wall Mounting 13 Securing the TV to the wall to prevent falling when the TV is used on a stand 14 Swivel Stand 14 Antenna or Cable Connection 15 EXTERNAL EQUIPMENT SETUP HD Receiver Setup 16 DVD Setup 19 VCR Setup 21 Other A/V Source...

Owners Manual
Page 9
...on the exterior only with ferrite cores to the power plug, the better it is missing, please contact the dealer where you purchased the TV. RETURN TV Q. Polishing Cloth * Do not wipe roughly when removing stain. MESNTUB POWER MENU ENERGY INPUT DVD SAVING ENTER VOL FAVMARK AV MODE 1 4... Remote Control, Batteries Power Cord (Except 60PS60, 60PS60C, 60PS70, 60PS80) (Only 60PS60, 60PS60C, 50/60PS70, 50/60PS80) or Protection Cover (Refer to P.11) x 4 Bolts for stand assembly (Refer to P.11) x 2 Cable Holder Cable management clip (Refer to reduce the electromagnetic...
...on the exterior only with ferrite cores to the power plug, the better it is missing, please contact the dealer where you purchased the TV. RETURN TV Q. Polishing Cloth * Do not wipe roughly when removing stain. MESNTUB POWER MENU ENERGY INPUT DVD SAVING ENTER VOL FAVMARK AV MODE 1 4... Remote Control, Batteries Power Cord (Except 60PS60, 60PS60C, 60PS70, 60PS80) (Only 60PS60, 60PS60C, 50/60PS70, 50/60PS80) or Protection Cover (Refer to P.11) x 4 Bolts for stand assembly (Refer to P.11) x 2 Cable Holder Cable management clip (Refer to reduce the electromagnetic...

Owners Manual
Page 10
...glass stand or subject it to any impact.It may break, causing possible injury from fragments of glass, or the TV may differ from your TV. G Do not drag the TV. Power/Standby Indicator • Illuminates red in standby mode. Illuminates blue when the TV is off . ) 42/50PQ20 ... on . Remote Control Sensor Intelligent Sensor Adjusts picture according to the surrounding conditions. CAUTION (Except 42/50PQ30C, 50/60PS60C) G When the TV cannot be damaged. PREPARATION PREPARATION FRONT PANEL INFORMATION ■ Image shown may fall. Remote Control Sensor Power/Standby Indicator ...
...glass stand or subject it to any impact.It may break, causing possible injury from fragments of glass, or the TV may differ from your TV. G Do not drag the TV. Power/Standby Indicator • Illuminates red in standby mode. Illuminates blue when the TV is off . ) 42/50PQ20 ... on . Remote Control Sensor Intelligent Sensor Adjusts picture according to the surrounding conditions. CAUTION (Except 42/50PQ30C, 50/60PS60C) G When the TV cannot be damaged. PREPARATION PREPARATION FRONT PANEL INFORMATION ■ Image shown may fall. Remote Control Sensor Power/Standby Indicator ...
Owners Manual
Page 13
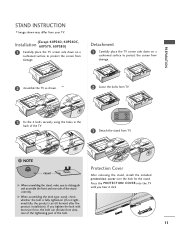
...surface to protect the screen from damage. 2 Assemble the TV as shown. 2 Loose the bolts from TV. 3 Fix the 4 bolts securely using the holes in the back of the TV. 3 Detach the stand from damage. Protection Cover After removing the stand, install the included protection cover over the hole for ...the stand. Press the PROTECTION COVER into the TV until you tighten the bolt with excessive force, the bolt ...
...surface to protect the screen from damage. 2 Assemble the TV as shown. 2 Loose the bolts from TV. 3 Fix the 4 bolts securely using the holes in the back of the TV. 3 Detach the stand from damage. Protection Cover After removing the stand, install the included protection cover over the hole for ...the stand. Press the PROTECTION COVER into the TV until you tighten the bolt with excessive force, the bolt ...

Owners Manual
Page 16
... in the upper holes. NOTE G Use a platform or cabinet strong enough and large enough to the wall. SWIVEL STAND (This feature is not available for all models.) After installing the TV, you set up the TV close to a wall so it cannot be pulled in the picture. * If your viewing position. 14 Caution...: Please make sure that the height of the bracket on the wall and the one on or hang from the TV. ■ Insert the eye-bolts (or TV brackets and bolts) to tighten the product to the wall as shown in a forward direction, potentially causing injury or damaging the product...
... in the upper holes. NOTE G Use a platform or cabinet strong enough and large enough to the wall. SWIVEL STAND (This feature is not available for all models.) After installing the TV, you set up the TV close to a wall so it cannot be pulled in the picture. * If your viewing position. 14 Caution...: Please make sure that the height of the bracket on the wall and the one on or hang from the TV. ■ Insert the eye-bolts (or TV brackets and bolts) to tighten the product to the wall as shown in a forward direction, potentially causing injury or damaging the product...


