
Owners Manual
Page 1
...USA, Commercial User 1-888-542-2623 CANADA LG Customer Information Center P/NO : SAC33575901(0905-REV06) www.lgusa.com / www.lg.cwaw/ww.lgwuws.alg.comm/ ewrwciwa.l.lgco.cma Record it for future reference. Changing the factory default picture setting or enabling other features will be achieved...your set and retain it below should you ever need service. Model: This product qualifies for Energy Star rating. PLASMA TV OWNER'S MANUAL 42PQ20 50PQ20 42PQ30 50PQ30 42PQ31 50PQ31 42PQ60 50PQ60 50PS30 50PS60 60PS60 42PQ30C 50PQ30C 50PS60C 60PS60C 50PS70 60PS70 50PS80 60PS80 Please read this ...
...USA, Commercial User 1-888-542-2623 CANADA LG Customer Information Center P/NO : SAC33575901(0905-REV06) www.lgusa.com / www.lg.cwaw/ww.lgwuws.alg.comm/ ewrwciwa.l.lgco.cma Record it for future reference. Changing the factory default picture setting or enabling other features will be achieved...your set and retain it below should you ever need service. Model: This product qualifies for Energy Star rating. PLASMA TV OWNER'S MANUAL 42PQ20 50PQ20 42PQ30 50PQ30 42PQ31 50PQ31 42PQ60 50PQ60 50PS30 50PS60 60PS60 42PQ30C 50PQ30C 50PS60C 60PS60C 50PS70 60PS70 50PS80 60PS80 Please read this ...
Owners Manual
Page 6
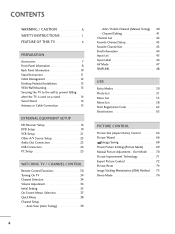
...10 Stand Instruction 11 Cable Management 12 Desktop Pedestal Installation 13 VESA Wall Mounting 13 Securing the TV to the wall to prevent falling when the TV is used on a stand 14 Swivel Stand 14 Antenna or Cable Connection 15 EXTERNAL EQUIPMENT ...50 Photo List 51 Music List 55 Movie List 58 DivX Registration Code 62 Deactivation 63 PICTURE CONTROL Picture Size (Aspect Ratio) Control 64 Picture Wizard 66 Energy Saving 68 Preset Picture Settings(Picture Mode 69 Manual Picture Adjustment - User Mode 70 Picture Improvement Technology 71 Expert Picture Control 72 Picture...
...10 Stand Instruction 11 Cable Management 12 Desktop Pedestal Installation 13 VESA Wall Mounting 13 Securing the TV to the wall to prevent falling when the TV is used on a stand 14 Swivel Stand 14 Antenna or Cable Connection 15 EXTERNAL EQUIPMENT ...50 Photo List 51 Music List 55 Movie List 58 DivX Registration Code 62 Deactivation 63 PICTURE CONTROL Picture Size (Aspect Ratio) Control 64 Picture Wizard 66 Energy Saving 68 Preset Picture Settings(Picture Mode 69 Manual Picture Adjustment - User Mode 70 Picture Improvement Technology 71 Expert Picture Control 72 Picture...

Owners Manual
Page 10
... Power/Standby Indicator Illuminates red in standby mode. • The LED is off . ) 42/50PQ20 Intelligent Sensor Adjusts picture according to the surrounding conditions. G Do not drag the TV. INPUT MENU ENTER VOL CH INPUT Button MENU Button 50/60PS70, 50/60PS80 ENTER Button VOLUME CHANNEL ButtoINnPsUT MENU EBNuTEtRtons VOL POWER Button CH G Do not...
... Power/Standby Indicator Illuminates red in standby mode. • The LED is off . ) 42/50PQ20 Intelligent Sensor Adjusts picture according to the surrounding conditions. G Do not drag the TV. INPUT MENU ENTER VOL CH INPUT Button MENU Button 50/60PS70, 50/60PS80 ENTER Button VOLUME CHANNEL ButtoINnPsUT MENU EBNuTEtRtons VOL POWER Button CH G Do not...
Owners Manual
Page 11
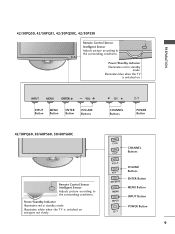
... Button ENTER Button VOLUME Buttons CH CHANNEL Buttons POWER Button 42/50PQ60, 50/60PS60, 50/60PS60C ENTER VOL Remote Control Sensor Intelligent Sensor Adjusts picture according to the surrounding conditions. CH CH VOL VOL ENTER MENU INPUT... CHANNEL Buttons VOLUME Buttons ENTER Button MENU Button INPUT Button POWER Button CH 9 Illuminates white when the TV is switched on and goes out slowly . Illuminates blue when the TV...
... Button ENTER Button VOLUME Buttons CH CHANNEL Buttons POWER Button 42/50PQ60, 50/60PS60, 50/60PS60C ENTER VOL Remote Control Sensor Intelligent Sensor Adjusts picture according to the surrounding conditions. CH CH VOL VOL ENTER MENU INPUT... CHANNEL Buttons VOLUME Buttons ENTER Button MENU Button INPUT Button POWER Button CH 9 Illuminates white when the TV is switched on and goes out slowly . Illuminates blue when the TV...

Owners Manual
Page 16
... using a wall mount). ■ Image shown may differ from the TV. ■ Insert the eye-bolts (or TV brackets and bolts) to tighten the product to the wall as shown in the picture. * If your TV. It is mounted on the TV are tightened securely. ■ Use a sturdy rope (sold separately) ...to the holes in a forward direction, potentially causing injury or damaging the product. G To use the TV safely, make sure that children don't ...
... using a wall mount). ■ Image shown may differ from the TV. ■ Insert the eye-bolts (or TV brackets and bolts) to tighten the product to the wall as shown in the picture. * If your TV. It is mounted on the TV are tightened securely. ■ Use a sturdy rope (sold separately) ...to the holes in a forward direction, potentially causing injury or damaging the product. G To use the TV safely, make sure that children don't ...

Owners Manual
Page 17
...the antenna. 2. Antenna (Analog or Digital) Wall Antenna Socket or Outdoor Antenna without a Cable Box Connection. Cable Cable TV Wall Jack RF Coaxial Wire (75 ohm) ANTENNA/ CABLE IN ■ To improve the picture quality in a poor signal area, plea(se) purchase a signal amplifier and install properly. ■ If the antenna needs... ANTENNA/ CABLE IN R Outdoor Antenna (VHF, UHF) RF Coaxial Wire (75 ohm) Single-family Dwellings /Houses (Connect to wall jack for assistance. 15 For optimum picture quality, adjust antenna direction if needed. ANTENNA OR CABLE CONNECTION R 1.
...the antenna. 2. Antenna (Analog or Digital) Wall Antenna Socket or Outdoor Antenna without a Cable Box Connection. Cable Cable TV Wall Jack RF Coaxial Wire (75 ohm) ANTENNA/ CABLE IN ■ To improve the picture quality in a poor signal area, plea(se) purchase a signal amplifier and install properly. ■ If the antenna needs... ANTENNA/ CABLE IN R Outdoor Antenna (VHF, UHF) RF Coaxial Wire (75 ohm) Single-family Dwellings /Houses (Connect to wall jack for assistance. 15 For optimum picture quality, adjust antenna direction if needed. ANTENNA OR CABLE CONNECTION R 1.

Owners Manual
Page 21
... DVD player, insert a DVD. ■ Select the Component1 input source on the TV using the INPUT button on the remote control. ■ If connected to COMPONENT IN 2 input, select the Component2 input source on the TV. DIO B/DVI) COMPONENT IN VIDEO AUDIO 2 1 L R AV IN 1 REMOTE... CONTROL IN S-VIDEO VIDEO /MONO AUDIO 1 2 Y PB PR L R Component Input ports To get better picture quality, connect a DVD player to the DVD player's manual for ...
... DVD player, insert a DVD. ■ Select the Component1 input source on the TV using the INPUT button on the remote control. ■ If connected to COMPONENT IN 2 input, select the Component2 input source on the TV. DIO B/DVI) COMPONENT IN VIDEO AUDIO 2 1 L R AV IN 1 REMOTE... CONTROL IN S-VIDEO VIDEO /MONO AUDIO 1 2 Y PB PR L R Component Input ports To get better picture quality, connect a DVD player to the DVD player's manual for ...
Owners Manual
Page 28
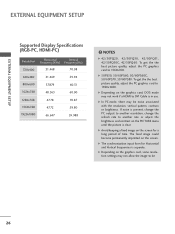
G Avoid keeping a fixed image on the PICTURE menu until the picture is clear. NOTES G 42/50PQ20, 42/50PQ30, 42/50PQ31, 42/50PQ30C, 42/50PQ60: To get the the best picture quality, adjust the PC graphics card to 1920x1080. G 50PS30, 50/60PS60, 50/60PS60C, 50/60PS70, 50/60PS80: To get the the best picture quality, adjust the PC graphics card to...
G Avoid keeping a fixed image on the PICTURE menu until the picture is clear. NOTES G 42/50PQ20, 42/50PQ30, 42/50PQ31, 42/50PQ30C, 42/50PQ60: To get the the best picture quality, adjust the PC graphics card to 1920x1080. G 50PS30, 50/60PS60, 50/60PS60C, 50/60PS70, 50/60PS80: To get the the best picture quality, adjust the PC graphics card to...

Owners Manual
Page 29
... using the manual settings or a different resolution or refresh rate on the PC. To Set Yes No 1 MENU 2 ENTER 3 ENTER Select PICTURE. PICTURE Move Enter E Picture Mode : Standard • Contrast 90 • Brightness 50 • Sharpness 60 • Color 60 • Tint 0R G • Advanced Control • Reset Screen (RGB-PC) Screen Resolution G Auto...
... using the manual settings or a different resolution or refresh rate on the PC. To Set Yes No 1 MENU 2 ENTER 3 ENTER Select PICTURE. PICTURE Move Enter E Picture Mode : Standard • Contrast 90 • Brightness 50 • Sharpness 60 • Color 60 • Tint 0R G • Advanced Control • Reset Screen (RGB-PC) Screen Resolution G Auto...

Owners Manual
Page 30
... 50 • Sharpness 60 • Color 60 • Tint 0R G • Advanced Control • Reset Screen (RGB-PC) Screen Resolution Auto config. D F G E 1 MENU 2 ENTER 3 ENTER 4 ENTER 5 ENTER Select PICTURE. Make appropriate adjustments. ■ Position: This function is to adjust picture...prefer. ■ S i z e: This function is not clear after auto adjustment and especially if characters are still trembling, adjust the picture phase manually. Select Screen (RGB-PC). This feature operates only in RGB-PC mode. Select Position, Si ze, or Phase. EXTERNAL EQUIPMENT...
... 50 • Sharpness 60 • Color 60 • Tint 0R G • Advanced Control • Reset Screen (RGB-PC) Screen Resolution Auto config. D F G E 1 MENU 2 ENTER 3 ENTER 4 ENTER 5 ENTER Select PICTURE. Make appropriate adjustments. ■ Position: This function is to adjust picture...prefer. ■ S i z e: This function is not clear after auto adjustment and especially if characters are still trembling, adjust the picture phase manually. Select Screen (RGB-PC). This feature operates only in RGB-PC mode. Select Position, Si ze, or Phase. EXTERNAL EQUIPMENT...

Owners Manual
Page 31
... Reset G 29 EXTERNAL EQUIPMENT SETUP Screen Reset (Reset to original factory values) Returns Position, S i z e, and Phase to the default factory settings. PICTURE Move Enter E Picture Mode : Standard • Contrast 90 • Brightness 50 • Sharpness 60 • Color 60 • Tint 0R G • Advanced Control • Reset Screen (RGB-PC) 1 MENU 2 ENTER 3 ENTER...
... Reset G 29 EXTERNAL EQUIPMENT SETUP Screen Reset (Reset to original factory values) Returns Position, S i z e, and Phase to the default factory settings. PICTURE Move Enter E Picture Mode : Standard • Contrast 90 • Brightness 50 • Sharpness 60 • Color 60 • Tint 0R G • Advanced Control • Reset Screen (RGB-PC) 1 MENU 2 ENTER 3 ENTER...

Owners Manual
Page 37
... "Home Use" mode for use this TV at home. It can adjust the "Picture menu - Customers can also be displayed on the screen when turning the TV on until the Initial setting procedure is only intended for the best picture in your home environment. ■ "Store Demo" Mode is completed... INITIAL SETTING This Function guides the user to easily set when you choose "Home Use". ■ If you want. Picture mode" manually while inspecting the TV, but the TV will be activated from the user menus. ■ Default selection is "Home Use". Language Selecting Language English Españ...
... "Home Use" mode for use this TV at home. It can adjust the "Picture menu - Customers can also be displayed on the screen when turning the TV on until the Initial setting procedure is only intended for the best picture in your home environment. ■ "Store Demo" Mode is completed... INITIAL SETTING This Function guides the user to easily set when you choose "Home Use". ■ If you want. Picture mode" manually while inspecting the TV, but the TV will be activated from the user menus. ■ Default selection is "Home Use". Language Selecting Language English Españ...

Owners Manual
Page 39
... 4 MENU Accept the current selection. ON-SCREEN MENUS SELECTION Your TV's OSD (On Screen Display) may differ slightly from that shown in this manual. Only 50/60PS60, 50/60PS60C CHANNEL Auto Tuning Manual Tuning Channel Edit Move Enter PICTURE Move Aspect Ratio : 16:9 Picture Wizard Energy Saving : Off Picture Mode : Standard • Contrast 90 • Brightness...
... 4 MENU Accept the current selection. ON-SCREEN MENUS SELECTION Your TV's OSD (On Screen Display) may differ slightly from that shown in this manual. Only 50/60PS60, 50/60PS60C CHANNEL Auto Tuning Manual Tuning Channel Edit Move Enter PICTURE Move Aspect Ratio : 16:9 Picture Wizard Energy Saving : Off Picture Mode : Standard • Contrast 90 • Brightness...

Owners Manual
Page 40
... on the viewing environment. ■ Sound Mode: Selects the factory preset sound for type of time before your desired picture format. ■ Picture Mode: Selects the factory preset picture depend on or off automatically. ■ Del/Add/Fav: Select channel you want to add/delete or add the ...Sleep Timer CH Del/Add/Fav Eject USB F 16:9 G Vivid Standard Off English Off Add Eject Close 1 Q. WATCHING TV / CHANNEL CONTROL WATCHING TV / CHANNEL CONTROL QUICK MENU Your TV's OSD (On Screen Display) may differ slightly from what is a menu of features which users might use frequently. ■...
... on the viewing environment. ■ Sound Mode: Selects the factory preset sound for type of time before your desired picture format. ■ Picture Mode: Selects the factory preset picture depend on or off automatically. ■ Del/Add/Fav: Select channel you want to add/delete or add the ...Sleep Timer CH Del/Add/Fav Eject USB F 16:9 G Vivid Standard Off English Off Add Eject Close 1 Q. WATCHING TV / CHANNEL CONTROL WATCHING TV / CHANNEL CONTROL QUICK MENU Your TV's OSD (On Screen Display) may differ slightly from what is a menu of features which users might use frequently. ■...

Owners Manual
Page 45
.... 3 Select Favorite. 4 Q. WATCHING TV / CHANNEL CONTROL FAVORITE CHANNEL LIST Favorite List DTV 83-0 DTV 15-1 DTV 18-2 Displaying the favorite channel list 1 MARK FAV FAV or MARK Display the Favorite channel list. Q.Menu Aspect Ratio Picture Mode Sound Mode Caption Multi Audio Sleep ...Timer CH Del/Add/Fav Eject USB 16:9 Vivid Standard Off English Off F Favorite G Eject Close 1 P A CH G E or 123 456 789 0 Select your choice without waiting for the TV to select through a favorite ...
.... 3 Select Favorite. 4 Q. WATCHING TV / CHANNEL CONTROL FAVORITE CHANNEL LIST Favorite List DTV 83-0 DTV 15-1 DTV 18-2 Displaying the favorite channel list 1 MARK FAV FAV or MARK Display the Favorite channel list. Q.Menu Aspect Ratio Picture Mode Sound Mode Caption Multi Audio Sleep ...Timer CH Del/Add/Fav Eject USB 16:9 Vivid Standard Off English Off F Favorite G Eject Close 1 P A CH G E or 123 456 789 0 Select your choice without waiting for the TV to select through a favorite ...

Owners Manual
Page 49
... AV mode, the "Picture Mode" and "Sound Mode" return to select the desired source. 2 ENTER ■ If you select "O f f" in AV mode, Cinema will be selected both for playing games. 47 WATCHING TV / CHANNEL CONTROL AV MODE AV Mode toggles through preset Video and Audio settings. ( O n l y 50 / 6 0 P S 6 0 . 50/60PS60C, 50/60PS70, 50/60PS80) Off Cinema or...
... AV mode, the "Picture Mode" and "Sound Mode" return to select the desired source. 2 ENTER ■ If you select "O f f" in AV mode, Cinema will be selected both for playing games. 47 WATCHING TV / CHANNEL CONTROL AV MODE AV Mode toggles through preset Video and Audio settings. ( O n l y 50 / 6 0 P S 6 0 . 50/60PS60C, 50/60PS70, 50/60PS80) Off Cinema or...

Owners Manual
Page 63
... Return to be located in the same folder. G A DivX movie file and its subtitle file name must be displayed. Close G Picture Size: Select the Full screen or Original size. G Subtitles in languages other than maximum resolution supported for each frame, cannot be guaranteed...video via a USB connection that doesn't support high speed may not be played, and certain functions could be turned on or off. Position --- Picture Size F Full G Subtitle Language --- Language --- . USB Option Menu Selection During the movie play, the following options are not supported in ...
... Return to be located in the same folder. G A DivX movie file and its subtitle file name must be displayed. Close G Picture Size: Select the Full screen or Original size. G Subtitles in languages other than maximum resolution supported for each frame, cannot be guaranteed...video via a USB connection that doesn't support high speed may not be played, and certain functions could be turned on or off. Position --- Picture Size F Full G Subtitle Language --- Language --- . USB Option Menu Selection During the movie play, the following options are not supported in ...
Owners Manual
Page 66
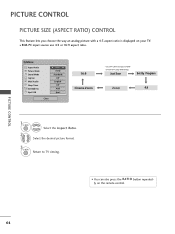
... (ASPECT RATIO) CONTROL This feature lets you choose the way an analog picture with a 4:3 aspect ratio is displayed on the remote control. 64 Select the desired picture format. 3 Q. Q.Menu Aspect Ratio Picture Mode Sound Mode Caption Multi Audio Sleep Timer CH Del/Add/Fav Eject USB F 16:9 ...G Vivid Standard Off English Off Add Eject Close 16:9 Cinema Zoom * Only DTV/CADTV/Component/HDMIDTV/DVI-DTV (720p/1080i/1080p) Just Scan Set By Program Zoom 4:3 1 Q. MENU Return to TV viewing....
... (ASPECT RATIO) CONTROL This feature lets you choose the way an analog picture with a 4:3 aspect ratio is displayed on the remote control. 64 Select the desired picture format. 3 Q. Q.Menu Aspect Ratio Picture Mode Sound Mode Caption Multi Audio Sleep Timer CH Del/Add/Fav Eject USB F 16:9 ...G Vivid Standard Off English Off Add Eject Close 16:9 Cinema Zoom * Only DTV/CADTV/Component/HDMIDTV/DVI-DTV (720p/1080i/1080p) Just Scan Set By Program Zoom 4:3 1 Q. MENU Return to TV viewing....

Owners Manual
Page 67
...9632; The adjustment range is activated. Just Scan turns off this cropping and shows the complete video. However, the top and bottom portions of the picture will be cropped. Just Scan operates only in correct proportion. Just Scan Normally the edges of the original signal, it will be visible when Just... Scan is 1-16. 65 Notes: If there is noise on the edges of video signals are cropped 1-2%. PICTURE CONTROL 16:9 Adjust the picture horizontally, in a linear proportion to fill the entire screen. 4:3 Choose 4:3 when you want to view the...
...9632; The adjustment range is activated. Just Scan turns off this cropping and shows the complete video. However, the top and bottom portions of the picture will be cropped. Just Scan operates only in correct proportion. Just Scan Normally the edges of the original signal, it will be visible when Just... Scan is 1-16. 65 Notes: If there is noise on the edges of video signals are cropped 1-2%. PICTURE CONTROL 16:9 Adjust the picture horizontally, in a linear proportion to fill the entire screen. 4:3 Choose 4:3 when you want to view the...

Owners Manual
Page 68
...E High Previous Next 5 ENTER Adjust White Level. G Previous Next 3 ENTER Adjust Picture Wizard. Low • Color Recommended 50 E E High Previous Next 6 ENTER Adjust C o l o r. Only 50/60PS60, 50/60PS60C models This feature lets you made. Set the screen above identical to L o... w, Recommended or H ig h, you can adjust the picture quality of the original image. E PICTURE CONTROL Low Recommended • Brightness 50 E High Previous 4 ENTER Next Adjust Black Level. 66 Low • Tint Recommended 0 E R E...
...E High Previous Next 5 ENTER Adjust White Level. G Previous Next 3 ENTER Adjust Picture Wizard. Low • Color Recommended 50 E E High Previous Next 6 ENTER Adjust C o l o r. Only 50/60PS60, 50/60PS60C models This feature lets you made. Set the screen above identical to L o... w, Recommended or H ig h, you can adjust the picture quality of the original image. E PICTURE CONTROL Low Recommended • Brightness 50 E High Previous 4 ENTER Next Adjust Black Level. 66 Low • Tint Recommended 0 E R E...


