
Owners Manual
Page 1
...This product qualifies for ENERGY STAR in the "factory default (Home Use mode)" setting and this manual carefully before operating your set and retain it below should you ever need service. PLASMA TV OWNER'S MANUAL 42PQ20 50PQ20 42PQ30 50PQ30 42PQ31 50PQ31 42PQ60 50PQ60 50PS30 50PS60 60PS60 42PQ30C 50PQ30C ...achieved. Serial: 1-800-243-0000 USA, Consumer User 1-888-865-3026 USA, Commercial User 1-888-542-2623 CANADA LG Customer Information Center P/NO : SAC33575901(0905-REV06) www.lgusa.com / www.lg.cwaw/ww.lgwuws.alg.comm/ ewrwciwa.l.lgco.cma Record it for Energy Star rating.
...This product qualifies for ENERGY STAR in the "factory default (Home Use mode)" setting and this manual carefully before operating your set and retain it below should you ever need service. PLASMA TV OWNER'S MANUAL 42PQ20 50PQ20 42PQ30 50PQ30 42PQ31 50PQ31 42PQ60 50PQ60 50PS30 50PS60 60PS60 42PQ30C 50PQ30C ...achieved. Serial: 1-800-243-0000 USA, Consumer User 1-888-865-3026 USA, Commercial User 1-888-542-2623 CANADA LG Customer Information Center P/NO : SAC33575901(0905-REV06) www.lgusa.com / www.lg.cwaw/ww.lgwuws.alg.comm/ ewrwciwa.l.lgco.cma Record it for Energy Star rating.
Owners Manual
Page 2
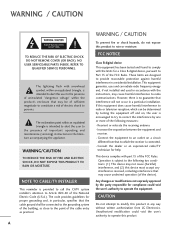
...separation between the equipment and receiver. - REFER TO QUALIFIED SERVICE PERSONNEL. NOTE TO CABLE/TV INSTALLER This reminder is no guarantee that interference will not occur in particular, specifies that ... be determined by turning the equipment off and on a circuit different from LG Electronics. The exclamation point within the product's enclosure that to correct the ...important operating and maintenance (servicing) instructions in a residential installation. This equipment generates, uses and can be connected to the grounding system of the building, as close to provide...
...separation between the equipment and receiver. - REFER TO QUALIFIED SERVICE PERSONNEL. NOTE TO CABLE/TV INSTALLER This reminder is no guarantee that interference will not occur in particular, specifies that ... be determined by turning the equipment off and on a circuit different from LG Electronics. The exclamation point within the product's enclosure that to correct the ...important operating and maintenance (servicing) instructions in a residential installation. This equipment generates, uses and can be connected to the grounding system of the building, as close to provide...

Owners Manual
Page 3
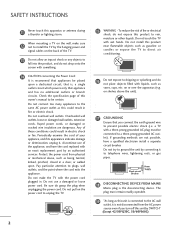
...convenience receptacles, and the point where they exit from tip-over. 4 Do not install near water. 2 Clean only with dry cloth. 7 Only use caution when moving the cart/apparatus com- A polarized plug has two blades with the cart, stand, tripod, bracket, or table specified by the... polarized or grounding-type plug. When a cart is required when the apparatus has been damaged in accordance with the manufacturer's instructions. 8 Use only with one wider than the other apparatus (including amplifiers)that produce heat. 9 Unplug this apparatus near any way, such as radiators,...
...convenience receptacles, and the point where they exit from tip-over. 4 Do not install near water. 2 Clean only with dry cloth. 7 Only use caution when moving the cart/apparatus com- A polarized plug has two blades with the cart, stand, tripod, bracket, or table specified by the... polarized or grounding-type plug. When a cart is required when the apparatus has been damaged in accordance with the manufacturer's instructions. 8 Use only with one wider than the other apparatus (including amplifiers)that produce heat. 9 Unplug this apparatus near any way, such as radiators,...
Owners Manual
Page 4
... closed in electric shock or fire. Periodically examine the cord of your appliance, and if its appearance indicates damage or deterioration, unplug it, discontinue use a damaged or loose power cord. Protect the power cord from the AC power source even if you connect the earth ground wire to telephone wires... fire or electrical shock, do not drop onto the screen with an exact replacement part by SWITCH" (Except 42/50PQ30C, 50/60PS60C) Do not touch the TV with a three-prong grounded AC plug must remain readily operable. 19 "As long as vases, cups, etc. on shelves above the unit). 17...
... closed in electric shock or fire. Periodically examine the cord of your appliance, and if its appearance indicates damage or deterioration, unplug it, discontinue use a damaged or loose power cord. Protect the power cord from the AC power source even if you connect the earth ground wire to telephone wires... fire or electrical shock, do not drop onto the screen with an exact replacement part by SWITCH" (Except 42/50PQ30C, 50/60PS60C) Do not touch the TV with a three-prong grounded AC plug must remain readily operable. 19 "As long as vases, cups, etc. on shelves above the unit). 17...
Owners Manual
Page 6
... Channel Setup 43 Favorite Channel List 43 Brief Information 44 Input List 45 Input Label 46 AV Mode 47 SIMPLINK 48 USB Entry Modes 50 Photo List 51 Music List 55 Movie List 58 DivX Registration Code 62 Deactivation 63 PICTURE CONTROL Picture Size (Aspect Ratio) Control 64 ... Back Panel Information 10 Stand Instruction 11 Cable Management 12 Desktop Pedestal Installation 13 VESA Wall Mounting 13 Securing the TV to the wall to prevent falling when the TV is used on a stand 14 Swivel Stand 14 Antenna or Cable Connection 15 EXTERNAL EQUIPMENT SETUP HD Receiver Setup 16 DVD ...
... Channel Setup 43 Favorite Channel List 43 Brief Information 44 Input List 45 Input Label 46 AV Mode 47 SIMPLINK 48 USB Entry Modes 50 Photo List 51 Music List 55 Movie List 58 DivX Registration Code 62 Deactivation 63 PICTURE CONTROL Picture Size (Aspect Ratio) Control 64 ... Back Panel Information 10 Stand Instruction 11 Cable Management 12 Desktop Pedestal Installation 13 VESA Wall Mounting 13 Securing the TV to the wall to prevent falling when the TV is used on a stand 14 Swivel Stand 14 Antenna or Cable Connection 15 EXTERNAL EQUIPMENT SETUP HD Receiver Setup 16 DVD ...
Owners Manual
Page 8
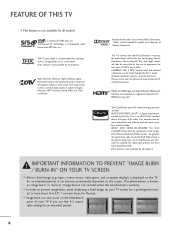
... must be registered in order to prevent image burn, avoid displaying a fixed image on your TV if you use in a dark room. (This feature is not available for an extended period, it can ...day" and "night" modes will then be made through the ISFccc mode. This TV contains the detailed calibrations necessary for Plasma). ■ Image burn can be accessible by the Imaging Science Foundation. Go to...divx.com for more hours for professional certification by the user to experience the best their LG HDTV has to inquire about DivX VOD. (This feature is not available for all models....
... must be registered in order to prevent image burn, avoid displaying a fixed image on your TV if you use in a dark room. (This feature is not available for an extended period, it can ...day" and "night" modes will then be made through the ISFccc mode. This TV contains the detailed calibrations necessary for Plasma). ■ Image burn can be accessible by the Imaging Science Foundation. Go to...divx.com for more hours for professional certification by the user to experience the best their LG HDTV has to inquire about DivX VOD. (This feature is not available for all models....

Owners Manual
Page 9
...closely. 7 Polishing Cloth * Do not wipe roughly when removing stain. The accessories included may cause (Not included with your TV. RETURN TV Q. Ferrite Core Use of the ferrite core to P.12) * Wipe spots on the exterior only with all models) scratch or discoloration. The ...1.5V 1.5V FAV MARK Owner's Manual CD Manual Remote Control, Batteries Power Cord (Except 60PS60, 60PS60C, 60PS70, 60PS80) (Only 60PS60, 60PS60C, 50/60PS70, 50/60PS80) or Protection Cover (Refer to P.11) x 4 Bolts for stand assembly (Refer to P.11) x 2 Cable Holder Cable management clip (...
...closely. 7 Polishing Cloth * Do not wipe roughly when removing stain. The accessories included may cause (Not included with your TV. RETURN TV Q. Ferrite Core Use of the ferrite core to P.12) * Wipe spots on the exterior only with all models) scratch or discoloration. The ...1.5V 1.5V FAV MARK Owner's Manual CD Manual Remote Control, Batteries Power Cord (Except 60PS60, 60PS60C, 60PS70, 60PS80) (Only 60PS60, 60PS60C, 50/60PS70, 50/60PS80) or Protection Cover (Refer to P.11) x 4 Bolts for stand assembly (Refer to P.11) x 2 Cable Holder Cable management clip (...
Owners Manual
Page 12
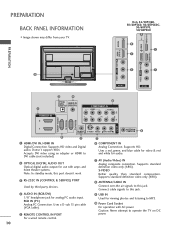
... than standard composition. Supports standard definition video only (480i). 8 ANTENNA/CABLE IN Connect over-the air signals to operate the TV on DC power. 10 Uses a red, green, and blue cable for video & red and white for viewing photos and listening to this port doesn't ...wired remote control. 9 USB IN Used for audio. 7 AV (Audio/Video) IN Analog composite connection. Supports HD video and Digital audio. PREPARATION BACK PANEL INFORMATION ■ Image shown may differ from your TV. USB IN R USB IN Only 42/50PQ60, 50/60PS60, 50/60PS60C, 50/60PS70, 50/60PS80 9 9 1 1 HDMI/DVI...
... than standard composition. Supports standard definition video only (480i). 8 ANTENNA/CABLE IN Connect over-the air signals to operate the TV on DC power. 10 Uses a red, green, and blue cable for video & red and white for viewing photos and listening to this port doesn't ...wired remote control. 9 USB IN Used for audio. 7 AV (Audio/Video) IN Analog composite connection. Supports HD video and Digital audio. PREPARATION BACK PANEL INFORMATION ■ Image shown may differ from your TV. USB IN R USB IN Only 42/50PQ60, 50/60PS60, 50/60PS60C, 50/60PS70, 50/60PS80 9 9 1 1 HDMI/DVI...
Owners Manual
Page 13
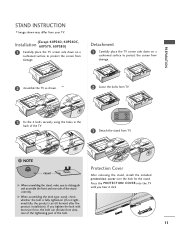
... the bolt. NOTE FRONT G When assembling the stand, make sure to protect the screen from damage. 2 Assemble the TV as shown. 2 Loose the bolts from TV. 3 Fix the 4 bolts securely using the holes in the back of the stand correctly. If you hear it click. 11 Press the PROTECTION COVER into... the TV until you tighten the bolt with excessive force, the bolt can tilt forward after the product installation). ...
... the bolt. NOTE FRONT G When assembling the stand, make sure to protect the screen from damage. 2 Assemble the TV as shown. 2 Loose the bolts from TV. 3 Fix the 4 bolts securely using the holes in the back of the stand correctly. If you hear it click. 11 Press the PROTECTION COVER into... the TV until you tighten the bolt with excessive force, the bolt can tilt forward after the product installation). ...
Owners Manual
Page 15
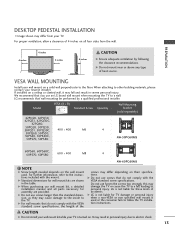
... screws may damage the TV or cause the TV to a fall and result in personal injury due to electric shock. 13 If installed on their specifications. Model VESA (A * B) A Standard Screw Quantity B Wall Mounting bracket (sold separately) 42PQ20, 42PQ30, 42PQ31, 42PQ30C, 42PQ60, 50PQ20, 50PQ30, 50PQ31, 50PQ30C... a detailed installation manual and all four sides from your TV is used . G Do not use an LG brand wall mount when mounting the TV to a wall. CAUTION G Do not install your wall mount kit while your TV. It may fall , leading to personal injury. When attaching...
... screws may damage the TV or cause the TV to a fall and result in personal injury due to electric shock. 13 If installed on their specifications. Model VESA (A * B) A Standard Screw Quantity B Wall Mounting bracket (sold separately) 42PQ20, 42PQ30, 42PQ31, 42PQ30C, 42PQ60, 50PQ20, 50PQ30, 50PQ31, 50PQ30C... a detailed installation manual and all four sides from your TV is used . G Do not use an LG brand wall mount when mounting the TV to a wall. CAUTION G Do not install your wall mount kit while your TV. It may fall , leading to personal injury. When attaching...

Owners Manual
Page 16
... the rope so it cannot be attached to a wall so it cannot fall over (when not using a wall mount). ■ Image shown may differ from the TV. ■ Insert the eye-bolts (or TV brackets and bolts) to tighten the product to the holes in the upper holes. Secure the wall... before inserting the eye-bolts, loosen the bolts. * Insert the eye-bolts or TV brackets/bolts and tighten them securely in the product. PREPARATION PREPARATION SECURING THE TV TO THE WALL TO PREVENT FALLING WHEN THE TV IS USED ON A STAND ■ You should purchase necessary components to suit your viewing position....
... the rope so it cannot be attached to a wall so it cannot fall over (when not using a wall mount). ■ Image shown may differ from the TV. ■ Insert the eye-bolts (or TV brackets and bolts) to tighten the product to the holes in the upper holes. Secure the wall... before inserting the eye-bolts, loosen the bolts. * Insert the eye-bolts or TV brackets/bolts and tighten them securely in the product. PREPARATION PREPARATION SECURING THE TV TO THE WALL TO PREVENT FALLING WHEN THE TV IS USED ON A STAND ■ You should purchase necessary components to suit your viewing position....
Owners Manual
Page 18
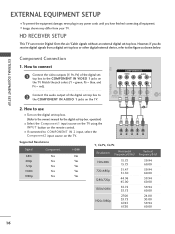
...connecting all equipment. ■ Image shown may differ from a digital set -top box. HD RECEIVER SETUP This TV can receive Digital Over-the-air/Cable signals without an external digital set -top box or other digital external device,...720x480p 1280x720p 1920x1080i 1920x1080p 15.73 15.73 31.47 31.50 44.96 45.00 33.72 33.75 27.00 33.75 67.43 67.50 59.94 60.00 59.94 60.00 59.94 60... /MONO AUDIO AN CA 2. Component Connection 1. operation) ■ Select the Component1 input source on the TV using the INPUT button on the remote control. ■ If connected to the owner's manual for the digital ...
...connecting all equipment. ■ Image shown may differ from a digital set -top box. HD RECEIVER SETUP This TV can receive Digital Over-the-air/Cable signals without an external digital set -top box or other digital external device,...720x480p 1280x720p 1920x1080i 1920x1080p 15.73 15.73 31.47 31.50 44.96 45.00 33.72 33.75 27.00 33.75 67.43 67.50 59.94 60.00 59.94 60.00 59.94 60... /MONO AUDIO AN CA 2. Component Connection 1. operation) ■ Select the Component1 input source on the TV using the INPUT button on the remote control. ■ If connected to the owner's manual for the digital ...
Owners Manual
Page 19
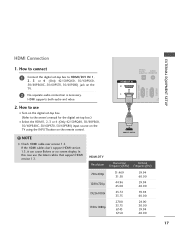
...; Turn on the digital set -top box.) ■ Select the HDMI1, 2, 3 or 4 (Only 42/50PQ60, 50/60PS60, 50/60PS60C, 50/60PS70, 50/60PS80) input source on the TV using the INPUT button on the TV. 2 No separate audio connection is necessary. How to connect 1 Connect the digital set-top box to the owner's manual for the digital...
...; Turn on the digital set -top box.) ■ Select the HDMI1, 2, 3 or 4 (Only 42/50PQ60, 50/60PS60, 50/60PS60C, 50/60PS70, 50/60PS80) input source on the TV using the INPUT button on the TV. 2 No separate audio connection is necessary. How to connect 1 Connect the digital set-top box to the owner's manual for the digital...
Owners Manual
Page 20
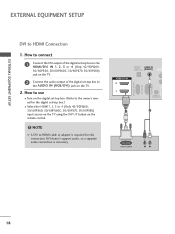
... 3 or 4 (Only 42/50PQ60, 50/60PS60, 50/60PS60C, 50/60PS70, 50/60PS80) jack on the TV. 2 Connect the audio output of the digital set -top box.) ■ Select the HDMI1, 2, 3 or 4 (Only 42/50PQ60, 50/60PS60, 50/60PS60C, 50/60PS70, 50/60PS80) input source on the TV using the INPUT button on the digital set-...top box. (Refer to HDMI cable or adapter is necessary. How to use ■ Turn on the remote control. ! OPTICAL DIGITAL AUDIO OUT...
... 3 or 4 (Only 42/50PQ60, 50/60PS60, 50/60PS60C, 50/60PS70, 50/60PS80) jack on the TV. 2 Connect the audio output of the digital set -top box.) ■ Select the HDMI1, 2, 3 or 4 (Only 42/50PQ60, 50/60PS60, 50/60PS60C, 50/60PS70, 50/60PS80) input source on the TV using the INPUT button on the digital set-...top box. (Refer to HDMI cable or adapter is necessary. How to use ■ Turn on the remote control. ! OPTICAL DIGITAL AUDIO OUT...

Owners Manual
Page 21
...; Turn on the DVD player, insert a DVD. ■ Select the Component1 input source on the TV using the INPUT button on the remote control. ■ If connected to COMPONENT IN 2 input, select the Component2 input...Y Y PB PR PB PR B-Y R-Y Cb Cr Pb Pr 19 Component ports on the TV Y Y Video output ports Y on the TV. ■ Refer to the COMPONENT IN AUDIO 1 jacks on the TV. How to connect 1 Connect the video outputs (Y, PB, PR) of the DVD to... L R Component Input ports To get better picture quality, connect a DVD player to the COMPONENT IN VIDEO 1 jacks on the TV. 2.
...; Turn on the DVD player, insert a DVD. ■ Select the Component1 input source on the TV using the INPUT button on the remote control. ■ If connected to COMPONENT IN 2 input, select the Component2 input...Y Y PB PR PB PR B-Y R-Y Cb Cr Pb Pr 19 Component ports on the TV Y Y Video output ports Y on the TV. ■ Refer to the COMPONENT IN AUDIO 1 jacks on the TV. How to connect 1 Connect the video outputs (Y, PB, PR) of the DVD to... L R Component Input ports To get better picture quality, connect a DVD player to the COMPONENT IN VIDEO 1 jacks on the TV. 2.

Owners Manual
Page 22
... the HDMI/DVI IN 1, 2, 3 or 4 (Only 42/50PQ60, 50/60PS60, 50/60PS60C, 50/60PS70, 50/60PS80) jack on the remote control. ■ Refer to use ■ Select the HDMI1, 2, 3 or 4 (Only 42/50PQ60, 50/60PS60, 50/60PS60C, 50/60PS70, 50/60PS80) input source on the TV using the INPUT button on the TV. 2. How to the DVD player's manual for operating instructions.
... the HDMI/DVI IN 1, 2, 3 or 4 (Only 42/50PQ60, 50/60PS60, 50/60PS60C, 50/60PS70, 50/60PS80) jack on the remote control. ■ Refer to use ■ Select the HDMI1, 2, 3 or 4 (Only 42/50PQ60, 50/60PS60, 50/60PS60C, 50/60PS70, 50/60PS80) input source on the TV using the INPUT button on the TV. 2. How to the DVD player's manual for operating instructions.

Owners Manual
Page 23
How to use ■ Set VCR output switch to 3 or 4 and then tune TV to the same channel number. ■ Insert a video tape into the VCR and press PLAY on the TV. 2 Connect the antenna cable to the VCR owner's manual.) ANTENNA/ CABLE IN 1 ANT OUT S-VIDEO VIDEO L R ANT IN OUTPUT SWITCH Wall Jack 2 Antenna 21 EXTERNAL EQUIPMENT SETUP AV IN 1 VCR SETUP Antenna Connection 1. How to connect 1 Connect the RF antenna out socket of the VCR to the ANTENNA/CABLE IN socket on the VCR. (Refer to the RF antenna in socket of the VCR. 2.
How to use ■ Set VCR output switch to 3 or 4 and then tune TV to the same channel number. ■ Insert a video tape into the VCR and press PLAY on the TV. 2 Connect the antenna cable to the VCR owner's manual.) ANTENNA/ CABLE IN 1 ANT OUT S-VIDEO VIDEO L R ANT IN OUTPUT SWITCH Wall Jack 2 Antenna 21 EXTERNAL EQUIPMENT SETUP AV IN 1 VCR SETUP Antenna Connection 1. How to connect 1 Connect the RF antenna out socket of the VCR to the ANTENNA/CABLE IN socket on the VCR. (Refer to the RF antenna in socket of the VCR. 2.

Owners Manual
Page 24
... PLAY on the VCR. (Refer to the VCR owner's manual.) UDIO IN GB/DVI) COMPONENT IN VIDEO AUDIO 2 ■ Select the A V 1 input source on the TV using the INPUT button on the remote control. 1 L R AV IN 1 RGB IN (PC) ■ If connected to the VCR owner's manual.) ■ Select the A ...V 1 input source on the TV using the INPUT button on the TV. 2 Connect the audio outputs of the VCR to the S -VIDEO input on the remote control. ! Match the jack colors (Video = yellow, Audio Left...
... PLAY on the VCR. (Refer to the VCR owner's manual.) UDIO IN GB/DVI) COMPONENT IN VIDEO AUDIO 2 ■ Select the A V 1 input source on the TV using the INPUT button on the remote control. 1 L R AV IN 1 RGB IN (PC) ■ If connected to the VCR owner's manual.) ■ Select the A ...V 1 input source on the TV using the INPUT button on the TV. 2 Connect the audio outputs of the VCR to the S -VIDEO input on the remote control. ! Match the jack colors (Video = yellow, Audio Left...
Owners Manual
Page 25
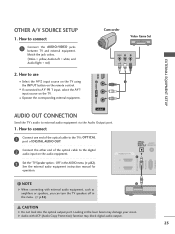
... instruction manual for operation. NOTE 2 G When connecting with ACP (Audio Copy Protection) function may damage your vision. How to use ■ Select the A V 2 input source on the TV using 1 the INPUT button on the remote control. ■ If connected to the digital audio input on the... TV. ■ Operate the corresponding external equipment. How to connect 1 Connect one end of the optical cable to the TV's OPTICAL port of DIGITAL AUDIO OUT....
... instruction manual for operation. NOTE 2 G When connecting with ACP (Audio Copy Protection) function may damage your vision. How to use ■ Select the A V 2 input source on the TV using 1 the INPUT button on the remote control. ■ If connected to the digital audio input on the... TV. ■ Operate the corresponding external equipment. How to connect 1 Connect one end of the optical cable to the TV's OPTICAL port of DIGITAL AUDIO OUT....
Owners Manual
Page 26
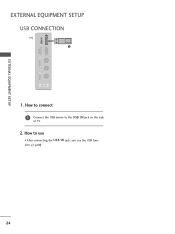
USB IN HDMI / DVI IN 3 VIDEO L/MONO AUDIO R EXTERNAL EQUIPMENT SETUP EXTERNAL EQUIPMENT SETUP USB CONNECTION i.e) 1 AV IN 2 1. How to the USB I N jack, you use the USB function. (G p.50) 24 How to connect 1 Connect the USB device to use ■ After connecting the USB I N jack on the side of TV. 2.
USB IN HDMI / DVI IN 3 VIDEO L/MONO AUDIO R EXTERNAL EQUIPMENT SETUP EXTERNAL EQUIPMENT SETUP USB CONNECTION i.e) 1 AV IN 2 1. How to the USB I N jack, you use the USB function. (G p.50) 24 How to connect 1 Connect the USB device to use ■ After connecting the USB I N jack on the side of TV. 2.


