Owners Manual
Page 2
... digital images and sound. TruSurround XT technology is a trademark of LG's audio/video device connected to the HDMI (high-definition multimedia interface), LG TV with this logo works easily with one remote control. High-definition television. under license from SRS Labs, Inc. o_... 16:9 aspect-ratio screens, and AC3 digital audio. High-resolution digital television broadcast and playback system composed of Dolby Laboratories. LG's own special digital image generator, consisting of digital television, HDTV formats include 1080i and 720p resolutions. A subset of a full...
... digital images and sound. TruSurround XT technology is a trademark of LG's audio/video device connected to the HDMI (high-definition multimedia interface), LG TV with this logo works easily with one remote control. High-definition television. under license from SRS Labs, Inc. o_... 16:9 aspect-ratio screens, and AC3 digital audio. High-resolution digital television broadcast and playback system composed of Dolby Laboratories. LG's own special digital image generator, consisting of digital television, HDTV formats include 1080i and 720p resolutions. A subset of a full...
Owners Manual
Page 6
...User Mode 47 XD - Add / Delete Channel (Manual Scan) ......... 35 - Color Tone - Black (Darkness) Level 50 Picture Reset 51 Image Sticking Minimization (ISM) Method ....... 52 Low - Digital Broadcasting System Captions ........ 62 iiiiiiiiiiiiiiiiii!_i_i__i_!_i_...Pedestal Installation 16 Antenna or Cable Connection 17 Picture Size (Aspect Ratio) Control 42 Preset Picture Settings 44 - i_i_i_i_i_iC_ai_pi_tiio_ni_iO_ip_tii_oin_i_i_..i._..J..i_..i 63 Remote Control Key Functions 30 Turning On TV 32 Channel Selection 32 Volume Adjustment 52 On-Screen Menus Selection 33 ...
...User Mode 47 XD - Add / Delete Channel (Manual Scan) ......... 35 - Color Tone - Black (Darkness) Level 50 Picture Reset 51 Image Sticking Minimization (ISM) Method ....... 52 Low - Digital Broadcasting System Captions ........ 62 iiiiiiiiiiiiiiiiii!_i_i__i_!_i_...Pedestal Installation 16 Antenna or Cable Connection 17 Picture Size (Aspect Ratio) Control 42 Preset Picture Settings 44 - i_i_i_i_i_iC_ai_pi_tiio_ni_iO_ip_tii_oin_i_i_..i._..J..i_..i 63 Remote Control Key Functions 30 Turning On TV 32 Channel Selection 32 Volume Adjustment 52 On-Screen Menus Selection 33 ...
Owners Manual
Page 7
SleepTimerSetting 6..7... Setting up Your Password 69 - Set Password 70 - TV Rating Children & General (forUSAonly) 73 - AutoOn/OffTimerSetting 6..6.. TV Rating English & French (forCanada only) .. 74 Troubleshooting 75 Maintenance 77 Product Specifications 78 Programming the Remote Control 80 IR Codes 84 External Control Through RS-232C 86 S Set Password & Lock System 69 - Movie Rating (MPAA 72 - ManuaCl lockSetup...
SleepTimerSetting 6..7... Setting up Your Password 69 - Set Password 70 - TV Rating Children & General (forUSAonly) 73 - AutoOn/OffTimerSetting 6..6.. TV Rating English & French (forCanada only) .. 74 Troubleshooting 75 Maintenance 77 Product Specifications 78 Programming the Remote Control 80 IR Codes 84 External Control Through RS-232C 86 S Set Password & Lock System 69 - Movie Rating (MPAA 72 - ManuaCl lockSetup...

Owners Manual
Page 9
...p.14) Cable Management Twist Holder Arrange the wires with the polishing cloth for the product. 6 z Owner's Manual CD Manual Remote Control, Batteries Power Cord 75ohm Round Cable Polishing Cloth * Slightly wipe stained spot on surface of that the following accessories are included with...removing stain. If an accessory is stain or fingerprint on the exterior only with the twist holder. 7 TV Brackets, (Refer to p.14) D-sub 15 pin Cable 2- TV Bracket Bolts 2- PREPARATION ACCESSORIES Ensure that excessive pressure may cause scratch or discoloration. 2-Eye-bolts (Refer ...
...p.14) Cable Management Twist Holder Arrange the wires with the polishing cloth for the product. 6 z Owner's Manual CD Manual Remote Control, Batteries Power Cord 75ohm Round Cable Polishing Cloth * Slightly wipe stained spot on surface of that the following accessories are included with...removing stain. If an accessory is stain or fingerprint on the exterior only with the twist holder. 7 TV Brackets, (Refer to p.14) D-sub 15 pin Cable 2- TV Bracket Bolts 2- PREPARATION ACCESSORIES Ensure that excessive pressure may cause scratch or discoloration. 2-Eye-bolts (Refer ...

Owners Manual
Page 10
l(_ ,A)Buttons 8 When the TV is turned on, the indicator blinks green and then illuminates green before the picture is displayed. PREPARATION FRONT PANELINFORMATION _ Here shown may be somewhat different from your TV. _D I-rl Front Panel Controls z Plasma TV Model Remote Control Sensor Power Standby Indicator Illuminates red in standby mode.
l(_ ,A)Buttons 8 When the TV is turned on, the indicator blinks green and then illuminates green before the picture is displayed. PREPARATION FRONT PANELINFORMATION _ Here shown may be somewhat different from your TV. _D I-rl Front Panel Controls z Plasma TV Model Remote Control Sensor Power Standby Indicator Illuminates red in standby mode.

Owners Manual
Page 13
...this jack. @ DIGITAL AUDIO OUT Connect digital audio from a PC or DTV. Connect cable signals to this jack. Remote Control Port Connect a wired remote control. @ RS-232C IN (CONTROL & SERVICE) PORT For external control devices. @ SERVICE 11 Note: In standby mode, these jacks. AUDIO IN (RGB/DVI) Connect the audio from various...For operation with AC power. _o @ COMPONENT IN Power Cord Socket Connect a component video/audio device to these jacks. z Connect a second TV or monitor. _AV (Audio/Video) IN 2 @ AV (Audio/Video) IN 1 Connect audio/video output device to operate the...
...this jack. @ DIGITAL AUDIO OUT Connect digital audio from a PC or DTV. Connect cable signals to this jack. Remote Control Port Connect a wired remote control. @ RS-232C IN (CONTROL & SERVICE) PORT For external control devices. @ SERVICE 11 Note: In standby mode, these jacks. AUDIO IN (RGB/DVI) Connect the audio from various...For operation with AC power. _o @ COMPONENT IN Power Cord Socket Connect a component video/audio device to these jacks. z Connect a second TV or monitor. _AV (Audio/Video) IN 2 @ AV (Audio/Video) IN 1 Connect audio/video output device to operate the...

Owners Manual
Page 20
... box to use picture for the digital set-top box. HD RECEIVERSETUP This TV can receive Digital Over-the-air/Cable signals without an external digital set -top box. (Refer to the COMPONENT IN VIDEO 1 jacks on the remote control. Match the jack colors c (Y = green, PB = blue, and PR = red). EXTERNAL... to COMPONENT Component 2 input source. How to the COMPONENT IN AUDIO 1 jacks on the set z top box to the owner's manual for LCD TV model. Connect the audio output of the digital set . 2. IN2 input, select Yes No Yes Yes Yes Yes Yes Yes Yes Yes 18 This part...
... box to use picture for the digital set-top box. HD RECEIVERSETUP This TV can receive Digital Over-the-air/Cable signals without an external digital set -top box. (Refer to the COMPONENT IN VIDEO 1 jacks on the remote control. Match the jack colors c (Y = green, PB = blue, and PR = red). EXTERNAL... to COMPONENT Component 2 input source. How to the COMPONENT IN AUDIO 1 jacks on the set z top box to the owner's manual for LCD TV model. Connect the audio output of the digital set . 2. IN2 input, select Yes No Yes Yes Yes Yes Yes Yes Yes Yes 18 This part...
Owners Manual
Page 21
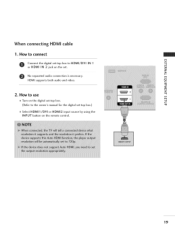
When connecting HDMI cable 1. How to use m Turn on the digital set -top box.) Select HDMII/DVI or HDMI2 input source by using the INPUT button on the set. m HDMI supports both audio and video. _D c m z 2. m _D z No separated audio connection is necessary. c (Refer to HDMI/DVI IN I or HDMI IN 2 jack on the remote control. 19 How to connect m x O Connect the digital set-top box to the owner's manual for the digital set -top box.
When connecting HDMI cable 1. How to use m Turn on the digital set -top box.) Select HDMII/DVI or HDMI2 input source by using the INPUT button on the set. m HDMI supports both audio and video. _D c m z 2. m _D z No separated audio connection is necessary. c (Refer to HDMI/DVI IN I or HDMI IN 2 jack on the remote control. 19 How to connect m x O Connect the digital set-top box to the owner's manual for the digital set -top box.
Owners Manual
Page 22
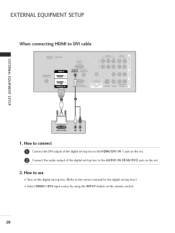
EXTERNAL EQUIPMENT SETUP When connecting HDMI to the owner's manual for the digital set-top box.) Select HDMI1/DVI input source by using the INPUT button on the remote control. 2O How to use Turn on the set -top box. (Refer to DVI cable m x m _o z rm _D c m z m c 1. How to connect Connect the DVI output of the digital set-top box to the HDMI/DVI IN 1 jack on the set. @ Connect the audio output of the digital set-top box to the AUDIO IN (RGB/DVI) jack on the digital set . 2.
EXTERNAL EQUIPMENT SETUP When connecting HDMI to the owner's manual for the digital set-top box.) Select HDMI1/DVI input source by using the INPUT button on the remote control. 2O How to use Turn on the set -top box. (Refer to DVI cable m x m _o z rm _D c m z m c 1. How to connect Connect the DVI output of the digital set-top box to the HDMI/DVI IN 1 jack on the set. @ Connect the audio output of the digital set-top box to the AUDIO IN (RGB/DVI) jack on the digital set . 2.
Owners Manual
Page 23
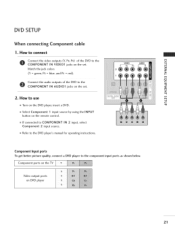
... of the DVD to the c COMPONENT IN AUDIO1 jacks on the set . How to the component input ports as shown below. Component ports on the TV Y P_ iilii+++i+l+p++'+'+'+?'++l+++?+l+++?+l+++?+l+++?+l+++?+ii Video output ports on the DVD player, insert a DVD. IN 2 input, select m Refer to COMPONENT Component 2 input source. Component Input ports To... jack colors z (Y = green, PB = blue, and PR = red). DVD SETUP When connecting Component cable 1. m Select Component I input source by using the INPUT button on the remote control.
... of the DVD to the c COMPONENT IN AUDIO1 jacks on the set . How to the component input ports as shown below. Component ports on the TV Y P_ iilii+++i+l+p++'+'+'+?'++l+++?+l+++?+l+++?+l+++?+l+++?+ii Video output ports on the DVD player, insert a DVD. IN 2 input, select m Refer to COMPONENT Component 2 input source. Component Input ports To... jack colors z (Y = green, PB = blue, and PR = red). DVD SETUP When connecting Component cable 1. m Select Component I input source by using the INPUT button on the remote control.
Owners Manual
Page 24
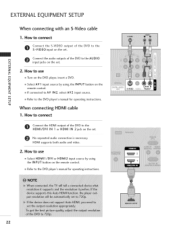
m 0 Connect the audio outputs of the DVD to the AUDIO x input jacks on the m remote control. No separated audio connection is necessary. z If connected to AV IN2, select AV2 input source. ¢/1 m Refer to use Select HDMI1/DVI or HDMI2 input ... to connect Connect the S-VIDEO output of the DVD to the DVD player's manual for operating instructions. m _o z 2. How to the S-VIDEO input on the remote control.
m 0 Connect the audio outputs of the DVD to the AUDIO x input jacks on the m remote control. No separated audio connection is necessary. z If connected to AV IN2, select AV2 input source. ¢/1 m Refer to use Select HDMI1/DVI or HDMI2 input ... to connect Connect the S-VIDEO output of the DVD to the DVD player's manual for operating instructions. m _o z 2. How to the S-VIDEO input on the remote control.

Owners Manual
Page 26
...connect Connect the AUDIO/VIDEO jacks between TV and VCR. How to use z Insert a video tape into the VCR and press PLAY on the VCR. (Refer to the VCR owner's manual.) Select AVl input source by using the INPUT button on the remote control. How to use Insert a video... set . Connect the audio outputs of the VCR to the VCR owner's manual.) xD c i Select AV1 input source by using the INPUT button on the remote control. EXTERNAL EQUIPMENT SETUP When connecting with an S-Video cable I. How to AV IN2, select AV2 input source. t/3 m c i When connecting with a RCA ...
...connect Connect the AUDIO/VIDEO jacks between TV and VCR. How to use z Insert a video tape into the VCR and press PLAY on the VCR. (Refer to the VCR owner's manual.) Select AVl input source by using the INPUT button on the remote control. How to use Insert a video... set . Connect the audio outputs of the VCR to the VCR owner's manual.) xD c i Select AV1 input source by using the INPUT button on the remote control. EXTERNAL EQUIPMENT SETUP When connecting with an S-Video cable I. How to AV IN2, select AV2 input source. t/3 m c i When connecting with a RCA ...

Owners Manual
Page 27
How to AV INI input, select AVI input source. Match the jack colors. (Video = yellow, Audio Left = white, and Audio Right = red) 2. Camcorder Video Game Set l-m x r_ _o z m £3) c r_ z r_ c ex) LCD TV Model 2S Operate the corresponding external equipment. If connected to connect 0 Connect the AUDIO/VIDEO jacks between TV and external equipment. How to use Select AV2 input source by using the INPUT button on the remote control. OTHER A/V SOURCE SETUP 1.
How to AV INI input, select AVI input source. Match the jack colors. (Video = yellow, Audio Left = white, and Audio Right = red) 2. Camcorder Video Game Set l-m x r_ _o z m £3) c r_ z r_ c ex) LCD TV Model 2S Operate the corresponding external equipment. If connected to connect 0 Connect the AUDIO/VIDEO jacks between TV and external equipment. How to use Select AV2 input source by using the INPUT button on the remote control. OTHER A/V SOURCE SETUP 1.

Owners Manual
Page 28
EXTERNAL EQUIPMENT SETUP PC SETUP This TV provides Plug and Play capability, meaning that the PC adjusts automatically to use m c ,,l_Turn on the PC and the TV. ,,l_Select RGB-PC input source by using the INPUT button on the remote control. Connect the PC audio output to the AUDIO IN c (RGB/DVI)... jack on the set . How to the TV's settings. m _D Connect the PC audio output to the...
EXTERNAL EQUIPMENT SETUP PC SETUP This TV provides Plug and Play capability, meaning that the PC adjusts automatically to use m c ,,l_Turn on the PC and the TV. ,,l_Select RGB-PC input source by using the INPUT button on the remote control. Connect the PC audio output to the AUDIO IN c (RGB/DVI)... jack on the set . How to the TV's settings. m _D Connect the PC audio output to the...

Owners Manual
Page 32
... devices connected to enter a program number for multiple program channels such as 2-1,2-2, etc. VCR/DVD control buttons Control video cassette recorders or DVD players. BACK Tune to TV viewing Z from any menu. WATCHING TV / CHANNEL CONTROL REMOTE CONTROL FUNCTIONS When using the remote control, aim it at the screen. p.40 VOLUME UP Increase/decrease the sound level. /DOWN MUTE...
... devices connected to enter a program number for multiple program channels such as 2-1,2-2, etc. VCR/DVD control buttons Control video cassette recorders or DVD players. BACK Tune to TV viewing Z from any menu. WATCHING TV / CHANNEL CONTROL REMOTE CONTROL FUNCTIONS When using the remote control, aim it at the screen. p.40 VOLUME UP Increase/decrease the sound level. /DOWN MUTE...
Owners Manual
Page 34
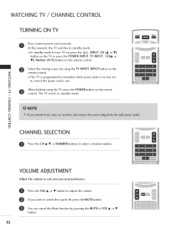
... state it was last set to switch the sound off, press the MUTE button. When finished using the TV INPUT, INPUT button on the remote control. This TV is out. The TV reverts to adjust the volume. Press the VOL • or • button to standby mode. At this... moment, the TV switches to turn TV on, press the (b/I, INPUT, CH (A or •) button on the TV or press the POWEK INPUT, TV INPUT, CH(A or • ), Number (0~9) button on the remote control. WATCHINGTV / CHANNELCONTROL TURNING ON TV First, connect power cord correctly. In standby mode...
... state it was last set to switch the sound off, press the MUTE button. When finished using the TV INPUT, INPUT button on the remote control. This TV is out. The TV reverts to adjust the volume. Press the VOL • or • button to standby mode. At this... moment, the TV switches to turn TV on, press the (b/I, INPUT, CH (A or •) button on the TV or press the POWEK INPUT, TV INPUT, CH(A or • ), Number (0~9) button on the remote control. WATCHINGTV / CHANNELCONTROL TURNING ON TV First, connect power cord correctly. In standby mode...
Owners Manual
Page 38
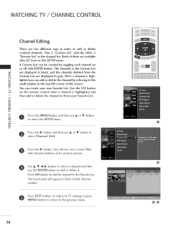
... deleted from the Custom List are available after EZ Scan on or off with channel numbers and a preview picture. Press EXIT button to return to TV viewing or press MENU button to return to the Favorite List. Use A _' @ _ button to select a channel and then use A or Y button to add or delete...
... deleted from the Custom List are available after EZ Scan on or off with channel numbers and a preview picture. Press EXIT button to return to TV viewing or press MENU button to return to the Favorite List. Use A _' @ _ button to select a channel and then use A or Y button to add or delete...

Owners Manual
Page 60
...select Stereo or SAP on the digital signal, select _o them with the SAP button. SOUND &LANGUAGE CONTROL STEREO/SAP BROADCASTS SETUP This TV can be received in Analog channel. z cl c 0 Press EXIT button to save and return ...remote areas during stereo/SAP broadcasting. is automatically received if the broadcast Mono; r_ N 0 Z © "_iiiiiiiiiiiiiiiiiiiiiiiiiiiiiiiiiiiiiiiiiiiiiiiiiiiiiiiiiiiiiiiiiiiiiiiiiiiiiiiiiii S8 Each time you want to listen to the mono sound in turn. © c z ,mI_f other languages available on the remote control. Use the SAP button to TV...
...select Stereo or SAP on the digital signal, select _o them with the SAP button. SOUND &LANGUAGE CONTROL STEREO/SAP BROADCASTS SETUP This TV can be received in Analog channel. z cl c 0 Press EXIT button to save and return ...remote areas during stereo/SAP broadcasting. is automatically received if the broadcast Mono; r_ N 0 Z © "_iiiiiiiiiiiiiiiiiiiiiiiiiiiiiiiiiiiiiiiiiiiiiiiiiiiiiiiiiiiiiiiiiiiiiiiiiiiiiiiiiii S8 Each time you want to listen to the mono sound in turn. © c z ,mI_f other languages available on the remote control. Use the SAP button to TV...
Owners Manual
Page 77
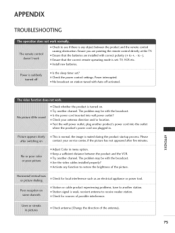
... antenna direction and/or location. Try another channel. Ensure that the batteries are pointing the remote control directly at the TV. Power interrupted. Test the wall power outlet, plug another station. x Keep a sufficient distance between the product and the remote control causing obstruction. Station or cable product experiencing problems, tune to +, - Check for local interference...
... antenna direction and/or location. Try another channel. Ensure that the batteries are pointing the remote control directly at the TV. Power interrupted. Test the wall power outlet, plug another station. x Keep a sufficient distance between the product and the remote control causing obstruction. Station or cable product experiencing problems, tune to +, - Check for local interference...
Owners Manual
Page 82
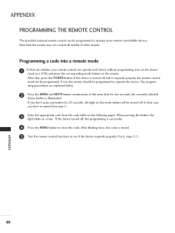
...MENU and MUTE button continuously at a time. After blinking twice, this code is stored. -0 O Test the remote control functions to operate most remote-controllable Note that the remote may not control all models of other brands. devices. If you have to repeat from the code table on the... two seconds; the currently selected device button is successful. In that , press the POWER button. PROGRAMMING THE REMOTECONTROL The provided universal remote control can operate each device without programming, turn on the device (such as a VCR) and press the corresponding mode button on the ...
...MENU and MUTE button continuously at a time. After blinking twice, this code is stored. -0 O Test the remote control functions to operate most remote-controllable Note that the remote may not control all models of other brands. devices. If you have to repeat from the code table on the... two seconds; the currently selected device button is successful. In that , press the POWER button. PROGRAMMING THE REMOTECONTROL The provided universal remote control can operate each device without programming, turn on the device (such as a VCR) and press the corresponding mode button on the ...


