Owner's Manual
Page 4
yyWhen mounting a TV on the back of the TV. yyDo not allow an impact shock or any way, such as gasoline or candles, or expose the TV to direct air conditioning. Any of fire or electrical shock, do not expose this product to plugs, wall outlets, and the point... the Power Cord: It is recommended that appliances be certain. that appliance and has no additional outlets or branch circuits. Overloaded wall outlets, loose or damaged wall outlets, extension cords, frayed power cords, or damaged or cracked wire insulation are dangerous. Pay particular attention to rain, moisture or...
yyWhen mounting a TV on the back of the TV. yyDo not allow an impact shock or any way, such as gasoline or candles, or expose the TV to direct air conditioning. Any of fire or electrical shock, do not expose this product to plugs, wall outlets, and the point... the Power Cord: It is recommended that appliances be certain. that appliance and has no additional outlets or branch circuits. Overloaded wall outlets, loose or damaged wall outlets, extension cords, frayed power cords, or damaged or cracked wire insulation are dangerous. Pay particular attention to rain, moisture or...
Owner's Manual
Page 8
...Listening to an antenna or cable 36 - Component Connection 76 - CHANNEL Settings 63 - DVI to the AC/DC adapter 37 Turning the TV on a wall 31 - Connecting an antenna or basic cable 36 - Connecting a cable box 37 Connecting to HDMI Connection 76 - Connecting USB storage devices 51 - ...the product or service informa- Adjusting aspect ratio 43 - Locking the buttons on a table 30 - Testing the Picture / Sound 45 - Viewing Videos 56 - Mounting on the TV (Child Lock) 46 3D IMAGING (FOR 3D TV) 46 3D Technology 47 - 8 TABLE OF CONTENTS ENEGNLGISH TABLE OF CONTENTS 2 LICENSES 3 ...
...Listening to an antenna or cable 36 - Component Connection 76 - CHANNEL Settings 63 - DVI to the AC/DC adapter 37 Turning the TV on a wall 31 - Connecting an antenna or basic cable 36 - Connecting a cable box 37 Connecting to HDMI Connection 76 - Connecting USB storage devices 51 - ...the product or service informa- Adjusting aspect ratio 43 - Locking the buttons on a table 30 - Testing the Picture / Sound 45 - Viewing Videos 56 - Mounting on the TV (Child Lock) 46 3D IMAGING (FOR 3D TV) 46 3D Technology 47 - 8 TABLE OF CONTENTS ENEGNLGISH TABLE OF CONTENTS 2 LICENSES 3 ...
Owner's Manual
Page 23
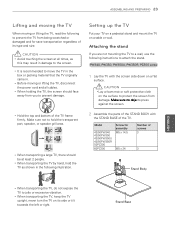
... the left or right. Setting up the TV Put your TV on a pedestal stand and mount the TV on its type and size. yyWhen transporting the TV, keep the TV upright, never turn the TV... on a table or wall. yyIt is recommended to prevent the TV from damage. PW340, PW350, PW350U, PW350R, PZ200 series ...bottom of the TV. yyWhen transporting a large TV, there should face away from you are not mounting the TV to a wall, use the following instructions to jolts or excessive vibration. yyBefore moving or lifting the TV, read...
... the left or right. Setting up the TV Put your TV on a pedestal stand and mount the TV on its type and size. yyWhen transporting the TV, keep the TV upright, never turn the TV... on a table or wall. yyIt is recommended to prevent the TV from damage. PW340, PW350, PW350U, PW350R, PZ200 series ...bottom of the TV. yyWhen transporting a large TV, there should face away from you are not mounting the TV to a wall, use the following instructions to jolts or excessive vibration. yyBefore moving or lifting the TV, read...
Owner's Manual
Page 24
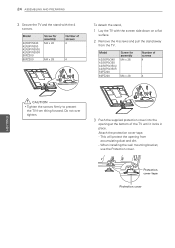
... until it locks in place. Do not over tighten. 3 Push the supplied protection cover into the opening from accumulating dust and dirt. - When installing the wall mounting bracket, use the Protection cover. This will protect the opening at the bottom of screws 4 4 ENEGNLGISH CAUTION yyTighten the screws firmly to prevent the TV...
... until it locks in place. Do not over tighten. 3 Push the supplied protection cover into the opening from accumulating dust and dirt. - When installing the wall mounting bracket, use the Protection cover. This will protect the opening at the bottom of screws 4 4 ENEGNLGISH CAUTION yyTighten the screws firmly to prevent the TV...

Owner's Manual
Page 27
... CAUTION yyTighten the screws firmly to protect the screen from damage. This will protect the opening at the bottom of the TV. When installing the wall mounting bracket, use the Protection cover. ASSEMBLING AND PREPARING 27 LK330, LK430, LK450, LK520 series 1 Lay the TV with the screen side down on a flat surface...
... CAUTION yyTighten the screws firmly to protect the screen from damage. This will protect the opening at the bottom of the TV. When installing the wall mounting bracket, use the Protection cover. ASSEMBLING AND PREPARING 27 LK330, LK430, LK450, LK520 series 1 Lay the TV with the screen side down on a flat surface...
Owner's Manual
Page 28
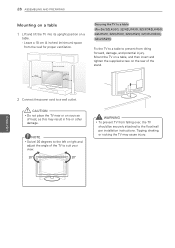
...stand. Tipping, shaking, or rocking the TV may result in fire or other damage. Mount the TV on a table, and then insert and tighten the supplied screw on sources of the TV to the floor/wall per installation instructions. ENEGNLGISH 2 Connect the power cord to the left or right and... adjust the angle of heat, as this may cause injury. NOTE yySwivel 20 degrees to a wall outlet. 28 ASSEMBLING AND PREPARING Mounting on a table 1 Lift and tilt ...
...stand. Tipping, shaking, or rocking the TV may result in fire or other damage. Mount the TV on a table, and then insert and tighten the supplied screw on sources of the TV to the floor/wall per installation instructions. ENEGNLGISH 2 Connect the power cord to the left or right and... adjust the angle of heat, as this may cause injury. NOTE yySwivel 20 degrees to a wall outlet. 28 ASSEMBLING AND PREPARING Mounting on a table 1 Lift and tilt ...
Owner's Manual
Page 29
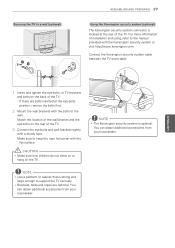
Securing the TV to a wall (optional) ASSEMBLING AND PREPARING 29 Using the Kensington security system (optional) The Kensington security system connector is located at the eye-bolts position, remove the bolts first. 2 Mount the wall brackets with the bolts to the wall. Connect the Kensington security system cable between the... TV and a table. Match the location of the wall bracket and the eye-bolts on the rear of the TV. ...
Securing the TV to a wall (optional) ASSEMBLING AND PREPARING 29 Using the Kensington security system (optional) The Kensington security system connector is located at the eye-bolts position, remove the bolts first. 2 Mount the wall brackets with the bolts to the wall. Connect the Kensington security system cable between the... TV and a table. Match the location of the wall bracket and the eye-bolts on the rear of the TV. ...
Owner's Manual
Page 30
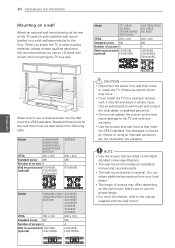
... may cause damage to other building materials, please contact qualified personnel. Model 37LV3500 42LK430 37/42/47LK450 42/47LK520 VESA 200 x 200 Standard screw M6 Number of screws 4 Wall mount bracket LSW200B, (optional) LSW200BG 42/47/55LV3500 42LV3520 55LK520 400 x 400 M6 4 LSW400B, LSW400BG, DSW400BG ...inches) 10 cm 10 cm Make sure to use an LG brand wall mount when mounting the TV to the manual supplied with the wall mount. yyIf you use the proper length. Make sure to use screws and wall mounts that you install the TV on the VESA standard screw ...
... may cause damage to other building materials, please contact qualified personnel. Model 37LV3500 42LK430 37/42/47LK450 42/47LK520 VESA 200 x 200 Standard screw M6 Number of screws 4 Wall mount bracket LSW200B, (optional) LSW200BG 42/47/55LV3500 42LV3520 55LK520 400 x 400 M6 4 LSW400B, LSW400BG, DSW400BG ...inches) 10 cm 10 cm Make sure to use an LG brand wall mount when mounting the TV to the manual supplied with the wall mount. yyIf you use the proper length. Make sure to use screws and wall mounts that you install the TV on the VESA standard screw ...


