
Specification (English)
Page 1
... be accessible by the Imaging Science Foundation. The result is a picture optimized for it's surroundings, more detailed picture. ISFccc This TV contains the detailed calibrations necessary for professional certification by the user to experience the best their LG HDTV has to offer. 47LG50 LCD 1080P HDTV 47" Class (46.9" diagonal) • Full HD 1080p Resolution • 15...
... be accessible by the Imaging Science Foundation. The result is a picture optimized for it's surroundings, more detailed picture. ISFccc This TV contains the detailed calibrations necessary for professional certification by the user to experience the best their LG HDTV has to offer. 47LG50 LCD 1080P HDTV 47" Class (46.9" diagonal) • Full HD 1080p Resolution • 15...

Specification (English)
Page 2
...Level Enhancer) • 24p Cinema (Film Mode) • Picture Reset • AV Mode (Picture & Sound) 3 Modes Picture Selection Mode 8 Modes ISFccc • Intelligent Sensor Mode •... Auto Off (When no video is a registered trademark of their respective owners. "LG Life's Good" is present) • SIDE AUDIO/VIDEO INPUTS/OUTPUTS L/R Audio/...1080P Source Input - Component 60p/30p/24p - 47LG50 LCD 1080P HDTV 47" Class (46.9" diagonal) TECHNICAL SPECIFICATIONS LCD PANEL Native Display Resolution 1920 x 1080p Brightness (...
...Level Enhancer) • 24p Cinema (Film Mode) • Picture Reset • AV Mode (Picture & Sound) 3 Modes Picture Selection Mode 8 Modes ISFccc • Intelligent Sensor Mode •... Auto Off (When no video is a registered trademark of their respective owners. "LG Life's Good" is present) • SIDE AUDIO/VIDEO INPUTS/OUTPUTS L/R Audio/...1080P Source Input - Component 60p/30p/24p - 47LG50 LCD 1080P HDTV 47" Class (46.9" diagonal) TECHNICAL SPECIFICATIONS LCD PANEL Native Display Resolution 1920 x 1080p Brightness (...

Owner's Manual (English)
Page 6
... 66 Power Indicator 67 6 Black (Darkness) Level 63 Advanced Control - Picture Mode - Picture Mode - Auto Scan (Auto Tuning 40 - Add / Delete Channel (Manual Tuning 41 - CONTENTS WARNING / CAUTION 2 SAFETY INSTRUCTIONS 3 FEATURE OF THIS TV 8 PREPARATION Accessories 9 Front Panel Information 10 Back Panel Information 11 Stand Instruction 12 VESA Wall Mounting 13 Cable Management...
... 66 Power Indicator 67 6 Black (Darkness) Level 63 Advanced Control - Picture Mode - Picture Mode - Auto Scan (Auto Tuning 40 - Add / Delete Channel (Manual Tuning 41 - CONTENTS WARNING / CAUTION 2 SAFETY INSTRUCTIONS 3 FEATURE OF THIS TV 8 PREPARATION Accessories 9 Front Panel Information 10 Back Panel Information 11 Stand Instruction 12 VESA Wall Mounting 13 Cable Management...

Owner's Manual (English)
Page 10
And then wipe the TV with your TV, use it). Illuminates blue when the set is included with a cloth (If a polishing cloth is switched on. (Can be adjusted using Power Indicator in standby mode. Intelligent Sensor Adjusts picture according to the surrounding conditions Power/Standby Indicator Illuminates red in the OPTION menu. G p.67) Remote...
And then wipe the TV with your TV, use it). Illuminates blue when the set is included with a cloth (If a polishing cloth is switched on. (Can be adjusted using Power Indicator in standby mode. Intelligent Sensor Adjusts picture according to the surrounding conditions Power/Standby Indicator Illuminates red in the OPTION menu. G p.67) Remote...
Owner's Manual (English)
Page 16
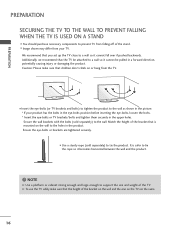
...TV. I Insert the eye-bolts (or TV brackets and bolts) to tighten the product to the wall as shown in the picture. * If your TV. It is mounted on or hang from the TV. G To use the TV... safely make sure that is safer to support the size and weight of the bracket on the wall and the one on the TV...I You should purchase necessary components to the wall. I Use a sturdy rope (sold separately) to prevent TV from falling off of the bracket that children don't climb on the wall to tie the product. NOTE ...
...TV. I Insert the eye-bolts (or TV brackets and bolts) to tighten the product to the wall as shown in the picture. * If your TV. It is mounted on or hang from the TV. G To use the TV... safely make sure that is safer to support the size and weight of the bracket on the wall and the one on the TV...I You should purchase necessary components to the wall. I Use a sturdy rope (sold separately) to prevent TV from falling off of the bracket that children don't climb on the wall to tie the product. NOTE ...

Owner's Manual (English)
Page 17
... Wire (75 ohm) Single-family Dwellings /Houses (Connect to wall jack for outdoor antenna) Copper Wire Be careful not to be split for two TV's, install a 2-Way Signal Splitter. ( ) I If the antenna needs to bend the copper wire when connecting the antenna. 2. I If the... assistance. 17 Antenna (Analog or Digital) Wall Antenna Socket or Outdoor Antenna without a Cable Box Connection. For optimum picture quality, adjust the antenna direction if needed. PREPARATION I To improve the picture quality in a poor signal area, please purchase a signal amplifier and install properly.
... Wire (75 ohm) Single-family Dwellings /Houses (Connect to wall jack for outdoor antenna) Copper Wire Be careful not to be split for two TV's, install a 2-Way Signal Splitter. ( ) I If the antenna needs to bend the copper wire when connecting the antenna. 2. I If the... assistance. 17 Antenna (Analog or Digital) Wall Antenna Socket or Outdoor Antenna without a Cable Box Connection. For optimum picture quality, adjust the antenna direction if needed. PREPARATION I To improve the picture quality in a poor signal area, please purchase a signal amplifier and install properly.

Owner's Manual (English)
Page 21
... to connect 1 Connect the video outputs (Y, PB, PR) of the DVD to the COMPONENT IN VIDEO1 jacks on the TV. Y PB PR L R 2 Connect the audio outputs of the DVD to the COMPONENT IN AUDIO1 jacks on the DVD player, insert a DVD. How to use I...) CONTROL VI IN ( 2 Y 1 PB PR L R VIDEO AUDIO COMPONENT IN Component Input ports To get better picture quality, connect a DVD player to COMPONENT IN 2 input, select the Component 2 input source on the TV. Component ports on the TV Y Y Video output ports Y on the remote control. Match the jack colors (Y = green, PB = blue, ...
... to connect 1 Connect the video outputs (Y, PB, PR) of the DVD to the COMPONENT IN VIDEO1 jacks on the TV. Y PB PR L R 2 Connect the audio outputs of the DVD to the COMPONENT IN AUDIO1 jacks on the DVD player, insert a DVD. How to use I...) CONTROL VI IN ( 2 Y 1 PB PR L R VIDEO AUDIO COMPONENT IN Component Input ports To get better picture quality, connect a DVD player to COMPONENT IN 2 input, select the Component 2 input source on the TV. Component ports on the TV Y Y Video output ports Y on the remote control. Match the jack colors (Y = green, PB = blue, ...

Owner's Manual (English)
Page 23
... antenna in socket of the VCR to all TVs and is used; I Set VCR output switch to 3 or 4 and then tune TV to connect 1 Connect the RF antenna out socket of the VCR. EXTERNAL EQUIPMENT SETUP VCR SETUP I If the 4:3 picture format is not covered by warranty. ANTENNA/... CABLE IN et on the TV. Antenna Connection 1. How to the same channel number. How to use I Insert a video tape into the ...
... antenna in socket of the VCR to all TVs and is used; I Set VCR output switch to 3 or 4 and then tune TV to connect 1 Connect the RF antenna out socket of the VCR. EXTERNAL EQUIPMENT SETUP VCR SETUP I If the 4:3 picture format is not covered by warranty. ANTENNA/... CABLE IN et on the TV. Antenna Connection 1. How to the same channel number. How to use I Insert a video tape into the ...
Owner's Manual (English)
Page 27
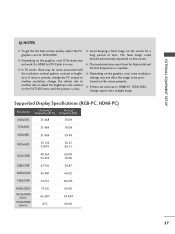
... HDMI-PC 1920x1080, change the refresh rate to Just scan. G The synchronization input form for a long period of time. NOTES G To get the the best picture quality, adjust the PC graphics card to DVI Cable is clear. Supported Display Specifications (RGB-PC, HDMI-PC) Resolution Horizontal Vertical Frequency(KHz) Frequency(Hz... 59.94 800x600 35.156 37.879 56.25 60.31 1024x768 48.363 56.476 60.00 70.06 1280x768 47.776 59.87 1280x1024 63.981 60.02 1360x768 47.712 60.015 1600x1200 1920x1080 RGB-PC 1920x1080 HDMI-PC 75.00 66.587 67.5 60.00 59.934 60...
... HDMI-PC 1920x1080, change the refresh rate to Just scan. G The synchronization input form for a long period of time. NOTES G To get the the best picture quality, adjust the PC graphics card to DVI Cable is clear. Supported Display Specifications (RGB-PC, HDMI-PC) Resolution Horizontal Vertical Frequency(KHz) Frequency(Hz... 59.94 800x600 35.156 37.879 56.25 60.31 1024x768 48.363 56.476 60.00 70.06 1280x768 47.776 59.87 1280x1024 63.981 60.02 1360x768 47.712 60.015 1600x1200 1920x1080 RGB-PC 1920x1080 HDMI-PC 75.00 66.587 67.5 60.00 59.934 60...
Owner's Manual (English)
Page 28
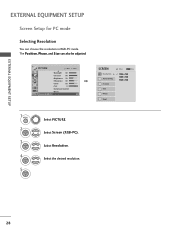
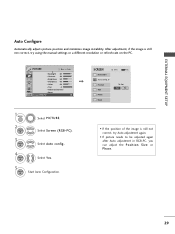
... SETUP EXTERNAL EQUIPMENT SETUP Screen Setup for PC mode Selecting Resolution You can also be adjusted. Select the desired resolution. 28 Select Screen (RGB-PC). PICTURE Move Enter E • Backlight 80 • Contrast 90 • Brightness 50 • Sharpness 60 • Color 60 • Tint 0R G • Advanced... Resolution G Auto config. Position Size Phase Reset Move MENU Prev. 1024 x 768 1280 x 768 1360 x 768 1 MENU 2 ENTER 3 ENTER 4 ENTER 5 ENTER Select PICTURE. The Position, Phase, and Size can choose the resolution in RGB-PC mode. Select Resolution.
... SETUP EXTERNAL EQUIPMENT SETUP Screen Setup for PC mode Selecting Resolution You can also be adjusted. Select the desired resolution. 28 Select Screen (RGB-PC). PICTURE Move Enter E • Backlight 80 • Contrast 90 • Brightness 50 • Sharpness 60 • Color 60 • Tint 0R G • Advanced... Resolution G Auto config. Position Size Phase Reset Move MENU Prev. 1024 x 768 1280 x 768 1360 x 768 1 MENU 2 ENTER 3 ENTER 4 ENTER 5 ENTER Select PICTURE. The Position, Phase, and Size can choose the resolution in RGB-PC mode. Select Resolution.
Owner's Manual (English)
Page 29
... 90 • Brightness 50 • Sharpness 60 • Color 60 • Tint 0R G • Advanced Control • Reset Screen (RGB-PC) 1 MENU 2 ENTER 3 ENTER Select PICTURE. To Set Yes No • If the position of the image is still not correct, try Auto adjustment again. • If... picture needs to be adjusted again after Auto adjustment in RGB-PC, you can adjust the Position, S i z e or P h a s e. 29 G Position Size Phase Reset Move MENU Prev. ...
... 90 • Brightness 50 • Sharpness 60 • Color 60 • Tint 0R G • Advanced Control • Reset Screen (RGB-PC) 1 MENU 2 ENTER 3 ENTER Select PICTURE. To Set Yes No • If the position of the image is still not correct, try Auto adjustment again. • If... picture needs to be adjusted again after Auto adjustment in RGB-PC, you can adjust the Position, S i z e or P h a s e. 29 G Position Size Phase Reset Move MENU Prev. ...
Owner's Manual (English)
Page 30
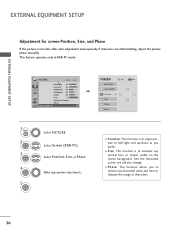
...z e, or Phase. Select Screen (RGB-PC). EXTERNAL EQUIPMENT SETUP EXTERNAL EQUIPMENT SETUP Adjustment for screen Position, Size, and Phase If the picture is to adjust picture to left/right and up/down as you to remove any vertical bars or stripes visible on the screen background. D F G E ... in RGB-PC mode. Position G Size Phase Reset Move MENU Prev. Make appropriate adjustments. I P h a s e: This function allows you prefer. PICTURE Move Enter E • Backlight 80 • Contrast 90 • Brightness 50 • Sharpness 60 • Color 60 • Tint 0R G ...
...z e, or Phase. Select Screen (RGB-PC). EXTERNAL EQUIPMENT SETUP EXTERNAL EQUIPMENT SETUP Adjustment for screen Position, Size, and Phase If the picture is to adjust picture to left/right and up/down as you to remove any vertical bars or stripes visible on the screen background. D F G E ... in RGB-PC mode. Position G Size Phase Reset Move MENU Prev. Make appropriate adjustments. I P h a s e: This function allows you prefer. PICTURE Move Enter E • Backlight 80 • Contrast 90 • Brightness 50 • Sharpness 60 • Color 60 • Tint 0R G ...

Owner's Manual (English)
Page 31
... Y e s. EXTERNAL EQUIPMENT SETUP Screen Reset (Reset to original factory values) Returns Position, S i z e, and Phase to the default factory settings. PICTURE Move Enter E • Backlight 80 • Contrast 90 • Brightness 50 • Sharpness 60 • Color 60 • Tint 0R G ...• Advanced Control • Reset Screen (RGB-PC) 1 MENU 2 ENTER 3 ENTER 4 ENTER 5 ENTER Select PICTURE. To Set Yes No 31 Select Reset. SCREEN Resolution Auto config. This feature operates only in RGB-PC mode. Position Size Phase Reset G Move...
... Y e s. EXTERNAL EQUIPMENT SETUP Screen Reset (Reset to original factory values) Returns Position, S i z e, and Phase to the default factory settings. PICTURE Move Enter E • Backlight 80 • Contrast 90 • Brightness 50 • Sharpness 60 • Color 60 • Tint 0R G ...• Advanced Control • Reset Screen (RGB-PC) 1 MENU 2 ENTER 3 ENTER 4 ENTER 5 ENTER Select PICTURE. To Set Yes No 31 Select Reset. SCREEN Resolution Auto config. This feature operates only in RGB-PC mode. Position Size Phase Reset G Move...

Owner's Manual (English)
Page 37
... the factory preset picture depend on or off automatically. I Backlight: Adjust the brightness of LCD panel to the Favorite List. I Caption: Select on the viewing environment. I Aspect Ratio: Selects your desired channel. 789 0 2Q. I USB Eject: Select "USB Eject" in ... want to add/delete or add the channel to control the brightness of time before your TV turns off . I To tune to eject USB device. MENU Return to TV viewing. 37 Q.Menu Aspect Ratio Backlight Clear Voice Picture Mode Sound Mode Caption Multi Audio Sleep Timer CH Del/Add/Fav USB Eject F 16...
... the factory preset picture depend on or off automatically. I Backlight: Adjust the brightness of LCD panel to the Favorite List. I Caption: Select on the viewing environment. I Aspect Ratio: Selects your desired channel. 789 0 2Q. I USB Eject: Select "USB Eject" in ... want to add/delete or add the channel to control the brightness of time before your TV turns off . I To tune to eject USB device. MENU Return to TV viewing. 37 Q.Menu Aspect Ratio Backlight Clear Voice Picture Mode Sound Mode Caption Multi Audio Sleep Timer CH Del/Add/Fav USB Eject F 16...

Owner's Manual (English)
Page 38
...It will automatically return to preset in your desired language. 3 ENTER Step4. I Default selection is only intended for the best picture in -store mode after 5 minutes. WATCHING TV / CHANNEL CONTROL Step1. Enter 1 ENTER Enter RETURN Exit Start Auto Tuning. ! Option Setting 1. Audio Language Setting F English... Auto Tuning Auto Tuning can also be displayed on the screen when turning the TV on for the first time when purchasing the TV. Picture mode" manually while inspecting the TV, but the TV will be activated from the user menus. Option Setting Step3. Choose the setting...
...It will automatically return to preset in your desired language. 3 ENTER Step4. I Default selection is only intended for the best picture in -store mode after 5 minutes. WATCHING TV / CHANNEL CONTROL Step1. Enter 1 ENTER Enter RETURN Exit Start Auto Tuning. ! Option Setting 1. Audio Language Setting F English... Auto Tuning Auto Tuning can also be displayed on the screen when turning the TV on for the first time when purchasing the TV. Picture mode" manually while inspecting the TV, but the TV will be activated from the user menus. Option Setting Step3. Choose the setting...

Owner's Manual (English)
Page 39
... Component2 RGB-PC HDMI1 HDMI2 E USB Photo List Music List Move Enter 39 CHANNEL Auto Tuning Manual Tuning Channel Edit Move Enter PICTURE Move Aspect Ratio : 16:9 Picture Mode : Standard • Backlight 80 • Contrast 90 • Brightness 50 • Sharpness 60 • Color 60... Voice : On Balance 0L R Sound Mode : Standard • SRS TruSurround XT: Off • Treble 50 • Bass 50 • Reset TV Speaker : On OPTION Language Input Label SIMPLINK Key Lock Caption Set ID Power Indicator Initial Setting Move Enter : English : On : Off : Off : 1...
... Component2 RGB-PC HDMI1 HDMI2 E USB Photo List Music List Move Enter 39 CHANNEL Auto Tuning Manual Tuning Channel Edit Move Enter PICTURE Move Aspect Ratio : 16:9 Picture Mode : Standard • Backlight 80 • Contrast 90 • Brightness 50 • Sharpness 60 • Color 60... Voice : On Balance 0L R Sound Mode : Standard • SRS TruSurround XT: Off • Treble 50 • Bass 50 • Reset TV Speaker : On OPTION Language Input Label SIMPLINK Key Lock Caption Set ID Power Indicator Initial Setting Move Enter : English : On : Off : Off : 1...

Owner's Manual (English)
Page 45
Picture Mode" and "AUDIO menu - Off Cinema Game Sport 1AV MODE Press the AV MODE button repeatedly to select the desired source. 2 ENTER I If you select "Cinema" in AV mode, the "Picture Mode" and "Sound Mode" return to previous selected value. 45 Sound Mode" respectively. I If you select "O f f" in AV mode, Cinema will be selected both for "PICTURE menu - WATCHING TV / CHANNEL CONTROL AV MODE You can select the optimal images and sounds.
Picture Mode" and "AUDIO menu - Off Cinema Game Sport 1AV MODE Press the AV MODE button repeatedly to select the desired source. 2 ENTER I If you select "Cinema" in AV mode, the "Picture Mode" and "Sound Mode" return to previous selected value. 45 Sound Mode" respectively. I If you select "O f f" in AV mode, Cinema will be selected both for "PICTURE menu - WATCHING TV / CHANNEL CONTROL AV MODE You can select the optimal images and sounds.

Owner's Manual (English)
Page 56
...become imprinted on your TV. PICTURE Move Aspect Ratio : 16:9 Picture Mode : Standard • Backlight 80 • Contrast 90 • Brightness 50 • Sharpness 60 • Color 60 • Tint 0R • Advanced Control E Enter G PICTURE Move Enter Aspect Ratio : 16:9 Picture Mode : Standard ... • Sharpness 60 • Color 16:690 • Tint Zoo0m1R G • Advanced CZoonotmro2l E Just Scan 1 MENU Select PICTURE. 2 ENTER 3 ENTER Select Aspect Ratio. Although, after watching video that did not fill the screen, any after-image from the black...
...become imprinted on your TV. PICTURE Move Aspect Ratio : 16:9 Picture Mode : Standard • Backlight 80 • Contrast 90 • Brightness 50 • Sharpness 60 • Color 60 • Tint 0R • Advanced Control E Enter G PICTURE Move Enter Aspect Ratio : 16:9 Picture Mode : Standard ... • Sharpness 60 • Color 16:690 • Tint Zoo0m1R G • Advanced CZoonotmro2l E Just Scan 1 MENU Select PICTURE. 2 ENTER 3 ENTER Select Aspect Ratio. Although, after watching video that did not fill the screen, any after-image from the black...

Owner's Manual (English)
Page 57
... of the original signal, it will be cropped. (16:9 16:9) Zoom 2 Choose Zoom 2 when you want to view the picture without any alteration. The picture taking a halfway trade off this cropping and shows the complete video. Just Scan turns off between alteration and screen coverage. 4:3 Choose... 4:3 when you want to view a picture with an original 4:3 aspect ratio. 16:9 Adjust the picture horizontally, in DTV/CADTV/Component/HDMI-DTV/DVI-DTV (720p/1080i/1080p) input source. 57 However, the top ...
... of the original signal, it will be cropped. (16:9 16:9) Zoom 2 Choose Zoom 2 when you want to view the picture without any alteration. The picture taking a halfway trade off this cropping and shows the complete video. Just Scan turns off between alteration and screen coverage. 4:3 Choose... 4:3 when you want to view a picture with an original 4:3 aspect ratio. 16:9 Adjust the picture horizontally, in DTV/CADTV/Component/HDMI-DTV/DVI-DTV (720p/1080i/1080p) input source. 57 However, the top ...

Owner's Manual (English)
Page 58
... in the user menus. I When selecting Intelligent Sensor the most suitable picture is automatically adjusted according to TV viewing. Preset There are not adjustable. MENU Return to the surrounding conditions. PICTURE CONTROL PICTURE CONTROL PRESET PICTURE SETTINGS Picture Mode - PICTURE Move Aspect Ratio : 16:9 Picture Mode : Standard • Backlight 80 • Contrast 90 • Brightness 50 • Sharpness...
... in the user menus. I When selecting Intelligent Sensor the most suitable picture is automatically adjusted according to TV viewing. Preset There are not adjustable. MENU Return to the surrounding conditions. PICTURE CONTROL PICTURE CONTROL PRESET PICTURE SETTINGS Picture Mode - PICTURE Move Aspect Ratio : 16:9 Picture Mode : Standard • Backlight 80 • Contrast 90 • Brightness 50 • Sharpness...


