Owner's Manual (English)
Page 2
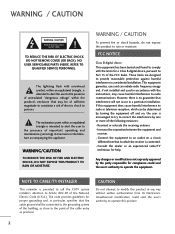
...is connected. - Increase the separation between the equipment and receiver. - NOTE TO CABLE/TV INSTALLER This reminder is intended to alert the user to radio communications. WARNING/CAUTION TO...provide reasonable protection against harmful interference in accordance with the instructions, may be determined by turning the equipment off and on a circuit different from that to persons. Reorient or ...'s enclosure that interference will not occur in any way without written authorization from LG Electronics. FCC NOTICE Class B digital device This equipment has been tested and...
...is connected. - Increase the separation between the equipment and receiver. - NOTE TO CABLE/TV INSTALLER This reminder is intended to alert the user to radio communications. WARNING/CAUTION TO...provide reasonable protection against harmful interference in accordance with the instructions, may be determined by turning the equipment off and on a circuit different from that to persons. Reorient or ...'s enclosure that interference will not occur in any way without written authorization from LG Electronics. FCC NOTICE Class B digital device This equipment has been tested and...

Owner's Manual (English)
Page 5
...It may occur. Do not spray water or other materials (e.g.) plastic while plugged in the U.S.A. Section 810 of the TV. 23 Ventilation Install your TV where there is proper ventilation. Antenna grounding according to the National Electrical Code, ANSI/NFPA 70 22 Moving Make sure the... product is installed, follow the precautions below. 20 ANTENNAS Outdoor antenna grounding If an outdoor antenna is turned off, unplugged...
...It may occur. Do not spray water or other materials (e.g.) plastic while plugged in the U.S.A. Section 810 of the TV. 23 Ventilation Install your TV where there is proper ventilation. Antenna grounding according to the National Electrical Code, ANSI/NFPA 70 22 Moving Make sure the... product is installed, follow the precautions below. 20 ANTENNAS Outdoor antenna grounding If an outdoor antenna is turned off, unplugged...

Owner's Manual (English)
Page 6
... Picture Mode - Real Cinema 65 Picture Reset 66 Power Indicator 67 6 CONTENTS WARNING / CAUTION 2 SAFETY INSTRUCTIONS 3 FEATURE OF THIS TV 8 PREPARATION Accessories 9 Front Panel Information 10 Back Panel Information 11 Stand Instruction 12 VESA Wall Mounting 13 Cable Management 14 Desktop Pedestal ... 23 Other A/V Source Setup 25 PC Setup 26 USB Connection 32 Audio Out Connection 33 WATCHING TV / CHANNEL CONTROL Remote Control Functions 34 Turning On the TV 36 Channel Selection 36 Volume Adjustment 36 Quick Menu / Favorite Channel Setup 37 Initial Setting 38...
... Picture Mode - Real Cinema 65 Picture Reset 66 Power Indicator 67 6 CONTENTS WARNING / CAUTION 2 SAFETY INSTRUCTIONS 3 FEATURE OF THIS TV 8 PREPARATION Accessories 9 Front Panel Information 10 Back Panel Information 11 Stand Instruction 12 VESA Wall Mounting 13 Cable Management 14 Desktop Pedestal ... 23 Other A/V Source Setup 25 PC Setup 26 USB Connection 32 Audio Out Connection 33 WATCHING TV / CHANNEL CONTROL Remote Control Functions 34 Turning On the TV 36 Channel Selection 36 Volume Adjustment 36 Quick Menu / Favorite Channel Setup 37 Initial Setting 38...
Owner's Manual (English)
Page 8
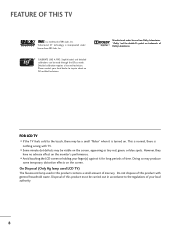
This is normal, there is turned on the screen, appearing as tiny red, green, or blue spots. However, they have no adverse effect on the screen. Doing so may be made ... under license from Dolby Laboratories. On Disposal (Only Hg lamp used LCD TV) The fluorescent lamp used in accordance to the regulations of this product contains a small amount of Dolby Laboratories. Detailed calibration requires a licensed technician. FOR LCD TV I Avoid touching the LCD screen or holding your local dealer to the touch, there may produce...
This is normal, there is turned on the screen, appearing as tiny red, green, or blue spots. However, they have no adverse effect on the screen. Doing so may be made ... under license from Dolby Laboratories. On Disposal (Only Hg lamp used LCD TV) The fluorescent lamp used in accordance to the regulations of this product contains a small amount of Dolby Laboratories. Detailed calibration requires a licensed technician. FOR LCD TV I Avoid touching the LCD screen or holding your local dealer to the touch, there may produce...

Owner's Manual (English)
Page 13
...For wall mounts that you use screws that wall mounting be performed by a qualified professional installer. G LG is not liable for wall mount kits are provided. PREPARATION VESA WALL MOUNTING Install your nearest dealer. A B Product LCD TV Model 37LG5* 42LG5* 47LG5* 52LG5* VESA (A * B) Standard Screw Quantity 200 * 200 M6... purchasing our wall mount kit, a detailed installation manual and all parts necessary for TV damage or personal injury when a non-VESA or non specified wall mount is turned on the wall mount used or the consumer fails to personal injury. CAUTION G Do...
...For wall mounts that you use screws that wall mounting be performed by a qualified professional installer. G LG is not liable for wall mount kits are provided. PREPARATION VESA WALL MOUNTING Install your nearest dealer. A B Product LCD TV Model 37LG5* 42LG5* 47LG5* 52LG5* VESA (A * B) Standard Screw Quantity 200 * 200 M6... purchasing our wall mount kit, a detailed installation manual and all parts necessary for TV damage or personal injury when a non-VESA or non specified wall mount is turned on the wall mount used or the consumer fails to personal injury. CAUTION G Do...

Owner's Manual (English)
Page 18
... Vertical Frequency(KHz) Frequency(Hz) 720x480i 720x480p 1280x720p 1920x1080i 1920x1080p 15.73 15.73 31.47 31.50 44.96 45.00 33.72 33.75 26.97 27.00 33.71 ...To prevent the equipment damage, never plug in any power cords until you do receive digital signals from your TV. I Image shown may differ from a digital set -top box to connect 1 Connect the video outputs...PR) of the digital set -top box or other digital external device. operation) I Turn on the TV. How to the COMPONENT IN AUDIO 1 jacks on the TV. 2. How to the owner's manual for the digital set -top box. Match the...
... Vertical Frequency(KHz) Frequency(Hz) 720x480i 720x480p 1280x720p 1920x1080i 1920x1080p 15.73 15.73 31.47 31.50 44.96 45.00 33.72 33.75 26.97 27.00 33.71 ...To prevent the equipment damage, never plug in any power cords until you do receive digital signals from your TV. I Image shown may differ from a digital set -top box to connect 1 Connect the video outputs...PR) of the digital set -top box or other digital external device. operation) I Turn on the TV. How to the COMPONENT IN AUDIO 1 jacks on the TV. 2. How to the owner's manual for the digital set -top box. Match the...

Owner's Manual (English)
Page 19
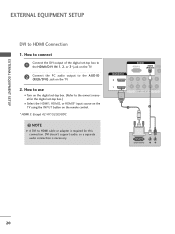
HDMI supports both audio and video. 2. How to use I Turn on the digital set -top box.) I Select the HDMI1, HDMI2, or HDMI3* input source on the TV using the INPUT button on the TV. 2 No separate audio connection is necessary. EXTERNAL EQUIPMENT SETUP HDMI Connection 1. How to connect 1 Connect the digital set... box. (Refer to HDMI/DVI IN1, 2, or 3* jack on the remote control. * HDMI 3: Except 42/47/52LG50DC HDMI-DTV Resolution Horizontal Vertical Frequency(KHz) Frequency(Hz) 720x480p 1280x720p 1920x1080i 1920x1080p 31.47 31.50 44.96 45.00 33.72 33.75 26.97 27.00 33.71 33.75...
HDMI supports both audio and video. 2. How to use I Turn on the digital set -top box.) I Select the HDMI1, HDMI2, or HDMI3* input source on the TV using the INPUT button on the TV. 2 No separate audio connection is necessary. EXTERNAL EQUIPMENT SETUP HDMI Connection 1. How to connect 1 Connect the digital set... box. (Refer to HDMI/DVI IN1, 2, or 3* jack on the remote control. * HDMI 3: Except 42/47/52LG50DC HDMI-DTV Resolution Horizontal Vertical Frequency(KHz) Frequency(Hz) 720x480p 1280x720p 1920x1080i 1920x1080p 31.47 31.50 44.96 45.00 33.72 33.75 26.97 27.00 33.71 33.75...
Owner's Manual (English)
Page 20
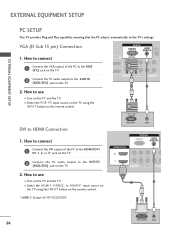
How to use I Turn on the digital set -top box.) I O (RGB/DVI) jack on the remote control. * HDMI 3: Except 42/47/52LG50DC ! How to connect 1 Connect the DVI output of the digital set-top box to the HDMI/DVI IN 1, 2, or 3* jack on the TV. 2 Connect the PC audio output to the owner's... connection is required for the digital set -top box. (Refer to the A U D I Select the HDMI1, HDMI2, or HDMI3* input source on the TV using the INPUT button on the TV. 2. NOTE G A DVI to HDMI Connection 1. RGB IN RGB(PC) AUDIO REMO (RGB/DVI) CONTRO HDMI/DVI IN 2 1 2 Y 1 PB PR L R VIDEO ...
How to use I Turn on the digital set -top box.) I O (RGB/DVI) jack on the remote control. * HDMI 3: Except 42/47/52LG50DC ! How to connect 1 Connect the DVI output of the digital set-top box to the HDMI/DVI IN 1, 2, or 3* jack on the TV. 2 Connect the PC audio output to the owner's... connection is required for the digital set -top box. (Refer to the A U D I Select the HDMI1, HDMI2, or HDMI3* input source on the TV using the INPUT button on the TV. 2. NOTE G A DVI to HDMI Connection 1. RGB IN RGB(PC) AUDIO REMO (RGB/DVI) CONTRO HDMI/DVI IN 2 1 2 Y 1 PB PR L R VIDEO ...

Owner's Manual (English)
Page 21
... use I If connected to the COMPONENT IN AUDIO1 jacks on the remote control. I Turn on the TV. I Select the Component 1 input source on the TV using the INPUT button on the TV. 2. Component ports on the TV Y Y Video output ports Y on the TV. How to connect 1 Connect the video outputs (Y, PB, PR) of the DVD to...
... use I If connected to the COMPONENT IN AUDIO1 jacks on the remote control. I Turn on the TV. I Select the Component 1 input source on the TV using the INPUT button on the TV. 2. Component ports on the TV Y Y Video output ports Y on the TV. How to connect 1 Connect the video outputs (Y, PB, PR) of the DVD to...

Owner's Manual (English)
Page 22
...'s manual for operating instructions. * HDMI 3: Except 42/47/52LG50DC RGB(PC) AUDIO (RGB/D HDMI/DVI IN 2 1 2 Y 1 PB PR L VIDEO A COMPONENT IN 1 HDMI-DVD OUTPUT 22 I Refer to use I Select the HDMI1, HDMI2, or HDMI3* input source on the TV using the INPUT button on the TV. 2 No separate audio connection is necessary. How... HDMI/DVI IN1, 2, or 3* jack on the remote control. How to connect 1 Connect the S-VIDEO output of the DVD to the S -VIDEO input on the TV. 2 Connect the audio outputs of the DVD to use I Turn on the remote control.
...'s manual for operating instructions. * HDMI 3: Except 42/47/52LG50DC RGB(PC) AUDIO (RGB/D HDMI/DVI IN 2 1 2 Y 1 PB PR L VIDEO A COMPONENT IN 1 HDMI-DVD OUTPUT 22 I Refer to use I Select the HDMI1, HDMI2, or HDMI3* input source on the TV using the INPUT button on the TV. 2 No separate audio connection is necessary. How... HDMI/DVI IN1, 2, or 3* jack on the remote control. How to connect 1 Connect the S-VIDEO output of the DVD to the S -VIDEO input on the TV. 2 Connect the audio outputs of the DVD to use I Turn on the remote control.
Owner's Manual (English)
Page 26
How to connect 1 Connect the VGA output of the PC to the HDMI/DVI I N 1, 2, or 3* jack on the TV. 2 Connect the PC audio output to use I Turn on the remote control. * HDMI 3: Except 42/47/52LG50DC RGB OUTPUT AUDIO RGB IN RGB(PC) AUDIO R (RGB/DVI) CO HDMI/DVI IN 2 1 2 Y 1 PB ...PR L R VIDEO AUDIO COMPONENT IN 1 2 26 DVI-PC OUTPUT AUDIO How to the A U D I Turn on the TV. 2. How to connect 1...
How to connect 1 Connect the VGA output of the PC to the HDMI/DVI I N 1, 2, or 3* jack on the TV. 2 Connect the PC audio output to use I Turn on the remote control. * HDMI 3: Except 42/47/52LG50DC RGB OUTPUT AUDIO RGB IN RGB(PC) AUDIO R (RGB/DVI) CO HDMI/DVI IN 2 1 2 Y 1 PB ...PR L R VIDEO AUDIO COMPONENT IN 1 2 26 DVI-PC OUTPUT AUDIO How to the A U D I Turn on the TV. 2. How to connect 1...
Owner's Manual (English)
Page 33
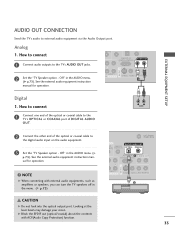
... G When connecting with ACP(Audio Copy Protection) function. How to connect AUDIO 1 Connect one end of the optical or coaxial cable to the TV's OPTICAL or COAXIAL port of DIGITAL AUDIO O U T. 2 Connect the other end of the optical or coaxial cable to external audio equipment via...p.73). Analog 1. G Block the SPDIF out (optical/coaxial) about the contents with external audio equipments, such as amplifiers or speakers, you can turn the TV speakers off in the menu. (G p.73) CAUTION G Do not look into the optical output port. See the external audio equipment instruction manual for...
... G When connecting with ACP(Audio Copy Protection) function. How to connect AUDIO 1 Connect one end of the optical or coaxial cable to the TV's OPTICAL or COAXIAL port of DIGITAL AUDIO O U T. 2 Connect the other end of the optical or coaxial cable to external audio equipment via...p.73). Analog 1. G Block the SPDIF out (optical/coaxial) about the contents with external audio equipments, such as amplifiers or speakers, you can turn the TV speakers off in the menu. (G p.73) CAUTION G Do not look into the optical output port. See the external audio equipment instruction manual for...

Owner's Manual (English)
Page 34
POWER Turns your TV or any menu. G p.37 MENU Displays the main menu. INPUT External input modes rotate in regular sequence. UP/DOWN PAGE Move from any other programmed equipment on or off . TV POWER DVD STB VCR Q. UP/DOWN NUMBER button - (DASH) Used to the last channel viewed. Q.... FUNCTIONS When using the remote control, aim it at the remote control sensor on the mode. Clear all on or off , depending on the TV. VOLUME UP Increase/decrease the sound level. /DOWN FAV Scroll through the programmed Favorite channels. G p.36 CHANNEL Select available channels. G p.37...
POWER Turns your TV or any menu. G p.37 MENU Displays the main menu. INPUT External input modes rotate in regular sequence. UP/DOWN PAGE Move from any other programmed equipment on or off . TV POWER DVD STB VCR Q. UP/DOWN NUMBER button - (DASH) Used to the last channel viewed. Q.... FUNCTIONS When using the remote control, aim it at the remote control sensor on the mode. Clear all on or off , depending on the TV. VOLUME UP Increase/decrease the sound level. /DOWN FAV Scroll through the programmed Favorite channels. G p.36 CHANNEL Select available channels. G p.37...

Owner's Manual (English)
Page 36
...the power cord is out. 3 When finished using the INPUT button on the remote control. NOTE G If you want to turn TV on, press the , INPUT, CH ( ) button on the TV or press the POWER, INPUT, CH( or ), Number (0~9) button on the remote control. 2 Select the viewing source ...by pressing the MUTE or VOL (+ or -) button. 36 WATCHING TV / CHANNEL CONTROL WATCHING TV / CHANNEL CONTROL TURNING ON THE TV 1 First, connect power cord correctly. At this moment, the TV switches to be away on vacation, disconnect the power plug from the wall power outlet.
...the power cord is out. 3 When finished using the INPUT button on the remote control. NOTE G If you want to turn TV on, press the , INPUT, CH ( ) button on the TV or press the POWER, INPUT, CH( or ), Number (0~9) button on the remote control. 2 Select the viewing source ...by pressing the MUTE or VOL (+ or -) button. 36 WATCHING TV / CHANNEL CONTROL WATCHING TV / CHANNEL CONTROL TURNING ON THE TV 1 First, connect power cord correctly. At this moment, the TV switches to be away on vacation, disconnect the power plug from the wall power outlet.

Owner's Manual (English)
Page 37
...: Selects MTS sound (Analog signal). I Multi Audio: Changes the audio language (Digital signal). Make appropriate adjustments. 3 Q. MENU Return to TV viewing. MENU Select Del/Add/Fav. 3 Select Favorite. 4Q. I Aspect Ratio: Selects your desired picture format. I Sleep Timer: Select the...Channle Setup 1 CH 123 or 4 5 6 Select your TV turns off . I Backlight: Adjust the brightness of LCD panel to the Favorite List. MENU 2 Display each menu. WATCHING TV / CHANNEL CONTROL QUICK MENU / FAVORITE CHANNEL SETUP Your TV's OSD (On Screen Display) may differ slightly from others,...
...: Selects MTS sound (Analog signal). I Multi Audio: Changes the audio language (Digital signal). Make appropriate adjustments. 3 Q. MENU Return to TV viewing. MENU Select Del/Add/Fav. 3 Select Favorite. 4Q. I Aspect Ratio: Selects your desired picture format. I Sleep Timer: Select the...Channle Setup 1 CH 123 or 4 5 6 Select your TV turns off . I Backlight: Adjust the brightness of LCD panel to the Favorite List. MENU 2 Display each menu. WATCHING TV / CHANNEL CONTROL QUICK MENU / FAVORITE CHANNEL SETUP Your TV's OSD (On Screen Display) may differ slightly from others,...

Owner's Manual (English)
Page 38
Customers can also be displayed on the screen when turning the TV on for the best picture in retail environments. Mode Setting ! Option Setting...1 ENTER Enter RETURN Exit Start Auto Tuning. ! It can adjust the "Picture menu - We recommend setting the TV to start Auto Tuning? Time Setting Current Time Setting Year Month Date Hour Minute Time Zone Daylight Saving F Auto ... preset in the OPTION menu. Auto Tuning Step4. Picture mode" manually while inspecting the TV, but the TV will be activated from the user menus. Choose the setting mode you want . Time ...
Customers can also be displayed on the screen when turning the TV on for the best picture in retail environments. Mode Setting ! Option Setting...1 ENTER Enter RETURN Exit Start Auto Tuning. ! It can adjust the "Picture menu - We recommend setting the TV to start Auto Tuning? Time Setting Current Time Setting Year Month Date Hour Minute Time Zone Daylight Saving F Auto ... preset in the OPTION menu. Auto Tuning Step4. Picture mode" manually while inspecting the TV, but the TV will be activated from the user menus. Choose the setting mode you want . Time ...

Owner's Manual (English)
Page 40
I A password is turned on the channel list. Run Auto Tuning again after any Antenna/Cable connection changes. CHANNEL Auto Tuning Manual Tuning Channel Edit Move Enter CHANNEL Auto ... to Auto Tuning menu if the Lock System is required to gain access to begin auto tuning. MENU Return to the previous menu. WATCHING TV / CHANNEL CONTROL WATCHING TV / CHANNEL CONTROL CHANNEL SETUP Auto Scan (Auto Tuning) Automatically finds all channels available through antenna or cable inputs, and stores them in memory...
I A password is turned on the channel list. Run Auto Tuning again after any Antenna/Cable connection changes. CHANNEL Auto Tuning Manual Tuning Channel Edit Move Enter CHANNEL Auto ... to Auto Tuning menu if the Lock System is required to gain access to begin auto tuning. MENU Return to the previous menu. WATCHING TV / CHANNEL CONTROL WATCHING TV / CHANNEL CONTROL CHANNEL SETUP Auto Scan (Auto Tuning) Automatically finds all channels available through antenna or cable inputs, and stores them in memory...

Owner's Manual (English)
Page 41
... quality of the signal being received. I A password is required to gain access to Manual Tuning menu if the Lock System is turned on -screen signal strength monitor to TV viewing. WATCHING TV / CHANNEL CONTROL Add/Delete Channel (Manual Tuning) If selecting DTV or CADTV input signal, you want to the previous menu. Select...
... quality of the signal being received. I A password is required to gain access to Manual Tuning menu if the Lock System is turned on -screen signal strength monitor to TV viewing. WATCHING TV / CHANNEL CONTROL Add/Delete Channel (Manual Tuning) If selecting DTV or CADTV input signal, you want to the previous menu. Select...

Owner's Manual (English)
Page 46
... user menus. G When you switch the Input source with the logo. NOTE G Connect the HDMI/DVI IN or HDMI IN terminal of the TV to TV viewing. ! OPTION Language Input Label SIMPLINK Key Lock Caption Set ID Power Indicator Initial Setting Move Enter : English : On : Off : Off... or O f f. 4 RETURN Return to the home theater speakers. G When you select a device with the HDMI cable. The TV might not function properly when using SIMPLINK, turn it with other AV devices connected with an OPTICAL cable. 46 MENU Return to the rear terminal (HDMI terminal) of the SIMPLINK...
... user menus. G When you switch the Input source with the logo. NOTE G Connect the HDMI/DVI IN or HDMI IN terminal of the TV to TV viewing. ! OPTION Language Input Label SIMPLINK Key Lock Caption Set ID Power Indicator Initial Setting Move Enter : English : On : Off : Off... or O f f. 4 RETURN Return to the home theater speakers. G When you select a device with the HDMI cable. The TV might not function properly when using SIMPLINK, turn it with other AV devices connected with an OPTICAL cable. 46 MENU Return to the rear terminal (HDMI terminal) of the SIMPLINK...

Owner's Manual (English)
Page 47
I Sync Power on: When you play the connected AV device, TV will automatically turn on. (A device, which is connected (displayed in bright color) 47 out additional settings. I Select AV device: Enables you to switch audio-out. G When no device is connected (displayed in HDD. 5 Audio Out to Home Theater ...
I Sync Power on: When you play the connected AV device, TV will automatically turn on. (A device, which is connected (displayed in bright color) 47 out additional settings. I Select AV device: Enables you to switch audio-out. G When no device is connected (displayed in HDD. 5 Audio Out to Home Theater ...


