
User Manual
Page 1
...ZD 6631 : 50PQ1000-ZD 6632 : 42PQ1100-ZE 6633 : 50PQ1100-ZE 6023: 42PQ2000-ZA 6320 : 42PQ2010-ZB 6024: 50PQ2000-ZA 6319 : 50PQ2010-ZB 6025: 42PQ3000-ZA 6020: 50PQ3000-ZA 6026: 42PQ6000-ZA 6875 : 42PQ6010-ZB 6029: 50PQ6000-ZA 6884 : 50PS2000-ZB 6322 : 50PS3000-ZB 6341: 50PS6000-ZC 6609 :...** 50PQ10** 42PQ11** 50PQ11** 42PQ20** 50PQ20** 42PQ30** 50PQ30** 42PQ60** 50PQ60** 50PS20** 50PS30** 50PS60** 60PS40** Please read this manual carefully before operating your dealer when requiring any service. Changing the factory default picture setting or enabling other features will be achieved. ...
...ZD 6631 : 50PQ1000-ZD 6632 : 42PQ1100-ZE 6633 : 50PQ1100-ZE 6023: 42PQ2000-ZA 6320 : 42PQ2010-ZB 6024: 50PQ2000-ZA 6319 : 50PQ2010-ZB 6025: 42PQ3000-ZA 6020: 50PQ3000-ZA 6026: 42PQ6000-ZA 6875 : 42PQ6010-ZB 6029: 50PQ6000-ZA 6884 : 50PS2000-ZB 6322 : 50PS3000-ZB 6341: 50PS6000-ZC 6609 :...** 50PQ10** 42PQ11** 50PQ11** 42PQ20** 50PQ20** 42PQ30** 50PQ30** 42PQ60** 50PQ60** 50PS20** 50PS30** 50PS60** 60PS40** Please read this manual carefully before operating your dealer when requiring any service. Changing the factory default picture setting or enabling other features will be achieved. ...

User Manual
Page 3
... power plug closely. 1 Polishing Cloth Polishing cloth for use excessive force. I Image shown may cause scratching or discolouration. Owner's Manual AV MODE POWER ENERGY SAVING LIST MUTE Q.VIEW MENU Q.MENU INFO i GUIDE FAMVARK RETURN / EXIT or FREEZE ENERGY SAVING RATIO Owner...'s Manual Batteries Remote Control Power Cord Protection Cover (Refer to p.8) x 4 Bolts for stand assembly (Refer to p.8) (Except for 60PS40**) x 2 Cable Holder (...
... power plug closely. 1 Polishing Cloth Polishing cloth for use excessive force. I Image shown may cause scratching or discolouration. Owner's Manual AV MODE POWER ENERGY SAVING LIST MUTE Q.VIEW MENU Q.MENU INFO i GUIDE FAMVARK RETURN / EXIT or FREEZE ENERGY SAVING RATIO Owner...'s Manual Batteries Remote Control Power Cord Protection Cover (Refer to p.8) x 4 Bolts for stand assembly (Refer to p.8) (Except for 60PS40**) x 2 Cable Holder (...

User Manual
Page 4
... Function in 8 Day Guide Mode . . . . 68 - Picture Mode-User option 75 Picture Improvement Technology 76 Expert Picture Control 78 2 Picture Mode-Preset 74 Manual Picture Adjustment - Button Function in NOW/NEXT Guide Mode . 68 - Button Function in Date Change Mode . . . . 69 - Screen Setup for Wire Arrangement...] INFORMATION . . . 44 Selecting the Programme Table 45 Input List 46 47 Data Service 49 Input Label 49 AV Mode 50 Simple manual 51 Initializing (Reset to original factory settings) . .52 TO USE A USB DEVICE When connecting a USB device 53 Photo List 54 ...
... Function in 8 Day Guide Mode . . . . 68 - Picture Mode-User option 75 Picture Improvement Technology 76 Expert Picture Control 78 2 Picture Mode-Preset 74 Manual Picture Adjustment - Button Function in NOW/NEXT Guide Mode . 68 - Button Function in Date Change Mode . . . . 69 - Screen Setup for Wire Arrangement...] INFORMATION . . . 44 Selecting the Programme Table 45 Input List 46 47 Data Service 49 Input Label 49 AV Mode 50 Simple manual 51 Initializing (Reset to original factory settings) . .52 TO USE A USB DEVICE When connecting a USB device 53 Photo List 54 ...

User Manual
Page 12
SWIVEL STAND After installing the TV, you can adjust the TV manually to the left or right direction by 20 degrees to the antenna as shown above. VIDEO L/MONO AUDIO R S-VIDEO HDMI IN 3 AV IN 3 Wall Antenna ...
SWIVEL STAND After installing the TV, you can adjust the TV manually to the left or right direction by 20 degrees to the antenna as shown above. VIDEO L/MONO AUDIO R S-VIDEO HDMI IN 3 AV IN 3 Wall Antenna ...
User Manual
Page 13
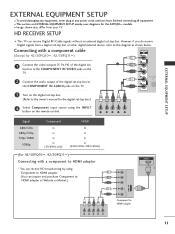
... diagrams for the 42PQ30** models. I This TV can inquire and purchase Component to HDMI adapter at Website or Market.) HDMI OUT Component to the owner's manual for the digital set -top box. Signal 480i/576i 480p/576p 720p/1080i 1080p Component O O O O (50/60Hz only) HDMI X O O O (24Hz/30Hz/50Hz/60Hz) (For 42...
... diagrams for the 42PQ30** models. I This TV can inquire and purchase Component to HDMI adapter at Website or Market.) HDMI OUT Component to the owner's manual for the digital set -top box. Signal 480i/576i 480p/576p 720p/1080i 1080p Component O O O O (50/60Hz only) HDMI X O O O (24Hz/30Hz/50Hz/60Hz) (For 42...
User Manual
Page 14
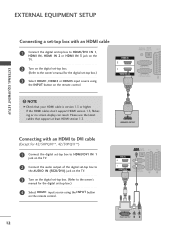
... digital set-top box to the AUDIO IN (RGB/DVI) jack on the TV. 3 Turn on the digital set-top box. (Refer to the owner's manual for the digital set -top box.) 3 Select HDMI1, HDMI2 or HDMI3 input source using the INPUT button on the remote control. Connecting with an HDMI... HDMI/DVI IN 1, HDMI IN, HDMI IN 2 or HDMI IN 3 jack on the TV. 2 Turn on the digital set-top box. (Refer to the owner's manual for the digital set -top box.) 4 Select HDMI1 input source using the INPUT button on the remote control. NOTE G Check that support at least HDMI...
... digital set-top box to the AUDIO IN (RGB/DVI) jack on the TV. 3 Turn on the digital set-top box. (Refer to the owner's manual for the digital set -top box.) 3 Select HDMI1, HDMI2 or HDMI3 input source using the INPUT button on the remote control. Connecting with an HDMI... HDMI/DVI IN 1, HDMI IN, HDMI IN 2 or HDMI IN 3 jack on the TV. 2 Turn on the digital set-top box. (Refer to the owner's manual for the digital set -top box.) 4 Select HDMI1 input source using the INPUT button on the remote control. NOTE G Check that support at least HDMI...

User Manual
Page 15
... DVD player Y PB PR Y B-Y R-Y Y Cb Cr Y Pb Pr 13 tions. 1 2 Component Input ports To achieve better picture quality, connect a DVD player to the DVD player's manual for operating instruc- Component ports on the TV Y PB PR Video output ports on the remote control. 5 Refer to the component input ports as shown...
... DVD player Y PB PR Y B-Y R-Y Y Cb Cr Y Pb Pr 13 tions. 1 2 Component Input ports To achieve better picture quality, connect a DVD player to the DVD player's manual for operating instruc- Component ports on the TV Y PB PR Video output ports on the remote control. 5 Refer to the component input ports as shown...

User Manual
Page 16
... HDMI IN 3 ! EXTERNAL EQUIPMENT SETUP EXTERNAL EQUIPMENT SETUP Connecting with a Euro Scart cable 1 Connect the Euro scart socket of the DVD to the DVD player's manual for 42/50PQ10**, 42/50PQ11**. G AV3, Component, RGB : Except for operating instructions.
... HDMI IN 3 ! EXTERNAL EQUIPMENT SETUP EXTERNAL EQUIPMENT SETUP Connecting with a Euro Scart cable 1 Connect the Euro scart socket of the DVD to the DVD player's manual for 42/50PQ10**, 42/50PQ11**. G AV3, Component, RGB : Except for operating instructions.

User Manual
Page 17
... INPUT button on the remote control. 5 Refer to the AUDIO input jacks on the TV. 3 Turn on the remote control. 3 Refer to the DVD player's manual for operating instruc- AV IN 3 Connecting the HDMI cable 1 Connect the HDMI output of the DVD to the DVD player...'s manual for operating instructions. G If the DVD does not support Auto HDMI, you must set the output resolution appropriately. G Check that support at least HDMI version 1.3. ...
... INPUT button on the remote control. 5 Refer to the AUDIO input jacks on the TV. 3 Turn on the remote control. 3 Refer to the DVD player's manual for operating instruc- AV IN 3 Connecting the HDMI cable 1 Connect the HDMI output of the DVD to the DVD player...'s manual for operating instructions. G If the DVD does not support Auto HDMI, you must set the output resolution appropriately. G Check that support at least HDMI version 1.3. ...

User Manual
Page 19
... to the A V 1 Euro scart socket on the TV. 2 Insert a video tape into the VCR and press PLAY on the VCR. (Refer to the VCR owner's manual.) 3 Select AV1 input source using recording equipment.) O O (The input mode is converted to AV2 Euro scart socket, select AV2 input source. 1 AUDIO/ VIDEO (R) AUDIO (L) Input...
... to the A V 1 Euro scart socket on the TV. 2 Insert a video tape into the VCR and press PLAY on the VCR. (Refer to the VCR owner's manual.) 3 Select AV1 input source using recording equipment.) O O (The input mode is converted to AV2 Euro scart socket, select AV2 input source. 1 AUDIO/ VIDEO (R) AUDIO (L) Input...

User Manual
Page 20
... = yellow, Audio Left = white, and Audio Right = red) 2 Insert a video tape into the VCR and press PLAY on the VCR. (Refer to the VCR owner's manual.) 4 Select AV3 input source with a RCA cable (Except for 42/50PQ10**, 42/50PQ11**) 1 Connect the S-VIDEO output of the VCR to the AUDIO L/MONO jack... to the AUDIO input jacks on the TV. 3 Insert a video tape into the VCR and press PLAY on the VCR. (Refer to the VCR owner's manual.) AV IN 3 3 Select A V 3 input source using the INPUT button on the remote control. NOTE G If you have been connected to normal composite (RCA cable) ...
... = yellow, Audio Left = white, and Audio Right = red) 2 Insert a video tape into the VCR and press PLAY on the VCR. (Refer to the VCR owner's manual.) 4 Select AV3 input source with a RCA cable (Except for 42/50PQ10**, 42/50PQ11**) 1 Connect the S-VIDEO output of the VCR to the AUDIO L/MONO jack... to the AUDIO input jacks on the TV. 3 Insert a video tape into the VCR and press PLAY on the VCR. (Refer to the VCR owner's manual.) AV IN 3 3 Select A V 3 input source using the INPUT button on the remote control. NOTE G If you have been connected to normal composite (RCA cable) ...

User Manual
Page 21
... to the TV Digital Audio (Optical) Output port. 2 Connect the other end of TV as shown. Refer to the external audio equipment VI IN instruction manual for all countries. 1 1 Insert the CI Module to the TV and the PCMCIA card slot. EXTERNAL EQUIPMENT SETUP INSERTION OF CI MODULE - Looking at the...
... to the TV Digital Audio (Optical) Output port. 2 Connect the other end of TV as shown. Refer to the external audio equipment VI IN instruction manual for all countries. 1 1 Insert the CI Module to the TV and the PCMCIA card slot. EXTERNAL EQUIPMENT SETUP INSERTION OF CI MODULE - Looking at the...

User Manual
Page 29
... for screen Position, Size, Phase If the picture is not clear after auto adjustment and especially if characters are still trembling, adjust the picture phase manually. This function works in the following mode : RGB[PC]. 1 MENU 2 OK 3 OK 4 PICTURE SSccrreeeenn Move OK E • Contrast 100 • Brightness 50 • Sharpness 70...
... for screen Position, Size, Phase If the picture is not clear after auto adjustment and especially if characters are still trembling, adjust the picture phase manually. This function works in the following mode : RGB[PC]. 1 MENU 2 OK 3 OK 4 PICTURE SSccrreeeenn Move OK E • Contrast 100 • Brightness 50 • Sharpness 70...
User Manual
Page 35
... Setting Standard Standard L+R Off USB Eject Eject Close (Except for the images being watched. For Zoom Setting, select 14:9, Zoom and Cinema Zoom in this manual. or Select your desired Sound Mode. • Audio : Selects the sound output. • Sleep Timer : Sets the sleep timer. • USB Eject : Selects "USB Eject...
... Setting Standard Standard L+R Off USB Eject Eject Close (Except for the images being watched. For Zoom Setting, select 14:9, Zoom and Cinema Zoom in this manual. or Select your desired Sound Mode. • Audio : Selects the sound output. • Sleep Timer : Sets the sleep timer. • USB Eject : Selects "USB Eject...
User Manual
Page 36
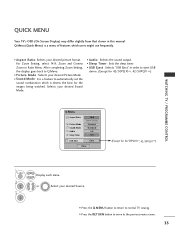
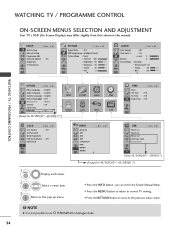
...Input Block : Off : Off 1 MENU Display each menu. 2 OK Select a menu item. 3 OK Move to the pop up menu. SETUP Auto Tuning Manual Tuning Programme Edit Software Update Diagnostics CI Information Move OK : On PICTURE Move Aspect Ratio : 16:9 Energy Saving : Intelligent Sensor Picture Mode : Vivid •... : UK Input Label SIMPLINK : On E (Except for 42/50PQ10**, 42/50PQ11**) • Press the INFO button, you can check the Simple Manual Menu. • Press the MENU button to return to normal TV viewing. • Press the RETURN button to move to use CI Information in ...
...Input Block : Off : Off 1 MENU Display each menu. 2 OK Select a menu item. 3 OK Move to the pop up menu. SETUP Auto Tuning Manual Tuning Programme Edit Software Update Diagnostics CI Information Move OK : On PICTURE Move Aspect Ratio : 16:9 Energy Saving : Intelligent Sensor Picture Mode : Vivid •... : UK Input Label SIMPLINK : On E (Except for 42/50PQ10**, 42/50PQ11**) • Press the INFO button, you can check the Simple Manual Menu. • Press the MENU button to return to normal TV viewing. • Press the RETURN button to move to use CI Information in ...

User Manual
Page 37
... Programme Edit Software Update Diagnostics CI Information Move OK : On 1 MENU 2 OK Select SETUP. SETUP Move OK Auto Tuning Manual Tuning Programme Edit Software Update Diagnostics CI Information : Onf All service-information will be deleted. Then, press the OK but- ing stations for tuning. • ...
... Programme Edit Software Update Diagnostics CI Information Move OK : On 1 MENU 2 OK Select SETUP. SETUP Move OK Auto Tuning Manual Tuning Programme Edit Software Update Diagnostics CI Information : Onf All service-information will be deleted. Then, press the OK but- ing stations for tuning. • ...

User Manual
Page 38
Select the desired channel number. WATCHING TV / PROGRAMME CONTROL MANUAL PROGRAMME TUNING (IN DIGITAL MODE) Manual Tuning lets you manually add a programme to your channel list. : UOHnF CH. 30 Bad Normal Good Update Close • Use NUMBER buttons to input a 4-digit ... the MENU button to return to normal TV viewing. • Press the RETURN button to move to your programme list. Select Manual Tuning. SETUP Auto Tuning Manual Tuning Programme Edit Software Update Diagnostics CI Information Move OK F DTV G Your receiver will add this channel to the previous menu screen...
Select the desired channel number. WATCHING TV / PROGRAMME CONTROL MANUAL PROGRAMME TUNING (IN DIGITAL MODE) Manual Tuning lets you manually add a programme to your channel list. : UOHnF CH. 30 Bad Normal Good Update Close • Use NUMBER buttons to input a 4-digit ... the MENU button to return to normal TV viewing. • Press the RETURN button to move to your programme list. Select Manual Tuning. SETUP Auto Tuning Manual Tuning Programme Edit Software Update Diagnostics CI Information Move OK F DTV G Your receiver will add this channel to the previous menu screen...

User Manual
Page 39
... button to move to the previous menu screen. • Use NUMBER buttons to input a 4-digit password in whatever order you desire. MANUAL PROGRAMME TUNING (IN ANALOGUE MODE) Manual Tuning lets you manually tune and arrange the stations in Lock System 'O n'. • L : SECAM L/L' (France) B G : PAL B/G, SECAM B/G (...Name TV G 3 BG V/UHF 0 FG C 02 Store Close 1 MENU Select SETUP. 6 Select V/UHF or Cable. 2 OK 3 OK 4 5 Select Manual Tuning. 7 1 2 3 Select the desired or 456 789 channel number. 0 Select T V. 8 Commence searching. 9 or 1 2 3 Select the desired pro- 456 789 ...
... button to move to the previous menu screen. • Use NUMBER buttons to input a 4-digit password in whatever order you desire. MANUAL PROGRAMME TUNING (IN ANALOGUE MODE) Manual Tuning lets you manually tune and arrange the stations in Lock System 'O n'. • L : SECAM L/L' (France) B G : PAL B/G, SECAM B/G (...Name TV G 3 BG V/UHF 0 FG C 02 Store Close 1 MENU Select SETUP. 6 Select V/UHF or Cable. 2 OK 3 OK 4 5 Select Manual Tuning. 7 1 2 3 Select the desired or 456 789 channel number. 0 Select T V. 8 Commence searching. 9 or 1 2 3 Select the desired pro- 456 789 ...

User Manual
Page 40
... MENU button to return to normal TV viewing. • Press the RETURN button to move to each programme number. 1 MENU Select SETUP. 5 OK 2 OK Select Manual Tuning. OK Select N a m e. 6 OK Select C l o s e. 7 OK Select S t o r e. Select the position and make your choice of the ...second character, and so on. WATCHING TV / PROGRAMME CONTROL SETUP Auto Tuning Manual Tuning Programme Edit Software Update Diagnostics CI Information Move OK : On SETUP Auto Tuning Manual Tuning Programme Edit Software Update Diagnostics CI Information Move OK F Storage : OnSystem Band Channel...
... MENU button to return to normal TV viewing. • Press the RETURN button to move to each programme number. 1 MENU Select SETUP. 5 OK 2 OK Select Manual Tuning. OK Select N a m e. 6 OK Select C l o s e. 7 OK Select S t o r e. Select the position and make your choice of the ...second character, and so on. WATCHING TV / PROGRAMME CONTROL SETUP Auto Tuning Manual Tuning Programme Edit Software Update Diagnostics CI Information Move OK : On SETUP Auto Tuning Manual Tuning Programme Edit Software Update Diagnostics CI Information Move OK F Storage : OnSystem Band Channel...

User Manual
Page 41
This function enables you to skip the stored programmes. WATCHING TV / PROGRAMME CONTROL SETUP Auto Tuning Manual Tuning Programme Edit Software Update Diagnostics CI Information Move OK : On 1 YLE TV1 Favourite List FAV Favourite Pr. Change DTV Radio TV 1 YLE TV1 4 TV4 ...
This function enables you to skip the stored programmes. WATCHING TV / PROGRAMME CONTROL SETUP Auto Tuning Manual Tuning Programme Edit Software Update Diagnostics CI Information Move OK : On 1 YLE TV1 Favourite List FAV Favourite Pr. Change DTV Radio TV 1 YLE TV1 4 TV4 ...

