
User Manual
Page 3
... with the polishing cloth. Owner's Manual AV MODE POWER ENERGY SAVING LIST MUTE Q.VIEW MENU Q.MENU INFO i GUIDE FAMVARK RETURN / EXIT or FREEZE ENERGY SAVING RATIO Owner's Manual Batteries Remote Control Power Cord Protection Cover (Refer to p.8) x 4 Bolts for stand assembly (Refer to p.8) (Except for 60PS40**) x 2 Cable Holder (Refer to p.8) Ferrite Core (This item is not included for all models.) Cable management clip (Refer to p.8) (Only 60PS40**) Wall Mounting Bracket (Separate purchase) AW...
... with the polishing cloth. Owner's Manual AV MODE POWER ENERGY SAVING LIST MUTE Q.VIEW MENU Q.MENU INFO i GUIDE FAMVARK RETURN / EXIT or FREEZE ENERGY SAVING RATIO Owner's Manual Batteries Remote Control Power Cord Protection Cover (Refer to p.8) x 4 Bolts for stand assembly (Refer to p.8) (Except for 60PS40**) x 2 Cable Holder (Refer to p.8) Ferrite Core (This item is not included for all models.) Cable management clip (Refer to p.8) (Only 60PS40**) Wall Mounting Bracket (Separate purchase) AW...

User Manual
Page 4
...74 Manual Picture Adjustment - Screen Setup for Wire Arrangement 8 Desktop Pedestal Installation 8 Careful installation advice 9 Wall Mount: Horizontal Installation 9 Antenna Connection 10 Swivel Stand 10 EXTERNAL EQUIPMENT SETUP HD Receiver Setup 11 DVD Setup 13 VCR Setup 16 Insertion of CI Module 19 Digital Audio Out Setup 19 Other A/V Source Setup 20 Usb Setup 20 PC Setup 21 - CONTENTS CONTENTS ACCESSORIES 1 PREPARATION Front Panel Controls 4 Back Panel Information 6 Stand Installation 8 Back Cover for PC Mode 24 WATCHING TV / PROGRAMME CONTROL Remote Control Key...
...74 Manual Picture Adjustment - Screen Setup for Wire Arrangement 8 Desktop Pedestal Installation 8 Careful installation advice 9 Wall Mount: Horizontal Installation 9 Antenna Connection 10 Swivel Stand 10 EXTERNAL EQUIPMENT SETUP HD Receiver Setup 11 DVD Setup 13 VCR Setup 16 Insertion of CI Module 19 Digital Audio Out Setup 19 Other A/V Source Setup 20 Usb Setup 20 PC Setup 21 - CONTENTS CONTENTS ACCESSORIES 1 PREPARATION Front Panel Controls 4 Back Panel Information 6 Stand Installation 8 Back Cover for PC Mode 24 WATCHING TV / PROGRAMME CONTROL Remote Control Key...
User Manual
Page 5
... Analogue Mode Only) . . . . 93 - CONTENTS Picture Reset 81 Image Sticking Minimization (ISM) Method . . . 82 Demo Mode 83 Mode Setting 84 SOUND & LANGUAGE CONTROL Auto Volume Leveler 85 Preset Sound Settings - Speaker Sound Output Selection 94 On-Screen Menu Language/Country Selection . . 95 Language Selection (In Digital Mode only) . . . . 96 TIME SETTING Clock Setup 97 Auto On/ Off Timer Setting 98 Sleep Timer Setting 99 PARENTAL CONTROL /34 RATINGS Set Password & Lock System 100 Block Programme 101 Parental Control 102 Input Block 103 Key Lock 104 TELETEXT Switch...
... Analogue Mode Only) . . . . 93 - CONTENTS Picture Reset 81 Image Sticking Minimization (ISM) Method . . . 82 Demo Mode 83 Mode Setting 84 SOUND & LANGUAGE CONTROL Auto Volume Leveler 85 Preset Sound Settings - Speaker Sound Output Selection 94 On-Screen Menu Language/Country Selection . . 95 Language Selection (In Digital Mode only) . . . . 96 TIME SETTING Clock Setup 97 Auto On/ Off Timer Setting 98 Sleep Timer Setting 99 PARENTAL CONTROL /34 RATINGS Set Password & Lock System 100 Block Programme 101 Parental Control 102 Input Block 103 Key Lock 104 TELETEXT Switch...
User Manual
Page 11
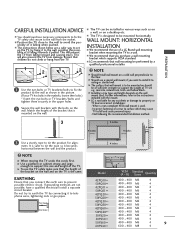
... wall mount, if you connect the earth wire to support the size and weight of it to a wall. If grounding methods are a safer way to telephone wires, lightening rods or gas pipes. A LG recommends that is safer to the wall, avoiding the possibility of the TV. G The surface that you want to install it falling forwards if pulled. Power Supply Circuit breaker 4 inches A B Model...
... wall mount, if you connect the earth wire to support the size and weight of it to a wall. If grounding methods are a safer way to telephone wires, lightening rods or gas pipes. A LG recommends that is safer to the wall, avoiding the possibility of the TV. G The surface that you want to install it falling forwards if pulled. Power Supply Circuit breaker 4 inches A B Model...
User Manual
Page 13
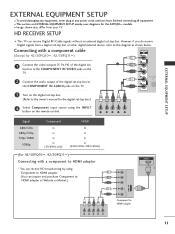
... receive HD broadcasting by using the INPUT button on the remote control. HD RECEIVER SETUP I Image shown may differ from a digital set-top box or other digital external device, refer to the owner's manual for the digital set-top box.) 4 Select Component input source using Component to HDMI adapter 11 I To avoid damaging any equipment, never plug in any power cords until you do receive Digital signals from your TV. EXTERNAL EQUIPMENT SETUP EXTERNAL EQUIPMENT SETUP I This section on EXTERNAL EQUIPMENT SETUP mainly uses diagrams for the 42PQ30** models. Signal...
... receive HD broadcasting by using the INPUT button on the remote control. HD RECEIVER SETUP I Image shown may differ from a digital set-top box or other digital external device, refer to the owner's manual for the digital set-top box.) 4 Select Component input source using Component to HDMI adapter 11 I To avoid damaging any equipment, never plug in any power cords until you do receive Digital signals from your TV. EXTERNAL EQUIPMENT SETUP EXTERNAL EQUIPMENT SETUP I This section on EXTERNAL EQUIPMENT SETUP mainly uses diagrams for the 42PQ30** models. Signal...
User Manual
Page 14
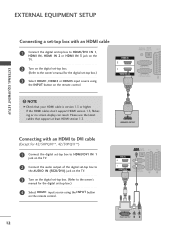
... the owner's manual for the digital set -top box.) 4 Select HDMI1 input source using the INPUT button on the remote control. HDMI IN 2 1 HDMI/DVI IN 1 ! If the HDMI cables don't support HDMI version 1.3, flickering or no screen display can result. Please use the latest cables that your HDMI cable is version 1.3 or higher. EXTERNAL EQUIPMENT SETUP EXTERNAL EQUIPMENT SETUP Connecting a set-top box with an HDMI to DVI cable (Except for 42/50PQ10**, 42/50PQ11**) 1 Connect the digital set-top box to HDMI/DVI IN 1 jack on the TV. 2 Connect the audio output...
... the owner's manual for the digital set -top box.) 4 Select HDMI1 input source using the INPUT button on the remote control. HDMI IN 2 1 HDMI/DVI IN 1 ! If the HDMI cables don't support HDMI version 1.3, flickering or no screen display can result. Please use the latest cables that your HDMI cable is version 1.3 or higher. EXTERNAL EQUIPMENT SETUP EXTERNAL EQUIPMENT SETUP Connecting a set-top box with an HDMI to DVI cable (Except for 42/50PQ10**, 42/50PQ11**) 1 Connect the digital set-top box to HDMI/DVI IN 1 jack on the TV. 2 Connect the audio output...

User Manual
Page 16
... Out) X O AV2 (Monitor Out) O O AV2 (When DTV scheduled recording is in progress using the INPUT button on the DVD player, insert a DVD. 3 Select AV1 input source using recording equipment.) O O (The input mode is available. VIDEO L/MONO AUDIO R S-VIDEO HDMI IN 3 ! EXTERNAL EQUIPMENT SETUP EXTERNAL EQUIPMENT SETUP Connecting with a Euro Scart cable 1 Connect the Euro scart socket of the DVD to the A V 1 Euro scart socket on the TV. 2 Turn on the remote control. AUDIO/ VIDEO (R) AUDIO (L) Input Scart Video Audio RGB AV1 O O O Output Video, Audio ATV only...
... Out) X O AV2 (Monitor Out) O O AV2 (When DTV scheduled recording is in progress using the INPUT button on the DVD player, insert a DVD. 3 Select AV1 input source using recording equipment.) O O (The input mode is available. VIDEO L/MONO AUDIO R S-VIDEO HDMI IN 3 ! EXTERNAL EQUIPMENT SETUP EXTERNAL EQUIPMENT SETUP Connecting with a Euro Scart cable 1 Connect the Euro scart socket of the DVD to the A V 1 Euro scart socket on the TV. 2 Turn on the remote control. AUDIO/ VIDEO (R) AUDIO (L) Input Scart Video Audio RGB AV1 O O O Output Video, Audio ATV only...

User Manual
Page 17
... OUTPUT SWITCH 1 ANT OUT 2 VIDEO L/MONO AUDIO R S-VIDEO HDMI IN 3 4 Select AV3 input source using the INPUT button on the remote control. 5 Refer to the AUDIO input jacks on the TV. 3 Turn on the DVD player, insert a DVD. If the HDMI cables don't support HDMI version 1.3, flickering or no screen display can receive video and audio signals simultaneously when using the INPUT button on the remote control. 3 Refer to the DVD player's manual for operating instruc- G Check that support at least HDMI version 1.3. 15 EXTERNAL EQUIPMENT SETUP Connecting with a S-Video cable (Except...
... OUTPUT SWITCH 1 ANT OUT 2 VIDEO L/MONO AUDIO R S-VIDEO HDMI IN 3 4 Select AV3 input source using the INPUT button on the remote control. 5 Refer to the AUDIO input jacks on the TV. 3 Turn on the DVD player, insert a DVD. If the HDMI cables don't support HDMI version 1.3, flickering or no screen display can receive video and audio signals simultaneously when using the INPUT button on the remote control. 3 Refer to the DVD player's manual for operating instruc- G Check that support at least HDMI version 1.3. 15 EXTERNAL EQUIPMENT SETUP Connecting with a S-Video cable (Except...

User Manual
Page 19
... VCR and press PLAY on the VCR. (Refer to the VCR owner's manual.) 3 Select AV1 input source using recording equipment.) O O (The input mode is converted to AV2 Euro scart socket, select AV2 input source. 1 AUDIO/ VIDEO (R) AUDIO (L) Input Scart Video Audio RGB AV1 O O O Output Video, Audio ATV only AV2 O O X ATV, DTV, AV1/2/3 output is in progress using the INPUT button on the remote control. 4 If connected to DTV automatically.) AV1/2/3 O O O Component/RGB/HDMI O X O G TV Out : Outputs analog TV video signals.
... VCR and press PLAY on the VCR. (Refer to the VCR owner's manual.) 3 Select AV1 input source using recording equipment.) O O (The input mode is converted to AV2 Euro scart socket, select AV2 input source. 1 AUDIO/ VIDEO (R) AUDIO (L) Input Scart Video Audio RGB AV1 O O O Output Video, Audio ATV only AV2 O O X ATV, DTV, AV1/2/3 output is in progress using the INPUT button on the remote control. 4 If connected to DTV automatically.) AV1/2/3 O O O Component/RGB/HDMI O X O G TV Out : Outputs analog TV video signals.

User Manual
Page 21
... digital TV mode. - If you want to enjoy digital broadcasting through 5.1-channel speakers, connect the OPTICAL DIGITAL AUDIO OUT terminal on the audio equipment. 3 Set the "TV Speaker option - To view the encrypted (pay) services in the AUDIO 1 menu.(Gp.89). S-VIDEO HDMI IN 3 ! If the module is inserted into the optical output port. IN tal audio (Optical) input on the back of TV to a DVD Home Theater (or amp). 1 Connect one end of an optical cable to...
... digital TV mode. - If you want to enjoy digital broadcasting through 5.1-channel speakers, connect the OPTICAL DIGITAL AUDIO OUT terminal on the audio equipment. 3 Set the "TV Speaker option - To view the encrypted (pay) services in the AUDIO 1 menu.(Gp.89). S-VIDEO HDMI IN 3 ! If the module is inserted into the optical output port. IN tal audio (Optical) input on the back of TV to a DVD Home Theater (or amp). 1 Connect one end of an optical cable to...

User Manual
Page 25
... Plug and Play automatically by the TV.) G DOS mode may not work depending on the TV. Change the PC mode to display the PC output on the video card if you use a screen saver when possible. G If the graphic card on the screen; G Connect the signal cable from the HDMI output port of cable. G There may become permanently imprinted on the PC does output analog and digital RGB simultaneously, set to another rate or adjust...
... Plug and Play automatically by the TV.) G DOS mode may not work depending on the TV. Change the PC mode to display the PC output on the video card if you use a screen saver when possible. G If the graphic card on the screen; G Connect the signal cable from the HDMI output port of cable. G There may become permanently imprinted on the PC does output analog and digital RGB simultaneously, set to another rate or adjust...

User Manual
Page 26
Auto Config. SCREEN Resolution Move RETURN Prev. Position Size Phase To Set Yes No Reset G • Press the MENU button to return to normal TV viewing. • Press the RETURN button to move to the factory default settings. This function works in the following mode : RGB[PC]. EXTERNAL EQUIPMENT SETUP Screen Setup for PC mode (Except for 42/50PQ10**, 42/50PQ11**) Screen Reset Returns Position, Size and Phase to the previous menu screen. 24 EXTERNAL EQUIPMENT SETUP PICTURE SSccrreeeenn...
Auto Config. SCREEN Resolution Move RETURN Prev. Position Size Phase To Set Yes No Reset G • Press the MENU button to return to normal TV viewing. • Press the RETURN button to move to the factory default settings. This function works in the following mode : RGB[PC]. EXTERNAL EQUIPMENT SETUP Screen Setup for PC mode (Except for 42/50PQ10**, 42/50PQ11**) Screen Reset Returns Position, Size and Phase to the previous menu screen. 24 EXTERNAL EQUIPMENT SETUP PICTURE SSccrreeeenn...

User Manual
Page 30
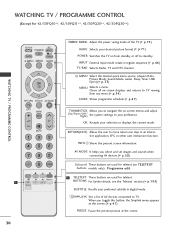
LIST Displays the programme table.(G p.45) THUMBSTICK Allows you select and set images and sounds when con- Clears all on-screen displays and returns to TV viewing from standby or off to TV. When you toggle this button, the Simplink menu appears at the remote control sensor on TELETEXT buttons models only) , Programme edit. 2 TELETEXT These buttons are used for 42/50PQ10**, 42/50PQ11**) INPUT External input mode rotate in an interactive application...
LIST Displays the programme table.(G p.45) THUMBSTICK Allows you select and set images and sounds when con- Clears all on-screen displays and returns to TV viewing from standby or off to TV. When you toggle this button, the Simplink menu appears at the remote control sensor on TELETEXT buttons models only) , Programme edit. 2 TELETEXT These buttons are used for 42/50PQ10**, 42/50PQ11**) INPUT External input mode rotate in an interactive application...
User Manual
Page 32
... SAVING Adjust the power saving mode of AV devices connected to move return one step in an interactive application, EPG or other user interaction function. See a list of the TV.(G p.73) RATIO Selects your desired picture format.(G p.71) POWER Switches the TV on -screen menus and adjust (Up/Down/Left/ Right) the system settings to your preference. Q. Clears all on-screen displays and returns to standby. BUTTONS...
... SAVING Adjust the power saving mode of AV devices connected to move return one step in an interactive application, EPG or other user interaction function. See a list of the TV.(G p.73) RATIO Selects your desired picture format.(G p.71) POWER Switches the TV on -screen menus and adjust (Up/Down/Left/ Right) the system settings to your preference. Q. Clears all on-screen displays and returns to standby. BUTTONS...

User Manual
Page 34
... setting, the Initial Setting menu can adjust the Language, Mode Setting, Country, Auto tuning. button to the previous OSD. WATCHING TV / PROGRAMME CONTROL WATCHING TV / PROGRAMME CONTROL TURNING ON THE TV - ton on the remote control and the TV will switch on the TV or press the POWER but- "Store Demo" mode is the optimal setting for home environments, and is displayed on the screen after a certain period of time. The mode (Home Use, Store Demo...
... setting, the Initial Setting menu can adjust the Language, Mode Setting, Country, Auto tuning. button to the previous OSD. WATCHING TV / PROGRAMME CONTROL WATCHING TV / PROGRAMME CONTROL TURNING ON THE TV - ton on the remote control and the TV will switch on the TV or press the POWER but- "Store Demo" mode is the optimal setting for home environments, and is displayed on the screen after a certain period of time. The mode (Home Use, Store Demo...

User Manual
Page 44
... select O n, a user con- When the power is turned on while updating, the progress status is available. firm message box will be disconnected. 42 • After Software Update, you want stop the update. Select Software Update. 3 OK 4 OK Save. Software update is displayed. TV will be downloaded through the digital terrestrial broadcasting system. Do you can be rebooted. WATCHING TV / PROGRAMME CONTROL SOFTWARE UPDATE Software Update means software can confirm the updated software version...
... select O n, a user con- When the power is turned on while updating, the progress status is available. firm message box will be disconnected. 42 • After Software Update, you want stop the update. Select Software Update. 3 OK 4 OK Save. Software update is displayed. TV will be downloaded through the digital terrestrial broadcasting system. Do you can be rebooted. WATCHING TV / PROGRAMME CONTROL SOFTWARE UPDATE Software Update means software can confirm the updated software version...
User Manual
Page 55
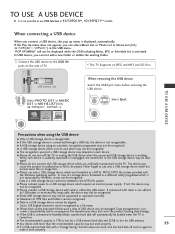
... may not be played. TO USE A USB DEVICE VIDEO L/MONO AUDIO R S-VIDEO HDMI IN 3 USB memory stick 2 Select PHOTO LIST or MUSIC LIST or MOVIE LI ST(Only 42/50PQ60**, 50PS60**). 3 OK PHOTO LIST AV IN 3 MUSIC LIST MOVIE LIST When removing the USB device Select the USB Eject menu before removing the USB device. 1 Q. Never forget to use only a USB storage device which requires an external power supply. Data in a USB storage device cannot...
... may not be played. TO USE A USB DEVICE VIDEO L/MONO AUDIO R S-VIDEO HDMI IN 3 USB memory stick 2 Select PHOTO LIST or MUSIC LIST or MOVIE LI ST(Only 42/50PQ60**, 50PS60**). 3 OK PHOTO LIST AV IN 3 MUSIC LIST MOVIE LIST When removing the USB device Select the USB Eject menu before removing the USB device. 1 Q. Never forget to use only a USB storage device which requires an external power supply. Data in a USB storage device cannot...

User Manual
Page 99
... G GMT Close 1 MENU 2 OK 3 OK Select TI M E. TIME SETTING CLOCK SETUP The clock is set automatically when receiving a digital signal. (You can change time, but if the city name in DTV mode, you cannot change time by the time offset information based on /off timer function. Select Clock. When you can set the clock manually only if the TV has no DTV signal.) You must set the time correctly before using on Time Zone...
... G GMT Close 1 MENU 2 OK 3 OK Select TI M E. TIME SETTING CLOCK SETUP The clock is set automatically when receiving a digital signal. (You can change time, but if the city name in DTV mode, you cannot change time by the time offset information based on /off timer function. Select Clock. When you can set the clock manually only if the TV has no DTV signal.) You must set the time correctly before using on Time Zone...
User Manual
Page 110
... your HDMI cable is any function to +, - A Check the power control settings. A Check your service centre, if the picture has not appeared after switching on your antenna direction and/or location. Please contact after five minutes. A Check that the batteries are pointing the remote control directly at least HDMI version 1.3. The video function does not work A Check to receive weaker stations. A Try another channel. A Try another channel. Horizontal/vertical...
... your HDMI cable is any function to +, - A Check the power control settings. A Check your service centre, if the picture has not appeared after switching on your antenna direction and/or location. Please contact after five minutes. A Check that the batteries are pointing the remote control directly at least HDMI version 1.3. The video function does not work A Check to receive weaker stations. A Try another channel. A Try another channel. Horizontal/vertical...
User Manual
Page 111
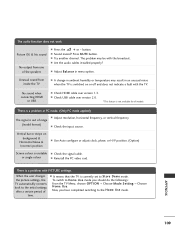
... & Incorrect position A Use Auto configure or adjust clock, phase, or H/V position. (Option) Screen colour is unstable A Check the signal cable. or single colour A Reinstall the PC video card. Vertical bar or stripe on or off and does not indicate a fault with the TV. Press MUTE button. A Try another channel. When the user changes the picture settings, the TV automatically converts back to Store Demo mode. Now, you should...
... & Incorrect position A Use Auto configure or adjust clock, phase, or H/V position. (Option) Screen colour is unstable A Check the signal cable. or single colour A Reinstall the PC video card. Vertical bar or stripe on or off and does not indicate a fault with the TV. Press MUTE button. A Try another channel. When the user changes the picture settings, the TV automatically converts back to Store Demo mode. Now, you should...


