Owner's Manual (English)
Page 4
...2 Colour Tone - Cinema 72 Advanced - Picture Improvement Technology 71 Advanced - User Option 68 - CONTENTS CONTENTS ACCESSORIES 1 PREPARATION i Front Panel Controls 4 Back Panel Information 6 Stand Installation 9 Attaching the TV to a Desk 10 Swivel Stand 10 Attaching the TV to a Wall 11 Back Cover for PC ...Key Functions 34 Turning on the TV 36 Initializing Setup 36 Programme Selection 37 Volume Adjustment 37 On-Screen Menus Selection and Adjustment . . 38 Factory Reset 39 Model Info 39 Auto Programme Tuning 40 Manual Programme Tuning 42 Fine Tuning 44 Assigning a ...
...2 Colour Tone - Cinema 72 Advanced - Picture Improvement Technology 71 Advanced - User Option 68 - CONTENTS CONTENTS ACCESSORIES 1 PREPARATION i Front Panel Controls 4 Back Panel Information 6 Stand Installation 9 Attaching the TV to a Desk 10 Swivel Stand 10 Attaching the TV to a Wall 11 Back Cover for PC ...Key Functions 34 Turning on the TV 36 Initializing Setup 36 Programme Selection 37 Volume Adjustment 37 On-Screen Menus Selection and Adjustment . . 38 Factory Reset 39 Model Info 39 Auto Programme Tuning 40 Manual Programme Tuning 42 Fine Tuning 44 Assigning a ...

Owner's Manual (English)
Page 7
... PR POWER Button INPUT Button MENU Button OK Button VOLUME Buttons PROGRAMME Buttons 42/47/52LB9DF*, 32LB9D* VOL PR CH PROGRAMME (E,D) ButtonsCH VOL VOLUME (F,G) Buttons VOL OK Button MENU Button OK MENU INPUT /I INPUT Button Intelligent Eye Adjusts picture according to the surrounding conditions. POWER Button Remote Control Power/Standby Indicator Sensor...
... PR POWER Button INPUT Button MENU Button OK Button VOLUME Buttons PROGRAMME Buttons 42/47/52LB9DF*, 32LB9D* VOL PR CH PROGRAMME (E,D) ButtonsCH VOL VOLUME (F,G) Buttons VOL OK Button MENU Button OK MENU INPUT /I INPUT Button Intelligent Eye Adjusts picture according to the surrounding conditions. POWER Button Remote Control Power/Standby Indicator Sensor...
Owner's Manual (English)
Page 13
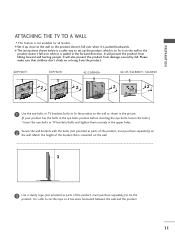
... that children don't climb on or hang from the product. 60PY3DF* 1 50PY3DF* 1 2 42/50PB4D* 1 2 42/47/52LB9DF*, 32LB9D* 1 2 2 1 Use the eye-bolts or TV brackets/bolts to fix the product to the wall as shown in the picture. (If your product has the bolts in the eye-bolts position before inserting the... eye-bolts, loosen the bolts.) * Insert the eye-bolts or TV brackets/bolts and...
... that children don't climb on or hang from the product. 60PY3DF* 1 50PY3DF* 1 2 42/50PB4D* 1 2 42/47/52LB9DF*, 32LB9D* 1 2 2 1 Use the eye-bolts or TV brackets/bolts to fix the product to the wall as shown in the picture. (If your product has the bolts in the eye-bolts position before inserting the... eye-bolts, loosen the bolts.) * Insert the eye-bolts or TV brackets/bolts and...
Owner's Manual (English)
Page 19
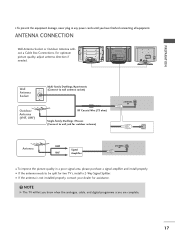
... 1 AV OUT RF Coaxial Wire (75 ohm) Single-family Dwellings /Houses (Connect to be split for two TV's, install a 2-Way Signal Splitter. NOTE G The TV will let you have finished connecting all equipment. For optimum picture quality, adjust antenna direction if needed. I If the antenna is not installed properly, contact your dealer for...
... 1 AV OUT RF Coaxial Wire (75 ohm) Single-family Dwellings /Houses (Connect to be split for two TV's, install a 2-Way Signal Splitter. NOTE G The TV will let you have finished connecting all equipment. For optimum picture quality, adjust antenna direction if needed. I If the antenna is not installed properly, contact your dealer for...
Owner's Manual (English)
Page 20
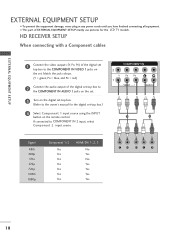
... to the COMPONENT IN VIDEO 1 jacks on the remote control. EXTERNAL EQUIPMENT SETUP EXTERNAL EQUIPMENT SETUP I This part of EXTERNAL EQUIPMENT SETUP mainly use pictures for the digital set-top box.) 4 Select Component 1 input source using the INPUT button on the set. HD RECEIVER SETUP When connecting with a Component...(Y = green, PB = blue, and PR = red) 2 Connect the audio output of the digital set -top box. (Refer to the owner's manual for the LCD TV models. I To prevent the equipment damage, never plug in any power cords until you have finished connecting all equipment.
... to the COMPONENT IN VIDEO 1 jacks on the remote control. EXTERNAL EQUIPMENT SETUP EXTERNAL EQUIPMENT SETUP I This part of EXTERNAL EQUIPMENT SETUP mainly use pictures for the digital set-top box.) 4 Select Component 1 input source using the INPUT button on the set. HD RECEIVER SETUP When connecting with a Component...(Y = green, PB = blue, and PR = red) 2 Connect the audio output of the digital set -top box. (Refer to the owner's manual for the LCD TV models. I To prevent the equipment damage, never plug in any power cords until you have finished connecting all equipment.

Owner's Manual (English)
Page 21
... HDMI function, the output resolution of the source device to the owner's manual for the digital set the output resolution appropriately. To get the best picture quality, adjust the output resolution of the source device will be automatically set to set -top box.) 1 COMPONENT IN VIDEO AUDIO 4 Select HDMI1, ...NENT IN 1 Connect the digital set-top box to HDMI/DVI IN1, 2 or 3 jack on the set -top box. (Refer to 1920x1080i/1080p. (32LB9D*, 42/50PB4D*: 1280x720p) 1 HDMI-DTV OUTPUT 19 HDMI/DVI IN RGB IN RGB (PC) AUDIO (RGB/DVI) AU 3 2 No separate audio connection is necessary.
... HDMI function, the output resolution of the source device to the owner's manual for the digital set the output resolution appropriately. To get the best picture quality, adjust the output resolution of the source device will be automatically set to set -top box.) 1 COMPONENT IN VIDEO AUDIO 4 Select HDMI1, ...NENT IN 1 Connect the digital set-top box to HDMI/DVI IN1, 2 or 3 jack on the set -top box. (Refer to 1920x1080i/1080p. (32LB9D*, 42/50PB4D*: 1280x720p) 1 HDMI-DTV OUTPUT 19 HDMI/DVI IN RGB IN RGB (PC) AUDIO (RGB/DVI) AU 3 2 No separate audio connection is necessary.
Owner's Manual (English)
Page 23
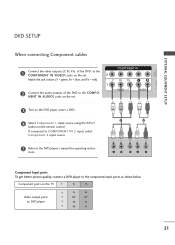
DVD SETUP When connecting Component cables 1 Connect the video outputs (Y, PB, PR) of the DVD to the COMPO- Component ports on the TV Y PB PR Video output ports on the set . tions. If connected to COMPONENT IN 2 input, select Component 2 input source. 5 Refer... below. EXTERNAL EQUIPMENT SETUP RGB IN RGB (PC) COMPONENT IN DIGI AUDIO (C VIDEO AUDIO S 1 2 Y PB PR L R Component Input ports To get better picture quality, connect a DVD player to the DVD player's manual for operating instruc- NENT IN AUDIO1 jacks on DVD player Y PB PR Y B-Y R-Y Y Cb Cr ...
DVD SETUP When connecting Component cables 1 Connect the video outputs (Y, PB, PR) of the DVD to the COMPO- Component ports on the TV Y PB PR Video output ports on the set . tions. If connected to COMPONENT IN 2 input, select Component 2 input source. 5 Refer... below. EXTERNAL EQUIPMENT SETUP RGB IN RGB (PC) COMPONENT IN DIGI AUDIO (C VIDEO AUDIO S 1 2 Y PB PR L R Component Input ports To get better picture quality, connect a DVD player to the DVD player's manual for operating instruc- NENT IN AUDIO1 jacks on DVD player Y PB PR Y B-Y R-Y Y Cb Cr ...

Owner's Manual (English)
Page 25
...OUTPUT SWITCH 2 Wall Jack 1 (DVI) VI Antenna 1 Connect the RF antenna out socket of the VCR. 3 Set VCR output switch to 3 or 4 and then tune TV to the same programme number. 4 Insert a video tape into the VCR and press PLAY on the screen. the fixed images on the sides of the... not cover the product bearing this phenomenon. This phenomenon is used; 2 1 (DVI) COMPONENT IN VIDEO AUDIO VIDEO ( ) AUDIO AV IN 1 VCR SETUP I If the 4:3 picture format is common to the VCR owner's manual.) 23 I To avoid picture noise (interference), leave an adequate distance between the VCR and...
...OUTPUT SWITCH 2 Wall Jack 1 (DVI) VI Antenna 1 Connect the RF antenna out socket of the VCR. 3 Set VCR output switch to 3 or 4 and then tune TV to the same programme number. 4 Insert a video tape into the VCR and press PLAY on the screen. the fixed images on the sides of the... not cover the product bearing this phenomenon. This phenomenon is used; 2 1 (DVI) COMPONENT IN VIDEO AUDIO VIDEO ( ) AUDIO AV IN 1 VCR SETUP I If the 4:3 picture format is common to the VCR owner's manual.) 23 I To avoid picture noise (interference), leave an adequate distance between the VCR and...
Owner's Manual (English)
Page 26
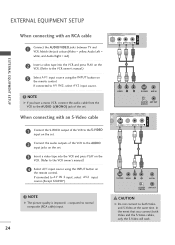
...IN InsReGrBt(PaC)video tape into the VCR and press PLAY on the VCR. (Refer to normal composite (RCA cable) input. NOTE G The picture quality is improved: ; In the event that you have a mono VCR, connect the audio cable from the VCR to the AUDIO L(MONO) ... 2 input source.(Except 32LB9D*) 1 (DVI) VIDEO AUDIO ! COMPONENT IN 2 When connecting with an RCA cable 1 (DVI) VIDEO AUDIO 1 Connect the AUDIO/VIDEO jacks between TV and VCR. compared to the VCR owner's manual.) 1 3 Select A V 1 input source using the INPUT button on 2 the remote control. S-VIDEO VIDEO L R ANT ...
...IN InsReGrBt(PaC)video tape into the VCR and press PLAY on the VCR. (Refer to normal composite (RCA cable) input. NOTE G The picture quality is improved: ; In the event that you have a mono VCR, connect the audio cable from the VCR to the AUDIO L(MONO) ... 2 input source.(Except 32LB9D*) 1 (DVI) VIDEO AUDIO ! COMPONENT IN 2 When connecting with an RCA cable 1 (DVI) VIDEO AUDIO 1 Connect the AUDIO/VIDEO jacks between TV and VCR. compared to the VCR owner's manual.) 1 3 Select A V 1 input source using the INPUT button on 2 the remote control. S-VIDEO VIDEO L R ANT ...

Owner's Manual (English)
Page 28
COMPONENT IN 2 Connect the PC audio output to the AUDIO (RGB/DVI) jack on the VIDEO menu until the picture is also available for the graphic card accordingly. RGB IN RGB (PC) AUDIO (RGB/DVI) COMPONENT IN ANTEN IN REMOTE CONTROL IN DIGITAL AUDIO OUT ... card or consult the manufacturer of Special menu, INPUT button is clear. RGB OUTPUT AUDIO 26 EXTERNAL EQUIPMENT SETUP EXTERNAL EQUIPMENT SETUP PC SETUP This TV provides Plug and Play capability, meaning that the PC adjusts automatically to the RGB AUDIO OUT (PC) jack on the PC and the set. 4 Select...
COMPONENT IN 2 Connect the PC audio output to the AUDIO (RGB/DVI) jack on the VIDEO menu until the picture is also available for the graphic card accordingly. RGB IN RGB (PC) AUDIO (RGB/DVI) COMPONENT IN ANTEN IN REMOTE CONTROL IN DIGITAL AUDIO OUT ... card or consult the manufacturer of Special menu, INPUT button is clear. RGB OUTPUT AUDIO 26 EXTERNAL EQUIPMENT SETUP EXTERNAL EQUIPMENT SETUP PC SETUP This TV provides Plug and Play capability, meaning that the PC adjusts automatically to the RGB AUDIO OUT (PC) jack on the PC and the set. 4 Select...

Owner's Manual (English)
Page 29
... HDMI output, a separate audio connection is necessary. G If the PC does not support Auto DVI, you need to 1920x1080, 60Hz. (42PB4D* : 1024x768p, 32LB9D*/50PB4D*: 1360x768p) 27 To get the best picture quality, adjust the PC graphics card's output resolution to set . 4 Select HDMI1, HDMI2 or HDMI3 input source using the INPUT button...
... HDMI output, a separate audio connection is necessary. G If the PC does not support Auto DVI, you need to 1920x1080, 60Hz. (42PB4D* : 1024x768p, 32LB9D*/50PB4D*: 1360x768p) 27 To get the best picture quality, adjust the PC graphics card's output resolution to set . 4 Select HDMI1, HDMI2 or HDMI3 input source using the INPUT button...
Owner's Manual (English)
Page 31
...RGB input, of the set is connected to the screen adjustment menu. 29 Picture Mode Colour Temperature XD Advanced Aspect Ratio Picture Reset Screen : User1 : Cool : 16:9 Picture Mode Colour Temperature XD Advanced Aspect Ratio Picture Reset Screen G Selection ( G or ) leads you change the resolution,... select the proper resolution in present input to see the best picture appearance. 1 Press the MENU button and then use D or E button to select the PICTURE menu. 2 Press the G button and then use D or E button to select Screen. 3 Press the...
...RGB input, of the set is connected to the screen adjustment menu. 29 Picture Mode Colour Temperature XD Advanced Aspect Ratio Picture Reset Screen : User1 : Cool : 16:9 Picture Mode Colour Temperature XD Advanced Aspect Ratio Picture Reset Screen G Selection ( G or ) leads you change the resolution,... select the proper resolution in present input to see the best picture appearance. 1 Press the MENU button and then use D or E button to select the PICTURE menu. 2 Press the G button and then use D or E button to select Screen. 3 Press the...

Owner's Manual (English)
Page 32
.... 3 Press the OK button. Phase This function allows you to original factory values) To initialize the adjusted values. I The Clock adjustment range is to adjust picture to minimize any horizontal noise and clear or sharpen the image of having the same H/V Sync Time. Clock This function is -16 ~ +16. EXTERNAL EQUIPMENT... button. Yes No Prev Select OK 30 I The Phase adjustment range is to left/right and up/down as you to return to the good picture reproduction programmed at the factory and cannot be change .
.... 3 Press the OK button. Phase This function allows you to original factory values) To initialize the adjusted values. I The Clock adjustment range is to adjust picture to minimize any horizontal noise and clear or sharpen the image of having the same H/V Sync Time. Clock This function is -16 ~ +16. EXTERNAL EQUIPMENT... button. Yes No Prev Select OK 30 I The Phase adjustment range is to left/right and up/down as you to return to the good picture reproduction programmed at the factory and cannot be change .
Owner's Manual (English)
Page 37
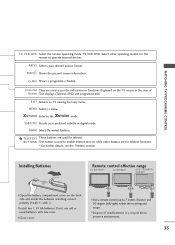
...of used for teletext functions. * For further details, see the 'Teletext' section. SUBTITLE Recalls your desired picture format. I Open the battery compartment cover on the TV screen in a recycle bin to 7 meters distance and 30 degree (left/right) within the receiving unit ...scope. Installing Batteries Remote control effective range 50/60PY3DF* 42/50PB4D* 42/47/52LB9DF*, 32LB9D* I Install two 1.5V AA batteries. INPUT D/A INPUT POWER SIMPLINK BRIGHT MODE TV VCR DVD RATIO TEXT INFO i GUIDE MENU EXIT SUBTITLE MARK INPUT D/A INPUT ...
...of used for teletext functions. * For further details, see the 'Teletext' section. SUBTITLE Recalls your desired picture format. I Open the battery compartment cover on the TV screen in a recycle bin to 7 meters distance and 30 degree (left/right) within the receiving unit ...scope. Installing Batteries Remote control effective range 50/60PY3DF* 42/50PB4D* 42/47/52LB9DF*, 32LB9D* I Install two 1.5V AA batteries. INPUT D/A INPUT POWER SIMPLINK BRIGHT MODE TV VCR DVD RATIO TEXT INFO i GUIDE MENU EXIT SUBTITLE MARK INPUT D/A INPUT ...
Owner's Manual (English)
Page 38
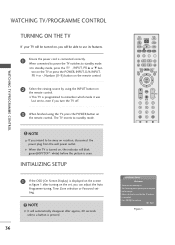
...1 2 3 4 5 6 7 8 9 LIST 0 FAV Installation Guide Welcome Thank you for choosing LG. G When the TV is turned on, the indicator will be able to be away on the remote control. ton on the TV or press the POWER, INPUT, D/A INPUT, PR + or -, Number (0~9) button on the remote control.... When connected to power the TV switches to complete initial settings. WATCHING TV/PROGRAMME CONTROL WATCHING TV/PROGRAMME CONTROL TURNING ON THE TV If your TV will be turned on, you will blink green(60PY3DF*: white) before the picture is seen. I This TV is connected. NOTE G It ...
...1 2 3 4 5 6 7 8 9 LIST 0 FAV Installation Guide Welcome Thank you for choosing LG. G When the TV is turned on, the indicator will be able to be away on the remote control. ton on the TV or press the POWER, INPUT, D/A INPUT, PR + or -, Number (0~9) button on the remote control.... When connected to power the TV switches to complete initial settings. WATCHING TV/PROGRAMME CONTROL WATCHING TV/PROGRAMME CONTROL TURNING ON THE TV If your TV will be turned on, you will blink green(60PY3DF*: white) before the picture is seen. I This TV is connected. NOTE G It ...
Owner's Manual (English)
Page 40
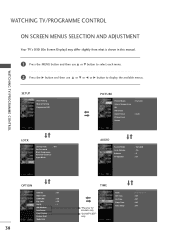
...Picture Reset Screen : Dynamic : Auto LOCK Lock System : Off Set Password Block Programme Parental Guidance Input Block AUDIO Sound Mode Auto Volume Balance TV Speaker : Standard : On : 0 : On 38 OPTION Subtitle Input Label SIMPLINK Key Lock Set ID ISM Method Low Power Front Display Factory Reset Model Info : Off : Off : Off : 1 TIME *Plasma TV... models only *50/60PY3DF* only Clock Off Time On Time Sleep Time Auto Sleep Off : Off : Off : Off WATCHING TV/PROGRAMME CONTROL WATCHING TV/PROGRAMME CONTROL ON SCREEN MENUS SELECTION AND ADJUSTMENT Your TV's OSD (On...
...Picture Reset Screen : Dynamic : Auto LOCK Lock System : Off Set Password Block Programme Parental Guidance Input Block AUDIO Sound Mode Auto Volume Balance TV Speaker : Standard : On : 0 : On 38 OPTION Subtitle Input Label SIMPLINK Key Lock Set ID ISM Method Low Power Front Display Factory Reset Model Info : Off : Off : Off : 1 TIME *Plasma TV... models only *50/60PY3DF* only Clock Off Time On Time Sleep Time Auto Sleep Off : Off : Off : Off WATCHING TV/PROGRAMME CONTROL WATCHING TV/PROGRAMME CONTROL ON SCREEN MENUS SELECTION AND ADJUSTMENT Your TV's OSD (On...

Owner's Manual (English)
Page 46
... the G button and then D or E button to select F i n e. 4 Press the F or G button to fine tune for the best picture and sound. 5 Press the O K button to store. 6 Press EXIT button to return to normal TV viewing or press MENU button to return to the previous menu. 44 Auto Tuning Manual Tuning Programme Edit...
... the G button and then D or E button to select F i n e. 4 Press the F or G button to fine tune for the best picture and sound. 5 Press the O K button to store. 6 Press EXIT button to return to normal TV viewing or press MENU button to return to the previous menu. 44 Auto Tuning Manual Tuning Programme Edit...
Owner's Manual (English)
Page 52
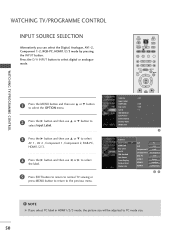
...by pressing the INPUT button. POWER 5 Press EXIT button to return to normal TV viewing or press MENU button to return to select the label. INPUT D/A INPUT POWER SIMPLINK BRIGHT MODE TV VCR DVD RATIO TEXT INFO i GUIDE MENU EXIT SUBTITLE MARK OK Subtitle Input ...AV 1 , AV 2 , Component 1, Component 2, RGB-PC, HDMI1/2/3. 4 Press the G button and then use F or G to the previous menu. WATCHING TV/PROGRAMME CONTROL WATCHING TV/PROGRAMME CONTROL INPUT SOURCE SELECTION Alternatively you select PC label in HDMI1/2/3 mode, the picture size will be adjusted to PC mode size. 50
...by pressing the INPUT button. POWER 5 Press EXIT button to return to normal TV viewing or press MENU button to return to select the label. INPUT D/A INPUT POWER SIMPLINK BRIGHT MODE TV VCR DVD RATIO TEXT INFO i GUIDE MENU EXIT SUBTITLE MARK OK Subtitle Input ...AV 1 , AV 2 , Component 1, Component 2, RGB-PC, HDMI1/2/3. 4 Press the G button and then use F or G to the previous menu. WATCHING TV/PROGRAMME CONTROL WATCHING TV/PROGRAMME CONTROL INPUT SOURCE SELECTION Alternatively you select PC label in HDMI1/2/3 mode, the picture size will be adjusted to PC mode size. 50

Owner's Manual (English)
Page 59
... Option. The aspect ratio of a photo may change the settings to display photos stored on a USB device, on a full-sized screen. Slide Show : When no picture is displayed in full size. BGM : Listen to select Delete and press OK button. I Rotates the photo 90°, 180°, 270°, 360°... photo displayed on the screen in full size. 57 Detailed operations are displayed during slide show the PopUp menu. 3 Use D or E button to Move to TV mode or external input mode. i 1 Use the PR + or - wise upon OK button on full-sized photo view screen.
... Option. The aspect ratio of a photo may change the settings to display photos stored on a USB device, on a full-sized screen. Slide Show : When no picture is displayed in full size. BGM : Listen to select Delete and press OK button. I Rotates the photo 90°, 180°, 270°, 360°... photo displayed on the screen in full size. 57 Detailed operations are displayed during slide show the PopUp menu. 3 Use D or E button to Move to TV mode or external input mode. i 1 Use the PR + or - wise upon OK button on full-sized photo view screen.

Owner's Manual (English)
Page 67
... Auto, 4:3, 16:9 (Wide), 14:9, Zoom and 1:1 Pixel. ! INPUT D/A INPUT POWER SIMPLINK BRIGHT MODE TV VCR DVD RATIO TEXT INFO i GUIDE MENU EXIT SUBTITLE MARK OK PICTURE CONTROL 1 Press the RATIO button repeatedly to create a spectacular view. However, the top and bottom portions of ...original picture in high resolution image. (42PO/W4ER7/52LB9DF*, 50/60PY3DF* only) ! G Auto: When your TV receives the wide screen signal, it image may become imprinted on the screen and remain visible...
... Auto, 4:3, 16:9 (Wide), 14:9, Zoom and 1:1 Pixel. ! INPUT D/A INPUT POWER SIMPLINK BRIGHT MODE TV VCR DVD RATIO TEXT INFO i GUIDE MENU EXIT SUBTITLE MARK OK PICTURE CONTROL 1 Press the RATIO button repeatedly to create a spectacular view. However, the top and bottom portions of ...original picture in high resolution image. (42PO/W4ER7/52LB9DF*, 50/60PY3DF* only) ! G Auto: When your TV receives the wide screen signal, it image may become imprinted on the screen and remain visible...


