Owner's Manual (English)
Page 6
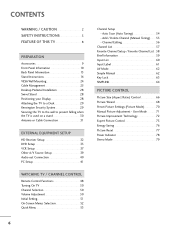
... (Aspect Ratio) Control 66 Picture Wizard 68 Preset Picture Settings (Picture Mode 70 Manual Picture Adjustment - User Mode 71 Picture Improvement Technology 72 Expert Picture Control 73 Energy Saving 76 Picture Reset 77 Power Indicator 78 Demo Mode 79 Add / Delete Channel (Manual Tuning 55 - CONTENTS WARNING / CAUTION 2 SAFETY INSTRUCTIONS 3 FEATURE OF THIS TV 8 PREPARATION Accessories 9 Front Panel Information...
... (Aspect Ratio) Control 66 Picture Wizard 68 Preset Picture Settings (Picture Mode 70 Manual Picture Adjustment - User Mode 71 Picture Improvement Technology 72 Expert Picture Control 73 Energy Saving 76 Picture Reset 77 Power Indicator 78 Demo Mode 79 Add / Delete Channel (Manual Tuning 55 - CONTENTS WARNING / CAUTION 2 SAFETY INSTRUCTIONS 3 FEATURE OF THIS TV 8 PREPARATION Accessories 9 Front Panel Information...
Owner's Manual (English)
Page 8
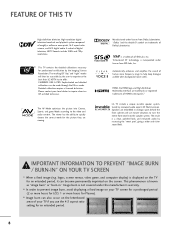
... setting for professional certification by the user to experience the best their LG HDTV has to the video and audio content. IMPORTANT INFORMATION TO PREVENT "IMAGE BURN / BURN-IN" ON YOUR TV SCREEN... TruSurround XT technology is displayed on your local dealer to quickly choose the correct mode for LCD, 1 or more pixels, 16:9 aspect-ratio screens, and AC3 digital audio. The resulting...and playback system composed of SRS Labs, Inc. Please contact your TV screen for a prolonged period (2 or more hours for the picture they are embedded in ." logos, screen menus, video game, ...
... setting for professional certification by the user to experience the best their LG HDTV has to the video and audio content. IMPORTANT INFORMATION TO PREVENT "IMAGE BURN / BURN-IN" ON YOUR TV SCREEN... TruSurround XT technology is displayed on your local dealer to quickly choose the correct mode for LCD, 1 or more pixels, 16:9 aspect-ratio screens, and AC3 digital audio. The resulting...and playback system composed of SRS Labs, Inc. Please contact your TV screen for a prolonged period (2 or more hours for the picture they are embedded in ." logos, screen menus, video game, ...
Owner's Manual (English)
Page 30
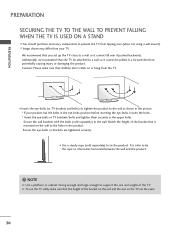
Additionally, we recommend that children don't climb on or hang from the TV. Caution: Please make sure that is safer to the wall as shown in the picture. * If your TV. Match the height of the bracket that the height of the TV. Ensure the eye-bolts or brackets are the same. 30 NOTE G Use... injury or damaging the product. I Use a sturdy rope (sold separately) to a wall so it becomes horizontal between the wall and the product. ! G To use the TV safely make sure that the TV be attached to tie the product. We recommend that you set up the TV close to the wall.
Additionally, we recommend that children don't climb on or hang from the TV. Caution: Please make sure that is safer to the wall as shown in the picture. * If your TV. Match the height of the bracket that the height of the TV. Ensure the eye-bolts or brackets are the same. 30 NOTE G Use... injury or damaging the product. I Use a sturdy rope (sold separately) to a wall so it becomes horizontal between the wall and the product. ! G To use the TV safely make sure that the TV be attached to tie the product. We recommend that you set up the TV close to the wall.
Owner's Manual (English)
Page 32
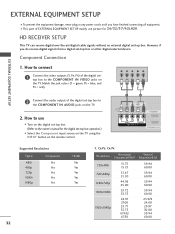
... operation.) I Turn on the digital set-top box. (Refer to use picture for the digital set -top box or other digital external device. Component Connection 1. Y PB PR L R 2 Connect the audio output of the digital settop box to the COMPONENT IN AUDIO jacks on the TV. HD RECEIVER SETUP This TV can receive digital over-the...
... operation.) I Turn on the digital set-top box. (Refer to use picture for the digital set -top box or other digital external device. Component Connection 1. Y PB PR L R 2 Connect the audio output of the digital settop box to the COMPONENT IN AUDIO jacks on the TV. HD RECEIVER SETUP This TV can receive digital over-the...
Owner's Manual (English)
Page 43
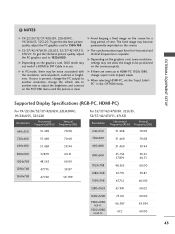
... Vertical frequencies is clear. G Avoid keeping a fixed image on the PICTURE menu until the picture is separate. G If there are overscan in use. G The synchronization input form for a long period of time. G When selecting HDMI-PC, set the "Input Label PC" in the OPTION menu. Supported Display Specifications ...KHz) Frequency(Hz) 640x350 31.469 70.08 720x400 31.469 70.08 640x480 31.469 59.94 For 32/37/42/47LH30, 22LU55, 32/37/42/47LF11, 47LF21 Resolution Horizontal Vertical Frequency(KHz) Frequency(Hz) 640x350 31.468 70.09 720x400 31.469 70.08 640x480...
... Vertical frequencies is clear. G Avoid keeping a fixed image on the PICTURE menu until the picture is separate. G If there are overscan in use. G The synchronization input form for a long period of time. G When selecting HDMI-PC, set the "Input Label PC" in the OPTION menu. Supported Display Specifications ...KHz) Frequency(Hz) 640x350 31.469 70.08 720x400 31.469 70.08 640x480 31.469 59.94 For 32/37/42/47LH30, 22LU55, 32/37/42/47LF11, 47LF21 Resolution Horizontal Vertical Frequency(KHz) Frequency(Hz) 640x350 31.468 70.09 720x400 31.469 70.08 640x480...
Owner's Manual (English)
Page 44
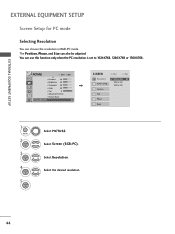
... E • Contrast 50 • Brightness 50 • Sharpness 50 • Color 50 • Tint 0R G • Advanced Control • Picture Reset Screen (RGB-PC) SCREEN Resolution Auto Config. Select Screen (RGB-PC). Select the desired resolution. 44 The Position, Phase, and Size can choose the ... Selecting Resolution You can also be adjusted. Position Size Phase Reset Move Prev. 1024 x 768 1280 x 768 1360 x 768 1 MENU 2 ENTER 3 ENTER 4 ENTER 5 ENTER Select PICTURE. You can use this function only when the PC resolution is set to 1024X768, 1280X768 or 1360X768.
... E • Contrast 50 • Brightness 50 • Sharpness 50 • Color 50 • Tint 0R G • Advanced Control • Picture Reset Screen (RGB-PC) SCREEN Resolution Auto Config. Select Screen (RGB-PC). Select the desired resolution. 44 The Position, Phase, and Size can choose the ... Selecting Resolution You can also be adjusted. Position Size Phase Reset Move Prev. 1024 x 768 1280 x 768 1360 x 768 1 MENU 2 ENTER 3 ENTER 4 ENTER 5 ENTER Select PICTURE. You can use this function only when the PC resolution is set to 1024X768, 1280X768 or 1360X768.
Owner's Manual (English)
Page 45
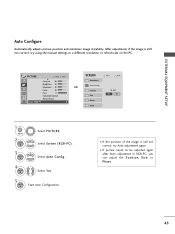
...; Tint 0R G • Advanced Control • Picture Reset Screen (RGB-PC) SCREEN Resolution Auto Config. Select Auto Config.. 4 ENTER Select Y e s. 5 ENTER Start Auto Configuration. To Set Yes No 1 MENU 2 ENTER 3 ENTER Select PICTURE. I If the position of the image is still ...not correct, try Auto adjustment again. Position Size Phase Reset Move Prev. I If picture needs to be adjusted again after Auto adjustment...
...; Tint 0R G • Advanced Control • Picture Reset Screen (RGB-PC) SCREEN Resolution Auto Config. Select Auto Config.. 4 ENTER Select Y e s. 5 ENTER Start Auto Configuration. To Set Yes No 1 MENU 2 ENTER 3 ENTER Select PICTURE. I If the position of the image is still ...not correct, try Auto adjustment again. Position Size Phase Reset Move Prev. I If picture needs to be adjusted again after Auto adjustment...
Owner's Manual (English)
Page 47
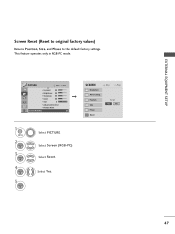
Select Screen (RGB-PC). Select Reset. Select Y e s. To Set Yes No 47 Position Size Phase Reset Move Prev. This feature operates only in RGB-PC mode. PICTURE Move Enter E • Contrast 50 • Brightness 50 • Sharpness 50 • Color 50 • Tint 0R G • Advanced Control • Picture Reset Screen (RGB-PC) 1 MENU 2 ENTER 3 ENTER 4 ENTER 5 ENTER Select PICTURE. SCREEN Resolution Auto Config. EXTERNAL EQUIPMENT SETUP Screen Reset (Reset to original factory values) Returns Position, S i z e, and Phase to the default factory settings.
Select Screen (RGB-PC). Select Reset. Select Y e s. To Set Yes No 47 Position Size Phase Reset Move Prev. This feature operates only in RGB-PC mode. PICTURE Move Enter E • Contrast 50 • Brightness 50 • Sharpness 50 • Color 50 • Tint 0R G • Advanced Control • Picture Reset Screen (RGB-PC) 1 MENU 2 ENTER 3 ENTER 4 ENTER 5 ENTER Select PICTURE. SCREEN Resolution Auto Config. EXTERNAL EQUIPMENT SETUP Screen Reset (Reset to original factory values) Returns Position, S i z e, and Phase to the default factory settings.
Owner's Manual (English)
Page 48
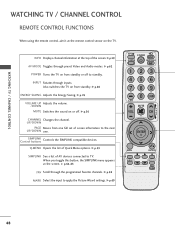
...When you toggle this button, the SIMPLINK menu appears at the remote control sensor on or off to the next UP/DOWN one full set of Quick Menu options. SIMPLINK Control buttons Controls the SIMPLINK compatible devices. Q.MENU Opens the list of screen information to standby. G ...p.76 VOLUME UP Adjusts the volume. /DOWN MUTE Switches the sound on the TV. INFO Displays channel information at the top of AV devices connected to apply the Picture Wizard settings. G p.53 SIMPLINK See a list of the screen. INPUT Rotates through inputs.
...When you toggle this button, the SIMPLINK menu appears at the remote control sensor on or off to the next UP/DOWN one full set of Quick Menu options. SIMPLINK Control buttons Controls the SIMPLINK compatible devices. Q.MENU Opens the list of screen information to standby. G ...p.76 VOLUME UP Adjusts the volume. /DOWN MUTE Switches the sound on the TV. INFO Displays channel information at the top of AV devices connected to apply the Picture Wizard settings. G p.53 SIMPLINK See a list of the screen. INPUT Rotates through inputs.

Owner's Manual (English)
Page 51
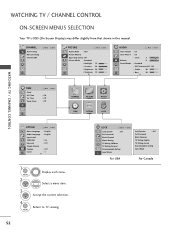
... INFO i Simple Manual Next Check your home environment. Picture mode" manually while inspecting the TV, but the TV will be sure that the TV antenna is an optimal setting for the first time. Mode setting Mode Setting Selecting the environment. Auto Tuning Auto Tuning Before starting,...for the first time when purchasing the TV. Step2. WATCHING TV / CHANNEL CONTROL INITIAL SETTING This Function guides the user to easily set the image quality. I "Store Demo" Mode is "Home Use". Step1. Step3. It can adjust the "Picture menu - Customers can also be activated...
... INFO i Simple Manual Next Check your home environment. Picture mode" manually while inspecting the TV, but the TV will be sure that the TV antenna is an optimal setting for the first time. Mode setting Mode Setting Selecting the environment. Auto Tuning Auto Tuning Before starting,...for the first time when purchasing the TV. Step2. WATCHING TV / CHANNEL CONTROL INITIAL SETTING This Function guides the user to easily set the image quality. I "Store Demo" Mode is "Home Use". Step1. Step3. It can adjust the "Picture menu - Customers can also be activated...
Owner's Manual (English)
Page 52
...-General Downloadable Rating Input Block Lock System : Off Set Password Block Channel TV Rating-English TV Rating-French Downloadable Rating Input Block For USA For Canada CHANNEL Auto Tuning Manual Tuning Channel Edit Move Enter PICTURE Move Enter Aspect Ratio : 16:9 Picture Wizard Energy Saving : Off Picture Mode : Standard • Backlight 70 • Contrast 90 •...
...-General Downloadable Rating Input Block Lock System : Off Set Password Block Channel TV Rating-English TV Rating-French Downloadable Rating Input Block For USA For Canada CHANNEL Auto Tuning Manual Tuning Channel Edit Move Enter PICTURE Move Enter Aspect Ratio : 16:9 Picture Wizard Energy Saving : Off Picture Mode : Standard • Backlight 70 • Contrast 90 •...
Owner's Manual (English)
Page 62
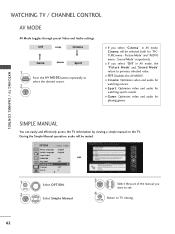
...settings. SIMPLE MANUAL You can easily and effectively access the TV information by viewing a simple manual on the TV. Return to see. Sound Mode" respectively. I O f f: Disables the AV MODE. Select Simple Manual. 3 ENTER 4 RETURN Select the part of the manual you want to TV viewing. 62 I Cinema: Optimizes video and audio for "PICTURE menu - Picture... Mode" and "AUDIO menu - I If you select "Cinema" in AV mode, the "Picture Mode" and "Sound Mode" return...
...settings. SIMPLE MANUAL You can easily and effectively access the TV information by viewing a simple manual on the TV. Return to see. Sound Mode" respectively. I O f f: Disables the AV MODE. Select Simple Manual. 3 ENTER 4 RETURN Select the part of the manual you want to TV viewing. 62 I Cinema: Optimizes video and audio for "PICTURE menu - Picture... Mode" and "AUDIO menu - I If you select "Cinema" in AV mode, the "Picture Mode" and "Sound Mode" return...

Owner's Manual (English)
Page 66
...; Contrast 90 • Brightness 50 • Sharpness 70 E 16:9 Just Scan Set By Program 4:3 Zoom Cinema Zoom 1 1 MENU 2 ENTER 3 ENTER Select PICTURE. RETURN Return to the previous menu. Select the desired picture format. 4 Return to TV viewing. Select Aspect Ratio. PICTURE CONTROL PICTURE CONTROL PICTURE SIZE (ASPECT RATIO) CONTROL This feature lets you can select all aspect...
...; Contrast 90 • Brightness 50 • Sharpness 70 E 16:9 Just Scan Set By Program 4:3 Zoom Cinema Zoom 1 1 MENU 2 ENTER 3 ENTER Select PICTURE. RETURN Return to the previous menu. Select the desired picture format. 4 Return to TV viewing. Select Aspect Ratio. PICTURE CONTROL PICTURE CONTROL PICTURE SIZE (ASPECT RATIO) CONTROL This feature lets you can select all aspect...

Owner's Manual (English)
Page 67
.../CADTV/Component/HDMI-DTV/DVI-DTV (720p/1080i/1080p) input source. Set By Program Selects the proper picture proportion to match the source's image. (4:3 4:3) Set By Program (16:9 16:9) Set By Program Cinema Zoom Choose Cinema Zoom when you want to view the picture without distortion. This enlarges an image with an original 4:3 aspect ratio...
.../CADTV/Component/HDMI-DTV/DVI-DTV (720p/1080i/1080p) input source. Set By Program Selects the proper picture proportion to match the source's image. (4:3 4:3) Set By Program (16:9 16:9) Set By Program Cinema Zoom Choose Cinema Zoom when you want to view the picture without distortion. This enlarges an image with an original 4:3 aspect ratio...
Owner's Manual (English)
Page 68
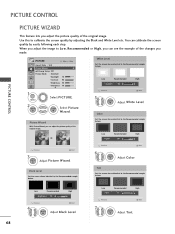
...following each step. Low Recommended High E E G • Color 50 Previous Next 3 ENTER Adjust Picture Wizard. Black Level Set the screen above identical to the Recommended sample below . Set the screen above identical to the Recommended sample below . Low Recommended E • Contrast 90 E High...image. You can calibrate the screen quality by adjusting the Black and White Level etc. When you can adjust the picture quality of the original image. Tint Set the screen above identical to L o w, Recommended or H i gh, you adjust the image to the Recommended ...
...following each step. Low Recommended High E E G • Color 50 Previous Next 3 ENTER Adjust Picture Wizard. Black Level Set the screen above identical to the Recommended sample below . Set the screen above identical to the Recommended sample below . Low Recommended E • Contrast 90 E High...image. You can calibrate the screen quality by adjusting the Black and White Level etc. When you can adjust the picture quality of the original image. Tint Set the screen above identical to L o w, Recommended or H i gh, you adjust the image to the Recommended ...
Owner's Manual (English)
Page 69
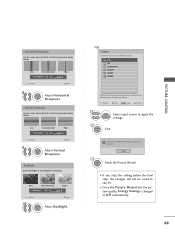
... Next 8 ENTER Adjust H o r i z o n t a l S h a r p n e s s. DTV AV Component RGB-PC HDMI1 HDMI2 Warning: The picture quality may vary according to your Brightness preference. I If you stop the setting before the final step, the changes will not be saved to the TV. Horizontal Sharpness Set the screen above identical to the Recommended sample below . Dark Recommended E •...
... Next 8 ENTER Adjust H o r i z o n t a l S h a r p n e s s. DTV AV Component RGB-PC HDMI1 HDMI2 Warning: The picture quality may vary according to your Brightness preference. I If you stop the setting before the final step, the changes will not be saved to the TV. Horizontal Sharpness Set the screen above identical to the Recommended sample below . Dark Recommended E •...
Owner's Manual (English)
Page 70
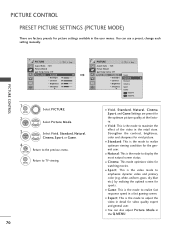
... Select Vivid, Standard, Natural, Cinema, Sport, or Game. 4 Return to TV viewing. I S p o r t: This is the mode to maximize the effect of the video in detail for video quality expert and general user. PICTURE CONTROL PRESET PICTURE SETTINGS (PICTURE MODE) There are preset for the optimum picture quality at the factory. Strengthen the contrast, brightness, color and...
... Select Vivid, Standard, Natural, Cinema, Sport, or Game. 4 Return to TV viewing. I S p o r t: This is the mode to maximize the effect of the video in detail for video quality expert and general user. PICTURE CONTROL PRESET PICTURE SETTINGS (PICTURE MODE) There are preset for the optimum picture quality at the factory. Strengthen the contrast, brightness, color and...

Owner's Manual (English)
Page 71
USER MODE Adjust the picture appearance to control the brightness of LCD panel, to suit your preference and viewing situations. I Backlight: This function adjusts the brightness of the screen. When decreasing ... Sharpness 70 E E • Backlight 70 E Enter 1 MENU 2 ENTER 3 ENTER 4 ENTER 5 ENTER Select PICTURE. Select Vivid, Standard, Natural, Cinema, Sport, or Game. Make appropriate adjustments. 6 Return to TV viewing. Adjusting the backlight is disabled. I When adjusting Energy Saving, Backlight function is recommended when setting the brightness of the video signal.
USER MODE Adjust the picture appearance to control the brightness of LCD panel, to suit your preference and viewing situations. I Backlight: This function adjusts the brightness of the screen. When decreasing ... Sharpness 70 E E • Backlight 70 E Enter 1 MENU 2 ENTER 3 ENTER 4 ENTER 5 ENTER Select PICTURE. Select Vivid, Standard, Natural, Cinema, Sport, or Game. Make appropriate adjustments. 6 Return to TV viewing. Adjusting the backlight is disabled. I When adjusting Energy Saving, Backlight function is recommended when setting the brightness of the video signal.
Owner's Manual (English)
Page 72
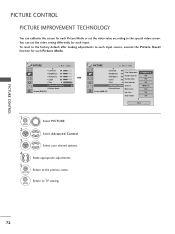
... after making adjustments to each input source, execute the Picture Reset function for each Picture Mode or set the video seeing differently for each Picture Mode. Select your desired options. 4 Make appropriate adjustments. 5 Return to TV viewing. Select Advanced Control. PICTURE CONTROL PICTURE CONTROL PICTURE IMPROVEMENT TECHNOLOGY You can set the video value according to the special video screen...
... after making adjustments to each input source, execute the Picture Reset function for each Picture Mode or set the video seeing differently for each Picture Mode. Select your desired options. 4 Make appropriate adjustments. 5 Return to TV viewing. Select Advanced Control. PICTURE CONTROL PICTURE CONTROL PICTURE IMPROVEMENT TECHNOLOGY You can set the video value according to the special video screen...

Owner's Manual (English)
Page 73
... help optimize the TV performance in the environment the TV is in. PICTURE CONTROL EXPERT PICTURE CONTROL By segmenting categories, Expert1 and Expert2 provide more categories which users can set as they see fit, offering the optimal picture quality for users. Select Expert1 or Expert2. PICTURE Move Enter Aspect Ratio : 16:9 Picture Wizard Energy Saving: Off Picture Mode : Expert1...
... help optimize the TV performance in the environment the TV is in. PICTURE CONTROL EXPERT PICTURE CONTROL By segmenting categories, Expert1 and Expert2 provide more categories which users can set as they see fit, offering the optimal picture quality for users. Select Expert1 or Expert2. PICTURE Move Enter Aspect Ratio : 16:9 Picture Wizard Energy Saving: Off Picture Mode : Expert1...


